
What is sewing for beginners? It is learning simple steps to make things with fabric. Can I learn to sew? Yes, absolutely anyone can learn to sew. Who is sewing for?** Sewing is for anyone who wants to create, fix, or customize items. It is a rewarding skill. This guide will help you begin sewing. It covers all you need for absolute beginner sewing. Soon you will stitch your own projects.
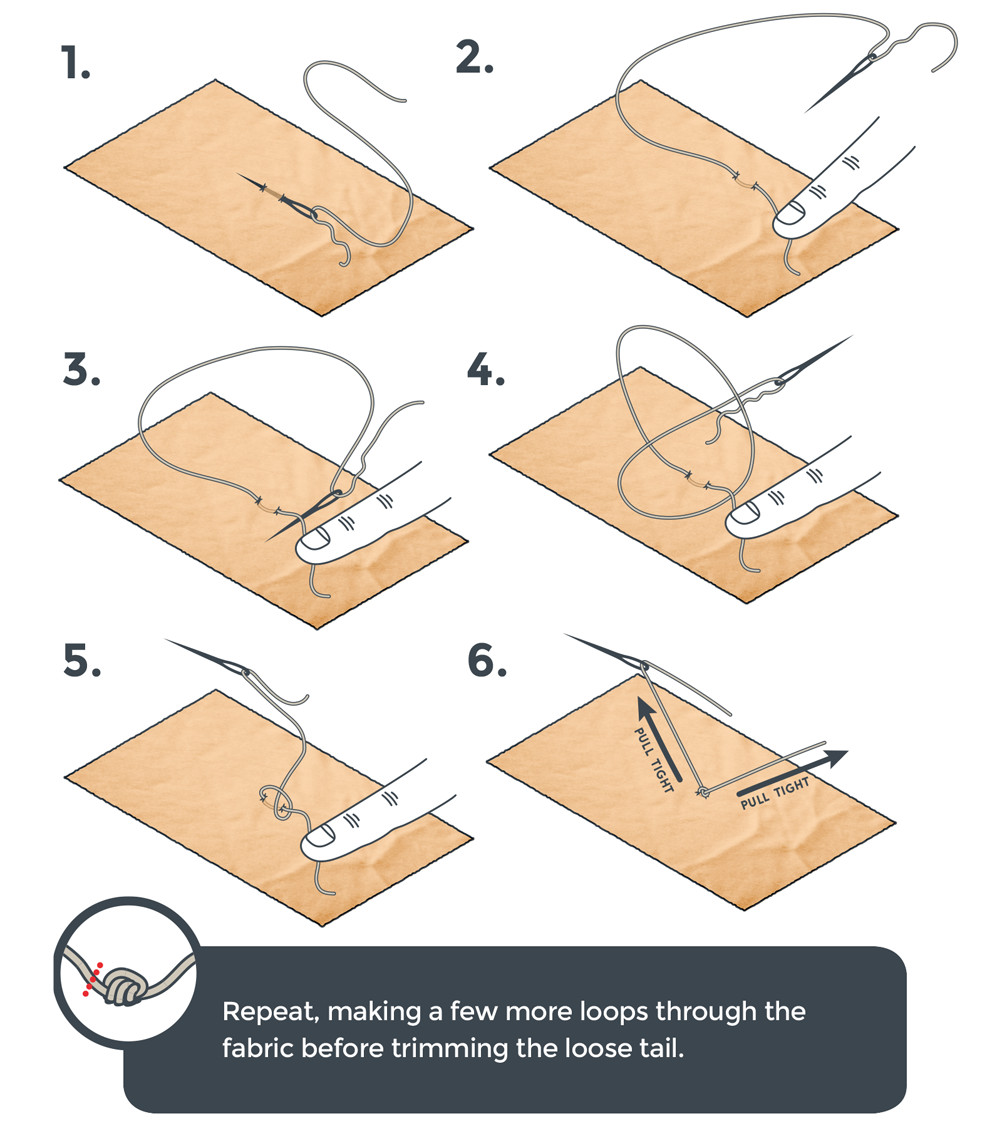
Image Source: cdn.sparkfun.com
Why Start Sewing?
Sewing is a fun hobby. It offers many great rewards. You can create unique items. This lets you show your style. You can also save money. Instead of buying new, you can fix old things. You can mend clothes. You can make gifts for friends and family. Sewing can calm your mind. It is a quiet activity. It helps you relax and focus. It is a creative outlet. You can turn a flat piece of fabric into something amazing. This skill builds confidence. Each finished project feels like a big win.
Gathering Your Tools: Essential Sewing Supplies
You do not need many items to start sewing. A few basic tools are enough. These beginner sewing supplies are easy to find. They make your sewing journey smooth. Having the right essential sewing tools helps a lot.
Basic Hand Sewing Kit
Start with hand sewing first. This helps you get a feel for fabric and thread.
- Needles: Get a pack of assorted hand sewing needles. They come in different sizes. Some are thin for light fabric. Others are thicker for heavier fabric.
- Thread: Buy a spool of all-purpose polyester thread. Black, white, and a neutral grey are good starting colors. Polyester thread is strong. It works for most fabrics.
- Fabric Scissors: This is very important. Buy sharp scissors only for fabric. Do not use them on paper or anything else. Paper dulls fabric scissors quickly. Sharp scissors make clean cuts. This helps your sewing look neat.
- Pins and Pincushion: Pins hold fabric pieces together. A pincushion keeps your pins safe. It also keeps them handy. Glass head pins are good. They are easy to see. You can iron over them without melting the heads.
- Seam Ripper: You will make mistakes. Everyone does. A seam ripper helps you undo stitches. It is a small tool with a sharp point. It cuts threads neatly. Do not be afraid to use it. It is your friend!
- Measuring Tape or Ruler: You need to measure fabric. A flexible measuring tape is great for curves. A clear ruler is good for straight lines.
- Fabric Marking Tool: You need to mark lines on fabric. This could be tailor’s chalk, a fabric pencil, or an erasable pen. These marks guide your stitching. They wash away later.
Fabric Choices for Beginners
Picking the right fabric is key. Some fabrics are much easier to sew.
- Quilting Cotton: This is the best fabric for beginners. It is stable. It does not stretch. It does not slip around. It comes in many colors and prints. It is easy to cut and sew.
- Linen Blends: These are also good. They are a mix of linen and cotton or rayon. They are stable. They have a nice drape.
- Flannel: This soft fabric is easy to work with. It is a bit thicker than cotton. It is great for cozy projects.
- Avoid: Stay away from very slippery fabrics like silk. Do not use very stretchy fabrics like knit jersey. Also, avoid very thick fabrics like denim or canvas at first. These fabrics can be tricky. They need special needles or techniques. Start simple.
Choosing Your First Sewing Machine
A sewing machine makes sewing much faster. It helps you make stronger stitches. Getting your first sewing machine is exciting. You do not need a fancy one. A basic machine is perfect for learning.
What to Look For
When you shop for a machine, keep these points in mind:
- Simple Functions: Look for a machine with basic stitches. A straight stitch and a zigzag stitch are all you need. Many machines have extra decorative stitches. You do not need them right away.
- Easy to Thread: Some machines are simpler to thread than others. Read reviews. Watch videos. A machine that threads easily saves you frustration.
- Good Brand Reputation: Brands like Brother, Janome, Singer, and Juki are popular. They make reliable beginner machines.
- Price Range: You can find good machines for a fair price. You do not need to spend a lot of money. Entry-level machines are usually under $200-$300.
- User Manual: Make sure the machine comes with a clear manual. This book is your best friend. It shows you how to use everything.
Basic Parts of a Sewing Machine
Knowing the parts of your machine helps you use it well.
| Part Name | Purpose |
|---|---|
| Needle | Pushes thread through the fabric. |
| Presser Foot | Holds the fabric down while sewing. |
| Bobbin | Holds the lower thread. |
| Thread Guides | Paths for the upper thread. |
| Stitch Selector | Changes the type of stitch (straight, zigzag). |
| Stitch Length Dial | Adjusts the length of each stitch. |
| Stitch Width Dial | Adjusts the width of zigzag or decorative stitches. |
| Foot Pedal | Controls the machine’s speed. |
| Handwheel | Turns the needle manually. |
| Reverse Lever/Button | Makes the machine sew backward. |
Setting Up Your Machine
Before you sew, you need to set up your machine.
- Winding the Bobbin: The bobbin is a small spool. It holds the bottom thread. Your machine will have a winding post. Put an empty bobbin on it. Follow your manual to guide the thread. Press the foot pedal. The bobbin will fill with thread.
- Threading the Machine: This is very important. The upper thread needs to go through many guides. It then goes through the needle. Your manual has clear pictures. Follow them exactly. If the machine is not threaded right, it will not sew. Or it will make tangled stitches.
- Changing the Needle: Needles get dull. They can break. Change your needle often. Your manual shows how to do this. Make sure the flat side of the needle faces the right way. Use the correct needle size for your fabric.
- Testing Stitches: Always test your stitches. Use a scrap piece of the fabric you will sew. This lets you check the tension. It shows if the stitches look good. Adjust tension if needed. Your manual explains tension.
Grasping Basic Sewing Stitches
You only need to know a few stitches to start. Both hand stitches and machine stitches are useful.
Hand Stitches You Should Know
These are good for small repairs or starting a project.
- Running Stitch: This is a simple up-and-down stitch. It is good for gathering fabric or quick seams. It is not very strong.
- Backstitch: This stitch looks like a machine stitch. It is very strong. You take one stitch forward. Then you bring the needle back to the start of the previous stitch. It makes a solid line. Use it for seams that need to hold up.
- Hemming Stitch: This stitch is almost invisible. It is used to finish edges. It holds a folded hem in place.
Machine Stitches You Should Know
Your sewing machine does the hard work for you.
- Straight Stitch: This is the most used stitch. It makes a straight line. You use it for almost all seams. It holds two pieces of fabric together. You can change its length.
- Zigzag Stitch: This stitch goes back and forth. It looks like a “Z”. It is great for finishing raw edges. It stops fabric from fraying. It is also good for sewing stretchy fabrics. You can change its width and length.
- Reverse Stitch (Backtack): This is not a stitch type. It is a function. At the start and end of a seam, you sew backward a few stitches. This locks your stitches in place. It stops them from coming undone.
Stitch Length and Width
- Stitch Length: This is how long each stitch is. A typical length for seams is 2.5 mm. Longer stitches are for gathering. Shorter stitches are stronger.
- Stitch Width: This only applies to zigzag stitches. It controls how wide the “Z” shape is. A wider zigzag covers more edge.
Mastering Key Sewing Skills
Practice these skills often. They are the building blocks of sewing.
Sewing a Straight Line
This is harder than it sounds. It takes practice.
- Use Seam Allowances: Most patterns have a seam allowance. This is the distance from the edge of the fabric to your stitch line. It is usually 5/8 inch (1.5 cm) or 1/2 inch (1.2 cm). Your machine’s needle plate has lines. Use these lines as guides. Line up the fabric edge with the correct line.
- Go Slow: Do not press the foot pedal too hard. Start slow. Speed up only when you feel ready.
- Keep Your Eyes on the Guide: Watch the edge of your fabric. Make sure it stays lined up with the seam allowance guide. Do not look at the needle.
Turning Corners
When sewing two pieces of fabric, you often need to turn corners.
- Stop at the Pivot Point: Sew up to the exact point where you need to turn. This is usually the seam allowance distance from the edge. For a 90-degree corner with a 1/2 inch seam allowance, stop 1/2 inch from the edge.
- Needle Down: Make sure your needle is down in the fabric.
- Lift Presser Foot: Raise the presser foot.
- Pivot Fabric: Turn the fabric gently. Keep the needle in place.
- Lower Presser Foot: Put the presser foot back down.
- Keep Sewing: Continue sewing in the new direction.
Finishing Seams
Raw fabric edges can fray. This makes your project messy. Finishing seams keeps them neat.
- Pressing: This is a vital step. After sewing a seam, press it flat with an iron. Pressing makes seams crisp. It makes your work look professional. Press seams open. Or press them to one side. Follow your pattern’s instructions.
- Trimming: Trim excess fabric from the seam allowance. Leave about 1/4 inch (0.6 cm). This reduces bulk.
- Zigzagging Raw Edges: Use your machine’s zigzag stitch. Sew along the raw edge of each seam allowance. This stops fraying. It makes your project last longer.
Hemming Basics
Hemming makes a neat bottom edge on clothing or other items.
- Fold and Press: Fold the raw edge up towards the wrong side of the fabric. Press it well.
- Fold Again: Fold it up one more time. Press again. This hides the raw edge.
- Stitch: Sew close to the inner folded edge. Use a straight stitch. Or use a specific hem stitch if your machine has one.
Starting Your First Projects: Easy Sewing Projects for Beginners
The best way to learn is by doing. Pick some easy sewing projects. Simple sewing patterns are your best friends here.
Why Start Small?
Beginning with small projects helps you learn without feeling overwhelmed. You can finish them quickly. This gives you a sense of success. It builds your confidence. You get to practice basic skills. You will make mistakes. Small projects mean small mistakes. You will learn from them easily.
Project Ideas
Here are some simple sewing patterns for beginners:
-
Pin Cushion:
- Cut two squares of fabric.
- Put them right sides together.
- Sew around three sides and part of the fourth. Use a 1/2 inch seam.
- Clip corners. Turn it right side out.
- Stuff it with fiberfill.
- Hand stitch the opening closed.
- Why it’s easy: It uses only straight lines. It is small.
-
Tote Bag:
- Cut two rectangles for the bag body.
- Cut two strips for the handles.
- Hem the top edge of the bag pieces.
- Sew the side seams and bottom seam.
- Fold and press the handle strips. Stitch them.
- Attach handles to the bag top.
- Why it’s easy: Uses mostly straight lines. You learn about handles and hems.
-
Pillow Cover (Envelope Back):
- Cut one front square.
- Cut two back rectangles. These overlap to form an envelope.
- Hem one long edge of each back piece.
- Lay the front piece right side up.
- Place the two back pieces on top, right side down. Make sure they overlap.
- Sew all around the outside edge.
- Clip corners. Turn right side out. Insert a pillow.
- Why it’s easy: Great for learning to sew squares. You learn how to make an opening.
-
Scrunchie:
- Cut a long rectangle of fabric.
- Fold it in half lengthwise, right sides together.
- Sew the long edge.
- Turn the tube right side out.
- Thread elastic through the tube. Sew the elastic ends together.
- Stitch the fabric ends together.
- Why it’s easy: Simple straight stitch. Good for using scrap fabric.
-
Simple Apron:
- Cut a basic apron shape.
- Hem all raw edges.
- Cut and make straps for the neck and waist.
- Attach the straps.
- Why it’s easy: Teaches you to sew curves. Good for learning about straps.
How to Read a Simple Pattern
Patterns are like recipes for sewing. They tell you what to do.
- Pattern Pieces: These are the shapes you cut from fabric. They have lines and labels. They show you where to sew.
- Seam Allowance: This is the distance from the cutting line to the stitch line. The pattern will tell you the seam allowance.
- Cutting Instructions: The pattern tells you how many of each piece to cut. It shows how to lay the pieces on the fabric. This saves fabric.
- Notions List: Notions are extra items you need. This could be thread, buttons, zippers, or elastic. The pattern lists them.
Finding Your Way: Learn to Sew Tutorials & Resources
You have many ways to learn to sew. Modern tools make it easy to find help. Look for learn to sew tutorials that fit your style.
Online Video Tutorials
YouTube is a treasure chest for sewers. Search for “sewing for beginners.” You will find millions of videos.
- Popular Channels: Many channels offer clear, step-by-step guides. Look for channels like Melanie Ham, Professor Pincushion, or Sew Anastasia. They show you how to thread machines. They show how to sew a straight line. They teach basic projects.
- Visual Learning: Videos are great for visual learners. You can pause, rewind, and re-watch parts. This helps you grasp steps clearly.
Blogs and Websites
Many sewing blogs share free patterns and advice.
- Detailed Guides: Blogs often have written steps and photos. They are good for quick reference. Search for “beginner sewing projects free patterns.”
- Tips and Tricks: Bloggers share their best tips. They help you avoid common mistakes.
- Forums: Some sites have forums. You can ask questions there. Other sewers can help you.
Local Classes and Workshops
Some people learn best in person.
- Community Centers: Check your local community center. They often offer beginner sewing classes.
- Fabric Stores: Many fabric shops have sewing machines. They host workshops.
- Personalized Help: A teacher can watch you sew. They can correct your posture. They can help with machine issues right away. This hands-on help is very valuable.
Books and Magazines
Traditional resources are still great.
- Beginner Sewing Books: These books start from the very basics. They cover tools, stitches, and simple projects. They are good for learning at your own pace.
- Sewing Magazines: Magazines offer fresh project ideas. They often include patterns. They can inspire you.
Tips for Getting Started with Sewing
Here are some helpful tips for getting started with sewing. They will make your journey smoother and more fun.
- Practice Often: Sewing is a skill. Like any skill, it gets better with practice. Sew a little bit every day. Or sew for an hour a few times a week.
- Be Patient with Yourself: You will make mistakes. Your first projects might not be perfect. That is okay. Every stitch is a step forward. Do not get frustrated. Just keep trying.
- Don’t Fear the Seam Ripper: The seam ripper is your best friend. It helps you fix mistakes. Using it means you care about your work. It helps you learn what went wrong.
- Join a Sewing Group: Find other sewers. This could be online or in person. Sharing your wins and struggles is fun. You can learn from others. They can give you tips.
- Start with Simple Goals: Do not try to make a complicated dress right away. Begin with simple items. Master the basics. Then move to harder projects.
- Celebrate Small Wins: Did you sew a perfectly straight seam? Hooray! Did you fix a small tear? Great job! Every small success builds your confidence.
Troubleshooting Common Sewing Issues
Even experienced sewers face problems. Knowing how to fix common issues helps.
Thread Breaking
- Cause: Incorrect threading, poor tension, old thread, dull needle, wrong needle size.
- Fix: Re-thread your machine completely. Check tension settings. Use fresh, good-quality thread. Change your needle. Make sure the needle matches your fabric.
Skipped Stitches
- Cause: Dull or bent needle, wrong needle type, incorrect threading, fabric is too thick or thin.
- Fix: Change the needle. Use a needle meant for your fabric type (e.g., ballpoint for knits, sharp for woven). Re-thread. Try a different stitch length.
Uneven Stitches
- Cause: Inconsistent speed, poor tension, feeding fabric by hand, not using guides.
- Fix: Try to maintain a steady speed with your foot pedal. Adjust tension. Let the machine feed the fabric. Use the seam allowance guides on your machine plate.
Fabric Puckering
- Cause: Incorrect tension, wrong needle, pulling the fabric as you sew, very thin fabric.
- Fix: Adjust tension. Use a new, sharp needle. Do not pull the fabric. Gently guide it. Consider using a stabilizer for very thin fabric.
Machine Jamming
- Cause: Incorrect bobbin placement, tangled threads under the fabric, dull needle, trying to sew too thick a fabric.
- Fix: Remove the fabric. Clean out any tangled threads from the bobbin area. Re-insert the bobbin correctly. Change the needle. Check if your machine can handle the fabric thickness.
Taking the Next Steps
Once you feel comfortable with the basics, sewing offers endless possibilities.
- Explore More Patterns: Look for more challenging simple sewing patterns. Try different types of garments. Make home decor items.
- Try New Fabrics: Once you master cotton, try linen, denim, or even some knits. Each fabric teaches you something new.
- Personalize Your Projects: Add embroidery, patches, or different trims. Make your sewn items truly unique.
- Share Your Makes: Show off what you create! Share photos with friends or online. This boosts your spirits. It can also inspire others to start stitching.
Frequently Asked Questions (FAQ)
Is sewing hard to learn?
No, sewing is not hard to learn. It takes practice and patience. Start with simple projects. Break down tasks into small steps. You will get better with each stitch.
How long does it take to learn sewing?
You can learn the basic skills in a few hours. This includes threading a machine and sewing a straight line. Becoming good at sewing takes months or years of practice. It depends on how often you sew.
What is the easiest thing to sew?
The easiest things to sew are straight-line projects. Think about simple squares or rectangles. A pin cushion, a basic tote bag, or a simple pillow cover are great first projects.
Do I need a sewing machine to start sewing?
No, you do not need a sewing machine to start. You can begin with hand sewing. This helps you learn how thread and fabric work together. A sewing machine makes sewing faster and easier later on.
What type of fabric is best for beginners?
Quilting cotton is the best fabric for beginners. It is stable, does not stretch, and is easy to cut and sew. Avoid slippery or stretchy fabrics at first.