
How often to clean a sewing machine depends on how much you use it and the type of fabric you sew. A good rule of thumb is to give your machine a quick clean after every project or at least after every 8-10 hours of sewing time. If you sew with fuzzy fabrics like fleece or flannel, clean it more often. Regular cleaning is a key part of good sewing machine maintenance. It helps your machine run smoothly and last longer. This guide shows you how to keep your machine clean and happy.
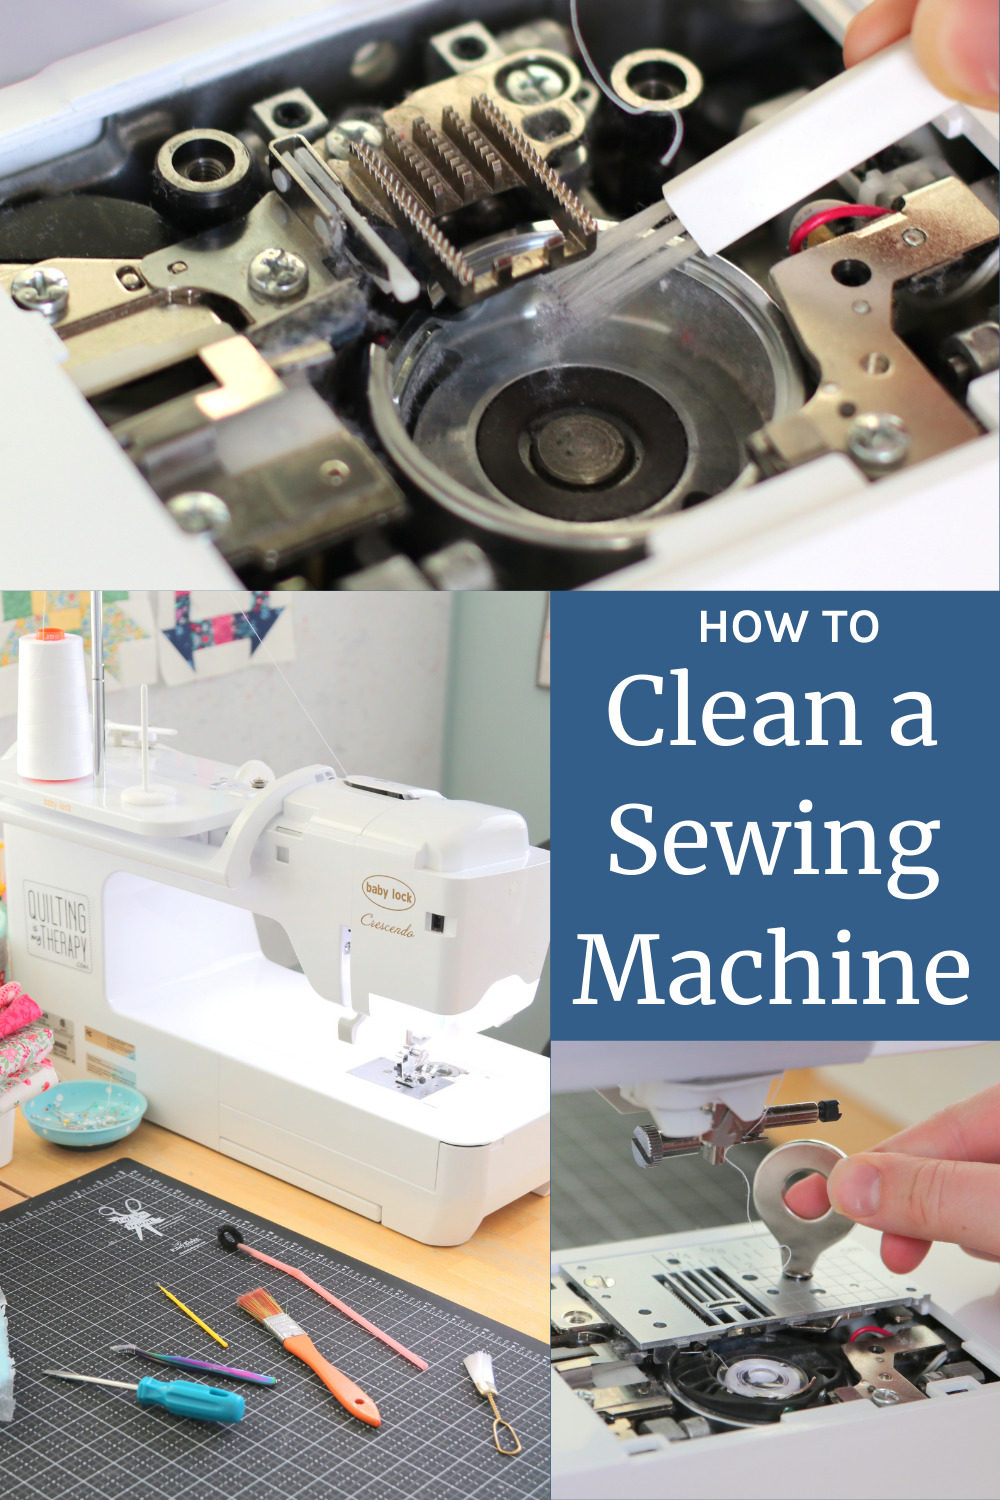
Image Source: www.diaryofaquilter.com
Why Keep Your Sewing Machine Clean?
Sewing machines have many moving parts. As you sew, tiny bits of thread and fabric dust collect inside. This dust is called lint. Lint builds up over time. It can block parts and slow down your machine. This lint can cause problems like:
- Skipped stitches
- Thread breaking often
- Noise from the machine
- Machine running slow
- Needle breaking
Oiling sewing machine parts is also important. But you must clean the machine first. Oil mixes with lint and makes a thick mess. This mess is worse than just dry lint. Regular cleaning and oiling sewing machine parts stops these problems. It keeps your machine working its best for many years.
Gather Your Sewing Machine Cleaning Tools
You need a few simple things to clean your sewing machine. Having the right sewing machine cleaning tools makes the job easier. You can often find these items together in a sewing machine cleaning kit.
Here are the tools you will need:
- Small brush (usually comes with the machine)
- Small screwdriver (to remove parts, check your machine’s manual)
- Tweezers
- Soft cloth (like microfiber)
- Sewing machine oil (check your manual for the right type)
- Can of compressed air (use carefully!)
- Vacuum cleaner with a small hose attachment (better than compressed air for removing lint)
- Old piece of fabric
Using a sewing machine cleaning kit is handy. It often has the brush, screwdriver, and oil you need.
Get Ready to Clean Your Machine
Before you start cleaning, always do these important things:
- Turn off the machine. Unplug it from the wall power outlet. This is very important for your safety.
- Take out the needle. The needle is sharp. Take it out to avoid poking yourself while you clean.
- Remove the presser foot. Taking off the foot gives you more space to clean the area around the needle plate.
Now you are ready to open up your machine and start cleaning.
Cleaning the Needle Plate Area
The needle plate is the flat metal piece under the needle. It has a small hole where the needle goes through. It also has slots for the feed dogs. A lot of lint and dust collects here. Cleaning needle plate areas is a key step.
Here is how to clean this area:
Take Off the Needle Plate
Look at your machine’s manual. It will show you how to take off the needle plate. Most plates are held on by one or two small screws.
- Find the small screws on the needle plate.
- Use the small screwdriver that fits the screws. Turn the screws counter-clockwise to loosen them.
- Put the screws in a safe place, like a small cup. You don’t want to lose them!
- Lift off the metal needle plate.
Now you can see inside the machine below the needle plate. This is where lint builds up.
Remove Lint From Sewing Machine Parts Here
This is often the part with the most fuzz. You will see lint, thread bits, and dust. This is where you will remove lint from sewing machine parts like the feed dogs.
- Use the small brush that came with your machine. Gently brush away the lint. Start in one spot and brush towards yourself or to one side. This helps you collect the lint.
- Brush out all the channels and corners you can reach.
- Use tweezers to pull out any stubborn threads or large pieces of lint that the brush cannot get. Be gentle. Do not pull on any wires or parts that look like they move.
- Some people use compressed air. But be careful! Compressed air can blow the lint deeper into the machine. It is better to vacuum or brush the lint out.
- If you use a vacuum, use a small hose attachment. Hold the hose near the lint and suck it up. This is a very good way to remove lint from sewing machine spaces.
Focus on cleaning feed dogs. The feed dogs are the little teeth that move the fabric. Lint gets stuck between these teeth. Clean feed dogs carefully with the brush. Make sure the slots around them are clear. Clean feed dogs well for smooth fabric feeding.
Cleaning the Bobbin Area
The bobbin area is another place where a lot of lint collects. This area is usually under or near the needle plate, depending on your machine type (top-loading or front-loading bobbin). Cleaning this area is very important for good stitch quality.
Access the Bobbin Area
How you open this area depends on your machine.
- Top-loading bobbin: The bobbin case sits flat under a clear plastic cover on the needle plate. Once the needle plate is off, you have easy access.
- Front-loading bobbin: You usually open a door on the front of the machine. You might need to take out the bobbin case.
Look at your machine’s manual if you are not sure how to open or get to the bobbin area.
Clean Bobbin Case and Area
Whether you have a top-loading or front-loading bobbin, the steps to clean are similar once you can see the area.
- Take out the bobbin.
- If your machine has a removable bobbin case, take it out. This lets you clean underneath it. Knowing how to clean bobbin case parts helps a lot.
- Use your small brush to gently sweep away lint and dust from the bobbin holder area. Get into all the little spaces.
- If you took out the bobbin case, clean it too. Use the brush to clean any fuzz off the case itself. Clean bobbin case edges and inside parts.
- Use tweezers to grab any tangled threads or thick lint bits.
- Again, use a vacuum with a small hose if you have one. It is great for sucking up lint from these small areas.
- If you use compressed air, use it away from the machine. Point it into the space and let the air carry the lint out, not deeper in. Many experts advise against compressed air for this reason. Brushing and vacuuming are better.
Cleaning bobbin case and the area around it helps the bobbin thread run smoothly. This stops thread breaks and uneven stitches.
Sewing Machine Lubrication: Oiling Your Machine
After cleaning away all the lint and dust, some sewing machines need oil. Sewing machine lubrication helps metal parts move against each other smoothly. This reduces friction and stops parts from wearing out too fast. It also makes the machine run quieter and smoother.
Important: Not all machines need oiling. Some modern machines are “self-lubricating” or have parts that do not need oiling by the user. Always check your machine’s manual. Using oil on a machine that does not need it, or putting oil in the wrong place, can cause problems.
Where to Put Oil
If your manual says your machine needs oiling, it will show you where to put it. Common places are metal parts that rub together.
- Look for shiny metal points that move. These are often the oiling points.
- Usually, oiling points are in the bobbin area and under the needle plate area.
- Your manual will have a diagram showing exactly where to put the oil. Do not guess!
- Use only proper sewing machine oil. This oil is thin and made for machines. Do not use cooking oil, car oil, or any other type of oil. These can damage your machine.
- Put just one small drop of oil on each oiling point. More is not better. Too much oil attracts lint and makes a mess.
After Oiling
After you put the drops of oil in the right places:
- Put the needle plate and bobbin case (if you took it out) back into the machine.
- Put the screws back in the needle plate. Make them snug but not too tight.
- Lower the presser foot lifter.
- Put a piece of scrap fabric (an old towel or plain cotton) under the presser foot.
- Thread the machine with some scrap thread.
- Sew on the scrap fabric for a minute or two. Sew some lines or just run the machine empty.
- The oil will spread to the moving parts. Some oil might come out onto the fabric. This is normal. It helps to soak up any extra oil and spread it. Keep sewing on the scrap fabric until no more oil marks appear.
- Cut the threads and remove the scrap fabric.
Your machine is now cleaned and oiled! Sewing machine lubrication is a key step for long-term care.
Cleaning Other Parts of the Machine
While the inside parts get the most lint, other parts of your machine need cleaning too.
Cleaning the Machine Body
The outside of your machine can get dusty or dirty from your hands.
- Use a soft, dry cloth to wipe down the outside of the machine.
- If there are sticky spots, dampen the cloth slightly with water. Do not use harsh cleaners, solvents, or too much water. These can damage the plastic or paint.
- Wipe the touch screen or buttons carefully according to your manual’s instructions.
Cleaning Under the Machine
Dust can collect under the machine as well.
- Carefully lift the machine (it can be heavy!).
- Use your soft cloth or a vacuum cleaner hose to clean dust from the surface under where the machine sits.
- Some machines have vents or openings on the bottom. You can gently brush these to remove dust.
Putting Your Machine Back Together
After cleaning all the parts, put everything back carefully.
- Make sure all screws are put back in the needle plate.
- Make sure the bobbin case is correctly put back in its spot.
- Put the presser foot back on.
- Put a new needle in the machine. A clean machine deserves a new, sharp needle!
Double check that everything is put back correctly. Turn the handwheel slowly a few times to make sure nothing feels stuck.
How Often Should You Clean? More Detail
We touched on this at the start, but let’s look closer at how often to clean sewing machine parts.
| How Often to Clean | Activity Level / Fabric Type | What to Do |
|---|---|---|
| After each project | Sewing one item or small group of items | Quick brush under the needle plate. |
| Every 8-10 hours | Regular sewing with cotton/quilting fabric | Remove needle plate, brush feed dogs and bobbin area well. |
| More often | Sewing fuzzy fabric (fleece, flannel, Minky) | Brush under plate and bobbin area after every 2-3 hours. |
| Every 6-12 months | Regular user | Full clean, including removing bobbin case (if possible), and oiling (if needed). |
| Yearly or Two-Yearly | Occasional user or for deep cleaning | Consider taking it to a professional for cleaning and service. |
This table gives you a good idea. Sewing machine maintenance is a bit like car maintenance. Regular small tasks stop big problems later. Don’t wait until your machine sounds funny or starts skipping stitches. Clean it often to keep it running smoothly.
Tips for Keeping Your Machine Clean
- Cover your machine: When you are not sewing, put a dust cover over your machine. This stops dust and lint from settling on and in it.
- Keep your sewing area clean: Clean your desk, floor, and fabric often. Less dust in the room means less dust gets into your machine.
- Use good quality thread: Cheap thread can create more lint than good quality thread.
- Change your needle often: A dull or bent needle can push fabric fibers into the machine instead of piercing them cleanly. This makes more lint.
- Have a dedicated cleaning kit: Keep your sewing machine cleaning tools together in a small box. This way, you always know where they are. A sewing machine cleaning kit is very helpful.
Advanced Cleaning Steps (If Your Manual Allows)
Some machine manuals might show you how to open other parts of the machine for deeper cleaning. Only do this if your manual clearly tells you how. Opening parts you are not supposed to can damage your machine or void the warranty.
- Removing the bobbin hook: On some machines, the metal hook that goes around the bobbin case can be taken out for cleaning. This area gets very fuzzy. Clean this area carefully with your brush.
- Cleaning tension discs: Thread tension discs can collect lint. This affects stitch tension. Your manual might show you how to clean these. Often, running a strong piece of thread or a piece of unwaxed dental floss between the discs with the presser foot up can clean them.
Again, check your specific machine’s manual before taking apart anything beyond the needle plate and bobbin area.
Benefits of Regular Cleaning
Taking time to clean your machine brings many rewards:
- Better Stitch Quality: Lint build-up affects how the thread moves. Cleaning helps the thread flow freely, making your stitches neat and even.
- Smoother Running Machine: Removing lint and adding oil (if needed) makes the machine parts move with less effort. It will sound better and feel smoother to use.
- Fewer Breakdowns: Lint is a main cause of sewing machine problems. Regular cleaning prevents many common issues. This means fewer trips to the repair shop.
- Longer Machine Life: A well-cared-for machine lasts much longer. Regular sewing machine maintenance protects your investment.
- Enjoyment: Sewing on a clean, smooth-running machine is simply more fun!
Summary of Cleaning Steps
Here is a quick rundown of the main steps to clean a sewing machine:
- Prepare: Unplug, remove needle and presser foot.
- Open: Remove needle plate.
- Brush/Vacuum Lint: Clean feed dogs, under needle plate, and bobbin area with brush and/or vacuum. Remove lint from sewing machine thoroughly.
- Clean Bobbin Case: Take out and brush the bobbin case itself.
- Oil (If Needed): Put one drop of sewing machine oil on points shown in your manual.
- Reassemble: Put all parts back carefully.
- Test: Sew on scrap fabric to spread oil and check function.
- Wipe Down: Clean the outside of the machine.
This routine covers the most important parts for how to clean a sewing machine effectively.
Professional Service vs. Home Cleaning
Cleaning your machine at home regularly is great. But sometimes, your machine needs more. A professional service technician can open up parts of your machine that you cannot. They can clean parts you cannot reach. They also oil and adjust your machine.
Think of it like this: Your home cleaning is like washing your car. A professional service is like taking your car in for a tune-up.
If your machine:
- Makes strange noises
- Skips stitches often, even after cleaning
- Feels stiff or slow
- Has not been serviced in several years
It might be time for a professional check-up. Tell the technician you clean and oil your machine at home. This shows them you take good care of it.
Frequently Asked Questions (FAQ)
h5 Can I use compressed air to clean my sewing machine?
Many experts say no. Compressed air can blow lint and dust deeper inside the machine where you cannot reach it. This can cause more problems later. Brushing and using a vacuum with a small hose are much better ways to remove lint from sewing machine parts.
h5 What kind of oil should I use for my sewing machine?
You should only use oil made for sewing machines. This is a light, clear mineral oil. Never use oils like cooking oil, WD-40, or multi-purpose oils. These can gum up and damage your machine’s parts. Always check your machine’s manual for the right type of oil and where to put it.
h5 My machine didn’t come with a cleaning brush. What can I use?
You can buy small brushes made for cleaning machines. A small, stiff paintbrush or a clean, dry makeup brush can also work. Just make sure it is clean and doesn’t lose its bristles easily.
h5 How do I clean the tension discs?
The best way to clean tension discs without taking them apart is often by running a piece of strong thread or unwaxed dental floss between them. Do this with the presser foot in the “up” position. This opens the discs. Pull the thread or floss through to catch any lint. Check your manual to see if it shows how to do this for your machine.
h5 Do I need to oil my machine every time I clean it?
Not always. Check your machine’s manual. Some modern machines do not need user oiling. If yours does, you typically oil it less often than you clean it. Oiling points often need oiling after a few thorough cleanings, or every few months if you sew a lot. The manual will give you the best advice.
h5 What is in a sewing machine cleaning kit?
A basic sewing machine cleaning kit often includes a small brush, a small screwdriver, and a small bottle of sewing machine oil. Some kits might also have tweezers, a lint brush, or cleaning cloths. Having these sewing machine cleaning tools together makes cleaning easier.
h5 My machine is very old. Can I still clean it myself?
Yes, you can often clean older mechanical machines yourself. They are sometimes simpler inside. However, older machines often need oiling more regularly than new ones. Always try to find the original manual or look online for your specific machine model’s cleaning and oiling instructions. If it is very old and has not been serviced, a professional check-up is a good idea.
h5 How does lint affect my sewing machine?
Lint is made of tiny fibers from your thread and fabric. It builds up in moving parts. This build-up acts like a brake, slowing parts down. It can block the path of the thread. This causes problems like poor stitches, thread breaks, and noise. Remove lint from sewing machine areas often to stop this.
Keeping your sewing machine clean is a simple habit. It makes a big difference in how your machine works and how long it lasts. Set a cleaning schedule based on how much you sew. Your machine will thank you with smooth stitching and reliable performance. Happy cleaning, and happy sewing!