
Anyone can learn to cut sewing patterns well. Good cutting is key to making clothes and other projects that fit right and look good. When you cut fabric, you are making the pieces that will become your finished item. Cutting wrong can make everything else harder or even impossible to fix. Learning how to cut patterns for sewing right sets you up for success in your sewing journey. It is a skill every beginner needs.
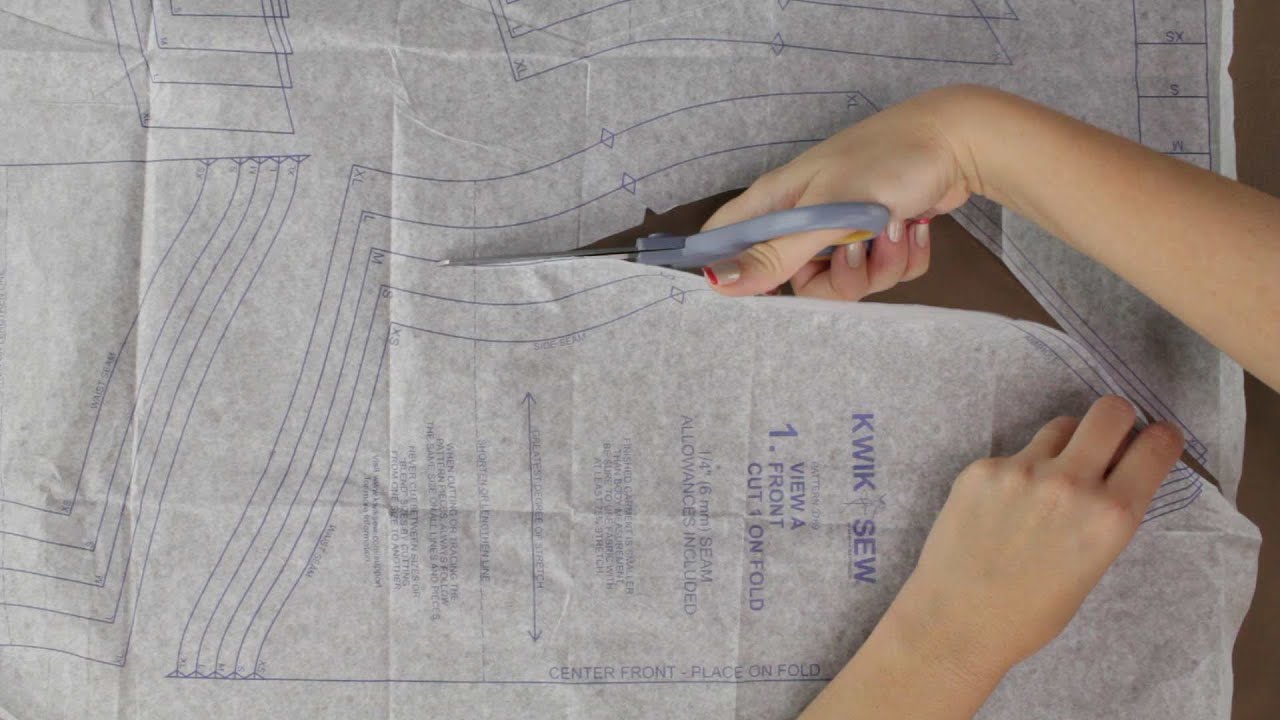
Image Source: i.ytimg.com
Why Cutting Correctly Matters So Much
Think of cutting as the first big step in sewing. If this step is not right, all the steps after it will be harder. Bad cuts lead to problems down the road.
- Pieces might not fit together well.
- Your finished item could twist or hang strangely.
- You might waste fabric.
Accurate cutting means following the lines exactly. It means paying attention to the fabric itself. Getting it right now saves you time and frustration later. It helps your sewing projects turn out the way you should.
Getting Ready to Cut Your Fabric
Before you even pick up scissors, you need to get ready. Having everything ready makes the process smoother and helps you cut better.
Prepare Your Space
- Find a large, flat surface. A big table is good. The floor can work too if it is clean and hard.
- Make sure you have enough space to lay out your fabric flat. The fabric should not hang off the edge.
- Have good light. You need to see the lines on your pattern and the fabric clearly.
Gather Your Tools
You need specific tools for pattern cutting. Having the right pattern cutting tools helps you cut fabric accurately.
- Your chosen pattern: This is the paper guide for your project.
- Fabric: The material you will cut and sew.
Fabric shears: These are special scissors only for fabric. Do not use them on paper! Paper makes them dull quickly. Sharp shears cut fabric cleanly.Rotary cutter and mat: Some people like using a rotary cutter. It is like a pizza cutter for fabric. You need a special mat underneath to protect your surface and the blade. This method is great for straight lines and curves.- Pins or
pattern weights: You need something to hold the pattern onto the fabric. Pins go through the pattern and fabric.Using pattern weightsmeans placing weights on the pattern edges to hold it down. Weights do not make holes in the fabric. - Measuring tape or ruler: To check grainlines and measurements.
- Fabric marking tools: Chalk, pens, or tracing paper to mark darts or other points from the pattern onto your fabric.
- Small snips or scissors: For cutting notches or clipping curves.
Deciphering Your Sewing Pattern
Your sewing pattern is more than just shapes on paper. It has important information you must read first. This is part of following the sewing pattern instructions.
Key Parts of a Pattern Piece
Look closely at each pattern piece.
- Cutting Lines: These show you where to cut. They are usually solid lines. Different sizes might have different lines (like dashed or dotted). Make sure you cut the line for your size.
- Seam Lines: Some patterns show seam lines. These are usually inside the cutting line. They show where your stitches will go. You do not cut on this line.
- Grainline Arrow: This is a long arrow on the pattern piece. It is super important! This arrow must line up with the
grainline on fabric. We will talk more about the grainline soon. - Notches: These are small marks on the edge of the pattern pieces. They look like diamonds, triangles, or just lines. They help you match up pieces when sewing. You need to cut these notches onto your fabric.
- Dots or other symbols: These mark things like darts, pleats, buttonholes, or pocket placements. You need to transfer these marks to your fabric.
- Pattern Name/Number and Size: Check you have the right piece for your project and size.
- Number of Pieces to Cut: The pattern piece will say how many of this piece you need to cut (e.g., “Cut 2”, “Cut 1 on fold”).
Reading the Instructions
Your pattern envelope and guide sheet inside have written sewing pattern instructions. Read these fully before you start. They tell you:
- Which pattern pieces to use for your view (the specific style you are making).
- How to fold your fabric.
- How to lay out the pieces (
laying out sewing patterns). - Any special notes about cutting.
Do not skip reading the instructions! They are there to help you.
Fathoming the Fabric Grainline
The grainline on fabric is the direction the threads run. Woven fabrics have threads going in two main directions:
- Warp: Threads that run along the length of the fabric, parallel to the selvage. The selvage is the finished edge of the fabric that does not fray.
- Weft (or filling): Threads that run across the width of the fabric, from selvage to selvage.
The grainline arrow on your pattern piece must be parallel to the warp threads (parallel to the selvage). Why is this so important?
- It affects how the fabric hangs: Garments cut on the straight grain (parallel to warp) hang smoothly.
- It affects stretch: Woven fabrics have slight stretch across the weft, very little along the warp, and more stretch on the bias (diagonal to the grain). Cutting correctly ensures your garment has the planned stretch and stability.
- It affects how pieces fit: If pieces are cut off-grain, they can twist, pucker, or not fit together right.
Finding the Grainline on Your Fabric
- Find the selvage edge of your fabric. This edge often looks different, maybe tighter or with tiny holes.
- The warp threads run parallel to this selvage.
- The pattern piece’s grainline arrow needs to run in the same direction as these warp threads.
If your fabric is not a simple rectangle with clear selvages (like a piece you bought already cut), you might need to find a single thread and pull it gently to see the grain. For most beginners, starting with fabric from the bolt with selvages is easiest.
Preparing Your Fabric for Cutting
Before you lay out your pattern, your fabric needs a little prep.
Pre-wash Your Fabric
It is almost always a good idea to wash and dry your fabric the way you will wash the finished item.
- Fabrics can shrink. If you do not pre-wash, your finished garment might shrink after you make it.
- Washing can remove sizing (chemicals that make fabric stiff) and make the fabric easier to work with.
- It is good practice for cleanliness too.
Iron Your Fabric
Ironing removes wrinkles and creases. Laying out pattern pieces on wrinkly fabric makes it hard to cut fabric accurately. A smooth, flat surface is key.
Laying Out Your Pattern Pieces
This step is critical for cutting fabric accurately. How you place the pattern pieces on the fabric matters a lot. This is laying out sewing patterns.
Check Your Layout Diagram
Most pattern instructions include a layout diagram. This picture shows you the best way to arrange the pattern pieces on your fabric. It helps you:
- Use the least amount of fabric.
- Make sure pieces are facing the right way (if the fabric has a nap or one-way design).
- Shows you how to fold the fabric.
Follow the diagram for your fabric width and pattern size.
Folding the Fabric
The diagram will tell you how to fold your fabric. Common ways include:
- Folded Lengthwise: Fold the fabric in half so the selvages meet. The fold runs parallel to the selvage (along the straight grain). This is used for cutting symmetrical pieces “on the fold.”
- Folded Crosswise: Fold the fabric in half so the cut ends meet. This fold runs across the grain (perpendicular to the selvage). Less common for pattern pieces, more for smaller items.
- Single Layer: Fabric is laid flat in one layer. Used for asymmetrical pieces or fabrics where the pattern needs to be matched carefully.
- Partial Folds: Sometimes you only fold over a small part of the fabric.
Ensure the fold is smooth and lies flat.
Placing the Pattern Pieces
Now, place your pattern pieces onto the folded or single-layer fabric, following the layout diagram.
- Start with pieces cut “on the fold”. Place the edge marked “Place on Fold” right along the fabric fold.
- Line up the grainline arrows. This is super important! For each piece, measure from the grainline arrow on the pattern to the nearest selvage or folded edge that is parallel to the selvage. This measurement must be the same at both ends of the arrow. Use your measuring tape to check this. Adjust the pattern piece until the arrow is perfectly parallel to the selvage/fold. This ensures the piece is on the straight grain.
- Position other pieces. Place the rest of the pieces, making sure their grainline arrows are also correctly lined up.
- Keep pieces within the fabric. Make sure no part of any pattern piece goes off the edge of the fabric.
- Leave space for cutting. Do not overlap pieces, even if the diagram shows them close together. You need space around each piece to cut easily.
Take your time with the layout. Getting this right is key to cutting fabric accurately.
Securing the Pattern to the Fabric
Once your pattern pieces are perfectly placed, you need to hold them still for cutting. You can use pins or pattern weights.
Using Pins
- Place pins straight through the pattern paper and into the fabric.
- Put pins inside the cutting line where they won’t get in the way of your scissors.
- Use enough pins to keep the pattern flat, especially on curves or points.
- For slippery fabrics, use more pins.
- Be careful not to distort the fabric by pushing or pulling it as you pin. The fabric should lie flat and smooth.
Using Pattern Weights
- Place weights on the edges of the pattern pieces.
- Use enough weights to hold the pattern firmly in place, especially on curves or corners.
- Weights are good because they do not make holes in the fabric. This is helpful for delicate fabrics.
- You might need to hold weights down with one hand while you cut with the other, especially with a rotary cutter.
Choose the method you like best or that works best for your fabric type. Sometimes, a mix of both works well.
The Art of Cutting Fabric Accurately
Now it is time to cut! This is where the pattern cutting techniques come into play. The goal is cutting fabric accurately by following the cutting lines smoothly.
Using Fabric Shears
- Use only your
fabric shearsfor this! - Place the hand not holding the scissors flat on the pattern piece to hold it steady.
- Hold the shears with the lower blade flat on the table or cutting surface. This helps lift the fabric less and gives a cleaner cut.
- Make long, smooth cuts if possible. Avoid making tiny snips unless you are cutting a tight curve.
- Cut right on the cutting line, not inside or outside it.
- When cutting curves, make slightly shorter cuts, pivoting the fabric and scissors slightly as you go to stay on the line.
- For corners, cut right up to the point.
- Cut notches outwards as small triangles. This makes them easy to see. Some people snip inwards, but be careful not to snip too far past the notch mark.
Using a Rotary Cutter
- You must use a
rotary cutter and mattogether. Never cut directly on a table with a rotary cutter! - Place the fabric and pattern (held with weights) on your cutting mat.
- Use a clear acrylic ruler as a guide for straight lines. Place the ruler next to the pattern line.
- Hold the rotary cutter upright and press down firmly. Roll the blade along the cutting line or alongside the ruler.
- Always cut away from your body.
- Keep your fingers safely away from the blade! Rotary cutters are very sharp.
- This method is great for straight lines and large curves. It is often faster than shears.
Choose the cutting tool that feels most comfortable and gives you the best results for the specific fabric and pattern piece. Many sewers use both shears and a rotary cutter for different tasks.
Interpreting Different Cutting Methods
Sewing offers various fabric cutting methods. The best method depends on your tool and the fabric.
- Scissors Cutting: Best for intricate shapes, curves, and when working with pins. You cut through both the pattern paper and fabric layers.
- Rotary Cutting: Excellent for straight lines, long cuts, and when
using pattern weights. It cuts multiple layers cleanly with a sharp blade. Requires a cutting mat. - Tracing Wheel and Paper: Not a cutting method, but a marking method often used before cutting, especially on delicate fabrics where pins or direct cutting marks might be an issue. You trace pattern lines onto the fabric with a tracing wheel and special paper. Then you cut along these traced lines.
Most beginners start with shears as they are the most common tool. As you sew more, you might add a rotary cutter to your pattern cutting tools.
Cutting Notches and Marks
After you cut the main shape of the pattern piece, you need to cut or mark the notches and other symbols.
Cutting Notches
- Outward Notches: Cut small triangles pointing away from the pattern piece edge. This is often easiest with shears or small snips.
- Inward Snips: Make a small snip (about 1/4 inch) into the fabric edge at the notch mark. Be careful not to cut past the mark into the seam allowance or the garment itself. This is best done with small, sharp snips. Choose one method and be consistent. Outward notches are generally safer for beginners as you avoid accidentally cutting too far.
Transferring Other Marks
Dots, squares, triangles, and other symbols on the pattern need to be transferred to your fabric. These marks show you where to place darts, pockets, zippers, etc.
- Tailor’s Chalk or Fabric Pen: Mark directly onto the fabric at the symbol point. Test the marker on a scrap first to make sure it can be removed or will not show on the finished side.
- Tracing Wheel and Paper: Place special dressmaker’s carbon paper between the pattern and fabric. Trace over the symbols with a tracing wheel. This leaves marks on the fabric.
- Tailor’s Tacks: Use needle and thread to make small loops through the pattern and fabric at the symbol point. These are good for delicate or thick fabrics.
Transfer marks neatly right after cutting each piece, while the pattern is still attached if possible.
Handling Different Fabrics
Some fabrics are easier to cut than others. Here are tips for specific types:
- Slippery Fabrics (like silk or rayon): These can shift easily. Use extra pins or weights. Consider laying fabric in a single layer instead of folded. Use a very sharp blade (shears or rotary). Tissue paper or a layer of muslin underneath can help stabilize them while cutting.
- Thick Fabrics (like fleece or denim): Can be hard to cut through. Make sure your
fabric shearsor rotary blade are very sharp. You might need to cut these in a single layer. - Stretchy Fabrics (like knits): Can stretch out of shape while cutting. Use weights instead of pins if possible to avoid distorting the fabric. A rotary cutter can be very helpful for knits as it cuts without lifting or shifting the fabric as much as shears.
- Fabrics with Nap or One-Way Design: Fabrics like velvet, corduroy, or those with pictures that all face one direction have a nap. All pattern pieces must be laid out and cut with the tops facing the same direction. Check your layout diagram carefully for these fabrics.
Practice cutting on scraps of tricky fabrics before cutting into your main project fabric.
Common Cutting Problems and How to Fix Them
Even with care, beginners can run into issues.
- Jagged Edges: Often caused by dull scissors or cutting with the tip of the blade instead of using the full length. Sharpen your shears or get them professionally sharpened. Practice using the full blade length.
- Wavy Edges: Can happen with stretchy fabrics or if the fabric was not laid flat and smooth. Use weights, handle the fabric gently, and make sure it is not stretched when you cut.
- Cutting Inside or Outside the Line: This is just practice! Focus your eyes right on the line. Go slowly.
- Pieces Cut Off-Grain: This means the grainline arrow was not parallel to the selvage. Check your measurements carefully when
laying out sewing patterns. Remeasure and reposition before cutting.
Do not get discouraged! Everyone makes cutting mistakes at first. The goal is to learn from them and improve.
After Cutting: What’s Next?
Once all your pieces are cut and marked:
- Keep the pattern pieces pinned or weighted to the fabric pieces until you are ready to sew them. This keeps them together and prevents mix-ups.
- Organize your cut pieces. You can use clips or safety pins to group pieces for the same section (like sleeves, bodice front).
- Fold or roll your fabric scraps neatly. Keep larger scraps for other projects.
- Store your paper pattern pieces carefully back in their envelope.
Summarizing the Right Way to Cut
Cutting patterns for sewing is a skill that takes practice. It is not just about cutting; it is about preparation and precision.
- Get your space and tools ready.
- Read your
sewing pattern instructionsand understand the marks. - Find and respect the
grainline on fabric. - Prepare your fabric by washing and ironing.
- Lay out patterns following the diagram, lining up grainlines carefully (
laying out sewing patterns). - Secure patterns with pins or
pattern weights(using pattern weights). - Use sharp
pattern cutting tools(fabric shearsorrotary cutter and mat). - Cut
fabric accuratelyright on the lines using smoothpattern cutting techniques. - Transfer all needed marks.
- Handle different fabrics with care.
By focusing on these steps, you will cut your patterns right. This sets you up for success in sewing, making the rest of your project much easier and more enjoyable. Keep practicing, and soon, accurate cutting will feel natural.
Frequently Asked Questions about Cutting Patterns
H5 Do I have to pre-wash my fabric?
Yes, almost always. Fabrics can shrink. If you do not wash it first, your finished item might shrink the first time you wash it. This could make it too small or change its shape. It also removes chemicals and makes the fabric easier to work with.
H5 Can I use regular scissors to cut fabric?
No. Regular scissors used for paper or other things will quickly make your fabric shears dull. Dull shears chew fabric instead of cutting it cleanly. Keep one pair of good scissors only for fabric.
H5 What is the easiest fabric to cut for a beginner?
Cotton is usually the easiest. It is stable, does not stretch or slip much, and holds its shape well.
H5 Pins or pattern weights? Which is better?
Both work. Pins go through the fabric and pattern. They are good for curves. Weights just hold the pattern down. They are good for delicate fabrics or when using pattern weights with a rotary cutter. Try both and see what you like. Weights are often faster for large pieces.
H5 My fabric piece is cut crooked. What do I do?
If it is a small wobble, you might be able to carefully straighten it if you have enough seam allowance. If it is very crooked, especially along a crucial edge like a fold or grainline, you might need to recut the piece if you have enough fabric. This is why cutting fabric accurately matters from the start.
H5 How do I know which cutting line to follow on the pattern?
Patterns often have lines for different sizes. Look at the key on the pattern sheet. It will show what kind of line (solid, dashed, dotted) goes with your size. Follow only that line for your size.
H5 Is a rotary cutter good for beginners?
Yes, a rotary cutter and mat can be good for beginners, especially for straight cuts. They are very sharp, so you must learn to use them safely with a ruler and keep your fingers away from the blade. Some people find shears easier to control for curves when starting.
H5 My fabric shifted while I was cutting. What went wrong?
The pattern or fabric might not have been secured enough with pins or weights. Or you might have lifted the fabric too much with your scissors. Make sure your fabric is flat, smooth, and well-secured before you start cutting. Cut with the lower scissor blade flat on the table.
H5 How do I cut notches neatly?
You can cut a small triangle pointing outwards from the fabric edge, or a small snip inwards. For beginners, cutting outward triangles is often safer as there is less risk of cutting too far into the fabric. Use small, sharp snips for either method.
H5 What if I do not have enough space to lay out all my pattern pieces at once?
Cut the largest pieces first that fit. Then rearrange your fabric to cut the next largest pieces, and so on. Always double-check the grainline and layout diagram as you rearrange. Make sure you do not cut pieces multiple times by mistake.