
Image Source: www.embird.net
Learn How To Digitize Photos For Embroidery Like A Pro
Can you turn a photo into an embroidery design? Yes, you absolutely can! What is digitizing photos for embroidery? It means taking a picture and turning it into a special file. This file tells an embroidery machine where to put each stitch. It’s like drawing with thread. You take a photo, prepare it, and use special tools to make it stitch-ready. This guide will show you how to do it step by step. We will cover everything from photo choice to final stitch file.
Why Transform Photos Into Stitches?
Turning photos into embroidery is a great way to make special gifts. You can capture memories in a unique way. Imagine a favorite pet, a family portrait, or a beloved landscape stitched onto fabric. This process opens up many creative doors. It lets you add a personal touch to clothes, bags, or wall art. It moves beyond simple text or clip art designs. You create truly one-of-a-kind pieces.
Essential Tools for Photo Digitizing
To turn your photos into stitches, you need some key tools. The right tools make the job much easier. They help you get good results.
Required Software for Digitizing
The most important tool is embroidery digitizing software. This software is your main workspace. It lets you convert images into stitch data. Many programs exist, each with different features and price points.
- Wilcom Hatch Embroidery Digitizer: This is a popular choice. It has many tools for complex designs. It offers good control over stitches.
- Embird: This software is powerful and flexible. It has many modules for different tasks. You can add more features as you need them.
- Brother PE-Design: Good for Brother machine users. It has user-friendly tools. It helps you get started quickly.
- Inkscape (with Ink/Stitch plugin): This is a free option. It needs a bit more learning. But it offers powerful vector tools. The Ink/Stitch plugin adds embroidery features.
When choosing software, think about your needs. Do you want simple auto-digitizing photos embroidery features? Or do you need full manual control? Many programs offer free trials. Try them out before you buy.
Other Key Equipment
You will also need:
- A Computer: A computer with enough power is a must. Digitizing software can use a lot of memory.
- A Scanner (Optional but Recommended): If you use physical photos, a scanner helps. It turns your paper photo into a digital file. Make sure your scanner can get good detail.
- Your Embroidery Machine: Of course, you need a machine to stitch out your design.
Preparing Your Image: The First Crucial Step
Image preparation for embroidery is vital. A bad image makes a bad design. A good image makes digitizing much easier. It also leads to a better final product. Think of it as laying a strong foundation.
Choosing the Right Photo
Not all photos are good for embroidery. Look for pictures with:
- Clear Subjects: The main thing in the photo should stand out.
- Good Contrast: Bright parts should be very bright. Dark parts should be very dark. This helps the software see shapes.
- Simple Backgrounds: Busy backgrounds can confuse the software. Simple backgrounds work best.
- Good Lighting: Even lighting helps. Avoid shadows that hide details.
Scanning Resolution for Embroidery
If you have a physical photo, you must scan it. The scanning resolution for embroidery is very important. It affects how clear your image is. Resolution is measured in DPI (dots per inch).
- For small designs (under 4×4 inches): Scan at 300-600 DPI.
- For larger designs: Scan at 600-1200 DPI.
- For very complex designs or tiny details: Go up to 1200-2400 DPI.
Scanning at a high DPI gives you more detail. But it also makes a bigger file. You can always reduce the size later. You cannot add detail that was not scanned.
Digital Adjustments for Clarity
Even digital photos need work. Use image editing software for these steps. Programs like Adobe Photoshop or GIMP (free) are great.
- Cropping: Cut out extra parts of the photo. Focus on the main subject.
- Resizing: Make the image size close to your final embroidery size. This helps keep detail.
- Sharpening: Make edges look crisper. Be careful not to over-sharpen. This can create noise.
- Brightness and Contrast: Adjust these settings. Make your image pop. This helps separate colors and shapes.
- Removing Noise: Digital cameras can add “noise.” This looks like tiny dots. Remove them for cleaner lines.
Simplifying Your Image: Color and Detail
Embroidery machines use thread. Each thread color means a stop and a trim. Too many colors or too much detail can make a design look messy. It can also cause problems on the machine. Color reduction techniques are key here.
Reducing Color Count
Most embroidery designs use fewer colors than a photo. A photo might have millions of colors. An embroidery design might use 10-20.
- Posterization: This filter reduces the number of colors in an image. It groups similar colors together. Use it in your image editor. Start with 8-16 colors and adjust.
- Thresholding: This turns an image into just black and white. It is great for very simple, bold designs. Or for outlines.
- Manual Color Selection: You can pick specific colors. Use the eyedropper tool in your image editor. Then fill areas with your chosen colors.
- Grayscale: Converting to grayscale first can help. It simplifies the image before reducing colors. This is good for portrait designs.
The goal is to simplify the image. You want clear areas of color. Each area will become a block of stitches.
Refining Details and Outlines
After color reduction, look at the details.
- Smooth Edges: Jagged edges can cause issues. Smooth them out using selection tools.
- Define Outlines: Sometimes, you might want a clear outline. Use a brush tool to draw over important lines. This helps the digitizing software.
- Remove Unwanted Elements: Get rid of anything that doesn’t add to the design. Less is often more in embroidery.
From Photo to Line Art: Vectorizing
Embroidery software works best with vector images. What is vectorizing photos for embroidery? It means turning a picture made of pixels into one made of lines and shapes.
Raster vs. Vector
- Raster Images: Photos are raster images. They are made of tiny squares called pixels. If you zoom in, they look blocky. They lose quality when resized. (Examples: JPG, PNG, GIF)
- Vector Images: Vector images are made of mathematical paths. They are smooth at any size. You can make them tiny or huge, and they never lose quality. (Examples: SVG, AI, EPS)
Embroidery machines need vector-like data. They need to know the exact path for each stitch. Converting your image to a vector format helps the digitizing software. It sees clear shapes, not blurry pixels.
Methods of Vectorization
- Auto-Tracing: Many
embroidery digitizing softwareprograms have anauto-digitizing photos embroideryfeature. This tool tries to turn your raster image into vectors automatically. It looks for color changes and creates lines.- Pros: Fast, easy for simple images.
- Cons: Not always perfect. Can create too many points or jagged lines. May miss details or add unwanted ones. It often needs clean-up.
- Manual Tracing: This is the best way for complex designs. You trace over your image using tools in vector software (like Inkscape or Adobe Illustrator) or your digitizing software.
- Pros: Full control, precise results, cleaner designs.
- Cons: Takes more time and skill.
Even with auto-tracing, you will likely need to clean up the lines. Remove extra points. Smooth rough edges. Join disconnected lines. The cleaner your vector lines, the better your photo to stitch conversion will be.
The Core Process: Photo to Stitch Conversion
This is where your prepared image becomes an embroidery file. Your embroidery digitizing software takes your vector shapes and turns them into stitches. This is the heart of digitizing images for embroidery machines.
Stitch Types and Their Use
Digitizing software uses different stitch types:
- Fill Stitch (Tatami/Couching): This fills large areas. It lays stitches side by side. Think of a solid patch of color. You can change stitch direction for texture.
- Satin Stitch (Column Stitch): This creates narrow, raised lines. It is great for outlines, letters, and thin shapes. Stitches go back and forth across the shape.
- Run Stitch (Walking Stitch): This is a simple single line of stitches. It’s used for outlines, small details, and connecting parts.
- Appliqué: Not a stitch type, but a method. You cut fabric pieces and stitch them down. Good for very large areas of color to save stitch count.
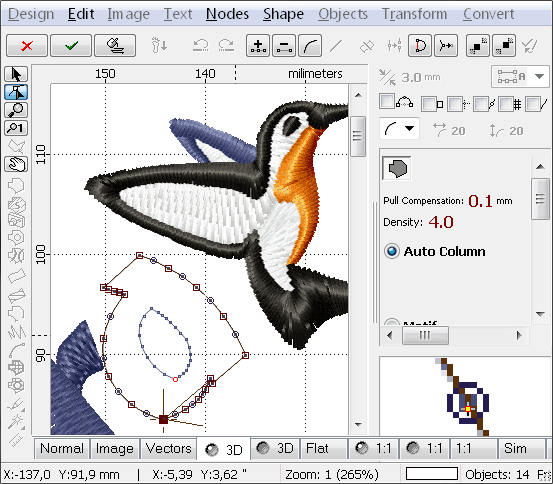
Placing Stitches: Density and Pull Compensation
- Stitch Density: This means how close together the stitches are.
- High density: More stitches, solid look, but can make fabric stiff.
- Low density: Fewer stitches, less solid, saves time and thread.
- Adjust density based on fabric and desired look. Thicker fabrics need more density.
- Pull Compensation: Fabric stretches as stitches are laid. This can make shapes look smaller than they should be. Pull compensation adds a tiny bit to the edges of shapes. It makes them the right size after stitching. Your software will have this setting. Use it!
Stitch Direction and Layering
- Stitch Direction: Where stitches point matters. It creates texture and shine. Satin stitches should go across the shape. Fill stitches can go in any direction. Changing direction adds interest.
- Layering: Designs are built in layers. Background colors go first. Then middle layers. Then foreground details. Overlapping stitches should be planned. Avoid too many layers on top of each other. This can make the fabric too thick or hard.
Addressing Small Details
Photos often have tiny details. Embroidery machines struggle with very small stitches.
- Simplify: Remove or merge tiny details. A tiny eye might become a single dot of thread.
- Enlarge: Sometimes, making the design bigger helps small details.
- Use Run Stitches: For very fine lines, a run stitch is better than a satin stitch.
Digitizing Images for Embroidery Machines: The Nitty-Gritty
Now, let’s talk about the hands-on part of digitizing images for embroidery machines. This is where you apply what you learned.
Manual Digitizing Techniques
Even with auto-digitizing, manual input is crucial.
- Open Image: Load your prepared photo (or vector image) into your digitizing software.
- Set Size: Set the final size of your design.
- Outline Major Shapes: Start by tracing the biggest shapes. Use fill stitches for large areas. Use satin or run stitches for outlines.
- Add Inner Details: Once major shapes are done, add smaller details. Think about eyes, mouths, patterns on clothes.
- Define Stitch Types and Directions: For each shape, pick the right stitch type. Change the stitch angle for texture.
- Add Underlay: Underlay stitches are laid down first. They give a base for the top stitches. They help with stability and coverage. Most software adds them automatically. Check the settings.
- Add Connectors and Trims: The software handles these. But check them. You want to avoid long jumps of thread between sections. These are called “travel stitches.” Trims cut the thread when it’s done with a section.
- Sequence Objects: Set the order of stitching. Stitch from back to front, or outside to inside. This helps create a smooth look. It also prevents puckering.
Common Challenges and Solutions
- Puckering: Fabric pulling or wrinkling.
- Solution: Use good stabilizer. Reduce stitch density. Use pull compensation.
- Thread Breaks: Thread keeps snapping.
- Solution: Check needle size. Re-thread machine. Reduce density.
- Gaps: See fabric through the stitches.
- Solution: Increase density. Adjust pull compensation.
- Frayed Edges: Especially on satin stitches.
- Solution: Ensure good underlay. Adjust stitch length/width.
Choosing the Right Embroidery File Format
Once your design is ready, you need to save it. Embroidery file formats are specific to machines. Your software will offer different options.
Popular Embroidery File Formats
- DST (Tajima): Very common. Works with many machines. It only holds stitch data, no color information. You set colors on the machine.
- PES (Brother/Babylock/Bernina): Popular for home machines. Stores color and stitch data.
- JEF (Janome): Used by Janome machines. Stores color and stitch data.
- EXP (Melco): Another common commercial format.
- HUS (Husqvarna/Viking): For Husqvarna Viking machines.
- VP3 (Husqvarna/Viking/Pfaff): Newer format for these brands.
- XXX (Singer/Compucon): For Singer machines.
Saving and Exporting Your Design
- Save Your Working File: Always save your design in your software’s native format first (e.g., .EMB for Wilcom, .PES for PE-Design). This lets you go back and make changes.
- Export for Your Machine: Then, export the design in the format your embroidery machine reads. Put it on a USB stick or send it directly.
- Test Stitch: Before stitching on your final item, always do a test stitch. Use scrap fabric and the same stabilizer. This lets you check for problems. You can fix them before ruining your main project.
Crafting a Custom Photo Embroidery Design
Making a custom photo embroidery design is very rewarding. Here are tips for success.
Fabric and Stabilizer Choices
- Fabric: Choose fabric that can handle dense stitches. Twill, denim, canvas, or thick cotton are good. Thin fabrics like silk or rayon are harder.
- Stabilizer: This is essential. It supports the fabric during stitching.
- Cut-Away: Stays with the fabric. Good for dense designs. Prevents puckering.
- Tear-Away: Tears away easily after stitching. Good for lighter designs.
- Wash-Away: Dissolves in water. Good for items where you don’t want stabilizer showing.
- Use a heavy-duty cut-away for most photo designs. It offers the best support.
Hooping Your Fabric Correctly
Proper hooping is crucial. It holds the fabric tight.
- Use the right size hoop for your design.
- Make sure the fabric and stabilizer are taut (tight) in the hoop. No wrinkles!
- Align the fabric grain.
Test Stitching for Perfection
Never skip this step. A test stitch will show you:
- If colors are right.
- If stitches are dense enough.
- If there are gaps or puckering.
- If any details are lost.
You can then go back to your software. Make small changes. Test again. Keep doing this until you are happy.
Troubleshooting Common Digitizing Issues
Even with great preparation, issues can pop up.
- Problem: Design is too dense, making fabric stiff.
- Fix: Reduce stitch density in your software. Add more gaps or reduce underlay.
- Problem: Details are lost, or look muddy.
- Fix: Simplify the original image more. Enlarge the design. Use more distinct colors. Try different stitch types for small areas.
- Problem: Design has too many thread changes.
- Fix: Merge similar colors in your image preparation. Simplify the design.
- Problem: Stitching takes too long.
- Fix: Reduce stitch count. Simplify the design. Consider using appliqué for large areas.
Advanced Tips for Professional Results
As you get better, you can try more advanced things.
- Texturing: Use different stitch angles and densities in fill areas. This adds depth.
- Shading: Use different shades of the same color. Layer them for smooth color changes.
- Blending: Use dithered patterns or layered stitches to blend colors.
- Manual Editing: Learn to manually edit stitch points. This gives you ultimate control.
- Practice, Practice, Practice: The more you digitize, the better you will become. Start simple. Move to more complex designs.
Conclusion
Digitizing photos for embroidery is a creative skill. It takes time and practice to master. But the results are truly special. You start with a simple photo. You then use embroidery digitizing software and image preparation for embroidery to get it ready. You learn about vectorizing photos for embroidery and color reduction techniques. You transform it through photo to stitch conversion. You pick the right embroidery file formats. You use your digitizing images for embroidery machines skills. Finally, you create a beautiful custom photo embroidery design. With patience and the right tools, you can digitize photos like a pro. Start your embroidery journey today!
Frequently Asked Questions (FAQ)
Q1: Can I use any photo for embroidery?
No, not every photo works well. Photos with clear subjects, good contrast, and simple backgrounds are best. Busy photos with many tiny details or low contrast are hard to digitize well.
Q2: Do I need expensive software to digitize photos?
While professional embroidery digitizing software can be costly, free options like Inkscape with the Ink/Stitch plugin exist. These free tools require more learning. But they can give great results.
Q3: What is the difference between auto-digitizing and manual digitizing?
Auto-digitizing photos embroidery uses software to automatically convert an image to stitches. It’s fast but often needs clean-up. Manual digitizing involves tracing shapes and placing stitches by hand. This gives better quality but takes more time and skill.
Q4: How many colors should I use in a photo embroidery design?
Photos usually have millions of colors. Embroidery designs should use far fewer. Aim for 8-20 colors. Use color reduction techniques to simplify your image. Fewer colors mean fewer thread changes and a cleaner look.
Q5: Why is scanning resolution for embroidery important?
High scanning resolution (DPI) captures more detail from your physical photo. If you scan at too low a resolution, your image will look blurry. It will be hard for the digitizing software to pick up fine lines.
Q6: What are embroidery file formats? Which one should I use?
These are specific file types (like DST, PES, JEF) that embroidery machines read. You should use the format that matches your embroidery machine brand. Your embroidery digitizing software can usually save in many different formats.
Q7: My stitches look gappy. What can I do?
Gaps often happen if the stitch density is too low or if you don’t use pull compensation. Increase the stitch density in your software. Make sure pull compensation is turned on. Also, choose the right stabilizer for your fabric.
Q8: Can I turn a photo into a patch?
Yes! You can digitize a photo, embroider it onto a fabric piece with a sturdy stabilizer, then trim it. You might add a satin stitch border around the edge for a clean finish. Then, you can apply it as a patch.