
Image Source: cutesycrafts.com
Everything You Need to Know: How To Do Embroidery
Embroidery is a craft. You use a needle and thread. You sew designs onto fabric. Anyone can learn embroidery. It is fun for all ages. To start, you need a few tools. These include fabric, needles, thread, and a hoop. This guide tells you all about it. It helps you begin your sewing journey.
Beginning Your Embroidery Journey
Embroidery is a peaceful hobby. It lets you make pretty things. You can sew gifts. You can make art for your home. Starting is easy. You just need a few basic things.
Your First Tools: Beginner Embroidery Kits
Getting started is simple. You can buy beginner embroidery kits. These kits have what you need. They often include:
- A piece of fabric
- A hoop
- Needles
- Some thread
- A pattern to follow
These kits are great. They take the guesswork out. You get everything in one box. You can just open it and start sewing.
Picking Your Fabric: Best Fabric for Embroidery
The right fabric helps a lot. It makes sewing easier. It also makes your art look good.
What to Look For in Fabric
- Even weave: This means the threads cross over evenly. It makes stitches look neat.
- Medium weight: Not too thin, not too thick. This helps the needle pass through easily.
- Stable: The fabric should not stretch much. Stretching can make your design uneven.
Top Fabric Choices for Beginners
- Cotton: This is a top choice. It is easy to find. It is not costly. It holds stitches well. Look for plain weave cotton.
- Linen: This fabric is also good. It has a nice texture. It is a bit more costly than cotton.
- Muslin: This is a simple cotton fabric. It is cheap. It is great for practice. You can learn on it without worry.
- Aida cloth: This fabric is for cross-stitch. But it works for some other stitches too. It has clear holes.
Table of Fabric Types
| Fabric Type | Key Feature | Good For | Notes |
|---|---|---|---|
| Cotton (plain) | Even, stable | General embroidery | Very common, good for beginners |
| Linen | Natural texture | Fine designs | Can be a bit pricey |
| Muslin | Inexpensive | Practice, mock-ups | Not for final, fancy projects |
| Aida Cloth | Clear square holes | Cross-stitch | Works for some counted stitches |
Your Sewing Friends: Embroidery Needle Guide
Needles are vital. They carry the thread. The right needle makes a big difference.
Types of Embroidery Needles
- Sharps: These have a sharp point. They are good for many fabrics. They glide through cloth easily.
- Crewels (or embroidery needles): These are like sharps. But they have a larger eye. This eye makes threading easier. It is good for thicker threads. They are common for surface embroidery.
- Tapestry needles: These have a blunt, round tip. They do not cut fabric. They push between fabric threads. They are best for counted cross-stitch or canvas work. They are not for regular embroidery.
- Chenille needles: These are sharp. They have a very large eye. They are for thick threads or ribbon.
Needle Size Matters
Needles come in sizes. A bigger number means a thinner needle. A smaller number means a thicker needle.
- For most embroidery floss, use a size 7 or 8 crewel needle.
- For very fine thread, use a higher number.
- For thick thread, use a lower number.
Choose a needle that fits your thread. It should pass through the fabric with ease.
Thread Choices: Embroidery Floss Types
Thread is the color of your art. There are many types of thread.
Main Types of Embroidery Floss
- Stranded Cotton (DMC is popular): This is the most common type. It is made of six strands. You can use all six. Or you can split them. Splitting gives different looks. Two or three strands are common for small work. Six strands give a bold look.
- Perle Cotton: This thread is shiny. It does not separate. It comes in different weights. It gives a raised, beaded look.
- Silk Floss: This thread is very shiny. It is soft. It is for fancy projects. It costs more.
- Metallic Floss: This thread has sparkle. It adds shine to your work. It can be a bit tricky to sew with.
- Rayon Floss: This thread is very shiny. It is smooth. It can be slippery.
Picking Your Floss
Start with stranded cotton. It is versatile. It is easy to work with. It comes in many colors.
Holding Your Work: Embroidery Hoop Use
An embroidery hoop holds your fabric. It keeps the fabric taut. This makes your stitches neat. It stops the fabric from puckering.
How to Use an Embroidery Hoop
- Separate the hoops: A hoop has two parts. An inner ring and an outer ring. The outer ring has a screw.
- Place fabric: Lay your fabric over the inner ring. Make sure it is smooth.
- Add outer ring: Place the outer ring on top. Push it down over the inner ring. The fabric goes between the two rings.
- Tighten screw: Pull the fabric gently. Make sure it is tight like a drum. Tighten the screw on the outer ring. Do not pull too hard. This can stretch your fabric.
Tips for Hoop Use
- Protect your fabric: Wrap the inner hoop with fabric strips. This can protect delicate fabric. It also helps grip the fabric better.
- Remove when not working: Take your fabric out of the hoop when you stop. This stops hoop marks. It also helps prevent stretching.
- Right size: Use a hoop that fits your design. Small hoops are good for small parts. Larger hoops hold more of your work.
Preparing Your Project
You have your tools. Now you are ready to start.
Getting Your Design: Transferring Embroidery Patterns
You need a design to sew. You can draw one. Or you can use a ready-made pattern.
Ways to Transfer Patterns
- Light Box or Window:
- Place your fabric on a light box. Or tape it to a window.
- Put your pattern under the fabric.
- The light shines through. You can see the lines.
- Trace the lines onto your fabric. Use a water-soluble pen or a heat-erasable pen. These marks disappear later.
- Tracing Paper:
- Place tracing paper over your design.
- Trace the design onto the paper.
- Place the tracing paper on your fabric. Carbon side down if using carbon paper.
- Trace over the lines again. This transfers the design.
- Water-Soluble Stabilizer:
- This is a special fabric-like material. You can print or draw on it.
- Stick it to your fabric.
- Sew through it.
- When done, wash it away. It dissolves in water. This is great for dark fabrics.
- Iron-On Transfers:
- Some patterns come ready to iron on.
- You place them on fabric.
- Iron them to transfer the design.
- Be careful. These can be permanent. Test on scrap fabric first.
Tips for Pattern Transfer
- Test your pen/pencil: Always test on a scrap of your fabric. Make sure the marks disappear.
- Light touch: Do not press too hard. A light line is all you need.
- Only transfer what you need: Transfer only the parts you will sew.
The Heart of Embroidery: Basic Hand Embroidery Techniques
Now for the fun part: sewing! There are many stitches. But you only need a few to start.
Getting Started: Starting and Ending Embroidery Thread
This is important. It makes your work neat. It stops stitches from coming undone.
Starting Your Thread
- Waste Knot:
- Make a knot at the end of your thread. Make it a few inches from the end.
- Bring your needle up from the back of the fabric. Bring it up a few inches from where you will start sewing.
- Make a few small stitches over the knot. These stitches will be covered by your main work.
- Cut the knot off once your main stitches hold the thread.
- This method is good for covering your thread ends.
- Anchor Stitch (for beginners):
- Do not make a knot.
- Bring your needle up from the back of the fabric. Leave a small tail of thread (about 1-2 inches).
- Make your first few stitches. Sew over this tail on the back. This traps the tail under your stitches.
- Trim any excess tail.
* This method works well for fine fabrics. It avoids bulky knots.
- Loop Method (for even number of strands):
- Cut a length of floss. Make sure it has an even number of strands (e.g., 2, 4, 6).
- Fold the floss in half. Line up the cut ends.
- Thread the two cut ends through your needle eye. The folded loop will be at the other end.
- Bring your needle up from the back of the fabric.
- Make your first stitch. Guide the needle into the folded loop on the back. Pull gently. The loop will secure the thread.
* This method is very clean. It leaves no knot or tail.
Ending Your Thread
- Weave Through Back Stitches:
- Turn your fabric over.
- Pass your needle under a few nearby stitches on the back. Do this two or three times. This locks the thread.
- Trim the thread close to the fabric.
- Small Knot:
- Make a tiny knot close to the fabric on the back. Do this by looping the thread around the needle. Then pull the needle through the loop.
- Make one or two more tiny knots.
- Trim the thread.
* This can be a bit bulky. Use it on thicker fabrics or if your work will not be seen from the back.
Choose a method that works for your fabric and project. The goal is a secure start and end.
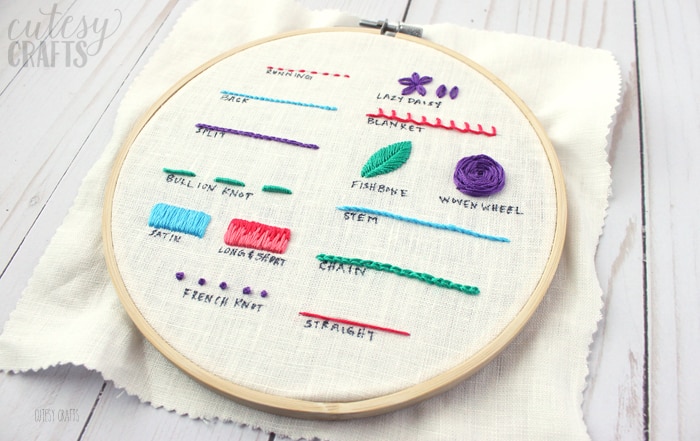
Your Stitch Library: Embroidery Stitches Tutorial
Learning stitches is fun. Each stitch makes a different texture. Here are some basic hand embroidery techniques.
Running Stitch
- How to do it: Bring needle up. Go down. Come up again a short space away. Repeat. It looks like small dashes.
- Use: Outlines, filling areas, making dashed lines. It is very simple.
Backstitch
- How to do it: Bring needle up. Go down a bit forward. Come up again. Go back to where your last stitch ended.
- Use: Strong outlines, lettering, fine details. It makes a solid line.
Stem Stitch
- How to do it: Bring needle up. Go down a bit forward. Come up halfway between. Keep the working thread to one side (e.g., always below the needle).
- Use: Making graceful lines, stems of flowers, curly designs. It makes a rope-like line.
Satin Stitch
- How to do it: Bring needle up on one side of a shape. Go down on the opposite side. Stitches lie close together. They cover the area fully.
- Use: Filling shapes with smooth color. It looks like silk. Keep stitches close and even.
French Knot
- How to do it: Bring needle up. Wrap the thread around the needle two or three times. Put the needle back down close to where it came up. Pull thread slowly.
- Use: Making dots, eyes, flower centers, texture. It adds a raised bump.
Lazy Daisy Stitch (Detached Chain Stitch)
- How to do it: Bring needle up. Make a loop with the thread. Go back down where you came up. Bring needle up just outside the loop. Catch the loop with this stitch. Go back down into the fabric.
- Use: Making petals, leaves, small decorative shapes. It looks like a chain link.
Blanket Stitch
- How to do it: Bring needle up. Make a loop. Insert needle into fabric. Keep loop under needle. Pull through. Repeat.
- Use: Edges, borders, holding layers of fabric together. It looks like small L-shapes.
Table of Basic Stitches
| Stitch Name | Appearance | Primary Use | Key Technique |
|---|---|---|---|
| Running Stitch | Small dashes | Outlines, filling, dashed lines | In and out, even gaps |
| Backstitch | Solid line | Outlines, lettering, details | Go back to join last stitch |
| Stem Stitch | Rope-like line | Curves, stems, fine lines | Always keep thread on same side |
| Satin Stitch | Smooth, filled area | Filling shapes | Stitches lie very close, parallel |
| French Knot | Small dot, raised | Dots, eyes, texture | Wrap thread around needle, insert close |
| Lazy Daisy Stitch | Petal, tear-drop | Petals, leaves | Create a loop, secure with small stitch |
| Blanket Stitch | L-shaped edge | Edging, borders | Keep loop under needle, even spacing |
Practicing Your Stitches
Start simple. Practice each stitch. Use scrap fabric. Do not worry about perfection. Your skill will grow with time.
Finishing Your Embroidery Project
You have sewn your design. Now, it is time to finish.
Cleaning Your Work: Washing Embroidered Items
Your piece might get dirty. It might have pencil marks. Washing can clean it.
Steps to Wash Embroidered Items
- Check thread and fabric: Make sure they are colorfast. This means their colors will not run. Most good quality floss is colorfast.
- Use cool water: Fill a clean basin with cool water. Add a tiny bit of mild soap. Use a soap like dish soap or baby shampoo. No harsh chemicals.
- Soak gently: Put your embroidery in the water. Let it soak for 15-30 minutes. Do not rub or scrub.
- Rinse well: Remove from soapy water. Rinse under cool, running water. Make sure all soap is gone.
- Press out water: Gently press the item. Do this between clean towels. Do not wring or twist.
- Air dry flat: Lay the item flat on a clean, dry towel. Let it air dry. Keep it out of direct sunlight.
- Iron (optional): If needed, iron your piece. Iron it while it is still a little damp. Place it face down on a soft towel. Use a low heat setting. This protects the stitches.
Important Notes
- Test first: If you are unsure, test a small, hidden part of your fabric or a scrap.
- No harsh cleaners: Avoid bleach or strong detergents.
- Gentle handling: Always be gentle. Wet stitches are more fragile.
Displaying Your Art
Once clean and dry, you can display your work.
- In a hoop: Keep it in the hoop. Hang it on a wall.
- Frame it: Put it in a picture frame.
- Sew it onto something: Make it into a pillow, a bag, or a patch.
Growing Your Embroidery Skills
You know the basics. Now you can explore more.
Advanced Stitches
There are hundreds of stitches. Explore things like:
- Bullion knots: A longer, more raised knot.
- Fishbone stitch: For filling leaves.
- Feather stitch: For decorative borders.
- Woven wheel stitch: For making roses.
Find a new stitch you like. Practice it. Add it to your art.
Different Styles of Embroidery
Embroidery is global. Many cultures have their own styles.
- Cross-Stitch: Uses X-shaped stitches. Often done on Aida cloth.
- Blackwork: Uses geometric patterns. Often done in black thread.
- Goldwork: Uses metallic threads and wires. Very ornate.
- Ribbon Embroidery: Uses silk or satin ribbons. Makes lovely 3D flowers.
- Whitework: Uses white thread on white fabric. Focuses on texture.
Each style offers new challenges and beauty.
Design Your Own Patterns
Once you feel good with stitches, try drawing.
- Sketch ideas: Draw simple shapes.
- Think about stitches: Which stitch would make this line? Which would fill this shape?
- Transfer your drawing: Use one of the methods learned earlier.
- Start sewing: Bring your ideas to life.
This lets your art be truly unique.
Tips for Embroidery Success
- Good Lighting: Sew in a well-lit area. This saves your eyes.
- Good Posture: Sit up straight. Take breaks. This stops aches.
- Sharp Scissors: Use small, sharp scissors. They help trim thread neatly.
- Thread Length: Do not use very long threads. About 18-24 inches is good. Longer threads tangle.
- Keep it clean: Wash your hands before sewing. This keeps your fabric clean.
- Enjoy the process: Embroidery is a journey. It is about patience and fun. Do not rush.
Frequently Asked Questions (FAQ)
Q1: Can I use a sewing machine for embroidery?
A1: Yes, you can. Machine embroidery is different. It uses special machines. This guide is for hand embroidery. Hand embroidery is done only by hand.
Q2: How do I fix a mistake in embroidery?
A2: You can carefully unpick stitches. Use a seam ripper or small scissors. Go slowly. Try not to cut the fabric. Sometimes, you can hide small mistakes. Just sew over them.
Q3: How long does it take to finish an embroidery project?
A3: It depends on the size. It also depends on the detail. A small, simple piece can take an hour. A big, detailed one can take many weeks. Take your time. Enjoy it.
Q4: What if my thread keeps tangling?
A4: Use shorter lengths of thread. About 18 inches is a good start. Let your needle hang free often. This lets the thread untwist. Also, separate your strands first if using stranded floss. Then put them back together. This helps them lie flat.
Q5: Is embroidery an expensive hobby?
A5: No, it is not. You can start with a low cost. Beginner kits are cheap. Floss and fabric are also cheap. It is a very good hobby for a small budget.
Embroidery is a wonderful skill. It is relaxing. It lets you be creative. With this guide, you have what you need. You can start your own beautiful work. Happy stitching!