
Embroidery applique is a wonderful way to add shapes, color, and texture to your sewing and embroidery projects. You might ask, “What is embroidery applique?” It’s simply adding pieces of fabric onto a base fabric and then stitching around their edges, often with decorative embroidery stitches. “Is it hard to do?” No, it’s quite beginner-friendly, especially with the right guidance. “Can I do it by hand?” Yes, you can definitely do applique by hand, though machines also make it easy. This guide will walk you through everything you need to start, from choosing your fabrics to finishing your first piece.
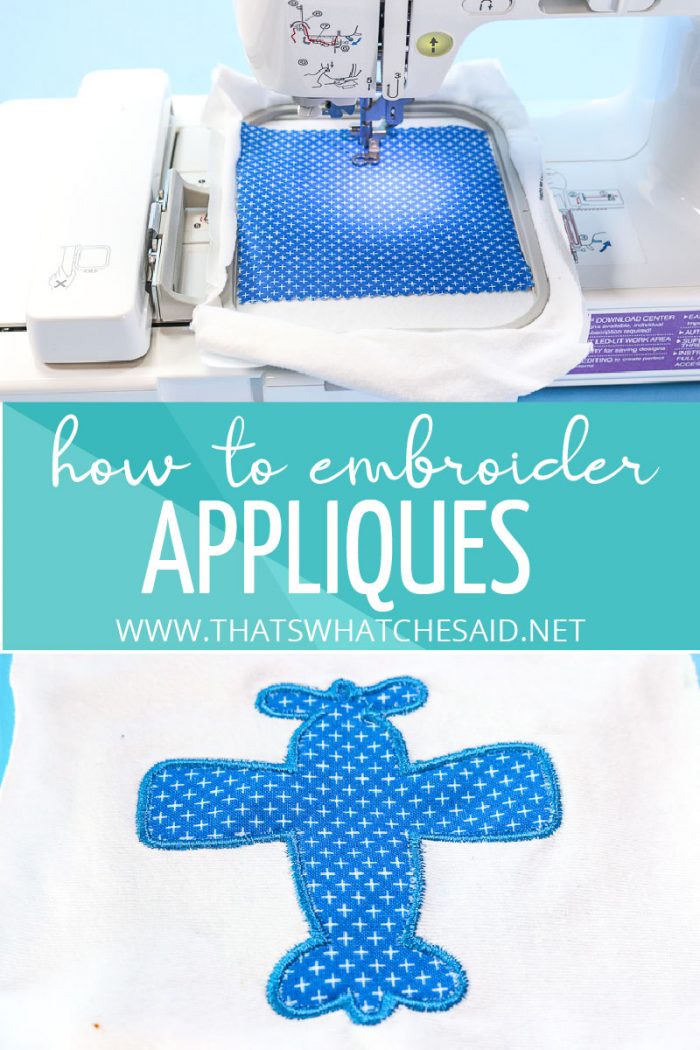
Image Source: www.thatswhatchesaid.net
What is Applique?
Applique is a sewing method. You cut shapes from one piece of fabric. Then you sew these shapes onto another fabric piece. It’s like making a fabric collage.
Adding embroidery stitches makes it ’embroidery’ applique. The stitches can hold the shape down. They can also add detail and decoration around the edges. It is a fun way to make designs pop.
Why Try Embroidery Applique?
Many people like to do applique. It has good points.
- Adds Color: You can use many different fabrics. This brings bright colors to your work.
- Adds Texture: The added fabric makes the design stand out. It gives it depth.
- Saves Stitches: Using a fabric shape is faster than filling a large area with embroidery stitches.
- Use Fabric Scraps: Small pieces of fabric are perfect for applique shapes.
- Lots of Ideas: You can make simple shapes or complex pictures.
Getting Started: Your Tools and Supplies
You need a few things to start applique. Don’t worry, you might have many already.
Fabrics
You need two main types of fabric.
- Base Fabric: This is the fabric you sew the shapes onto. Choose one strong enough to hold the applique. Cotton, linen, or denim work well.
- Applique Fabrics: These are the fabrics you cut shapes from. They can be any color or pattern you like. Quilting cottons are a good choice. They are easy to cut and sew.
Fabric preparation for applique is important. Wash your fabrics before you start. This stops them from shrinking later. Press them flat. This makes them smooth and ready to use.
Needles and Thread
The needles and thread you need depend on how you stitch.
- Hand Stitching: Use sharp needles. Milliner needles are good for fine work. Embroidery floss or perle cotton works well for decorative stitches. Regular sewing thread is good for hidden stitches.
- Machine Stitching: Use sharp machine needles. Universal or embroidery needles are fine. Polyester or rayon machine embroidery thread gives a nice shine. Use matching bobbin thread.
Scissors
You will need different scissors.
- Fabric scissors: Only use these for fabric. Keep them sharp.
- Paper scissors: Use these for cutting paper patterns or templates.
- Small, sharp scissors: These are great for trimming fabric shapes neatly. Applique scissors, also called duckbill scissors, are helpful. They have a wide blade that pushes the base fabric away. This helps you trim close to the stitching line without cutting the base fabric.
Design Tools
You need a way to get your design onto the fabric.
- Pencils or Pens: Use water-soluble or heat-erasable pens. Chalk pencils are also good.
- Templates: You can draw shapes or print them from a computer.
Embroidery Stabilizer for Applique
Stabilizer is very important. It helps your fabric stay flat and stable. It stops stitches from sinking into the fabric. It prevents puckering.
Choosing the right embroidery stabilizer for applique depends on your fabric and stitch type.
| Stabilizer Type | What it is like | When to use it for Applique |
|---|---|---|
| Tear-Away | Like paper, tears away easily. | Good for stable fabrics like cotton. Use it for designs with medium stitch count. |
| Cut-Away | Like soft fabric, you cut it away. | Best for stretchy or thin fabrics. Use it for dense stitches like satin stitch. Gives strong support. |
| Wash-Away (Water-Soluble) | Dissolves in water. | Good for towels or fabrics where you don’t want stabilizer left behind. Use it on top sometimes too. |
| Iron-On (Fusible) | Sticks to fabric when heated. | Adds body to fabric. Can use with other stabilizers for extra support. |
Most beginners start with tear-away or cut-away. You usually put it under the base fabric in your hoop.
Adhesives
Sometimes you need to hold the applique shape in place before stitching.
- Fusible Web: This is a paper-backed glue sheet. You iron it onto the back of your applique fabric. Then you cut the shape. Peel the paper. Iron the shape onto your base fabric. The heat melts the glue. This is the core of the fused applique method.
- Applique Glue Stick: This is a temporary glue stick made for fabric. It washes out later.
Embroidery Hoop or Frame
A hoop keeps your fabric tight. This helps your stitches lie flat. Choose a hoop that fits your design area. A machine embroidery hoop is needed for machine applique.
Sewing Machine (Optional)
If you plan to do machine applique, you need a sewing machine. A regular sewing machine can do zig-zag or straight stitches. An embroidery machine can do much more, including complex embroidery machine applique tutorial steps.
Choosing Your Applique Design
What do you want to make? Applique can be simple or complex. Think about shapes you like. Animals, letters, flowers, geometric shapes are popular applique design ideas.
You can find designs in many places:
* Craft books or magazines
* Online design websites
* Drawing your own shapes
* Using stencils or cookie cutters as guides
Keep it simple for your first try. One or two basic shapes are good to start.
Preparing Your Fabric Shapes
Now you have your design idea. You have your fabrics ready from fabric preparation for applique. Let’s get the shapes ready.
Transferring the Design
You need to get the shape outline onto your base fabric. And onto the back of your applique fabric if you are using the hand method.
- For the base fabric: Place your design under the fabric. If the fabric is thin, you can trace it with a pencil or water-soluble pen. If the fabric is dark or thick, use carbon paper made for fabric or a light box.
- For the applique fabric: If you use fusible web, draw or trace the shape on the paper side of the fusible web. If you are doing needle-turn applique (a hand technique), you trace the finished shape onto the back of your applique fabric.
Cutting Applique Fabric
This step needs care. How you cut depends on your method.
- For Raw Edge Applique or Fused Applique: Cut right on the line you traced.
- For Needle-Turn Applique (Hand): Cut about 1/4 inch (about 0.6 cm) outside the line you traced. This extra fabric is for turning under.
- For Prepared Edge Applique (Hand): Cut a bit outside the line. You will turn and press this edge before attaching it.
When cutting applique fabric, use sharp scissors. Cut smoothly. Don’t make jagged edges. This helps the final piece look neat. For tight curves or points, snip into the seam allowance (the extra fabric edge) but not up to the line. This helps the fabric lie flat when you turn it.
Securing Your Applique Pieces
Before you stitch, the fabric shapes must stay in place. This is called securing applique fabric. There are a few ways to do this.
The Fused Applique Method
This is very popular, especially for machine applique. It uses fusible web.
- Iron the rough side of the fusible web onto the back of your applique fabric. Follow the product instructions. Usually, you iron it for a few seconds.
- Let it cool.
- Draw or trace your shape onto the paper side of the web. Remember, if your shape needs a specific direction (like a letter or an animal facing right), you might need to reverse it when you trace.
- Cutting applique fabric with the web attached: Cut the shape out right on the line.
- Peel the paper backing off the fabric shape.
- Place the sticky fabric shape onto your base fabric. Put it where you want it based on your traced design outline on the base fabric.
- Iron the shape onto the base fabric. The heat melts the glue on the web. This sticks the applique shape down. Hold the iron still for the time the product says. Don’t slide the iron.
This method holds the fabric shape firmly. It stops edges from fraying while you stitch. It is a simple way to securing applique fabric.
Using Applique Glue Stick
Use a temporary fabric glue stick. Put a little glue on the back of your applique piece, near the edges. Place it on your base fabric. Press it down. The glue holds it until you stitch. This is good for hand applique or if you don’t want to use fusible web.
Pinning or Basting
For larger shapes or if you prefer no glue, use pins or basting stitches. Pins can get in the way of stitching. Basting stitches are large, loose stitches you sew by hand. They just hold the piece until the final stitching is done. Then you remove the basting stitches.
Adding the Embroidery Stitches
This step adds the ’embroidery’ part. You sew around the edges of the applique shapes. This holds them down permanently. It also makes a nice frame or edge.
Applique Stitches for Embroidery
You can use many different stitches. The stitch you pick can change the look. It also affects if the raw edge of the applique fabric shows or is covered.
Here are some common applique stitches for embroidery:
- Satin Stitch: This is a series of straight stitches sewn very close together. They go over the edge of the applique fabric. This covers the raw edge completely. It makes a smooth, raised line. Use it for a finished look.
- Blanket Stitch: This stitch makes a loop along the edge with a straight stitch going into the fabric. It gives a handcrafted look. It works well for hand or machine applique. It can cover a raw edge or be sewn just inside the edge.
- Straight Stitch: A simple running stitch or straight machine stitch sewn near the edge of the applique. This leaves the raw edge showing. It is used in raw edge applique steps. The edges will fray a little over time, which can be a wanted effect.
- Zig-Zag Stitch: A machine stitch that goes back and forth over the edge. Like satin stitch, it covers the raw edge. You can change the width and length. A wide, short zig-zag looks like satin stitch. A narrower, longer one looks different.
- Buttonhole Stitch: Very similar to blanket stitch, often used for hand applique.
- Blind Applique Stitch: A stitch that is mostly hidden on the back of the base fabric. Used in hand applique like needle turn. You pick up just a tiny bit of the base fabric and the folded edge of the applique.
| Stitch Type | Hand or Machine | Covers Raw Edge? | Look | Good For |
|---|---|---|---|---|
| Satin Stitch | Machine | Yes | Smooth, raised | Finished look, bold shapes |
| Blanket Stitch | Hand or Machine | Can do both | Loopy, crafted | Many styles, country look |
| Straight Stitch | Both | No | Simple line | Raw edge applique steps |
| Zig-Zag Stitch | Machine | Yes | Textured line | Quick edge finish |
| Buttonhole Stitch | Hand | Can do both | Loopy, crafted | Handcrafted feel |
| Blind Stitch | Hand | Yes (folded edge) | Nearly hidden | Smooth, invisible edge |
Working with the Stabilizer
Put your base fabric in the hoop. Make sure it is tight like a drum. Put the embroidery stabilizer for applique under the base fabric. Put both in the hoop together. The stabilizer supports the stitches and the fabric during sewing.
Stitching by Hand vs. Machine
You can choose how to sew.
- Hand Applique Techniques: This is slower but gives you fine control. You can use blind stitch, blanket stitch, or buttonhole stitch. Hand applique often uses the needle-turn or prepared-edge method.
- Machine Applique: This is faster. You can use zig-zag or satin stitch on a sewing machine. Or use an embroidery machine for special stitches and steps.
Methods of Applique
Let’s look closer at different ways to do applique.
Hand Applique Techniques
Hand applique is a beautiful, traditional craft. It takes more time but gives a soft, classic look.
-
Needle-Turn Applique: This method hides the raw edge as you sew.
- Prepare your base fabric and applique fabric (wash, press).
- Trace the design outline onto the base fabric. Place the applique fabric over the base fabric, matching the design area.
- Pin or baste the applique fabric roughly in place.
- Trace the shape outline onto the back of the applique fabric.
- Cut the applique shape out, leaving about a 1/4 inch (0.6 cm) seam allowance outside the traced line.
- Place the cut applique piece on the base fabric, matching the traced line on the base fabric. Baste it in place.
- Using a needle and thread, start stitching near a curve or corner. With the needle tip, turn the raw edge of the seam allowance under along the traced line on the base fabric.
- Use a small blind stitch or buttonhole stitch to sew the folded edge to the base fabric. Make small stitches. Pick up just a thread or two of the base fabric.
- Continue turning and stitching a little bit at a time. Use the needle to make the edge smooth as you turn it under.
-
Prepared Edge Applique: You prepare the edges of the applique shapes before you sew them down.
- Trace the shape onto a template material (like template plastic or thick paper).
- Cut out the template.
- Place the template on the right side of your applique fabric. Trace around it. This is your stitching line.
- Cut the fabric shape out, leaving a seam allowance of about 1/4 inch (0.6 cm) outside the traced line.
- Clip into the seam allowance on curves.
- Place the template on the wrong side of the fabric shape.
- Wrap the seam allowance over the template edge. Baste or glue the seam allowance down onto the template, or use heat-safe glue to hold it to the fabric back. Some methods use starch to press the edge over the template.
- Carefully remove the template. The fabric shape now has a neatly folded edge.
- Place the shape on the base fabric and stitch it down using a blind stitch, blanket stitch, or other preferred stitch.
These hand applique techniques take practice. But the results are beautiful and lasting.
Raw Edge Applique Steps
This is the simplest method. You don’t hide the raw edge.
- Prepare base and applique fabrics (wash, press).
- Trace your design outline onto the base fabric.
- Apply fusible web to the back of your applique fabric (see fused applique method steps above). Or use temporary glue or pins.
- Cut your applique shape out exactly on the line.
- Iron or stick the shape onto the base fabric, lining it up with your design outline. This is a key step for securing applique fabric in this method.
- Put the hooped fabric with stabilizer under it into your machine (if using a machine). Or get your hand needle ready.
- Sew around the edge of the applique shape. You can use a straight stitch, a zig-zag stitch, or even a free-motion stitch just inside the edge.
- Leave the raw edge as it is. It will soften and fray a little with washing, adding to the look.
This is one of the easiest raw edge applique steps for beginners.
Fused Applique Method
As discussed before, this is primarily a method for securing applique fabric. It involves using fusible web to iron the applique piece onto the base fabric. You then stitch around the edges using hand or machine stitches. This method works well with both raw edge and edge-covering stitches like satin or zig-zag.
Machine Applique
Using a sewing machine makes applique faster.
- Prepare fabrics and design.
- Use the fused applique method to stick the shapes down. Or use glue or pins.
- Put the base fabric (with stabilizer under it) in the machine.
- Choose your stitch. A zig-zag stitch is common. Set the stitch width and length. Start with a narrow zig-zag. Sew slowly around the edge of the applique shape. The needle should go into the applique shape on one side and into the base fabric on the other.
- For a satin stitch look, set the zig-zag width wider and the length very short. The stitches should be right next to each other.
- Carefully sew around the shape. Go slowly on curves and corners. Lift the presser foot slightly if needed to turn the fabric.
Embroidery Machine Applique Tutorial
An embroidery machine automates many steps. Applique designs for these machines are special. They have different stitch steps programmed in.
Here is a basic embroidery machine applique tutorial:
- Prepare your base fabric and put the correct embroidery stabilizer for applique under it. Hoop them tightly.
- Load the applique design file into your embroidery machine.
- The first stitch step is usually a “placement stitch.” This is a simple running stitch that sews the outline of the applique shape onto your base fabric. This shows you where to put the applique fabric.
- The machine stops after the placement stitch. Do not unhoop.
- Place a piece of your applique fabric over the placement stitch outline. Make sure it covers the whole shape area.
- The next stitch step is the “tack-down stitch.” This is another running stitch that sews the applique fabric piece onto the base fabric, usually just inside or right on the placement line. The machine sews this automatically.
- The machine stops again. Do not unhoop.
- Carefully trim the extra applique fabric from around the tack-down stitch. Use sharp, small scissors. Trim close to the stitches but do not cut the base fabric or the tack-down stitches. For satin stitch applique, you trim close. For raw edge machine applique, you might cut slightly further out or closer, depending on the desired look.
- The machine stops. Do not unhoop.
- The final stitch step is the “cover stitch” or “finish stitch.” This is often a satin stitch, zig-zag stitch, or decorative stitch. It sews around the trimmed edge. This covers the raw edge you just trimmed. Or, for raw edge designs, it might be a straight or zig-zag stitch just inside the edge.
- The machine finishes the design. You can then remove the hoop. Take the fabric out of the hoop. Remove the stabilizer.
This embroidery machine applique tutorial shows how the machine guides you through each step, making it very precise.
Tips for Beginner Success
Starting something new can feel tricky. Here are some tips to help you.
- Start simple. Choose easy shapes like circles or squares. Use fabrics that don’t fray much, like cotton.
- Practice cutting applique fabric on scrap pieces first. Get a feel for using your scissors.
- Test your stitches on scrap fabric before sewing on your project. This is key for machine settings.
- Use enough embroidery stabilizer for applique. Too little can lead to puckering.
- Take your time when securing applique fabric. Getting the pieces in the right place is important.
- For hand applique, use a hoop or frame. It keeps the fabric smooth.
- Don’t be afraid to remove stitches if you need to. A seam ripper is your friend.
- Keep your scissors sharp, especially for cutting fabric.
- Enjoy the process! It’s okay if your first project isn’t perfect.
Finishing Your Piece
Once all your applique pieces are stitched down, you are almost done.
- Remove the fabric from the hoop.
- Carefully remove any temporary securing (like basting stitches or glue stick, if they didn’t wash out).
- Remove the embroidery stabilizer for applique. Tear-away pulls away. Cut-away needs careful trimming close to the stitches on the back. Wash-away needs soaking in water (check product instructions).
- Trim any loose threads.
- Press your finished piece from the back. Use a pressing cloth if needed. This helps flatten the stitches and the fabric.
Your applique project is now finished!
Advanced Thoughts: Beyond the Basics
Once you feel good about basic applique, you can try more.
- Layering shapes: Put one applique shape on top of another.
- Combining methods: Use fused applique for some parts, hand applique for others.
- Adding other embroidery: Put extra stitches or details on top of the applique fabric.
- Using different materials: Try felt, leather, or even sheer fabrics for applique.
- Thread painting: Use different thread colors and stitches over the applique shape to add shading and detail.
There are many ways to be creative with applique. Look for more applique design ideas as you get more skilled.
Frequently Asked Questions
Q: What is the best fabric for beginner applique?
A: Quilting cotton is usually best. It’s easy to handle, cut, and sew. It doesn’t fray too much.
Q: Do I have to use stabilizer?
A: Yes, it is strongly recommended, especially for machine applique or any stitching with dense stitches like satin stitch. It gives needed support.
Q: Can I wash something with applique on it?
A: Yes, but be gentle. How you wash depends on the fabric and thread used. Handwashing or a gentle cycle in cool water is best. Air drying is often better than machine drying. If you used raw edge applique, washing will cause the edges to fray, which is part of the design.
Q: How do I make small, detailed shapes?
A: Using fusible web helps a lot for small shapes. It stops tiny pieces from moving and fraying. Use very sharp, small scissors for cutting.
Q: My stitches are sinking into the fabric or puckering. What’s wrong?
A: This often means you need more or stronger embroidery stabilizer for applique. Also, make sure your fabric is hooped tightly. For machine stitching, check your thread tension.
Conclusion
Embroidery applique is a fun skill. It adds beauty and life to fabric projects. With this guide, you know the tools you need. You know how to prepare fabric and cut shapes. You have learned about securing applique fabric using methods like the fused applique method. You have seen different applique stitches for embroidery. You explored hand applique techniques, understood raw edge applique steps, and even followed an embroidery machine applique tutorial.
Start with a simple project. Pick some nice fabrics and applique design ideas. Take it step by step. Practice makes you better. Soon, you’ll be adding beautiful fabric pictures to quilts, clothes, bags, and more! Have fun stitching!