
What is embroidery? Embroidery is the art of decorating fabric. You use a needle and thread to make designs. Can anyone learn it? Yes, anyone can learn how to do embroidery stitches. It does not matter if you have never sewn before. Why start with stitches? Learning stitches is the first step. It builds your basic skills. This guide will show you simple hand embroidery techniques. You will learn many common embroidery stitches. Think of this as your personal embroidery stitch guide. It will help you start your fun journey into needlework.
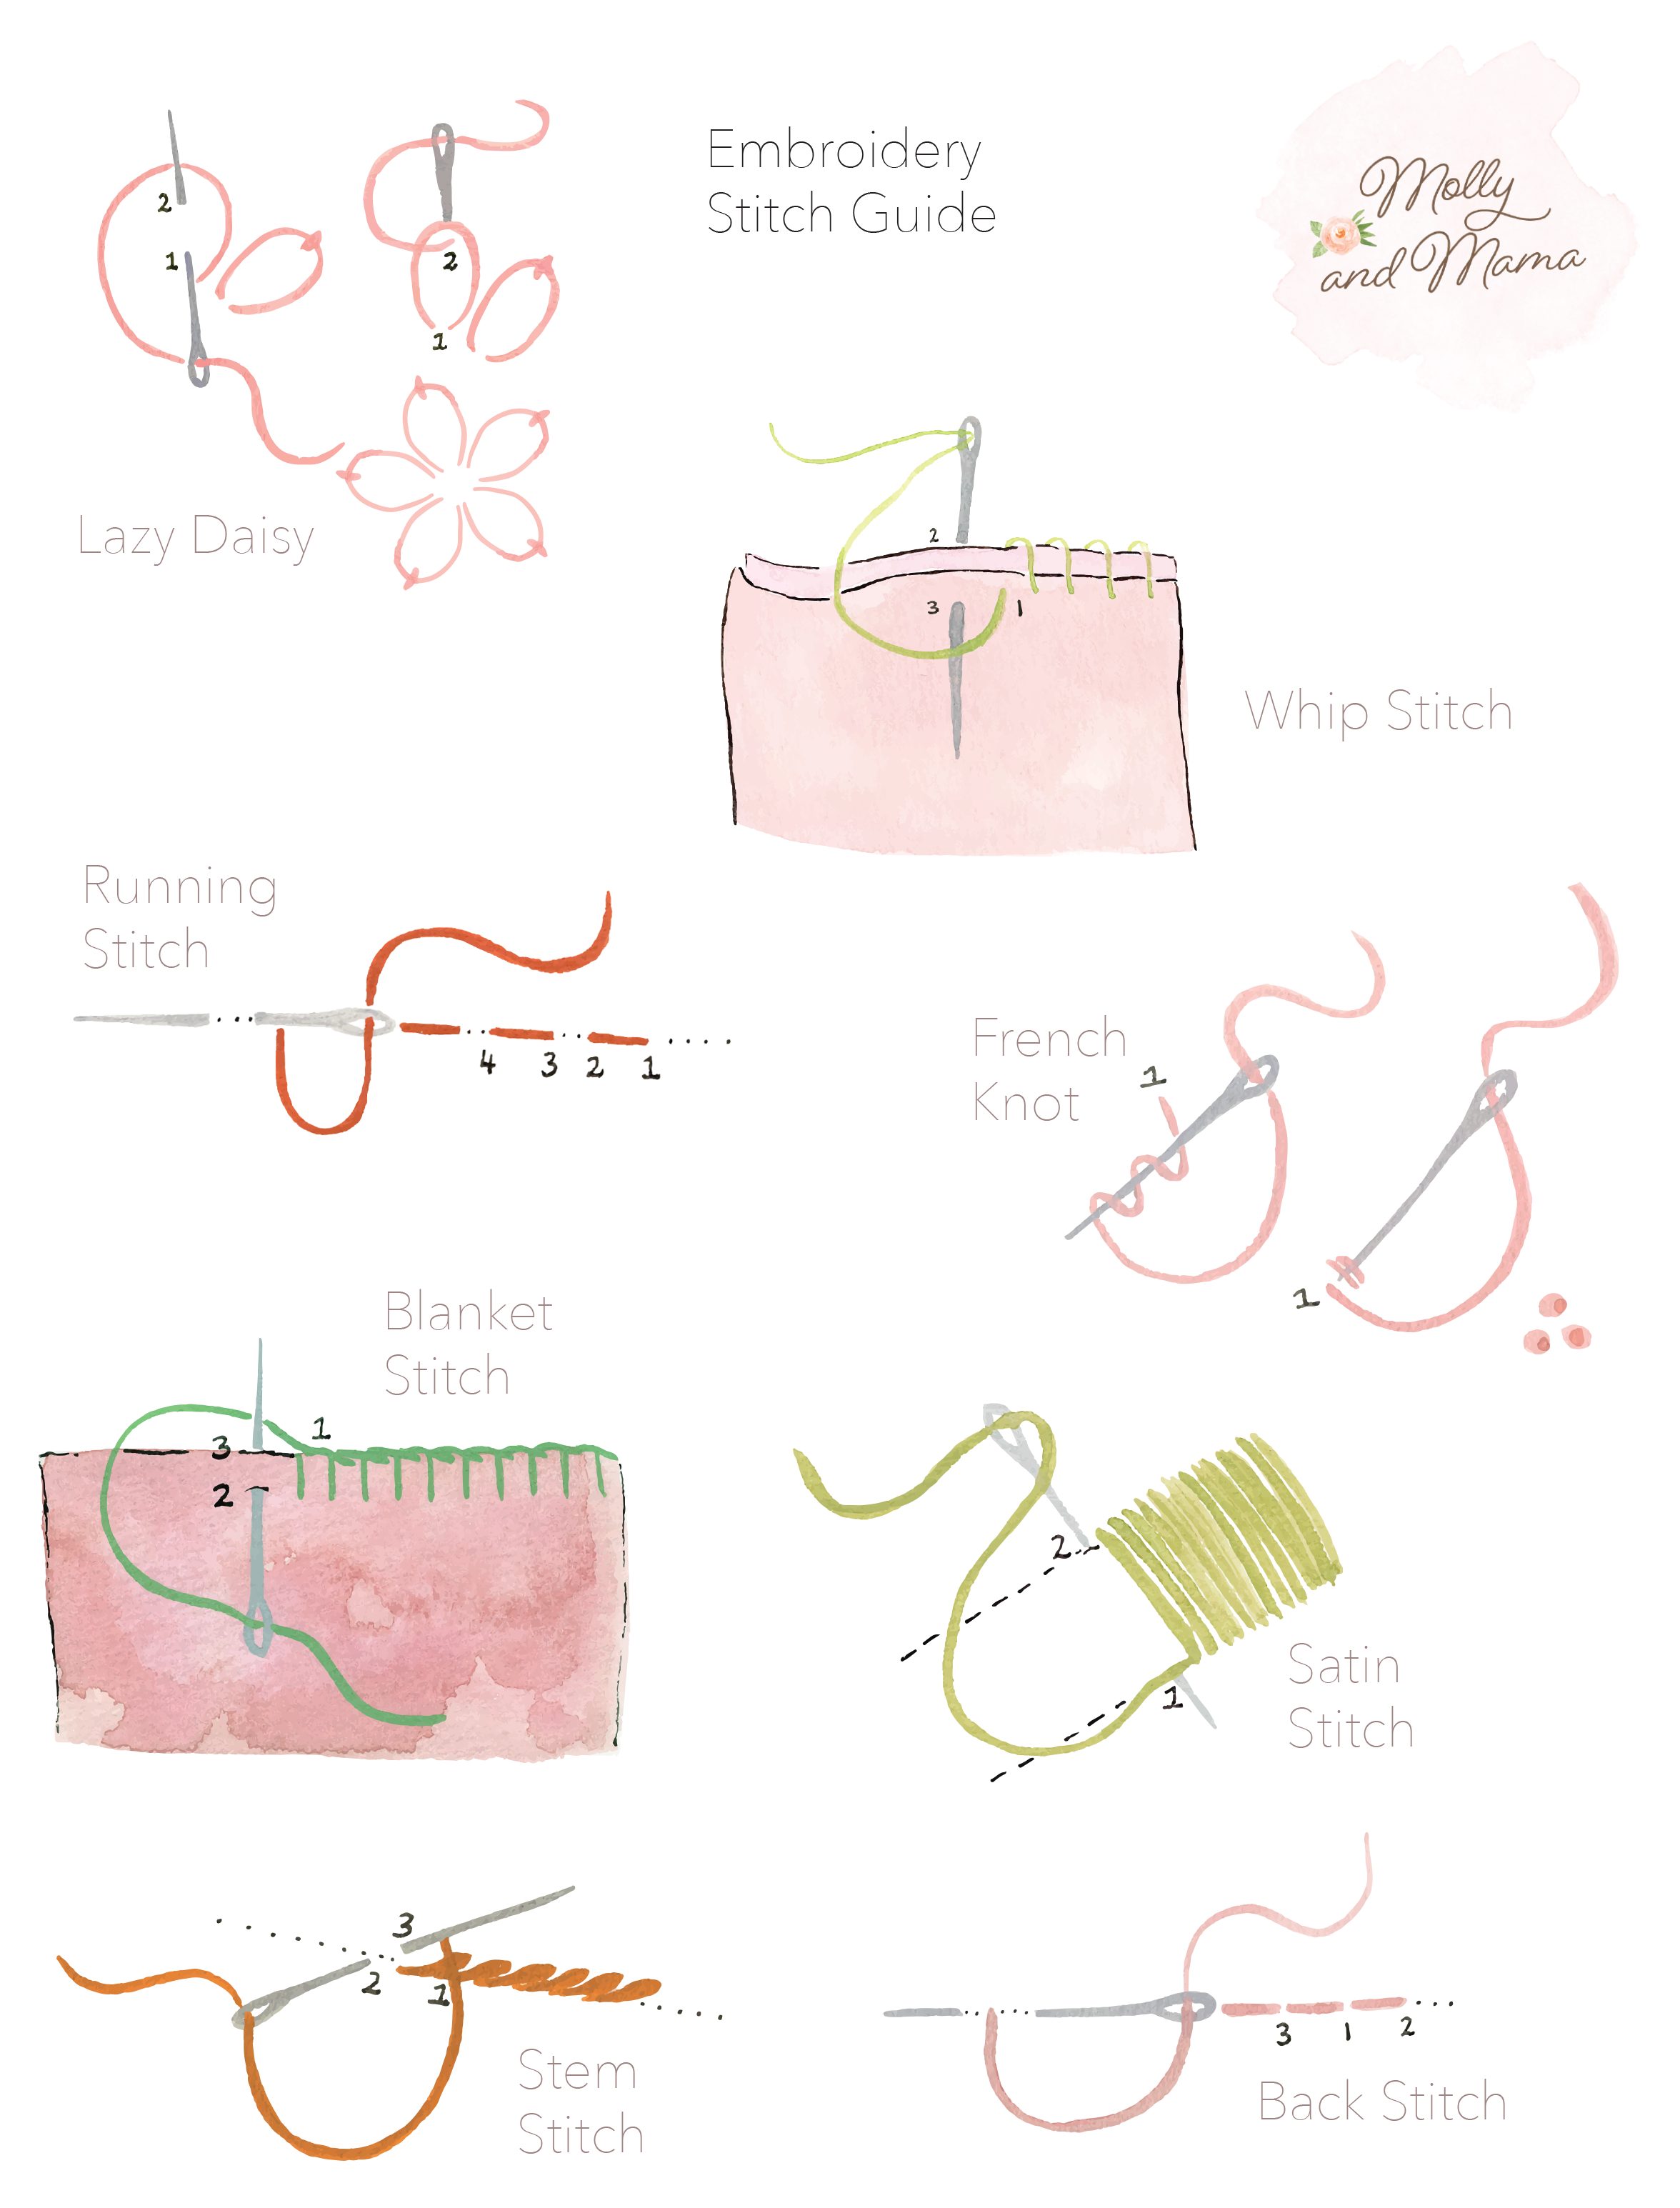
Image Source: b1641835.smushcdn.com
Your Essential Toolkit for Starting Embroidery
Before you begin learning embroidery stitches, gather your tools. Having the right supplies makes learning easier. Here are the basics you will need:
Fabric Choices for New Stitchers
Choosing the right fabric is important. For beginners, a stable fabric works best. This means it does not stretch much.
* Cotton or Linen: These are good choices. They are easy to find. Needles slide through them well.
* Muslin: This is a cheap fabric. It is great for practice. You can try out many beginner embroidery stitches on it.
* Evenweave Fabric: This fabric has threads that are easy to count. It is good for specific types of stitches.
Avoid stretchy fabrics like jersey for now. They make simple embroidery stitches hard to keep even.
The Embroidery Hoop: Your Stitches’ Best Friend
An embroidery hoop holds your fabric tight. This keeps your stitches neat. It also prevents the fabric from puckering.
* Wooden Hoops: These are strong and common. They hold fabric well.
* Plastic Hoops: These can be cheaper. Some have a lip that helps grip fabric.
* Sizes: Start with a 6-inch or 8-inch hoop. These sizes are easy to handle. They work for most small projects.
Make sure your hoop has a screw. This screw lets you tighten or loosen the hoop.
Needles for Hand Embroidery
Embroidery needles are special. They have a larger eye than sewing needles. This lets you thread thicker embroidery floss.
* Sharps: These have a sharp point. They are good for most fabrics.
* Tapestry Needles: These have a blunt point. They are for counted cross-stitch. They are not usually for regular embroidery stitches.
* Sizes: Needles come in different sizes. A higher number means a thinner needle. For common embroidery floss, sizes 7 or 8 are good to start with.
Have a few sizes on hand. You might like different ones for different tasks.
Embroidery Thread: A Rainbow of Colors
Embroidery thread is also called floss. It comes in many colors. It is usually made of six strands. You can use all six strands. Or, you can separate them to make thinner lines.
* DMC Brand: This is a very popular brand. Its colors are bright. They do not fade easily.
* Cotton Floss: This is the most common type. It is shiny and smooth. It is great for many types of embroidery stitches.
* Perle Cotton: This thread cannot be separated. It is thicker. It gives a bolder look.
For basic embroidery stitches, cotton floss is perfect. Get a few colors you like.
Other Handy Tools
- Small Scissors: Sharp, small scissors are best. They help you snip threads cleanly.
- Fabric Marker or Pencil: You will use this to draw your design on the fabric. Water-soluble pens are good. They wash away later.
- Thimble: This protects your finger. You push the needle with it.
- Needle Threader: If you have trouble threading needles, this tool helps a lot.
Preparing Your Workspace and Materials
Good preparation helps your stitching go smoothly. Follow these steps before you start learning embroidery stitches.
Prepping Your Fabric
Sometimes fabric needs a little help before you stitch.
* Wash and Iron: Some fabrics shrink. Wash and iron your fabric first. This helps prevent your finished piece from puckering later. It also makes the fabric smooth.
* Find Your Center: Fold your fabric in half. Then fold it in half again. The center point is where the folds meet. This helps you center your design.
Hooping Your Fabric
Putting your fabric in the hoop is easy. But doing it right is key for good hand embroidery techniques.
1. Separate the Hoops: Loosen the screw on the outer hoop. Take out the inner hoop.
2. Place Fabric on Inner Hoop: Lay your fabric over the inner hoop. Center your design.
3. Place Outer Hoop: Put the outer hoop over the fabric and inner hoop. Push it down firmly.
4. Tighten the Screw: Pull the fabric gently from all sides. Make sure it is tight like a drum. Then tighten the screw. Do not pull too hard, or the fabric may distort.
Threading the Needle
This can be tricky at first.
1. Cut Your Floss: Cut a piece of floss about 18 inches long. Longer pieces can tangle.
2. Separate Strands: Most embroidery floss has six strands. For many beginner embroidery stitches, you will use two or three strands. Gently pull them apart.
3. Wet the End: Wet the end of the thread. Pinch it flat. This makes it easier to push through the needle’s eye.
4. Thread It: Push the flattened end through the needle’s eye. Pull about 4-6 inches through.
Starting and Ending Your Threads
There are two main ways to start and end your thread.
1. Using a Knot (Easier for Beginners):
* Starting: Make a small knot at the end of your thread. Bring the needle up from the back of the fabric. Pull until the knot stops it.
* Ending: When you have about 2-3 inches of thread left, turn your fabric over. Weave the needle under a few nearby stitches. Make a small knot close to the fabric. Snip the extra thread.
2. Knotless Method (Cleaner Finish):
* Starting: Leave a 1-inch tail on the back of your fabric. Make your first few stitches. As you stitch, catch the tail under these stitches. This secures it.
* Ending: Weave the needle under a few stitches on the back. Do this without making a knot. Snip the extra thread close to the fabric.
For easy embroidery stitches, the knot method is fine. As you get better, try the knotless way.
Deciphering Basic Embroidery Stitches
This is the heart of your needlework stitches tutorial. We will go over many common embroidery stitches. Each one adds a different look to your design. Practice each stitch a few times. This helps you get a feel for them.
1. Running Stitch: The Quick Line Maker
The running stitch is super simple. It is one of the most simple embroidery stitches. It makes a dashed line. It is great for outlines or thin details.
- How to Do It:
- Bring your needle up from the back of the fabric at point A.
- Go down at point B, a short distance away.
- Come up again at point C, the same distance from B as A is from B.
- Go down at point D.
- Keep going. Make your stitches and gaps the same length.
- Tips: You can load several stitches onto your needle at once. This makes it faster.
- Uses: Outlines, filling large areas with a texture, simple lettering.
2. Backstitch: The Solid Line Builder
The backstitch makes a solid, unbroken line. It is perfect for clear outlines. It is a key stitch for many designs.
- How to Do It:
- Bring your needle up at point A.
- Go down at point B, a short distance away.
- Bring your needle up again at point C. Point C is the same distance from B as A is from B. C is ahead of B.
- Now, go down into the same hole as point B.
- Bring your needle up again at point D (ahead of C). Go down into C.
- Keep going, always going back to the end of the last stitch.
- Tips: Keep your stitch lengths even for a neat line.
- Uses: Outlines, lettering, drawing shapes, outlining areas for filling.
3. Stem Stitch: The Rope-Like Outline
The stem stitch makes a twisted, rope-like line. It is great for curved lines or stems of flowers.
- How to Do It:
- Bring your needle up at point A.
- Go down at point B, a short distance away.
- Bring your needle up at point C. Point C is about halfway between A and B, but slightly to the side of the line you are making.
- Pull the thread through. Keep the working thread below the needle (or above, just be consistent).
- Go down at point D (the same distance from B as A is from B). Bring the needle up halfway between B and D, slightly to the side.
- Repeat.
- Tips: Keep your stitch length short for smooth curves.
- Uses: Plant stems, curly lines, filling areas with texture.
4. Satin Stitch: The Smooth Filler
The satin stitch makes a smooth, solid filled area. It gives a beautiful, shiny surface. It is a bit trickier to keep even.
- How to Do It:
- Draw the shape you want to fill.
- Bring your needle up at one edge of the shape.
- Go straight across the shape and down at the opposite edge.
- Bring your needle up again very close to where your first stitch started.
- Go down very close to where your first stitch ended.
- Repeat. Keep stitches parallel and close together. Do not pull too tight.
- Tips: Outline your shape first with backstitch. This helps keep your satin stitches neat. Use fewer strands of floss for smaller areas.
- Uses: Filling leaves, petals, small shapes, blocks of color.
5. French Knot: The Textured Dot
The French knot makes a small, raised dot. It adds texture and detail. It is one of the fun types of embroidery stitches.
- How to Do It:
- Bring your needle up from the back of the fabric.
- Hold the thread taut with one hand.
- Wrap the thread around the needle two or three times. (Two wraps for a smaller knot, three for larger.)
- Insert the needle back into the fabric. Put it very close to where it came up, but not the exact same hole.
- Keep the wraps tight around the needle. Pull the needle through slowly.
- Pull the thread gently until the knot forms flat against the fabric.
- Tips: Practice makes perfect. Do not pull too hard on the knot while forming it.
- Uses: Eyes, flower centers, scattered textures, tiny berries.
6. Lazy Daisy (Detached Chain Stitch): The Petal Maker
The lazy daisy stitch makes a single loop. It looks like a petal or a teardrop. It is great for flowers or leaves.
- How to Do It:
- Bring your needle up at point A.
- Go back down at point A (or very close to it). Do not pull the thread all the way through. Leave a loop.
- Bring your needle up at point B, inside the loop. This point forms the tip of your petal.
- Pull the thread through the loop. This makes the loop lie flat.
- Make a tiny stitch over the tip of the loop at point B. This holds the loop in place.
- Go back down at point C, just outside the loop at the tip.
- Tips: Make sure your loop is not too tight before you make the securing stitch.
- Uses: Petals, leaves, small decorative elements.
7. Chain Stitch: The Textured Line
The chain stitch makes a strong, linked line. It looks like a chain. It adds a nice texture to outlines.
- How to Do It:
- Bring your needle up at point A.
- Go back down at point A (or very close). Do not pull the thread all the way through. Leave a loop.
- Bring your needle up at point B, a short distance away, inside the loop.
- Pull the thread through. This forms your first chain link.
- Go back down at point B (or very close to it). Do not pull the thread all the way through. Leave another loop.
- Bring your needle up at point C, inside the new loop.
- Repeat.
- Tips: Keep your stitch lengths even for a smooth chain.
- Uses: Outlines, bold lines, filling larger areas.
8. Split Stitch: The Fine Line Smoother
The split stitch makes a fine, rope-like line. It is great for outlines where you want a very neat, clean edge. It is often used for lettering.
- How to Do It:
- Bring your needle up at point A.
- Go down at point B, a short distance away.
- Bring your needle up again. This time, bring it up through the middle of the previous stitch. Yes, you split the thread.
- Go down at point C.
- Bring the needle up through the middle of the stitch you just made.
- Repeat.
- Tips: Using fewer strands of floss makes the split easier. It also makes a finer line.
- Uses: Fine outlines, lettering, hair, details.
9. Straight Stitch: The Basic Building Block
The straight stitch is the simplest stitch. It is just one line. It is a core basic embroidery stitch. You use it to make single lines, stars, or fill small areas.
- How to Do It:
- Bring your needle up at point A.
- Go down at point B, any distance away. That’s it!
- Tips: You can vary the length and direction of straight stitches. This makes many different patterns.
- Uses: Flower petals, starbursts, filling tiny spots, adding texture.
10. Seed Stitch: The Random Filler
The seed stitch is a simple way to fill areas with a textured look. It uses many small straight stitches scattered randomly.
- How to Do It:
- Make many small straight stitches.
- Place them randomly within an area.
- Vary their length and direction slightly. Do not let them touch too much.
- Tips: Use fewer strands of floss for a finer, more subtle texture.
- Uses: Filling backgrounds, adding subtle shading, creating a speckled look.
11. Feather Stitch: The Open, Branching Stitch
The feather stitch makes an open, decorative line. It looks like branches or leaves. It is a beautiful border stitch.
- How to Do It:
- Imagine three lines: a center line, and one on each side.
- Bring your needle up at the top of the center line (A).
- Go down at point B (on the right side line, a bit below A). Bring the needle up at point C (on the left side line, below A). Keep a loop of thread under the needle. Pull through. This makes a V-shape.
- Go down at point D (on the left side line, below C). Bring the needle up at point E (on the right side line, below B). Keep a loop under the needle. Pull through.
- Repeat, working down the design.
- Tips: Keep your loops loose until you secure them. This helps them lay flat.
- Uses: Borders, leafy patterns, outlining, decorative lines.
12. Fly Stitch: The Y-Shape Stitch
The fly stitch makes a Y-shape or an open V. It is good for single leaves, birds in flight, or decorative lines.
- How to Do It:
- Bring your needle up at point A (top left).
- Go down at point B (top right). Leave a loop.
- Bring your needle up at point C (center bottom, directly below the midpoint of A and B). Make sure C is inside the loop.
- Pull the thread through the loop.
- Make a small straight stitch from C to D (just below C) to hold the V in place.
- Tips: Vary the length of the horizontal bar (A-B) or the vertical bar (C-D) to change its look.
- Uses: Tiny leaves, antennae, decorative fills, small V-shapes.
An Embroidery Stitch Guide: Grouping Stitches for Different Uses
Knowing types of embroidery stitches helps you choose the best one for your design. Here are some common categories:
| Stitch Type | Purpose | Examples |
|---|---|---|
| Outline Stitches | Used to draw lines, shapes, and text. | Running Stitch, Backstitch, Stem Stitch, Split Stitch, Chain Stitch |
| Filling Stitches | Used to color in areas or create textures. | Satin Stitch, Seed Stitch, Long and Short Stitch (more advanced), Backstitch (filled) |
| Decorative Stitches | Used to add special textures or patterns. | French Knot, Lazy Daisy, Feather Stitch, Fly Stitch, Bullion Knot (advanced) |
| Joining Stitches | Used to connect fabric pieces or add edges. | Blanket Stitch, Buttonhole Stitch (often used for appliqué or edges) |
As you get more skilled with learning embroidery stitches, you will find stitches that fit into multiple categories.
Grasping Hand Embroidery Techniques: Tips for Success
Learning how to do embroidery stitches is easier with good habits. These hand embroidery techniques will help you make neat stitches.
1. Hold Your Hoop Right
Hold the hoop in your non-dominant hand. Keep your fingers under the fabric. Your dominant hand will work the needle from above. This lets you guide the needle easily.
2. Control Thread Tension
This is very important. Pull your thread firmly, but not too tightly. If you pull too hard, the fabric will pucker. If you pull too little, your stitches will be loose. Practice to find the right amount of pull. Your goal is flat, even stitches.
3. Keep Things Clean
Wash your hands before you stitch. Oils from your skin can stain the fabric over time. Keep your work area tidy. This prevents lost needles or tangled threads.
4. Practice, Practice, Practice
Like any skill, embroidery gets better with practice. Do not be afraid to make mistakes. Each stitch you make teaches you something. Start with simple designs. Make samplers of your easy embroidery stitches.
5. Work in Good Light
Good light helps you see your stitches clearly. It also helps prevent eye strain. Natural light is best. If you stitch at night, use a bright lamp.
6. Use the Right Number of Strands
Remember, embroidery floss has six strands.
* 1-2 strands: For very fine details, thin lines, or small lettering.
* 2-3 strands: This is common for many basic embroidery stitches. It gives a nice, medium thickness.
* 4-6 strands: For thicker lines, bold outlines, or filling larger areas. This gives a rich, full look.
7. Keep Your Thread Short
An 18-inch piece of thread is usually a good length. Longer pieces tangle more easily. They also fray from going through the fabric too many times. Cut a new piece when needed.
Progressing Your Needlework Skills: Learning More
Once you master simple embroidery stitches, you can do so much! Here are ways to keep growing your skills.
Start Small, Dream Big
Your first projects should be small. A few simple outlines, a name, or a small flower. As your confidence grows, try bigger and more complex designs. Do not jump into a huge project too soon.
Follow a Pattern
Many patterns are made for beginners. They show you exactly where to stitch and what colors to use. These patterns are a great way to learn design layout.
Design Your Own
Once you are comfortable, try drawing your own simple designs. Use a fabric marker. This is a great way to express your creativity. Start with simple shapes.
Join a Community
Look for online groups or local clubs. Sharing your work and seeing others’ projects is inspiring. You can ask questions and get tips. This makes learning embroidery stitches more fun.
Experiment with Colors
Do not be afraid to try new color combinations. Embroidery is art. There are no strict rules. Use different shades of the same color for depth. Use contrasting colors to make things pop.
Try New Stitches
This embroidery stitch guide covers the basics. There are hundreds more stitches! Once you feel good about these, look up more advanced stitches. Try the Bullion Knot, Weave Stitch, or couching.
Fun Project Ideas for Beginner Embroidery Stitches
You have learned many beginner embroidery stitches. Now, what can you make? Here are some simple ideas.
- Embroidery Sampler: This is a piece of fabric where you practice each new stitch. You can label each stitch. It becomes a useful reference for your
embroidery stitch guide. - Personalized T-shirt or Tote Bag: Use a simple outline design. Embroider a small motif or your initial.
- Greeting Cards: Stitch a small design onto cardstock. Make holes with a needle before stitching.
- Bookmarks: Embroider a simple line or pattern onto felt or stiff fabric.
- Hoop Art: Frame your finished piece in its hoop. Decorate the hoop with ribbon.
- Decorated Tea Towels: Add a simple flower or design to a plain tea towel.
- Gift Tags: Stitch tiny designs onto small pieces of fabric. Attach them to gifts.
- Patches: Stitch a design onto a piece of felt. Cut it out. Sew it onto a jacket or bag.
Taking Care of Your Finished Embroidery
You put a lot of work into your stitches. Proper care helps them last.
Washing Your Embroidery
- Hand Wash: Most embroidery pieces should be hand washed. Use cool or lukewarm water. Use a mild soap, like baby shampoo.
- Gentle Swish: Swish the item gently in the soapy water. Do not scrub or twist.
- Rinse Well: Rinse with clean water until all soap is gone.
- Roll in Towel: Lay the piece flat on a clean towel. Roll it up to absorb extra water.
- Air Dry: Lay the piece flat to air dry. Do not hang it up, as it might stretch.
Ironing Your Embroidery
- Iron from the Back: Place your embroidery face down on a soft towel.
- Use Low Heat: Use a low to medium heat setting on your iron. Use steam if needed.
- Do Not Press Too Hard: Just gently press. This helps protect the stitches.
Displaying Your Work
- In a Hoop: You can leave your finished piece in the hoop. Trim the extra fabric on the back. Glue it to the inner hoop.
- Framing: You can frame your embroidery under glass. Make sure the glass does not touch the stitches.
- Sewn into Projects: Use your embroidered fabric in pillows, bags, or clothing.
Frequently Asked Questions (FAQ)
How long does it take to learn embroidery stitches?
You can learn the basic embroidery stitches in a few hours. Mastering them takes more time. It depends on how much you practice. Most people feel comfortable with easy embroidery stitches after a few small projects.
What if my stitches are uneven?
This is normal for beginners. Do not worry! Keep practicing. Focus on keeping your thread tension even. Make sure your stitch length is consistent. Your stitches will get neater over time. It is part of learning embroidery stitches.
Can I use any fabric for embroidery?
While you can technically stitch on many fabrics, some are easier. For beginner embroidery stitches, use non-stretchy fabrics. Cotton, linen, or muslin are best. They hold stitches well.
How do I transfer a design to fabric?
There are a few ways:
* Light Box/Window: Tape your design and fabric to a window. Trace the design with a fabric marker.
* Water-soluble Stabilizer: Draw on the stabilizer. Stick it to your fabric. Stitch over it. Wash it away when done.
* Iron-on Transfer Pens: Draw your design with this pen. Iron it onto your fabric.
* Carbon Paper: Place special carbon paper between your design and fabric. Trace over the design.
My thread keeps tangling. What can I do?
This happens often. Try these tips:
* Use Shorter Thread: Cut your thread to about 18 inches.
* Let It Hang: After every few stitches, let your needle and thread hang freely. This unwinds any twists.
* Use a Thread Conditioner: This is a wax or balm that makes thread smoother.
Learning how to do embroidery stitches is a rewarding journey. With patience and practice, you will create beautiful textile art. Enjoy your new hobby!