
Can you embroider letters with a regular sewing machine? Yes, you absolutely can! You do not need a fancy embroidery machine to add beautiful letters or designs to your projects. With some basic supplies, your standard sewing machine, and a little practice, you can create custom embroidered letters. This guide will show you how.
Embroidery with a regular sewing machine lets you personalize clothes, gifts, and home decor. It’s a fun way to make things unique. Whether you want simple initials or detailed words, your sewing machine can help you do it. Let’s break down how to get started.
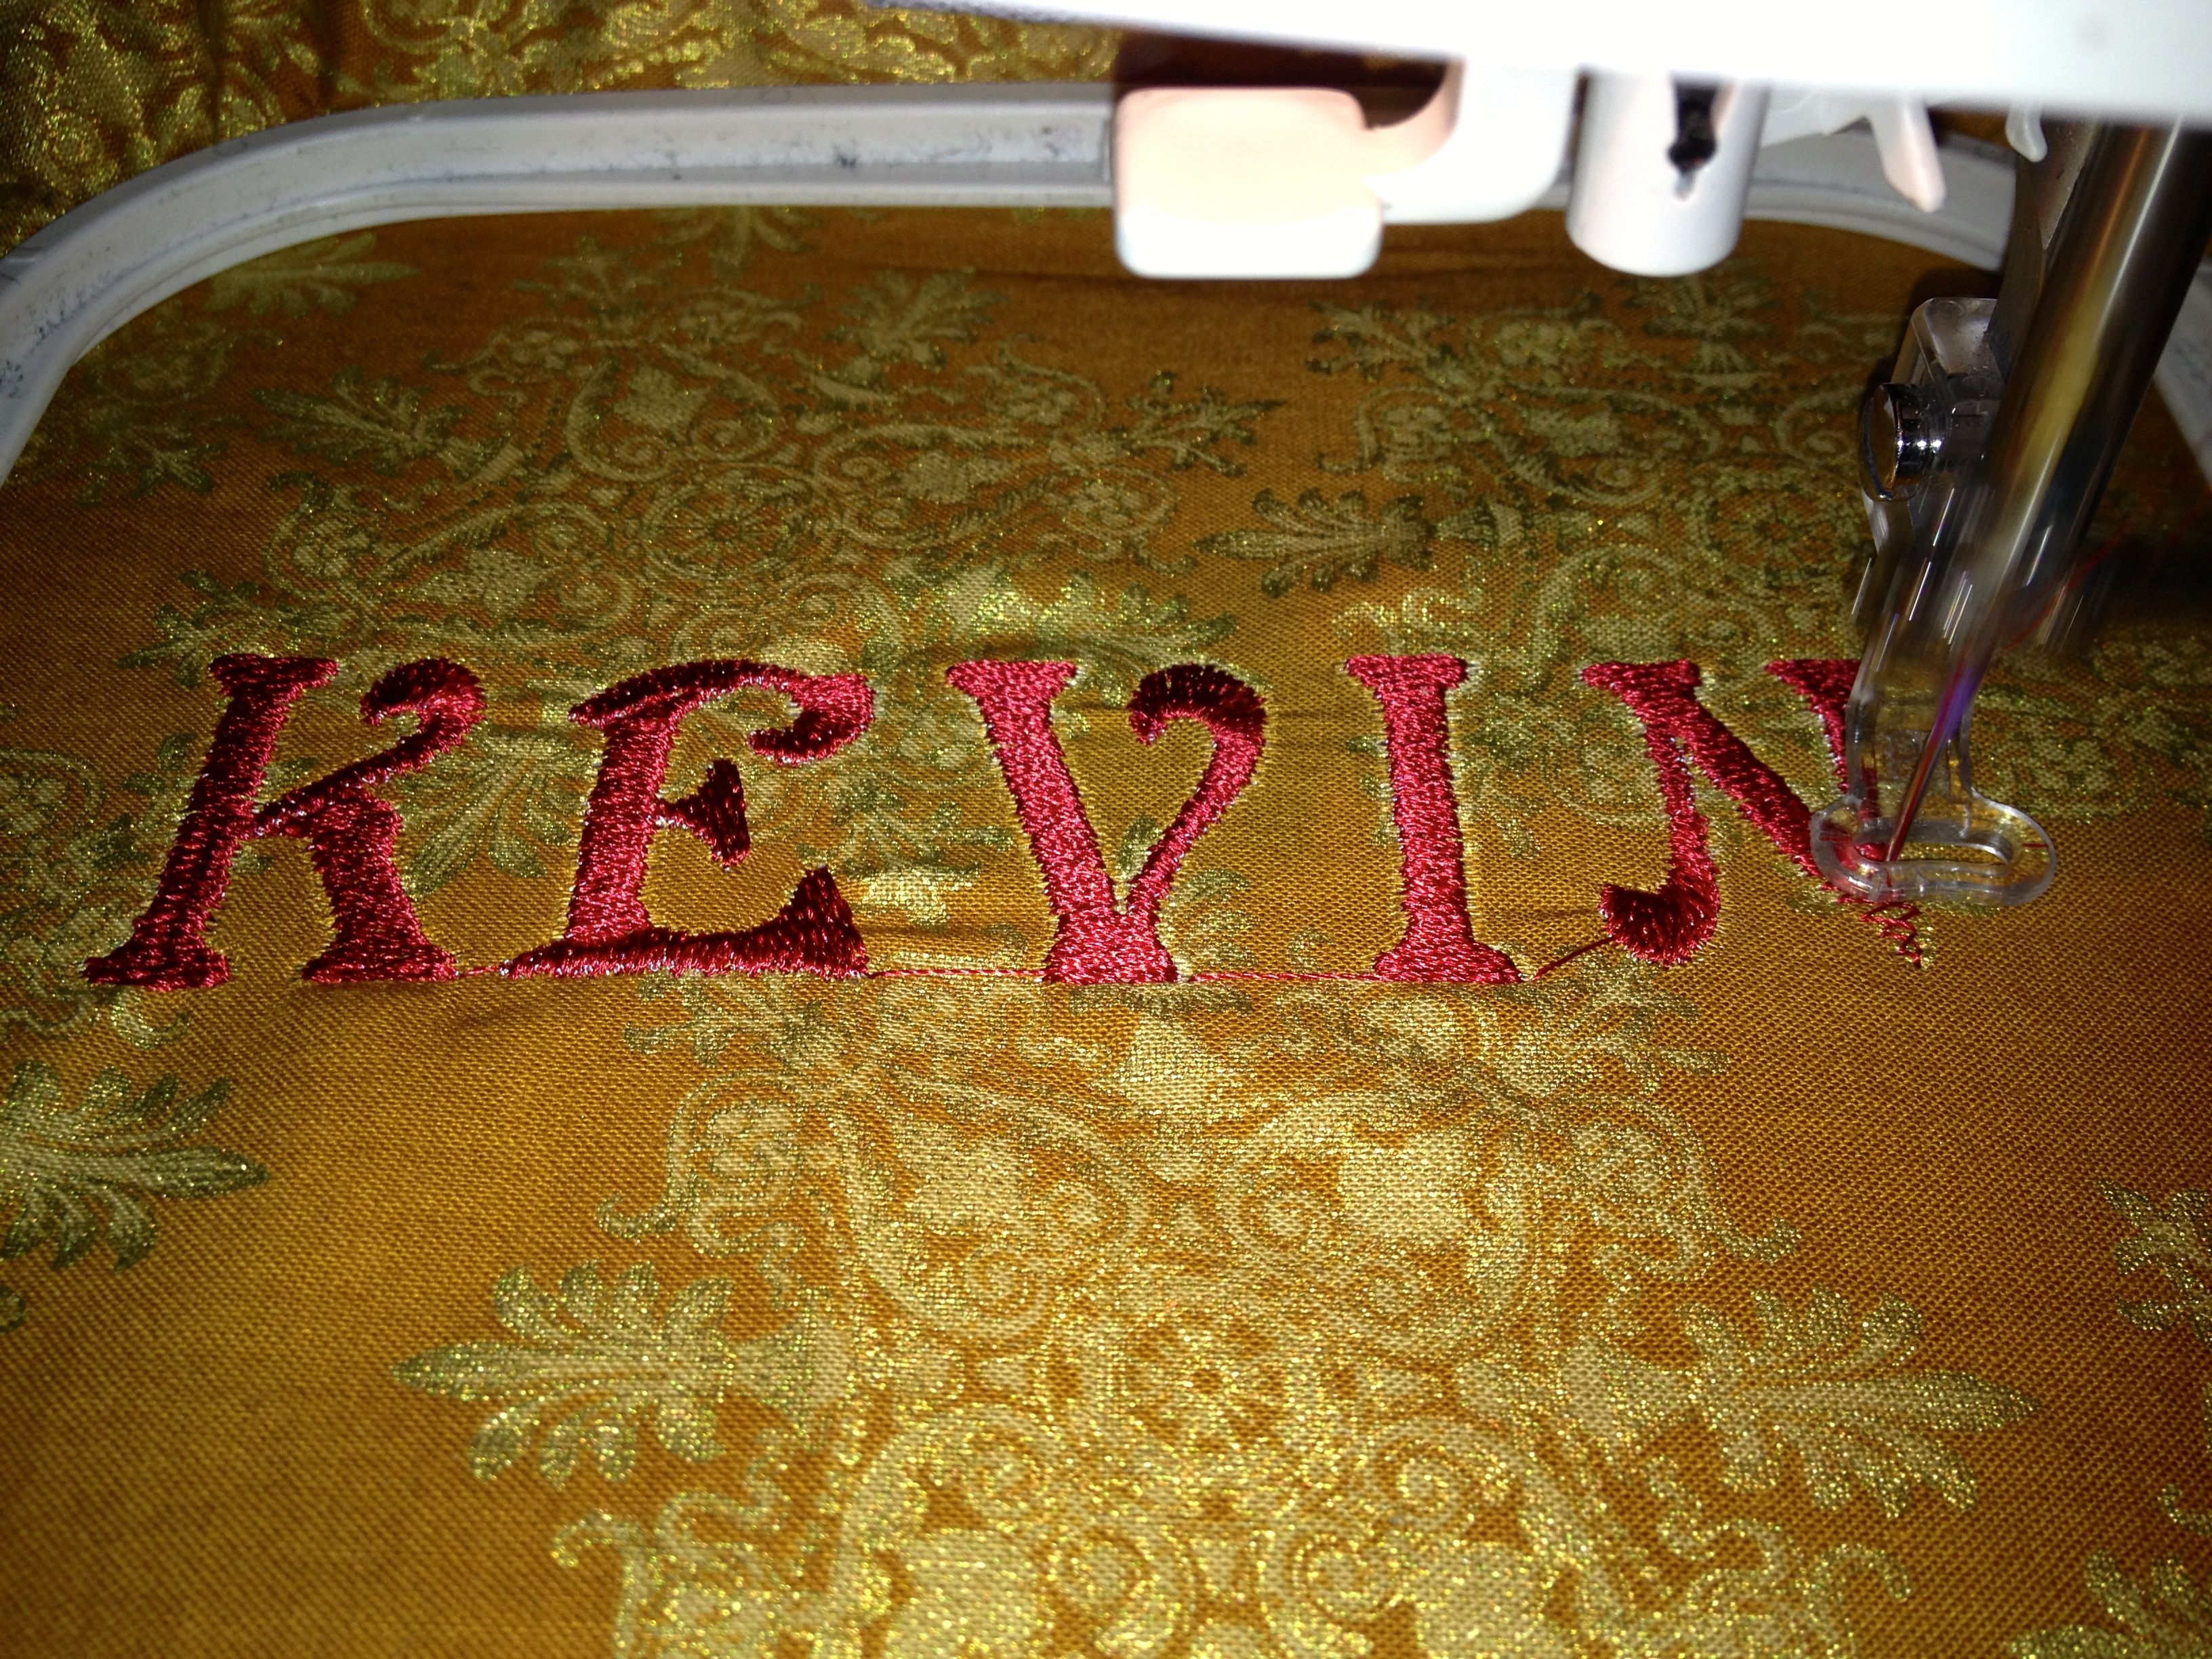
Image Source: content.instructables.com
What You Need to Start
Getting ready is the first step. You need the right tools and materials to make sewing machine monogramming and letter embroidery easier and look better.
Your Sewing Machine
Most sewing machines can do embroidery. You don’t need a special one.
* Your machine should be able to sew a straight stitch and a zig-zag stitch.
* For techniques like free motion embroidery letters, you need to be able to drop or cover the feed dogs. Feed dogs are the little teeth that move the fabric under the needle. When they are down, you can move the fabric yourself.
* Having speed control helps, but you can also control speed with your foot pedal.
The Right Needle and Thread
Choosing the correct needle and thread makes a big difference.
* Needles: Use a sharp needle. An embroidery needle (size 75/11 or 90/14) is best because it has a special eye that helps the thread flow smoothly and a sharp point for piercing fabric. A denim or microtex needle also works well on many fabrics. Make sure the needle size matches your thread and fabric. A thick needle on thin fabric will leave big holes.
* Thread: Sewing machine embroidery thread is different from regular sewing thread. It is usually stronger, has a nice sheen, and is made to handle faster sewing speeds without breaking. Rayon or polyester embroidery thread works well. Use the same type of thread in your bobbin, or use a special bobbin fill thread. Using regular sewing thread often causes problems like breaking stitches or loops.
Fabric and Stabilizer
What you sew on matters, and you need support.
* Fabric: You can embroider on many types of fabric. Thicker, tightly woven fabrics are easier to start with. Thin or stretchy fabrics need more support.
* Machine embroidery stabilizer is a must-have. It goes under or on top of your fabric to give it body and keep it from puckering or stretching while you sew. There are different types:
* Cut-away: Stays with the fabric after sewing. Good for stretchy fabrics or dense designs. You cut away the extra stabilizer from around the design.
* Tear-away: Easy to tear away from the fabric after sewing. Good for stable fabrics like cotton.
* Wash-away (or water-soluble): Dissolves in water. Used on top of fabric with a nap (like terrycloth) or under delicate fabrics where you don’t want stabilizer to show.
You choose the stabilizer based on your fabric and design. A heavy design on a light fabric needs a strong stabilizer. A simple outline on stable cotton needs less support.
Design and Pattern
You need a plan for your letters.
* Choosing a Style: Think about the look you want. Simple block letters, fancy script, or chunky shapes? The style affects the technique you’ll use. Embroidery fonts for sewing machine can be found online as patterns, or you can draw your own letters.
* Transferring the Design: Get your letter outline onto the fabric.
* Use a water-soluble or heat-erasable pen to draw directly on the fabric.
* Trace a printed pattern using transfer paper.
* Print the pattern on wash-away stabilizer and sew right over it.
Other Helpful Tools
- Embroidery hoop: A hoop holds your fabric tight like a drum. This is very important, especially for free motion and satin stitch. It stops the fabric from moving or puckering while you sew.
- Small, sharp scissors: For clipping threads closely.
- Fabric marker or pencil: For drawing lines.
- Seam ripper: Just in case you need to undo a mistake.
- Darning foot or embroidery foot: This special foot is used when the feed dogs are down. It hovers over the fabric and helps you see where you are going.
Prepping Your Workspace and Machine
Getting your machine ready is crucial. Taking the time here saves frustration later.
Set Up the Machine
Clear a space where you can move your fabric around easily, especially if you are doing free motion.
Install the Right Needle
Put in your embroidery or sharp needle. Make sure it is the right size for your thread.
Wind the Bobbin
Wind a bobbin with your sewing machine embroidery thread (or bobbin fill thread). Wind it evenly so the thread feeds smoothly.
Set the Sewing Machine Tension for Embroidery
This is one of the trickiest parts. Sewing machine tension for embroidery needs to be balanced.
* The top tension controls the thread from the needle.
* The bobbin tension controls the thread from below.
* You want the stitches to look the same on both the top and bottom of your fabric. If the top thread is too tight, it pulls the bobbin thread up. If the bobbin thread is too tight, it pulls the top thread down.
* Test your tension on a scrap piece of your fabric with the stabilizer before you start on your main project. Sew some lines or shapes. If you see loops on the bottom, the top tension might be too loose, or the bobbin tension too tight. If you see loops on the top, the top tension might be too tight, or the bobbin tension too loose. Adjust the top tension dial first. Bobbin tension is usually harder to adjust and often doesn’t need changing if your machine was sewing well before.
* Using the correct sewing machine embroidery thread for both top and bobbin (or bobbin fill) helps balance tension.
Attach the Right Foot and Drop Feed Dogs
- For free motion embroidery letters, you need a darning foot or embroidery foot and the feed dogs lowered. Check your machine’s manual to see how to drop the feed dogs.
- For techniques using regular stitches like zig-zag (for satin stitch or applique), use a clear embroidery foot or applique foot if you have one. It helps you see where you are sewing. Keep the feed dogs up for these methods.
Different Ways to Make Letters
There are several main ways to embroider letters with a regular sewing machine. The best method depends on the look you want and your skill level.
Crafting Letters with Free Motion
This technique is like drawing with your sewing machine. You use a straight stitch and move the fabric yourself to create the lines of the letters.
- How it works: With the feed dogs down and using a darning/embroidery foot, the machine just stitches in place when you press the pedal. You become the feed dogs, guiding the fabric to draw your letters.
- Looks like: This can create flowing script, sketchy outlines, or fill areas with stitched lines. Free motion embroidery letters have a handmade, often charming, look.
- Good for: Outlines, casual styles, filling in shapes, making your own unique fonts.
- Takes practice: Controlling the fabric movement takes time to learn. Start by practicing drawing shapes and lines on scrap fabric.
Making Bold Letters with Satin Stitch
Satin stitch is a dense zig-zag stitch sewn close together. It fills in shapes with smooth coverage, making bold, raised letters.
- How it works: You use a zig-zag stitch with a very short stitch length and a moderate width. You sew along the edge of your letter design, slowly covering the outline with stitches that lie side-by-side.
- Looks like: Smooth, shiny, solid letters, similar to machine embroidery done on specialized machines. Satin stitch letters sewing machine technique is great for giving letters a finished, professional look.
- Good for: Monograms, patches, clear lettering on clothes or bags, creating defined shapes.
- Requires: Careful tracing or marking, steady hands, and practice controlling stitch width and length as you go around curves and corners.
Adding Fabric Letters with Applique
Applique involves cutting shapes (your letters) from one fabric and sewing them onto another fabric. Your sewing machine is used to attach the cut-out letters neatly.
- How it works: You cut your letters from fabric. Place them on your background fabric. Use glue stick or fusible web to hold them in place. Then, sew around the edges of the cut-out letters using a tight zig-zag stitch (like a narrow satin stitch) or another decorative stitch.
- Looks like: Fabric letters with a stitched border. It adds texture and can use different colors and patterns of fabric for the letters themselves. Applique letters sewing machine method is durable and makes letters stand out.
- Good for: Large letters, banners, adding playful designs to kids’ items, using scraps of favorite fabrics.
- Requires: Accurate cutting of the letters and careful sewing around edges.
Simple Monogramming
Sewing machine monogramming often uses the techniques above for initials or small designs. It could be a simple free-motion initial, a small satin-stitch letter, or an applique letter.
- How it works: Choose one or more letters. Select a technique (free motion, satin stitch, applique). Apply the technique to create the monogram on your item.
- Looks like: Depends on the technique used. Can be fancy or simple.
- Good for: Personalizing towels, shirts, bags, napkins, etc.
Step-by-Step Guide: Choosing Your Method
Now, let’s go through the steps based on the technique you choose.
Method 1: Simple Outline or Free Motion Letters
This is the most direct way to ‘draw’ with your machine. It’s great for a hand-drawn feel.
Step 1: Prepare Fabric and Design
- Get your fabric ready. Press it smooth.
- Draw your letter design onto the fabric using a water-soluble or erasable pen. Or, draw it on wash-away stabilizer and place the stabilizer on top of the fabric.
- Cut a piece of machine embroidery stabilizer larger than your hoop. Place it under your fabric (or on top if using wash-away tracing paper).
Step 2: Set Up Machine
- Install the correct needle (embroidery or sharp).
- Thread the machine with sewing machine embroidery thread on top and bobbin.
- Set sewing machine tension for embroidery. Test on a scrap first.
- Attach the darning or embroidery foot.
- Lower the feed dogs. This is key for free motion.
Step 3: Hoop Fabric
- Place the fabric and stabilizer together in the embroidery hoop. Tighten the hoop so the fabric is stretched firm like a drum. No wrinkles! Make sure your letter design is centered in the hoop.
Step 4: Start Sewing
- Place the hooped fabric under the needle. Lower the presser foot lever (even though the foot doesn’t press down, the lever controls tension).
- Hold your top and bobbin threads for the first few stitches to stop them from getting pulled under.
- Start sewing slowly. Guide the hoop with both hands to follow the lines of your letter design. Move the hoop smoothly and evenly. The speed you move the hoop controls your stitch length. Move fast for long stitches, slow for short stitches. Try to keep the stitches a consistent length.
- Sew along the outline of your letter. You can go over lines multiple times to make them thicker or fill areas.
Step 5: Finish Sewing
- When done, stop sewing. With the needle down in the fabric (this holds your place), lift the presser foot lever. Pull the hoop out.
- Trim your threads close to the fabric.
Method 2: Satin Stitch Letters
This method creates solid, bold letters. It takes control to keep the stitch width and density even.
Step 1: Prepare Fabric and Design
- Prepare your fabric. Press it.
- Draw a clear outline of your letter. This is how to outline letters with sewing machine before filling them with satin stitch. You will sew along this outline. You can use a pen or transfer paper.
- Cut and place machine embroidery stabilizer under your fabric. For dense satin stitch, you might need a piece of stabilizer both under and on top of the fabric (wash-away on top).
- Hoop your fabric and stabilizer tightly.
Step 2: Set Up Machine
- Install the correct needle.
- Thread with sewing machine embroidery thread.
- Set sewing machine tension for embroidery. Test it! Satin stitch shows tension problems easily.
- Keep the feed dogs UP.
- Set your machine to a zig-zag stitch.
- Set stitch length to almost zero (0.5 or less). The zig-zags should be very close together.
- Set stitch width depending on how wide you want the border or fill of your letter. Start narrow (1.5-2.5 mm) for outlining.
Step 3: Hoop Fabric
- Place the hooped fabric under the needle. Lower the presser foot.
Step 4: Sew the First Pass (Outline)
- Start sewing slowly along the drawn outline of your letter. Use a narrow zig-zag stitch. This first pass creates a foundation and helps you define the shape.
Step 5: Sew Over Again (Wider Satin Stitch)
- Once you have a narrow outline, increase the stitch width slightly.
- Sew over the outline again. The zig-zags should cover the previous stitching line and extend slightly outwards, covering the space next to your outline.
- Slowly guide the fabric so the satin stitches lay side-by-side, filling the shape.
- For curves, you might need to slightly adjust the stitch width or length as you turn the hoop. Pivot carefully when you reach corners, keeping the needle down on the outside edge of the turn.
Step 6: Fill In Areas
- For thicker parts of letters, you might need multiple rows of satin stitch. Work outwards from your initial outline, making sure each row of stitches meets the last one perfectly.
- Keep your speed slow and consistent.
Step 7: Finish
- When done, secure your stitches. You can do this by sewing a few tiny straight stitches or by using your machine’s tie-off function if it has one.
- Lift the presser foot, remove the hoop, and trim threads.
Method 3: Applique Letters
This is a great way to add fabric letters using your machine to sew them down.
Step 1: Cut Letters
- Choose your fabric for the letters. You can find patterns for embroidery fonts for sewing machine online, or draw your own letters.
- Use paper-backed fusible web (like Heat’n Bond Lite). Trace your letter shapes backwards onto the paper side of the fusible web.
- Iron the fusible web onto the back of your letter fabric.
- Cut out the letters precisely along the traced lines.
Step 2: Place and Secure Letters
- Peel the paper backing off your cut-out letters.
- Place the fabric letters onto your background fabric where you want them.
- Iron the letters in place according to the fusible web instructions. This temporarily sticks them down.
- Place machine embroidery stabilizer under your background fabric. Hoop the fabric and stabilizer.
Step 3: Set Up Machine
- Install a sharp or embroidery needle.
- Thread with sewing machine embroidery thread. You can use thread that matches the letter fabric, the background fabric, or a contrast color.
- Set sewing machine tension for embroidery. Test tension.
- Keep feed dogs UP.
- Choose a stitch to sew around the edges. A tight zig-zag (satin stitch) is common and covers the raw edge of the applique fabric. You could also use a blanket stitch or other decorative stitch. Set stitch length and width based on your chosen stitch. For a satin stitch border, use a very short stitch length and a width that just covers the edge of the applique letter.
Step 4: Sew Around Letter Edges
- Starting on a straight edge if possible, lower the needle slightly inside the edge of the applique letter.
- Begin sewing slowly around the entire outline of each letter.
- Keep the stitch width consistent so the stitches fall evenly over the edge of the applique fabric.
- Go slowly around curves and corners. Stop with the needle down when you need to pivot.
- Overlap your starting stitches by about half an inch to secure the thread.
Step 5: Finish
- Lift the presser foot, remove the hoop, and trim threads closely.
Making It Look Good: Tips for Success
No matter which method you choose, these tips will help you get better results.
- Practice: Embroidery takes practice! Don’t expect perfection on your first try. Use scrap fabric to test your machine settings and practice your technique.
- Check Tension Often: Sewing machine tension for embroidery is critical. Test it before starting and occasionally while working on a large piece.
- Slow and Steady: Sew at a speed you can control. Going too fast often leads to mistakes, broken threads, and uneven stitches.
- Secure Threads: Start and end your stitching neatly. For free motion, you can leave long tails and tie them off by hand on the back. For satin or applique stitch, overlap stitches slightly or use a lock stitch function.
- Use a Hoop: For almost all machine embroidery on a regular machine, a hoop is essential. It keeps the fabric flat and prevents puckering.
- Good Lighting: Make sure you can clearly see your design and stitches.
Fixing Problems
Even with careful prep, you might run into issues.
- Loops on Top or Bottom: This is usually a tension problem. If loops are on the bottom (underneath), your top tension is likely too loose or bobbin tension too tight. If loops are on the top, your top tension is too tight or bobbin tension is too loose. Adjust your top tension dial first. Ensure your machine is threaded correctly and the bobbin is wound evenly. Make sure the sewing machine embroidery thread is right for the job.
- Fabric Puckering: This usually means you need more or stronger machine embroidery stabilizer. Or, the fabric wasn’t hooped tightly enough. For dense satin stitch, sometimes using wash-away stabilizer on top helps keep stitches smooth.
- Broken Threads: The thread might be low quality, too thick for the needle, the needle might be old or bent, or your tension is too tight. Re-thread your machine carefully. Change the needle. Check your tension settings.
- Uneven Stitches (Free Motion): This comes with practice. Try to move your fabric at a steady speed relative to your machine’s speed. Consistent speed gives consistent stitch length.
Finishing Your Embroidered Piece
Once the sewing is done, you have a few steps to make it look neat.
- Remove Stabilizer: Carefully remove the excess machine embroidery stabilizer. Tear-away is easy; just gently tear it away from the stitches. Cut-away needs to be trimmed with scissors about 1/4 inch away from the design. Wash-away dissolves in water (follow stabilizer instructions).
- Trim Threads: Use small, sharp scissors to trim any loose threads closely from the top and bottom of your work.
- Pressing: Place your embroidered piece face down on a soft towel. Press it gently with an iron according to your fabric’s needs. The towel helps protect the stitches.
Questions People Ask Often (FAQ)
Here are answers to common questions about embroidering letters with a sewing machine.
Q: Can I use regular sewing thread for embroidery?
A: You can, but it’s not ideal. Sewing machine embroidery thread is stronger, has a better sheen, and is designed for the higher speeds and density of embroidery stitches. Regular thread is more likely to break, shred, and won’t give you the same smooth look, especially with satin stitch.
Q: What kind of stabilizer should I use?
A: It depends on your fabric and the design. For stable fabrics and simple designs, tear-away machine embroidery stabilizer often works. For stretchy fabrics or dense designs like satin stitch, cut-away is usually better as it provides lasting support. Wash-away is good for delicate fabrics or on top of napped fabrics. Always test on a scrap if you are unsure.
Q: Is free motion embroidery hard to learn?
A: It takes practice to master controlling the fabric movement and stitch length, especially for free motion embroidery letters. Start with simple shapes and lines on scrap fabric. Don’t get discouraged if your first attempts aren’t perfect. It’s a skill that improves with time.
Q: Can I do simple sewing machine monogramming with these methods?
A: Yes! All the techniques described – free motion, satin stitch, and applique – are excellent ways to create simple or complex sewing machine monogramming. Satin stitch is popular for classic monograms, while free motion gives a more casual, handwritten initial.
Q: How do I choose embroidery fonts for sewing machine?
A: Think about the style of your project. For formal items, a script or classic block font works well. For fun items, more playful or quirky fonts are great. Consider the size – very small or very detailed fonts can be tricky to sew accurately, especially with satin stitch. Look for simple, clear shapes when you are starting. You can find many free or paid patterns for embroidery fonts for sewing machine online.
Embroidery with a regular sewing machine is a rewarding skill. It takes patience and practice, but the ability to add custom letters to your projects is well worth the effort. Start with simple designs, understand your machine settings (especially sewing machine tension for embroidery!), use the right supplies like machine embroidery stabilizer and sewing machine embroidery thread, and enjoy the process of creating something unique.