
Can you embroider using a regular sewing machine? Yes, absolutely! With the right techniques and a few key accessories, you can transform your everyday sewing machine into an embroidery powerhouse. This guide is designed for beginners looking to dive into the wonderful world of machine embroidery. We’ll cover everything you need to know to get started, from understanding the basic setup to creating your first embroidered masterpiece.
Embroidery opens up a whole new avenue for personalizing projects, adding unique touches to clothing, home decor, and gifts. While dedicated embroidery machines offer advanced features, a standard sewing machine can achieve beautiful results with a little know-how.
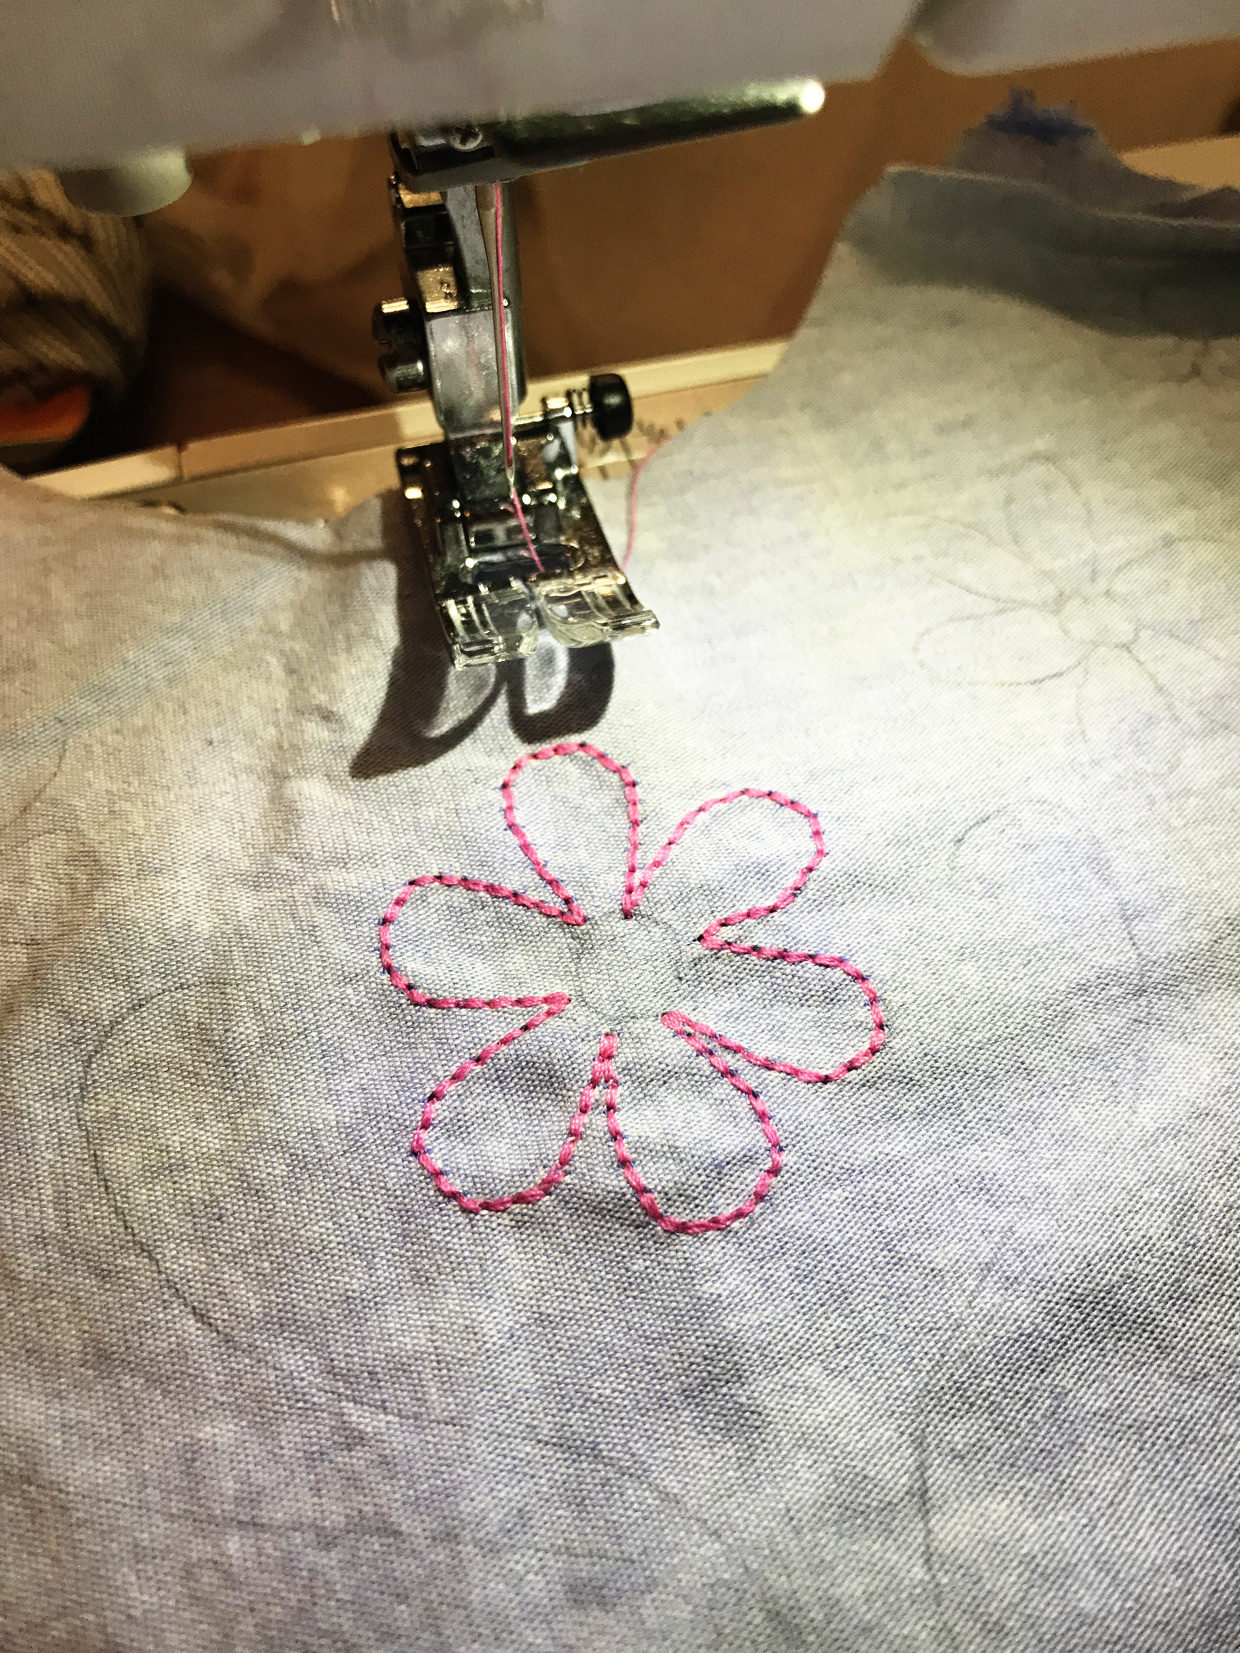
Image Source: oliverands.com
Getting Started: Essential Equipment for Sewing Machine Embroidery
To embark on your sewing machine embroidery journey, you’ll need a few specific items. Having the correct tools will make the process smoother and more enjoyable.
The Right Sewing Machine
While most modern sewing machines can be adapted for embroidery, some features are particularly helpful:
- Drop Feed Dogs: This is the most crucial feature. The feed dogs are the small metal teeth under the needle plate that move the fabric. For embroidery, you need to disengage these so the fabric doesn’t move automatically. Most machines have a lever or a switch to drop the feed dogs.
- Adjustable Stitch Length: While not strictly for embroidery, the ability to set your stitch length can be helpful for certain manual embroidery techniques.
- Clear Presser Foot: A clear presser foot gives you a better view of your stitching area, which is essential for precise control.
Embroidery Machine Needles
Using the correct needles is vital for smooth stitching and preventing skipped stitches or fabric damage.
Types of Embroidery Needles
- Sharps Needles: These are good general-purpose needles.
- Embroidery Needles: These are specifically designed for embroidery with a larger eye to accommodate thicker embroidery thread and a special scarf to reduce lint buildup and prevent skipped stitches. They often have a sharper point than a universal needle.
- Ballpoint Needles: These are used for knits to prevent snagging and running. While not primary for embroidery, they can be useful for certain fabric types.
Needle Sizes: Needles come in various sizes, typically ranging from 65/9 (very fine) to 90/14 (medium) and even larger. For embroidery, a size 75/11 or 80/12 is a good starting point for most projects.
Embroidery Machine Thread
The type of thread you use significantly impacts the look and feel of your embroidery.
Thread Materials
- Polyester Thread: This is the most popular choice for machine embroidery. It’s strong, durable, and comes in a vast array of colors. It’s also colorfast and holds up well to washing.
- Rayon Thread: Rayon offers a beautiful, lustrous sheen, similar to silk. It’s softer than polyester but less durable and can be prone to breaking if not handled carefully. It’s best for decorative items that won’t be washed frequently.
- Cotton Thread: Cotton thread is a good option for more subtle, matte finishes. It’s best suited for natural fabrics and less dense embroidery designs.
- Metallic Thread: Used for special effects, metallic threads add sparkle and glamour. They can be tricky to work with and often require a special metallic needle and slower machine speeds.
Thread Weight: Embroidery thread is typically thinner than standard sewing thread. Common weights are 40 wt (standard embroidery weight) and 30 wt (slightly thicker for bolder designs).
Embroidery Machine Hoops
Hoops are essential for holding your fabric taut, preventing it from puckering or shifting during stitching.
Hoop Types
- Internal Hoop (Inner Hoop): This is the smaller hoop that goes directly on top of the fabric.
- External Hoop (Outer Hoop): This larger hoop screws onto the inner hoop, sandwiching the fabric securely between them.
Embroidery Hoop Sizes: Hoops come in various sizes, from small circular hoops (e.g., 4×4 inches) to large rectangular hoops. The size of the hoop you use depends on the size of your embroidery design and the area you want to embroider. For beginner sewing machine embroidery, a standard 4×4 or 5×7 inch hoop is a good starting point.
Stabilizers: The Unsung Hero of Embroidery
Stabilizers are crucial for supporting your stitches and preventing fabric distortion. They are temporary fabrics that are removed after stitching.
Types of Stabilizers
- Cut-Away Stabilizer: This is a permanent stabilizer that is cut away from the back of the embroidery. It provides excellent support and is ideal for stable fabrics.
- Tear-Away Stabilizer: This stabilizer is designed to be torn away from the back of the embroidery. It’s good for lighter fabrics and designs with less dense stitching.
- Water-Soluble Stabilizer: This stabilizer dissolves in water. It’s often used as a topping to prevent stitches from sinking into napped fabrics (like velvet or terry cloth) or as a freestanding stabilizer for delicate lace-like designs.
- Fusible Stabilizer: This stabilizer has an adhesive backing and is ironed onto the fabric. It provides extra stability and can prevent shifting.
Choosing the Right Stabilizer: The choice of stabilizer depends on the fabric type, the density of the embroidery design, and the desired finish. For beginner sewing machine embroidery, a medium-weight tear-away or a lightweight cut-away stabilizer are good all-rounders.
Other Important Accessories
- Embroidery Needles Plate: Some machines have a special needle plate with a smaller hole to prevent the embroidery thread from getting caught or pulled through the plate.
- Embroidery Foot (Free-Motion Foot): This foot is designed to lift up and away from the fabric as you move the fabric, allowing for free-motion stitching. It usually has a spring mechanism.
- Appliqué Scissors: Small, sharp scissors are useful for trimming appliqué pieces or excess stabilizer.
- Thread Snips/Embroidery Scissors: These small, sharp scissors are perfect for snipping jump stitches and thread tails.
- Basting Spray or Temporary Adhesive: This can help secure the stabilizer to the fabric.
Setting Up Your Sewing Machine for Embroidery
The embroidery machine setup on a regular sewing machine involves a few key steps to prepare it for free-motion stitching.
Step 1: Prepare Your Sewing Machine
- Remove the Presser Foot: Lower the presser foot and then remove it from the presser foot holder.
- Install the Embroidery Foot (Free-Motion Foot): Attach the embroidery foot. Ensure it’s securely in place.
- Drop the Feed Dogs: Locate the lever or switch on your sewing machine that lowers the feed dogs. Consult your sewing machine manual if you’re unsure where this is. Once dropped, the feed dogs should no longer move the fabric.
- Set the Stitch Length (Optional but Recommended): If your machine allows, set the stitch length to zero or the lowest possible setting. This stops the machine from trying to move the fabric automatically.
- Thread Your Machine: Thread your machine with your chosen embroidery machine thread. Use a good quality embroidery thread in the top and a strong, matching bobbin thread.
Step 2: Prepare Your Fabric and Stabilizer
- Choose Your Fabric: Select an embroidery machine fabric. Stable woven fabrics like cotton, linen, and denim are excellent for beginners. Avoid very stretchy or slippery fabrics initially.
- Prepare the Stabilizer: Depending on your stabilizer type:
- Cut-Away/Tear-Away: Cut the stabilizer to be slightly larger than your embroidery design.
- Water-Soluble: Cut as needed for your design.
- Hoop Your Fabric and Stabilizer:
- Place your chosen fabric on a flat surface.
- Place the stabilizer on top of the fabric.
- Separate the inner and outer embroidery machine hoop pieces.
- Place the inner hoop with the fabric and stabilizer on top, centered where you want your design.
- Place the outer hoop over the inner hoop and fabric.
- Push down firmly on the outer hoop until it snaps into place. The fabric and stabilizer should be taut, like a drum. Ensure there are no wrinkles.
Step 3: Positioning Your Design
- Mark Placement: Before hooping, you might want to mark the center of your design on the fabric using a washable fabric marker or a small pin. This helps ensure accurate placement.
- Center Under the Needle: Place the hooped fabric under your embroidery foot and lower the foot. Position the needle directly over the center point of your design.
Mastering the Stitch: Techniques for Sewing Machine Embroidery
Once your machine is set up, it’s time to learn the stitching techniques. This is where the magic happens!
Free-Motion Stitching
This is the primary technique for creating designs with a regular sewing machine.
- Guide the Fabric: With the feed dogs dropped and the embroidery foot lowered, you will manually guide the fabric under the needle. Move the fabric slowly and deliberately in the direction of your design.
- Control Speed: Start with a slow to medium machine speed. As you gain confidence, you can gradually increase the speed.
- Follow the Pattern: Imagine the needle is a pen and you are drawing with it. Guide the fabric to create lines, curves, and fills for your embroidery machine patterns.
Stitch Types and Their Uses
While you won’t have the vast array of sewing machine embroidery stitches found on dedicated machines, you can achieve a lot with basic stitches and creative maneuvering.
- Running Stitch: This is a simple stitch that creates a dashed line. It’s great for outlining or creating fine details.
- Backstitch: This stitch creates a solid line, similar to hand embroidery. It’s excellent for outlines and lettering. You’ll achieve this by stitching forward, then reversing a stitch or two.
- Satin Stitch: This is used to fill areas with dense, parallel stitches, creating a smooth, solid look. To create a satin stitch, you’ll stitch back and forth closely together over an area.
- Fill Stitches: You can create various fill effects by stitching back and forth in a pattern, similar to satin stitch but potentially with more spacing or different directions.
Working with Embroidery Machine Patterns
Embroidery machine patterns can be found online or in specialized books. For beginner sewing machine embroidery, look for simpler designs with fewer color changes and less dense stitching.
Transferring Designs (for Computerized Patterns)
If you’re using digital patterns that come with instructions for a dedicated embroidery machine, you might need to adapt them.
- Printed Patterns: Some patterns are provided as printable templates. You can print these onto paper or stabilizer and then transfer them to your fabric.
- Printable Sticky Stabilizer: Print the design onto a special adhesive stabilizer, then stick it to your fabric.
- Lightweight Paper Patterns: Print onto lightweight paper, trace onto your fabric with a fabric marker, or use the paper itself as a guide for placement and then remove it.
- Freehand or Simple Stencils: For very basic designs, you can draw directly onto the fabric with a fabric marker or use stencils.
Manual Stitching of Patterns
When using your sewing machine, you’ll be manually creating the stitches for your chosen patterns.
- Outline: Stitch the outlines of your design first using a running stitch or backstitch.
- Fill Areas: Fill in larger areas with satin stitch or other fill stitch techniques. Move the fabric slowly and consistently to create even rows of stitches.
- Color Changes: If your pattern has multiple colors, change your top embroidery machine thread accordingly.
Working with Different Embroidery Machine Fabric Types
The success of your embroidery often depends on the fabric you choose. Different fabrics require different stabilizers and techniques.
Stable Woven Fabrics (Cotton, Linen, Denim)
- Best For: Beginners.
- Stabilizer: Medium-weight tear-away or lightweight cut-away stabilizer.
- Technique: These fabrics are forgiving and easy to control under the needle.
Knits (T-shirt Jersey, Sweatshirt Fleece)
- Best For: Slightly more experienced users.
- Stabilizer: A medium-weight cut-away stabilizer is usually best to prevent stretching and distortion. A water-soluble stabilizer can also be used as a topping.
- Technique: Move the fabric very gently to avoid stretching. Consider using a jersey needle on your sewing machine.
Napped Fabrics (Velvet, Terry Cloth, Fleece)
- Best For: Advanced users or when using a topping.
- Stabilizer: A water-soluble stabilizer as a topping is essential to keep the stitches on the surface of the nap and prevent them from sinking in. A cut-away stabilizer might also be needed on the back.
- Technique: Go slowly and be mindful of the pile.
Silks and Delicate Fabrics
- Best For: Advanced users.
- Stabilizer: Very lightweight water-soluble stabilizer or a very fine tear-away.
- Technique: Use a fine embroidery needle (e.g., 65/9) and go very slowly. Consider using a silk thread.
Advanced Techniques and Tips for Sewing Machine Embroidery
As you gain confidence, you can explore more advanced techniques and tips to enhance your embroidery.
Digitizing for Sewing Machines
Digitizing for sewing machines refers to the process of creating or converting embroidery designs into a format that an embroidery machine can read (like .DST, .PES, .JEF files). For regular sewing machines, you don’t typically digitize in the same way. Instead, you’ll be manually creating designs or using pre-made patterns that you can trace or follow.
However, there are software programs that allow you to create or modify embroidery designs that you can then print as templates for manual stitching. Think of it as preparing a blueprint for your hand-guided embroidery.
Creating Your Own Embroidery Machine Patterns
- Sketching: Draw your designs on paper.
- Tracing: Use existing images or clip art and trace them onto tracing paper or a printable stabilizer.
- Simple Shapes: Combine basic shapes like circles, squares, and lines to create simple motifs.
Layering Stabilizers
For very dense designs or challenging fabrics, you might need to layer stabilizers. For example, a layer of cut-away stabilizer on the back and a layer of water-soluble stabilizer on top can provide maximum support.
Backing Bobbin Thread
Ensure your bobbin thread is strong and clean. A good quality bobbin thread will prevent thread breaks and ensure a neat finish on the back of your embroidery.
Trim Jump Stitches
As you guide the fabric, you’ll inevitably create “jump stitches” where the needle moves between different parts of the design without stitching. Use your small embroidery scissors to trim these jump stitches as you go or after the design is complete for a cleaner look.
Practice Makes Perfect
- Test Designs: Before working on your final project, test your designs and techniques on scrap fabric with the same stabilizer. This helps you get a feel for the machine’s responsiveness and how the stitches will look.
- Consistency: Aim for consistent speed and pressure when guiding the fabric. This will result in smoother lines and fills.
Troubleshooting Common Embroidery Issues
Even with careful preparation, you might encounter a few hiccups. Here are some common problems and their solutions:
| Issue | Cause | Solution |
|---|---|---|
| Skipped Stitches | Dull or incorrect needle; Thread too thick; Lint in the machine. | Change to a new, sharp embroidery needle of the correct size. Ensure thread is suitable. Clean lint from the bobbin case and feed dogs. |
| Thread Breaking | Dull or bent needle; Thread catching on something; Tension too tight. | Change needle. Ensure thread is smooth and not snagged. Check and adjust upper and bobbin tension. |
| Fabric Puckering | Stabilizer too light; Hooping not tight enough; Too much tension. | Use a heavier or an additional layer of stabilizer. Re-hoop to ensure fabric is taut. Reduce upper thread tension if possible. |
| Needle Breaking | Hitting the hoop; Fabric too thick; Moving fabric too quickly. | Ensure hoop is properly aligned. Use a stronger needle or slow down. Avoid stitching over thick seams or hardware. |
| Uneven Stitches | Inconsistent fabric movement; Incorrect tension. | Guide the fabric smoothly and at a consistent speed. Check and adjust bobbin and upper thread tension. |
Elevating Your Embroidery with Other Embroidery Machine Accessories
While the core setup is key, having a few extra embroidery machine accessories can make the process even more efficient and enjoyable.
- Extension Table: For larger projects, an extension table can provide a larger, more stable sewing surface, making it easier to manage your hooped fabric.
- Light Attachments: Good lighting is essential for seeing your stitches clearly. Consider a specialized sewing machine light if your current lighting is inadequate.
- Seam Ripper: Indispensable for carefully removing any stitches that don’t look right.
- Tweezers: Useful for pulling up bobbin thread or removing small thread tails.
Frequently Asked Questions (FAQ)
Q1: Can I embroider with a sewing machine that doesn’t have a drop-feed feature?
While it’s much harder, some machines have a cover that can be placed over the feed dogs. If your machine doesn’t have either, you might be able to manually cover the feed dogs with painter’s tape or a small piece of cardboard, but this can be tricky and may not provide the best results. It’s best to check your manual or consult the manufacturer.
Q2: What is the best embroidery thread for beginners using a sewing machine?
Polyester thread is generally the best choice for beginners. It’s strong, reliable, and comes in a wide range of colors. Start with 40 wt polyester thread.
Q3: How do I know if my fabric is hooped correctly?
Your fabric should be taut in the hoop, like the skin of a drum. There should be no wrinkles or looseness. If you tap the fabric, it should have a slight resistance.
Q4: How do I keep my embroidery looking neat on the back?
Using a good quality bobbin thread, a suitable stabilizer, and ensuring your machine is well-maintained (clean lint, correct needle) will contribute to a neat back. Trimming jump stitches is also crucial.
Q5: Can I embroider lettering with a sewing machine?
Yes, you can! Many basic sewing machines have built-in lettering stitches. For more control and variety, you’ll need to use the free-motion technique and guide the fabric precisely to create letters. Look for simple fonts in your embroidery machine patterns.
Q6: What is digitizing for sewing machines?
Digitizing for sewing machines is the process of creating or converting embroidery designs into digital files that embroidery machines can read. For regular sewing machines, you won’t be digitizing in the same sense, but you might use software to prepare printable templates for your manual stitching.
Q7: What are the most important embroidery machine accessories for a beginner?
The most crucial accessories are the right embroidery machine needles, embroidery machine thread, a good embroidery machine hoop, and appropriate stabilizers. An embroidery foot (or free-motion foot) is also essential.
Q8: What is the difference between sewing machine embroidery stitches and dedicated embroidery machine stitches?
Dedicated embroidery machines have a vast library of built-in sewing machine embroidery stitches and can automatically execute complex patterns, color changes, and stitch types. With a regular sewing machine, you create these effects manually by guiding the fabric, often using basic stitches like running stitch and satin stitch.
Conclusion
Embarking on beginner sewing machine embroidery is an exciting venture that allows you to add a personal touch to your creations. By gathering the right equipment, mastering the embroidery machine setup, and practicing the techniques, you can achieve beautiful and intricate designs. Remember to experiment with different embroidery machine fabrics, stabilizers, and threads as you grow more comfortable. With a little patience and creativity, your sewing machine can become a versatile tool for bringing your embroidered visions to life. Happy stitching!