
Yes, you can embroider a name onto fabric! Whether you want to add a personal touch to a baby blanket, create unique gifts, or simply enjoy a relaxing craft, embroidering a name is a wonderful skill to learn. This guide will walk you through everything you need to know, from choosing your materials to finishing your project. We’ll cover both hand embroidery names and briefly touch upon machine embroidery names, focusing on the fundamental techniques that apply to both. Get ready to create beautiful personalized embroidery!
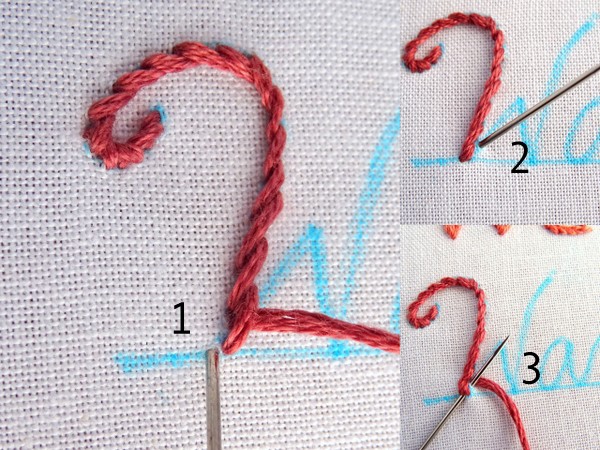
Image Source: www.wanderingthreadsembroidery.com
Getting Started: What You’ll Need
Embroidery can seem intimidating with all the different tools and supplies available, but for embroidering a name, you don’t need much. Here’s a breakdown of the essentials:
Fabric Selection
The type of fabric you choose can greatly impact the final look of your stitch name embroidery. For beginners, it’s best to start with fabrics that are easy to work with and don’t fray too much.
- Cotton: A fantastic all-around choice. Quilting cotton, broadcloth, or even an old cotton t-shirt work well. They are stable, easy to stitch through, and widely available.
- Linen: Offers a beautiful texture, but can be a bit more challenging due to its weave. If you’re using linen, opt for a medium-weight one.
- Embroidery Hoop Fabric: Some fabrics are specifically designed for embroidery hoops, offering a nice even weave.
- Avoid: Very stretchy fabrics like knits (unless you use a stabilizer), very thin or slippery fabrics like silk, or very thick fabrics like denim, which can be difficult for hand stitching.
Embroidery Thread
The thread is what brings your embroidery alphabet to life!
- Embroidery Floss: This is the most common type of thread for hand embroidery. It’s made of six strands that can be separated. For most name embroidery, using 2-3 strands is ideal for a balanced stitch.
- Colors: Think about the contrast between your thread and fabric. A darker thread on a light fabric, or vice versa, will make the name stand out. Having a few basic colors like black, white, navy, and red is a great start.
- Specialty Threads: As you progress, you might explore metallic threads, variegated threads (which change color along the length), or silk threads for different effects.
Needles
The right needle makes a big difference.
- Embroidery Needles: These have a longer eye to accommodate embroidery floss easily and a sharp point to pierce fabric.
- Size: A size 7 or 8 embroidery needle is generally good for most cotton fabrics and 2-3 strands of floss.
Embroidery Hoop
An embroidery hoop is crucial for keeping your fabric taut while you stitch, ensuring even stitches and preventing puckering.
- Wooden Hoops: Traditional and popular. They offer a good grip and are durable.
- Plastic Hoops: Lighter and often less expensive. They can sometimes be more slippery than wood.
- Sizes: Hoops come in various diameters. For a single name, a 4-inch or 6-inch hoop is usually sufficient. Make sure your design fits within the hoop.
Transferring the Name
You need a way to get the name from your mind (or a computer) onto your fabric.
- Water-Soluble Pen/Marker: These disappear with water or heat, making them ideal for temporary markings.
- Air-Erasable Pen: These pens fade on their own after a few hours or days.
- Transfer Paper: You can trace the name onto special transfer paper and then iron it onto the fabric.
- Tracing with a Pencil: For light fabrics, you can sometimes trace the name directly onto the fabric by placing it over a printed design and lightly tracing with a pencil. Be careful not to press too hard.
- Stencils: Pre-made stencils of letters are available if you don’t want to freehand.
Other Useful Tools
- Scissors: Sharp fabric scissors for cutting thread and fabric.
- Thimble: Protects your finger when pushing the needle through the fabric, especially useful for thicker materials.
- Seam Ripper: For correcting any mistakes (we all make them!).
Designing Your Personalized Embroidery
Before you start stitching, you need to decide on the font and size of the name.
Choosing an Embroidery Alphabet
The font you choose will set the tone for your custom name embroidery.
- Script Fonts: Elegant and flowing, but can be trickier to stitch precisely for beginners.
- Block Fonts: Simple, bold letters that are very forgiving for new embroiderers.
- Sans-serif Fonts: Clean and modern.
Tip: Search online for “free embroidery fonts” or “free printable fonts” to find inspiration. You can print out your desired name in various fonts and sizes to see what looks best.
Sizing and Placement
Consider where you want the name to appear on the item.
- Centering: For items like a pocket or a bib, centering the name often looks best.
- Placement: On a baby blanket, you might want the name in a corner or along an edge.
- Size: Make sure the name is not too large or too small for the item. Hold it up to the fabric to get a sense of scale.
Hand Embroidery Names: Step-by-Step
This section will focus on the most popular stitches for embroidering names by hand.
Preparing Your Fabric and Hoop
- Wash and Iron: If your fabric is new, wash and iron it to pre-shrink it and remove any creases.
- Trace the Name: Using your chosen transfer method, carefully trace the name onto your fabric in the desired location.
- Secure the Fabric: Place the inner hoop ring on a flat surface. Lay your fabric over it, centering the design. Place the outer hoop ring over the fabric and press down firmly. Tighten the screw on the outer hoop. Gently pull the fabric edges to ensure it’s taut like a drum. Trim any excess fabric from the hoop area if it gets in your way, leaving about an inch.
Threading Your Needle
- Separate Floss: Pull out the desired number of strands of embroidery floss from the skein (usually 2-3 for names).
- Thread the Needle: Gently guide the separated strands through the eye of your embroidery needle.
- Tie a Knot (Optional but Recommended for Beginners):
- Hold the ends of the floss together.
- Wrap the floss around the index finger of your non-dominant hand a couple of times.
- Roll the loops off your finger with your thumb and forefinger, creating a knot. Pull the tail of the floss to secure it.
- Alternatively, you can make a small knot at the very end of the floss.
Stitching the Name
Here are the stitches best suited for embroidery lettering:
Backstitch
This is the workhorse stitch for creating clean, solid lines, perfect for outlining letters or creating a solid fill. It looks similar to machine stitching.
How to do it:
- Start by bringing your needle up through the fabric from the back to the front at the beginning of your line.
- Make a small stitch forward, bringing the needle down through the fabric.
- Bring the needle up again through the fabric at the end of your first stitch (where the thread just went down).
- Make another stitch backward, bringing the needle down through the fabric at the beginning of your first stitch.
- Continue this pattern: up at the end of the last stitch, down at the beginning of the last stitch.
Table: Backstitch Application for Names
| Letter Part | Best Stitching Method | Why it Works |
|---|---|---|
| Letter Outlines | Backstitch | Creates a clean, solid line that defines letters. |
| Small Details | Backstitch | Good for sharp corners and intricate shapes. |
Stem Stitch
This stitch creates a slightly heavier, rope-like line, adding a bit more texture than the backstitch. It’s excellent for graceful curves.
How to do it:
- Bring your needle up through the fabric at the start of your line.
- Take a small stitch forward, bringing the needle down through the fabric.
- Before pulling the thread all the way through, bring the needle up just below where you are about to go down, keeping the working thread under the needle. This creates the characteristic twist.
- Pull the thread through, creating a slightly twisted stitch.
- Continue by taking a small stitch forward, bringing the needle down, and then bringing the needle up just below your next stitch point, keeping the thread under the needle.
Satin Stitch
For filling in letters to make them look solid and bold, satin stitch is your best friend.
How to do it:
- Outline the area you want to fill with a backstitch or another outlining stitch first. This helps keep your satin stitches neat.
- Bring your needle up from the back at one edge of the area to be filled.
- Take a small stitch across the width of the area, bringing the needle down on the opposite edge.
- Bring the needle back up right next to where your first stitch came up.
- Take another stitch across to the opposite edge, right next to where the previous stitch went down.
- Continue filling the area with parallel stitches, keeping them close together so there are no gaps.
Table: Stitch Choice for Different Letter Styles
| Font Style | Recommended Stitches | Notes |
|---|---|---|
| Block/Bold | Backstitch, Satin Stitch | Backstitch for outlines, Satin Stitch for filling for a solid look. |
| Cursive/Script | Stem Stitch, Backstitch | Stem stitch offers a nice flow for curves. Backstitch for thinner lines. |
| Monograms | Combination of stitches | Often uses satin stitch for initials and backstitch for surrounding details. |
| Decorative | French Knots, Lazy Daisy | Can be used for accents or embellishments around a name. |
French Knots
While not for stitching the letters themselves, French knots are lovely for adding small decorative dots or embellishments to your personalized embroidery.
How to do it:
- Bring your needle up through the fabric at the point where you want the knot.
- Wrap the working thread around the needle two times, keeping the thread taut.
- Bring the needle back down through the fabric very close to where it came up, keeping the thread around the needle taut.
- Hold the tail of the thread gently with your other hand as you pull the needle through. This helps form a neat knot.
Finishing Your Stitch Name Embroidery
- Securing the Thread: Once you’ve finished stitching a section or the entire name, bring your needle to the back of the fabric. Make a few small stitches in place, going over the thread you just used, to secure it.
- Trim the Thread: Cut the thread close to the fabric.
- Remove the Hoop: Loosen the screw on the outer hoop and lift it off the fabric.
- Pressing: If you used a water-soluble pen, lightly dab the fabric with a damp cloth to remove any markings. Iron your embroidery from the back on a soft surface (like a towel) to protect the stitches.
Machine Embroidery Names
While this guide primarily focuses on hand embroidery, it’s worth noting that machine embroidery names are also very popular.
- How it Works: Machine embroidery uses a computerized embroidery machine that follows a digital pattern to stitch designs. You select an embroidery alphabet from the machine’s built-in fonts or download designs.
- Stabilizers: Machine embroidery often requires stabilizers (like tear-away or water-soluble) to support the fabric and prevent stretching or distortion from the needle’s rapid movement.
- Hooping: Similar to hand embroidery, the fabric is secured in a machine hoop, often with stabilizer.
- Benefits: Machine embroidery is significantly faster than hand embroidery and can create very precise and intricate designs. It’s ideal for custom name embroidery on a larger scale or for consistent results across multiple items.
- Considerations: Requires an investment in a machine and learning its software or compatible design programs.
For anyone looking to do a lot of custom name embroidery or add monogram embroidery to many items, investing in a machine embroidery setup can be very rewarding.
Tips for Perfect Thread Embroidery Names
Creating beautiful thread embroidery names is all about practice and attention to detail. Here are some extra tips:
Consistency is Key
- Stitch Length: Try to keep your stitches the same length, especially when using the backstitch, for a smooth, even line.
- Tension: Maintain consistent tension on your floss. Too loose and the stitches will be floppy; too tight and they can pucker the fabric.
Managing Your Thread
- Thread Length: Use a manageable length of floss (about 18-24 inches). Longer threads can tangle and knot easily.
- Untangling: If your thread gets twisted, let the needle hang and the thread will often untwist itself.
Working with Different Fabrics
- Stretchy Fabrics: For t-shirts or other knits, use an iron-on or tear-away stabilizer on the back of the fabric to provide support.
- Dark Fabrics: Use a light-colored water-soluble pen or transfer paper. For very dark fabrics, consider using a metallic thread or a bright colored thread for better visibility.
Monogram Embroidery Ideas
Monograms, often featuring the first, middle, and last initials, are a classic form of personalized embroidery.
- Traditional Monogram: Typically, the first initial is on the left, the last initial is larger in the center, and the middle initial is on the right.
- Modern Monograms: You can play with different arrangements, like all initials in a row or a single initial.
- Stitches: Often, the center initial is done in satin stitch for prominence, with the flanking initials in backstitch or chain stitch.
DIY Name Embroidery Projects
The possibilities for DIY name embroidery are endless!
- Baby Items: Bibs, onesies, burp cloths, blankets.
- Clothing: T-shirts, jackets, tote bags, hats.
- Home Decor: Napkins, tea towels, pillowcases, quilt squares.
- Gifts: Personalized handkerchiefs, makeup bags, bookmarks.
Table: Common Embroidery Projects for Names
| Project Type | Ideal For | Stitch Recommendations |
|---|---|---|
| Baby Blanket | Birthdays, christenings, new arrivals | Backstitch for clean lines, satin stitch for filling |
| T-Shirt | Personal style, team spirit, event souvenirs | Backstitch for outlines, satin stitch for bold letters |
| Tote Bag | Everyday use, unique gifts | Backstitch, chain stitch for varied textures |
| Handkerchief | Traditional gift, personal accessory | Delicate backstitch, or ornate monogram stitches |
| Tea Towel | Kitchen decor, housewarming gifts | Simple backstitch, or satin stitch for a classic look |
Frequently Asked Questions (FAQ)
Q1: What are the best stitches for embroidering a name by hand?
A1: The backstitch is excellent for creating clear, defined lines, making it ideal for outlining letters. The stem stitch provides a beautiful, slightly textured line, perfect for curves. For filling letters to be solid and bold, the satin stitch is the best choice.
Q2: Can I embroider a name on any fabric?
A2: While you can embroider on most fabrics, some are easier than others. Cotton, linen, and tightly woven fabrics are generally best for beginners. Very stretchy, slippery, or thick fabrics can be more challenging and may require stabilizers.
Q3: How many strands of embroidery floss should I use for a name?
A3: For most hand embroidery of names, using 2-3 strands of embroidery floss is recommended. This provides a good balance of thickness and detail without being too bulky or too fine.
Q4: How do I keep my stitches even?
A4: Consistency is key! Try to make your stitches the same length, especially with the backstitch. Practicing on a scrap piece of fabric first can help you get a feel for stitch length and tension. Using a hoop to keep the fabric taut also helps create even stitches.
Q5: What if I make a mistake?
A5: Don’t worry! Embroidery is forgiving. Gently use a seam ripper to unpick any stitches you don’t like. Then, simply re-stitch the area.
Q6: How do I transfer a name onto fabric for embroidery?
A6: You can use several methods, including water-soluble pens, air-erasable pens, transfer paper (which you iron onto the fabric), or even tracing with a light pencil on some fabrics. Choose a method that suits your fabric and your comfort level.
Q7: Can I embroider a name on a machine?
A7: Yes, absolutely! Machine embroidery is a popular way to add names and monograms. It uses computerized embroidery machines to stitch designs from digital files, offering speed and precision.
Embarking on your embroidery lettering journey to stitch a name is a rewarding experience. With a little practice and patience, you’ll be creating beautiful, personalized embroidery pieces in no time. Enjoy the process and the satisfaction of bringing your custom name embroidery designs to life!