
Embroidery is a fun craft. Many ask, “What is embroidery?” It is simply drawing with a needle and thread on fabric. “Can I learn it easily?” Yes, you can! Many people start with basic steps and make beautiful art. “Who can do it?” Anyone can learn to embroider. It is a relaxing hobby. This guide will show you how to start. You will find it easy to pick up this skill.
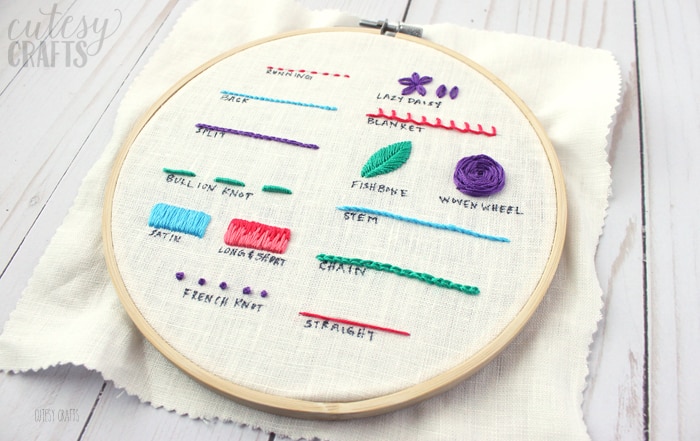
Image Source: cutesycrafts.com
Grasping the Basics: What is Embroidery?
Embroidery means decorating fabric. You use a needle and colorful threads. People have done this for a long time. They make pretty pictures. They add designs to clothes. It is a creative way to express yourself. Each stitch adds to the beauty. You can make gifts. You can decorate your home. It is a calm and mindful hobby. You focus on each stitch. This can ease your mind. It is a good break from busy days.
Getting Started: Your Essential Supplies
You need a few things to begin. Do not worry. The embroidery supplies list is short. Most items are easy to find. You can buy them at craft stores. Some stores sell them online. Having the right tools helps a lot. They make learning easier.
Essential Embroidery Tools:
- Embroidery Floss: This is your “paint.” It is made of six thin strands. You can use them together. Or you can split them. Many colors are available. Choose colors you love.
- Embroidery Needles: These needles have a larger eye. The eye is where you put the thread. This makes threading easier. Choose a sharp needle. It will go through fabric smoothly.
- Fabric: This is your “canvas.” It holds your stitches. We will talk more about fabric soon.
- Embroidery Hoop: This tool holds your fabric tight. It makes stitching much simpler. Your stitches will look neat.
- Small Scissors: You need sharp scissors. They cut thread cleanly. Tiny craft scissors work best.
- Thimble (Optional): This small cap protects your finger. You wear it on your pushing finger. It can help push the needle.
Purchasing an Embroidery Starter Kit
Many beginners ask about kits. An embroidery starter kit is a great choice. These kits have most things you need. They save you time. You do not have to buy each item.
What a Starter Kit Often Includes:
- Fabric with a pre-printed design.
- All the thread colors you need.
- A needle or two.
- An embroidery hoop.
- Basic instructions.
Pros of Using a Starter Kit:
- Easy Start: Everything is ready for you.
- Cost-Effective: Often cheaper than buying parts separately.
- Guided Project: You get a pattern to follow. This builds your skills.
- No Guesswork: You do not have to pick colors or fabric.
Cons of Using a Starter Kit:
- Less Choice: You might not love the design.
- Quality Varies: Some kits have lower quality items.
For your very first project, a good kit is highly recommended. It lets you try embroidery quickly. You can then buy single items later. You will know what you like.
Choosing Your Canvas: Fabric Selection
The fabric is important. It is the base for your design. For beginners, some fabrics are better. This is the best fabric for beginner embroidery. You want fabric that is easy to work with.
Key Features of Good Beginner Fabric:
- Not too stretchy: Stretchy fabric can make stitches look uneven.
- Not too thin: Thin fabric can show your thread ends.
- Not too thick: Thick fabric is hard to push a needle through.
- Even weave: This means the threads of the fabric cross evenly. It helps make straight stitches.
Recommended Fabrics for Beginners:
- Cotton: This is a top choice. It is affordable. It is easy to find. Cotton holds its shape well. It is easy to stitch through. Examples include plain quilting cotton.
- Linen: Linen is also good. It has a nice texture. It can be a bit pricier. Look for medium-weight linen.
- Muslin: This is a plain, unbleached cotton fabric. It is cheap. It is great for practice. You can try new stitches on it.
- Aida Cloth (for cross-stitch, but good for learning counts): While mainly for cross-stitch, Aida cloth has clear holes. It helps you see where to put your needle. This can be helpful for learning stitch spacing.
Fabric Size: Start with a piece about 10×10 inches. This gives you room to move. It is big enough for a small project. You can cut it smaller later.
Setting Up Your Tools: Hoop and Needle
You have your supplies. Now, let’s set them up. Proper setup makes a big difference. It helps your stitches look neat.
Mastering Embroidery Hoop Usage
An embroidery hoop usage guide is key. The hoop holds your fabric tight like a drum. This stops the fabric from puckering. It also makes it easier to push the needle.
Steps for Using an Embroidery Hoop:
- Separate the Hoops: An embroidery hoop has two parts. There is an outer hoop with a screw. There is an inner hoop without a screw. Unscrew the outer hoop until it is loose.
- Place Inner Hoop: Put the inner hoop on a flat surface.
- Lay Fabric Over Inner Hoop: Place your fabric flat over the inner hoop. Make sure the area you want to stitch is in the middle.
- Press Outer Hoop Down: Take the outer hoop. Place it over the fabric and the inner hoop. Press down firmly. The fabric should be tucked between the two hoops.
- Tighten the Screw: Pull your fabric gently. Make sure it is taut. It should feel like a drum. Then, tighten the screw on the outer hoop. Make it very tight.
- Check Tension: Tap the fabric. It should make a little drum sound. If it is loose, pull the fabric edges again. Tighten the screw more.
Tip: Do not leave your fabric in the hoop for too long. Over time, the hoop can leave marks. Take it out when you are done for the day.
Deciphering How to Thread an Embroidery Needle
How to thread an embroidery needle is a basic skill. It might seem tricky at first. But with practice, it gets easy. Embroidery floss has six strands. You will often use fewer. For beginners, using two or three strands is common. This makes a nice thickness.
Steps for Threading Your Needle:
- Cut Your Floss: Cut a piece of floss about 18-24 inches long. Longer pieces tangle more easily.
- Separate Strands (Optional): If your pattern asks for fewer than six strands, separate them. Hold the floss by one end. Gently pull one strand out from the bunch. The other strands will gather. Just let them go. They will straighten out.
- Wet the End: Lick the end of the floss. Or dampen it with water. This makes the strands stick together. It creates a firm point.
- Flatten the End: Pinch the wet end of the floss flat between your thumb and forefinger. Make it as thin as possible.
- Push Through Needle Eye: Push the flattened end through the eye of the needle. The eye is the hole. It helps to hold the needle still. Bring the floss to your eye. Push the floss through.
- Pull Through: Once a small loop pokes through, pull the thread all the way. Pull about 4-6 inches through.
How to Tie a Knot:
After threading, you need a knot at the end of your thread. This stops the thread from pulling out.
- Lay Thread Over Finger: Take the long end of the thread. Lay it over your index finger.
- Wrap Around Finger: Wrap the thread around your finger once or twice.
- Roll and Pinch: Roll the thread down your finger with your thumb. Pinch the rolled thread tightly.
- Pull Through Loop: Pull the needle through the loop you just made. Keep pinching the knot.
- Tighten: Pull the thread firmly until a neat knot forms at the end.
This is a common “quilter’s knot.” It is simple and secure.
Your First Threads: Basic Embroidery Stitches
Now for the fun part: stitching! There are many hand embroidery techniques. But you only need a few basic embroidery stitches to start. Master these, and you can make many designs.
Here are a few easy ones:
1. Running Stitch
The running stitch is the simplest. It looks like a dashed line.
-
How to Do It:
- Bring your needle up from the back of the fabric (Point 1).
- Go down into the fabric a short distance away (Point 2).
- Come up a short distance away (Point 3).
- Go down again (Point 4).
- Repeat. You can do several stitches on the needle at once.
-
Uses: Outlines, filling large areas, creating dashed lines.
2. Back Stitch
The back stitch makes a solid, unbroken line. It is great for outlines.
-
How to Do It:
- Bring your needle up from the back (Point 1).
- Go down a short distance away (Point 2).
- Bring your needle up again, leaving a gap from Point 2 (Point 3).
- Now, go back down into Point 2.
- Bring your needle up again, leaving a gap from Point 3 (Point 4). Go back down into Point 3.
- Repeat. You are always going “back” to the previous stitch end.
-
Uses: Outlines, text, creating sharp lines.
3. Stem Stitch
The stem stitch makes a ropelike line. It is good for stems of flowers.
-
How to Do It:
- Bring your needle up (Point 1).
- Go down a short distance away (Point 2).
- Bring your needle up again halfway between Point 1 and Point 2. Keep the working thread below the needle.
- For the next stitch, go down a short distance from Point 2. Come up halfway between that point and the new down point. Again, keep the working thread below the needle.
- Repeat.
-
Uses: Stems, curly lines, filling shapes.
4. Satin Stitch
The satin stitch creates a smooth, solid filled area. It looks like satin fabric.
-
How to Do It:
- Draw the shape you want to fill.
- Bring your needle up on one side of the shape (Point 1).
- Go down on the opposite side of the shape (Point 2).
- Bring your needle up very close to Point 1. Do not overlap.
- Go down very close to Point 2.
- Keep stitches close and parallel.
-
Uses: Filling shapes, making shiny areas.
5. French Knot
French knots make small raised dots. They add texture.
-
How to Do It:
- Bring your needle up (Point 1).
- Hold the working thread taut with your non-stitching hand.
- Wrap the thread around the needle 1, 2, or 3 times. More wraps make a bigger knot.
- Insert the needle back into the fabric very close to Point 1. Do not use the exact same hole.
- Keep the wrapped thread taut. Pull the needle and thread through.
- A small knot will form.
-
Uses: Eyes, berries, small flowers, texture.
6. Lazy Daisy (Detached Chain Stitch)
This stitch makes a single petal or leaf shape.
-
How to Do It:
- Bring your needle up (Point 1).
- Make a loop with the working thread. Hold it with your thumb.
- Go back down into Point 1.
- Bring your needle up a little distance away, inside the loop you made (Point 2).
- Pull the needle through. A loop will form.
- Take the needle over the top of the loop. Go down just outside the loop (Point 3). This creates a small “holding stitch” that holds the loop in place.
-
Uses: Petals, leaves, decorative elements.
Finding Your Path: Easy Embroidery Patterns
Once you know some stitches, you need something to stitch on. Easy embroidery patterns are key for beginners. They guide your needle. They help you create a finished piece.
Ways to Get Patterns:
- Free Online Patterns: Many blogs and websites offer free patterns. Search for “free beginner embroidery patterns.”
- Embroidery Books/Magazines: These often have many patterns. They also give tips.
- Pre-printed Fabric Kits: As mentioned, many starter kits come with a design printed on fabric.
- Drawing Your Own: You can draw a simple design. Think of basic shapes. Simple words work well too.
- Tracing: Find a simple picture. You can trace it onto your fabric.
Transferring Patterns to Fabric:
You need to get the pattern onto your fabric. Here are simple ways:
- Light Box/Window Method:
- Tape your pattern to a window. Or use a light box.
- Tape your fabric over the pattern.
- Use a heat-erasable pen or water-soluble pen to trace the lines. These pens disappear later.
- Water-Soluble Stabilizer:
- Print your pattern onto a special paper. This paper dissolves in water.
- Stick the paper onto your fabric.
- Stitch right over the paper.
- When done, wash the fabric. The paper goes away.
- Carbon Paper:
- Place carbon paper (designed for fabric) onto your fabric.
- Put your pattern on top.
- Trace the lines firmly with a pen. The design transfers to the fabric.
Choose a method that is easy for you. For small, simple designs, a window and a washable pen are perfect.
Embarking on Your Journey: Simple Embroidery Projects
You have your skills and a pattern. Now it is time for simple embroidery projects. Starting with small, quick projects is best. This builds your confidence. You see results fast.
Project Ideas for Beginners:
- Embroidered Coaster:
- Cut two fabric squares. About 6×6 inches.
- Draw a simple shape on one square. A heart, star, or a single letter.
- Embroider the shape using back stitch or running stitch.
- Place the second square behind the first. Stitch them together around the edges. Leave a small gap. Turn it right side out. Stitch the gap closed.
- Simple Tote Bag Decoration:
- Buy a plain canvas tote bag.
- Draw a small design on one side. Maybe a single flower or a quote.
- Use basic stitches to embroider the design. Back stitch for words. Lazy daisy for flowers.
- This makes a personalized bag.
- Patches for Clothes:
- Cut a piece of fabric. Make it a simple shape like a circle or square.
- Embroider a small picture or word on it.
- Cut around the design, leaving a small border.
- Stitch the patch onto a jacket or jeans.
- Quote Art:
- Draw a short, favorite quote onto fabric. Use a simple font.
- Use back stitch for the letters.
- Frame it in your hoop. Or put it in a picture frame.
Step-by-Step: An Embroidered Bookmark
Let’s walk through a very simple project. This bookmark will use just two stitches.
What You Need:
- Small fabric piece (e.g., cotton or linen, about 3×8 inches)
- Embroidery hoop
- Embroidery floss (2-3 colors)
- Needle
- Scissors
- Water-soluble pen
- Simple pattern (e.g., a tiny flower and your initial)
Steps:
- Prepare Fabric: Cut your fabric to size. Place it tightly in your embroidery hoop.
- Transfer Pattern: Draw a small flower at one end of the fabric. Draw your initial below it. Use your water-soluble pen. Keep it simple.
- Thread Needle: Choose a color for your flower. Thread your needle with two strands of floss. Tie a knot at the end.
- Stitch the Flower (Lazy Daisy):
- Bring needle up at the center of the flower.
- Make a loop. Go back down in the center.
- Come up on the edge of a petal line, inside the loop. Pull through.
- Go down just outside the loop to secure the petal. This is one lazy daisy stitch.
- Repeat for each petal.
- For the flower center, make a French knot or a few small running stitches.
- Stitch Your Initial (Back Stitch):
- Choose another color. Thread your needle with two strands. Knot it.
- Start stitching your initial using the back stitch. Follow your drawn lines.
- Work slowly. Make neat, even stitches.
- Finish Your Work:
- When done stitching, take the fabric out of the hoop.
- If you used a washable pen, gently rinse the fabric. Let it dry flat.
- Trim the fabric around your design. Leave about an inch border.
- Hem the edges by folding them twice and sewing them down. Or, apply a fabric glue to prevent fraying.
- You can add a ribbon to the top if you like.
You now have a custom bookmark! This project uses basic skills. It gives you a sense of accomplishment.
Smooth Sailing: Embroidery Tips for Beginners
Embroidery is fun. But it can have small challenges. Here are embroidery tips for beginners. They help you avoid common problems. They make your stitching journey smoother.
General Tips:
- Start Small: Your first project should be simple. Do not pick a complex design. A small design helps you learn the basics. It also gives you a quick win.
- Use Good Light: Always stitch in a well-lit area. This saves your eyes. You can see your stitches better.
- Short Thread Lengths: Use thread about 18-24 inches long. Longer pieces tangle more. They also wear down faster.
- Watch Your Tension: Tension is how tight or loose your stitches are. Keep your stitches even. Not too tight (fabric puckers). Not too loose (stitches look messy). Practice helps a lot.
- Protect Your Fingers: If your fingers hurt, use a thimble. It pushes the needle.
- Take Breaks: Your eyes and hands can get tired. Take short breaks. Stretch your fingers.
- Embrace Mistakes: Everyone makes mistakes. Do not be afraid to undo a stitch. Use small scissors or a seam ripper carefully. View them as learning chances.
- Practice on Scrap Fabric: Before a big project, try new stitches on a scrap piece. This builds muscle memory.
- Keep Your Fabric Clean: Wash your hands before stitching. This keeps your fabric from getting dirty.
- Finish Your Ends Neatly: When your thread runs out, weave the end through the back of nearby stitches. Do this for a few stitches. Then trim the excess. This keeps your work neat. It stops stitches from coming undone.
Managing Common Issues:
- Knots in Thread: If your thread tangles, let your needle hang. Let it spin freely. This often untwists the thread.
- Puckered Fabric: If your fabric puckers, your stitches are too tight. Or your hoop is too loose. Check your hoop tension. Try to loosen your stitches a little.
- Uneven Stitches: This is normal for beginners. Practice makes perfect. Try to make each stitch the same length.
Caring for Your Finished Pieces:
- Remove Hoop Marks: If your hoop left a mark, spritz the fabric with water. Iron it gently with a cool iron. Use a clean cloth between the iron and your embroidery.
- Washing: For most embroidery, a gentle hand wash is best. Use cool water and mild soap. Rinse well. Lay flat to dry.
- Display: You can frame your finished work. Put it in a hoop. Or make it into an item like a pillow cover.
Frequently Asked Questions (FAQ)
Q1: How do I choose thread colors?
A1: Start with a pattern’s suggested colors. Or, pick colors you like. Look at color wheels for ideas. Choose colors that look good together. Small packs of mixed colors are great for beginners.
Q2: Can I use regular sewing thread?
A2: No, it is not best. Regular sewing thread is too thin. It will not show up well. Embroidery floss is thicker. It is made for decorative stitches. It gives a nicer look.
Q3: How do I store my embroidery floss?
A3: Keep your floss neat. Wind it onto bobbins. These are small plastic or cardboard cards. Store them in a clear box. This stops tangles. It keeps colors organized.
Q4: My needle is hard to push through. What should I do?
A4: Your fabric might be too thick. Or your needle might be too small for the fabric. Try a larger needle. A thimble can also help push the needle through tough spots.
Q5: Is embroidery an expensive hobby?
A5: No, it is quite affordable. A good embroidery starter kit is cheap. Basic embroidery supplies list items are not costly. You can use simple fabrics. You do not need many tools to start.
Q6: How long does it take to finish an embroidery project?
A6: It depends on the size and detail of your project. A small bookmark might take a few hours. A complex picture can take many days or weeks. Start with quick projects to feel good about your progress.
Q7: Can I iron my embroidered pieces?
A7: Yes, but be careful. Iron on the back side of your embroidery. Place a clean cloth over it. Use a medium heat setting. This protects the stitches. It keeps them from getting squashed.
Embroidery is a journey. It is full of learning and joy. With these tips, you are ready to start. Pick up your needle and thread today. Let your creativity bloom!