
Image Source: www.wanderingthreadsembroidery.com
Get Started: How To Embroidery Name With Our Easy Tutorial
Can I learn to embroider names easily? Yes, absolutely! Learning to embroider names is a fun and rewarding project that anyone can start. You can add a special touch to clothes, bags, gifts, and more. It does not matter if you are new to sewing or crafting. This guide will show you how. We will cover simple steps for both hand and machine embroidery. You will soon be adding names to everything!
Why Put Names on Things?
Adding a name makes something special. It shows you took time and care.
- Personal Gifts: A towel or blanket with a name is a great gift.
- Kids’ Items: Names on backpacks or jackets help kids keep track of their things.
- Home Goods: Personalize pillows, towels, or stockings.
- Making Money: You can make and sell items with names on them.
- Your Style: Add your name or initials to your own clothes or bags.
Putting names on fabric is a popular craft. It lets you be creative.
Getting Ready: What You Need
Before you start, get your tools ready. The tools you need depend on if you stitch by hand or use a machine. Here are the basic embroidery supplies needed for both ways.
Supplies for Hand Stitching
Hand stitching uses simple tools.
- Fabric: Any fabric works, but cotton or linen are good to start with. They hold stitches well.
- Embroidery Hoop: This keeps the fabric tight. A tight fabric is easier to stitch. Hoops come in wood or plastic. Get one about 6-8 inches across.
- Embroidery Needles: You need special needles. Embroidery needle types have bigger eyes than sewing needles. This is for the thicker thread. Sharp ones are good for most fabrics. Ballpoint ones are for knits.
- Embroidery Thread: This is also called floss. It comes in many colors. Choosing embroidery thread is fun! You usually use 2 or 3 thin strands from the floss for names.
- Small Scissors: Sharp scissors are needed to cut thread cleanly.
- Pen or Pencil: You need something to draw the name on the fabric.
- Paper: For drawing your name design first.
Supplies for Machine Stitching
Machine stitching needs more tools and equipment.
- Embroidery Machine: This is a special sewing machine. It can stitch designs you load into it.
- Embroidery Hoops: Machines use specific hoops. They hold the fabric tight under the machine’s needle.
- Embroidery Thread: Machine thread is different from hand thread. It is often polyester or rayon. It needs to be strong for the machine speed.
- Bobbin Thread: You need special thread for the bobbin on the machine. It is usually thinner.
- Stabilizer: This is very important. It goes under the fabric in the hoop. It stops the fabric from puckering. There are many types: cut-away, tear-away, wash-away.
- Small Scissors: For cutting jump stitches (threads that connect parts of the design).
- Design Software (Optional): Some people use software to make or change designs. This helps with Machine embroidery fonts and sizes.
- USB Drive or Cable: To get the design into your machine.
It is best to have everything ready before you start. This makes your stitching go smoothly.
Hand or Machine? Pick Your Way
You can embroider names in two main ways. You can use your hands and a needle. Or you can use a special machine. Both ways are good. They just work differently.
Hand Embroidery
This is the older way. You use a needle and thread with your hands.
- Good Points:
- Costs less to start. Just a needle, thread, and hoop.
- You can stitch anywhere.
- It is relaxing for many people.
- Each stitch is made by you. It feels special.
- Things to Know:
- Takes more time.
- Stitches can look a little different each time.
- Harder to make many of the same thing.
Machine Embroidery
This way uses a computer-controlled machine.
- Good Points:
- Very fast.
- Makes stitches look perfect and the same every time.
- Good for making many items.
- You can use detailed designs and Machine embroidery fonts.
- Things to Know:
- Costs a lot to start. Machines are expensive.
- Takes time to learn the machine and software.
- Needs a place to set up the machine.
- Less “handmade” feel for some people.
For Beginner embroidery for names, hand stitching is a great way to start. It teaches you about stitches and thread. But machines make it fast and easy to do many names. Think about what you want to do. How much time and money do you have? This helps you choose.
Hand Stitching Names: A Step-by-Step Guide
Let’s learn how to embroider names by hand. This is perfect for Beginner embroidery for names. We will use simple stitches.
Step 1: Plan Your Name Design
First, think about the name.
- Write it Down: Practice writing the name on paper. Try different styles. Make it simple to start.
- Choose Font Style: Pick a simple letter style. Block letters or a basic script work well. Look up “simple embroidery fonts” online for ideas.
- Size Matters: How big should the name be? Think about where it goes on the fabric. Draw it the right size on paper.
Step 2: Get Your Fabric Ready
- Wash and Iron: Wash the fabric first. This stops it from shrinking later. Iron it smooth.
- Place the Hoop: Put the fabric in the embroidery hoop. Loosen the hoop first. Lay the fabric over the inner hoop. Press the outer hoop down over the fabric. Make it tight like a drum head. This is important. Loose fabric makes messy stitches.
Step 3: Put the Name on Fabric
You need to get your design from paper onto the fabric.
- Simple Way (Tracing): If your fabric is thin, put your paper design under it. Use a bright light behind it (like a window or light box). Trace the name onto the fabric with a water-soluble pen or light pencil.
- Other Ways: For dark or thick fabric, use carbon paper or transfer paper for fabric. Put the paper on the fabric, design on top, and trace over the design. The color will rub onto the fabric. Or, use an iron-on transfer pen. Draw on paper, then iron it onto the fabric.
Step 4: Picking Your Thread and Needle
Choosing embroidery thread affects how your name looks.
- Thread Type: Most people use stranded cotton floss. It has 6 thin strands twisted together.
- Number of Strands: For names, use 2 or 3 strands. Pull them apart gently. More strands make thicker lines. Less strands make thinner lines. Try 2 strands for a fine look, 3 for a bolder look.
- Color: Pick a color that stands out from your fabric. Or choose a color that matches. It is up to you!
- Needle Type: Get an embroidery needle. It has a large eye for the floss. Use a sharp one (like a crewel needle) for woven fabrics. Sizes 7-9 are good for 2-3 strands.
Thread your needle with the chosen number of strands. Tie a small knot at the end of the thread.
Step 5: Learning Hand Embroidery Stitches for Letters
You do not need many stitches to make names. Just one or two can work well. Learning to embroider letters is easy with simple stitches.
Here are good stitches for names:
-
Back Stitch: This is one of the best stitches for outlining letters. It makes a solid line.
- Come up from the back of the fabric (point 1).
- Go down a little way forward (point 2).
- Come up from the back again, the same distance behind point 2 as the first stitch length (point 3).
- Go down into the same hole as point 2.
- Repeat: Come up ahead, go back into the end of the last stitch.
- This makes stitches that touch each other, going backward.
-
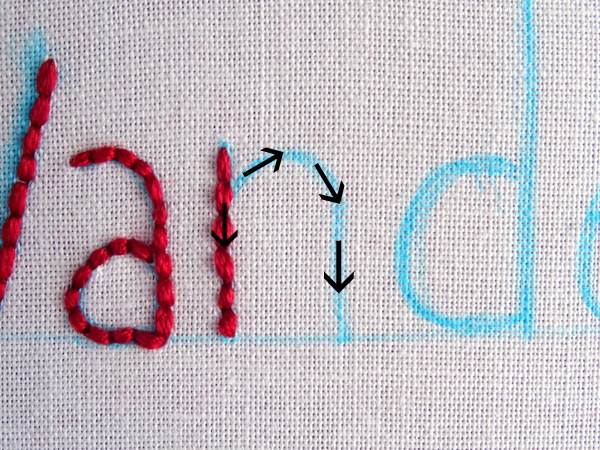
Stem Stitch: This stitch also makes a nice line. It looks a bit like a rope.
- Come up from the back (point 1).
- Go down a little way forward (point 2).
- Come up halfway between 1 and 2, but keep the thread below the needle tip.
- Pull the thread through. This makes a slant.
- The next stitch starts where the last one ended.
-
Outline Stitch: Very similar to stem stitch, but keep the thread above the needle tip. This makes the slant go the other way.
-
Satin Stitch: This stitch fills in areas. You could use it for thicker block letters or shapes.
- Make stitches that go straight across a shape.
- Place stitches very close together so no fabric shows.
- It takes practice to make it look smooth.
-
Chain Stitch: This makes a line that looks like a chain.
- Come up (point 1). Go back down almost in the same hole, leaving a loop of thread on top.
- Come up a little way forward, inside the loop.
- Pull the thread through. This makes the first loop.
- To make the next loop, go back down where your thread just came up, leaving a new loop.
- Come up forward, inside the new loop.
For your first name, just use Back Stitch. It is simple and clear. Once you are good at that, try Stem Stitch or Outline Stitch.
Step 6: Start Stitching Your Name
Now, start stitching along the lines you drew on the fabric.
- Start your first stitch. Pull the thread through until the knot is against the back of the fabric.
- Follow the lines of your name design. Use your chosen stitch (Back Stitch is great for beginners).
- Keep your stitches even in size. This makes the name look neat.
- When you finish a section or run out of thread, end the thread neatly on the back. Slide the needle under a few stitches on the back of your work. Pull the thread through and cut it close to the fabric. Do not make big knots on the back if you can help it.
Step 7: Finishing Up
- Once all the letters are stitched, take the fabric out of the hoop.
- If you used a water-soluble pen, gently wash the fabric to remove the lines. Let it dry.
- You might want to press the fabric gently from the back with a warm iron. Put a clean cloth over the embroidery first.
You have just finished embroidering a name by hand! This is a basic way to Learn to embroider letters. With practice, you can try different stitches and styles.
Machine Stitching Names: A Step-by-Step Guide
Using a machine is faster. It gives a different look. Here is how to do it.
Step 1: Choose Your Design and Font
Your machine might have built-in fonts. Or you might buy designs. Machine embroidery fonts come in many styles.
- Built-in Fonts: Look at the fonts on your machine’s screen. Choose a size that fits your project. Type the name using the machine’s controls.
- Purchased Fonts/Designs: Buy letter sets or name designs online. You download them to your computer.
- Software: Use embroidery software to type the name. You can pick fonts, change size, and move letters. This is part of Personalized embroidery techniques with a machine.
Save your finished name design to a USB drive or send it to your machine.
Step 2: Get Your Fabric and Stabilizer Ready
- Fabric Prep: Wash and iron your fabric just like for hand stitching.
- Stabilizer: This is key for machine work. It supports the stitches.
- Choose the right type for your fabric and design.
- A tear-away stabilizer is good for stable fabrics like cotton.
- A cut-away stabilizer is better for stretchy fabrics or dense designs.
- A wash-away stabilizer is good when you do not want any stabilizer left behind.
- Place Stabilizer: Put the stabilizer behind your fabric. Sometimes you iron on a fusible stabilizer. Other times you just place it together in the hoop.
Step 3: Hoop Your Fabric and Stabilizer
- Put the fabric (right side up) and the stabilizer (on the back) into the machine’s embroidery hoop.
- Make sure the fabric and stabilizer are smooth and tight. No wrinkles!
- The name should be placed where you want it on the item.
Step 4: Set Up the Machine
- Attach the hoop to the embroidery arm of your machine.
- Load your name design into the machine. Select the design on the screen.
- Tell the machine which hoop size you are using.
- Move the hoop (using the machine controls) to check the placement. The needle should start where you want the top or center of the name to be. Use the tracing function on the machine if it has one.
- Choose your thread color. Use special machine embroidery thread. Thread the machine. Put the correct bobbin thread in the bobbin case.
Step 5: Start Embroidering
- Lower the presser foot.
- Start the machine. It will stitch the name by itself.
- Watch the machine as it stitches. Sometimes thread breaks.
- The machine will stop when it finishes the design or when it needs a thread color change.
Step 6: Finishing Up
- Once the stitching is done, take the hoop off the machine.
- Take the fabric and stabilizer out of the hoop.
- Remove the stabilizer. Tear-away stabilizer rips away from the stitches. Cut-away needs to be cut carefully around the design. Wash-away dissolves in water.
- Trim any jump stitches (small threads connecting parts of letters) on the front of the design.
- You can gently press the back of the embroidery if needed.
Now you have a machine-embroidered name! This is how you start Embroidering names on fabric with a machine.
Embroidering Names on Fabric: Tips for Different Materials
The type of fabric matters. Some fabrics are easier than others.
- Cotton/Linen: These are great for beginners. They do not stretch much. Use a sharp needle.
- Knit Fabrics (like T-shirts): These stretch. This makes them harder to embroider.
- Hand: Use a ballpoint needle. Use a stitch that is not too tight. Put a stabilizer (like a light tear-away or wash-away) under the fabric in the hoop.
- Machine: Always use a stabilizer. Cut-away is often best for knits. Hoop the fabric with the stabilizer.
- Terrycloth (Towels): The loops make it hard to see stitches.
- Hand/Machine: Use a topping. This is a thin film that goes on top of the fabric in the hoop. It holds the loops down while you stitch. Water-soluble topping works well. Stitch the name, then wet it to make the topping go away. You might need heavier stabilizer too.
- Fleece: This is thick and soft.
- Hand/Machine: Use stabilizer. Use topping to keep stitches from sinking into the fluff.
- Thin/Delicate Fabrics (Silk, Satin): These can pucker or pull easily.
- Hand: Be very gentle. Use a fine needle and maybe fewer thread strands (1 or 2). Use a light stabilizer like an iron-on sheer mesh.
- Machine: Use a light, stable stabilizer. A mesh cut-away is often recommended. Use a water-soluble topping.
Always test stitch on a scrap of the same fabric first. This helps you see if your thread, needle, and stabilizer choices are right.
Personalized Embroidery Techniques Beyond Simple Names
Once you can stitch a basic name, try adding more! Personalized embroidery techniques make your work unique.
- Adding Simple Pictures: Stitch a small design next to the name. A star, heart, flower, or animal adds charm. You can find simple outlines to trace and stitch.
- Using Different Stitches: Try using a different stitch for the first letter of the name. Or use one stitch for the outline and another for filling inside.
- Mixing Colors: Use different colors for different letters. Or use one color for the name and another for an outline around it. Choosing embroidery thread in fun colors makes a big difference.
- Adding Details: Use French knots for dots, or tiny lazy daisy stitches for flowers around the name.
- Applique: Cut a shape from a different fabric. Stitch the name onto the shape. Then stitch the shape onto your main item. This is a more advanced technique.
- Monogramming Letters: This is a type of name embroidery using initials. Often it is one large letter with smaller letters (the other initials) placed on or around it. Monograms can be very fancy.
Grasping Monogramming Letters
Monograms usually follow a rule. For one person, it’s often: First Name Initial, Last Name Initial (bigger in the center), Middle Name Initial. Example: Mary Ann Smith would be MSA (with the S largest). For a couple, it’s often: Wife’s First Initial, Last Name Initial (center), Husband’s First Initial. Example: Mary and John Smith would be MSJ.
- Hand Monogramming: Draw the letters carefully. You can use different stitches to make the letters look special. Satin stitch is popular for filling thick monogram letters. Outline stitches work for thinner letters.
- Machine Monogramming: Many machines have special monogram fonts. You can set them up easily. Software lets you choose layouts and add frames around the letters.
Monogramming is a classic way to personalize items. It looks elegant on towels, shirts, or bags.
Learning to Embroider Letters Well
Being good at embroidering letters takes some practice. Here are tips for Learn to embroider letters:
- Start Simple: Pick a simple, straight font first.
- Draw Clearly: Make sure the lines you trace on the fabric are easy to see.
- Even Stitches: Try to make all your stitches the same length. This makes the name look neat.
- Curve Control (Hand): Letters have curves (like ‘S’, ‘C’, ‘O’). Make your stitches shorter on curves. This helps the line follow the curve smoothly. If stitches are too long on a curve, it will look bumpy.
- Thread Tension (Hand): Do not pull your thread too tight. This will make the fabric pucker. Pull it just enough so the stitch lies flat on the fabric.
- Practice: Stitch letters on scrap fabric before doing it on your good item. Practice makes perfect!
- Choosing the Right Supplies: Make sure your needle is right for your thread and fabric. Make sure your hoop is tight. This makes a big difference.
Beginner Embroidery for Names: Starting Out Right
Here are extra tips for anyone new to stitching names. These help make Beginner embroidery for names easy and fun.
- Small Project First: Do not start with a huge blanket. Start with a small item like a handkerchief or a fabric patch.
- Simple Name: Pick a short name to start. Or just stitch one initial.
- Basic Stitches: Stick to Back Stitch or Stem Stitch at first. Master one before trying others.
- Good Light: Work in a place with good light. It helps you see your stitches and lines clearly.
- Sharp Scissors: Dull scissors make it hard to cut thread close to the fabric. This can leave messy ends.
- Watch Videos: Look for videos online showing the stitches. Seeing how someone does it can help more than just reading words. Search for “how to do back stitch embroidery” or “simple embroidery stitches for letters”.
- Don’t Rush: Embroidery takes time. Enjoy the process.
- Embrace Mistakes: Your first name might not be perfect. That is okay! Everyone makes mistakes when they are learning. Keep practicing. Each name you stitch will get better.
Remember to use good Embroidery supplies needed. Having the right tools makes learning easier. Choosing embroidery thread colors you love makes it more fun. Knowing about Embroidery needle types helps your stitches go in smoothly.
Embroidering names on fabric is a skill that grows with practice. Start simple, be patient, and enjoy making something personal.
Frequently Asked Questions (FAQ)
Here are answers to common questions people ask when starting to embroider names.
Q: What is the easiest stitch for a beginner to embroider names?
A: The Back Stitch is the easiest and most popular stitch for outlining letters. It makes a clean, solid line that is easy to follow. Stem Stitch is also good once you are comfortable with Back Stitch.
Q: How do I choose the right size needle?
A: Your needle size depends on your thread. Embroidery needles have numbers. Higher numbers mean smaller needles. For 2-3 strands of standard embroidery floss, needles sizes 7, 8, or 9 are usually good. The eye must be large enough for your thread to pass through without fraying.
Q: How many strands of thread should I use?
A: For most name embroidery, 2 or 3 strands of stranded cotton floss work well. 2 strands give a finer line. 3 strands give a slightly bolder line. You can use more strands for a very thick line, but it can be harder to pull through the fabric neatly.
Q: My fabric is puckering when I stitch. Why?
A: Puckering often happens if you pull your stitches too tight. It can also happen if your fabric is not tight enough in the hoop (for hand stitching) or if you are not using the right stabilizer (for machine stitching, especially on knits). Try using less tension on your thread and make sure your fabric is drum-tight in the hoop. Use stabilizer for machine work.
Q: How do I transfer the name design onto dark fabric?
A: Tracing with a light box does not work on dark fabric. Use fabric carbon paper or transfer paper designed for dark fabrics. Place the paper on the fabric, your design on top, and trace firmly with a stylus or pencil. The design will transfer in a light color. Another option is to use an iron-on transfer pen, which transfers the ink when you iron over your drawing.
Q: Can I embroider names on clothes I already wear?
A: Yes! You can add names to t-shirts, denim jackets, hats, and more. For stretchy clothes like t-shirts (knits), use a ballpoint needle and a stabilizer when hand stitching. For machine embroidery on clothes, always use the correct stabilizer for the fabric type (often a cut-away for knits). Make sure you can get the area you want to stitch flat and tight in your hoop.
Q: Is it worth getting an embroidery machine just for names?
A: An embroidery machine is a big investment. If you only want to do one or two names, hand embroidery is much cheaper to start. If you plan to embroider many names, on many items, or want perfect consistency and speed, a machine can be worth it. Think about how much you will use it.
Q: How do I make my machine embroidered letters look good?
A: Use the right stabilizer! This is the most important thing for machine embroidery. Also, make sure your fabric and stabilizer are hooped tightly with no wrinkles. Use good quality machine embroidery thread and bobbin thread. Check your machine’s tension settings if you have problems.
Q: What is monogramming?
A: Monogramming is a type of embroidery that uses initials, usually personal initials or family initials. It is a classic way to personalize items like towels, shirts, and bedding. Monograms often have the last name initial larger in the center.
Q: What other Personalized embroidery techniques can I try for names?
A: You can add small embroidered pictures next to the name (like stars or hearts). You can use different colors for different letters or parts of the name. You can outline the name or add simple decorative elements around it. Monogramming is also a personalized technique.
Learning how to embroidery name is a great skill. Whether you choose hand or machine, starting with simple names is the best way. Get your Embroidery supplies needed, pick your method, and start stitching! Enjoy making special, personalized items.