
Image Source: b1641835.smushcdn.com
Essential Steps: How To Embroidery Stitches for Beginners
Do you want to learn how to make beautiful designs with a needle and thread? This guide is for you! We will show you how to embroidery stitches from the very start. Basic embroidery stitches are simple ways to make art on fabric. You can learn these beginner embroidery techniques quickly. We will cover many types of embroidery stitches. You will find easy embroidery stitches here. This post is a hand embroidery stitch guide to help you begin your sewing journey.
Getting Started: Tools You Need
Before you stitch, you need a few items. Think of these as your art supplies. Having the right tools makes learning easier.
The Right Needle
You need a good needle. Look for an embroidery needle. These needles have a larger eye. This big eye makes threading easier. The needle should be sharp enough to go through fabric. It should not be too big for your fabric. Different fabrics need different needle sizes.
Threads for Success
Embroidery thread is also called floss. It comes in many colors. Most often, you will use cotton floss. It has six thin strands twisted together. You can use all six strands for thick lines. Or, you can pull them apart. Using fewer strands makes thinner, finer lines. Start with cotton floss. It is easy to work with.
Hoops and Fabric
An embroidery hoop holds your fabric tight. This stops the fabric from puckering. It helps your stitches look neat. Hoops come in wood or plastic. Pick a size that feels good in your hand.
For fabric, start with a plain cotton. Muslin or a simple linen blend works well. These fabrics are not too stretchy. They are easy to stitch through.
Other Handy Items
- Small Scissors: You need sharp scissors. These are for cutting thread ends.
- Pencil or Water-Soluble Pen: Use this to draw your design on fabric. A water-soluble pen washes away later.
- Thimble (Optional): This small cap protects your finger. You wear it on the finger that pushes the needle. It is helpful for tough fabrics.
- Needle Threader (Optional): This small tool helps you put thread through the needle’s eye.
Core Concepts: Stitch Essentials
Before you learn actual embroidery stitch names, let’s go over some basic steps. These steps are key for all your stitching projects.
Preparing Your Fabric
First, iron your fabric. This makes it smooth. A smooth surface helps your stitches lie flat. Then, place your fabric in the embroidery hoop. Loosen the hoop’s screw. Put the inner ring under your fabric. Place the outer ring over the fabric. Press the outer ring down. Pull the fabric gently from the edges. Make sure it is drum-tight. Then, tighten the screw. Your fabric should be very taut. This stops it from moving.
Threading Your Needle
This can be tricky at first.
1. Cut a length of floss. About 18 inches (45 cm) is good. Longer pieces can tangle.
2. If using cotton floss, decide how many strands you need. Pull them apart gently.
3. Pinch the end of your chosen strands. Make a sharp point.
4. Push the pointed end through the needle’s eye. You may need to lick the end. This helps it go through.
5. Pull the thread through a few inches. Now your needle is ready.
Starting and Ending Stitches (No Knots!)
Many embroiderers avoid knots. Knots can make bumps on your fabric. They can also come undone. Here are two easy ways to start and end without a knot:
- Waste Knot Start:
- Make a small knot at the long end of your thread. This is a temporary knot.
- Bring your needle up from the back of the fabric. Go about 2-3 inches (5-8 cm) away from where your first stitch will be.
- Make your first few stitches. Stitch over the tail of the thread on the back.
- Once you have a few stitches in place, cut off the waste knot. The stitches hold the thread.
- Away Waste Knot Start:
- Make a small knot at the long end of your thread.
- Bring your needle up from the front of the fabric. Go about 2-3 inches (5-8 cm) away from where your first stitch will be.
- Make your first few stitches.
- When done, cut the knot off. Weave the thread tail under your finished stitches on the back.
- Ending Your Thread:
- When your thread is almost gone, turn your hoop over.
- Weave the needle under 3-4 nearby stitches on the back. Make sure to go under the stitches, not through the fabric.
- Pull the thread through.
- Trim the excess thread close to your work. This hides the end neatly.
Deciphering Basic Embroidery Stitches
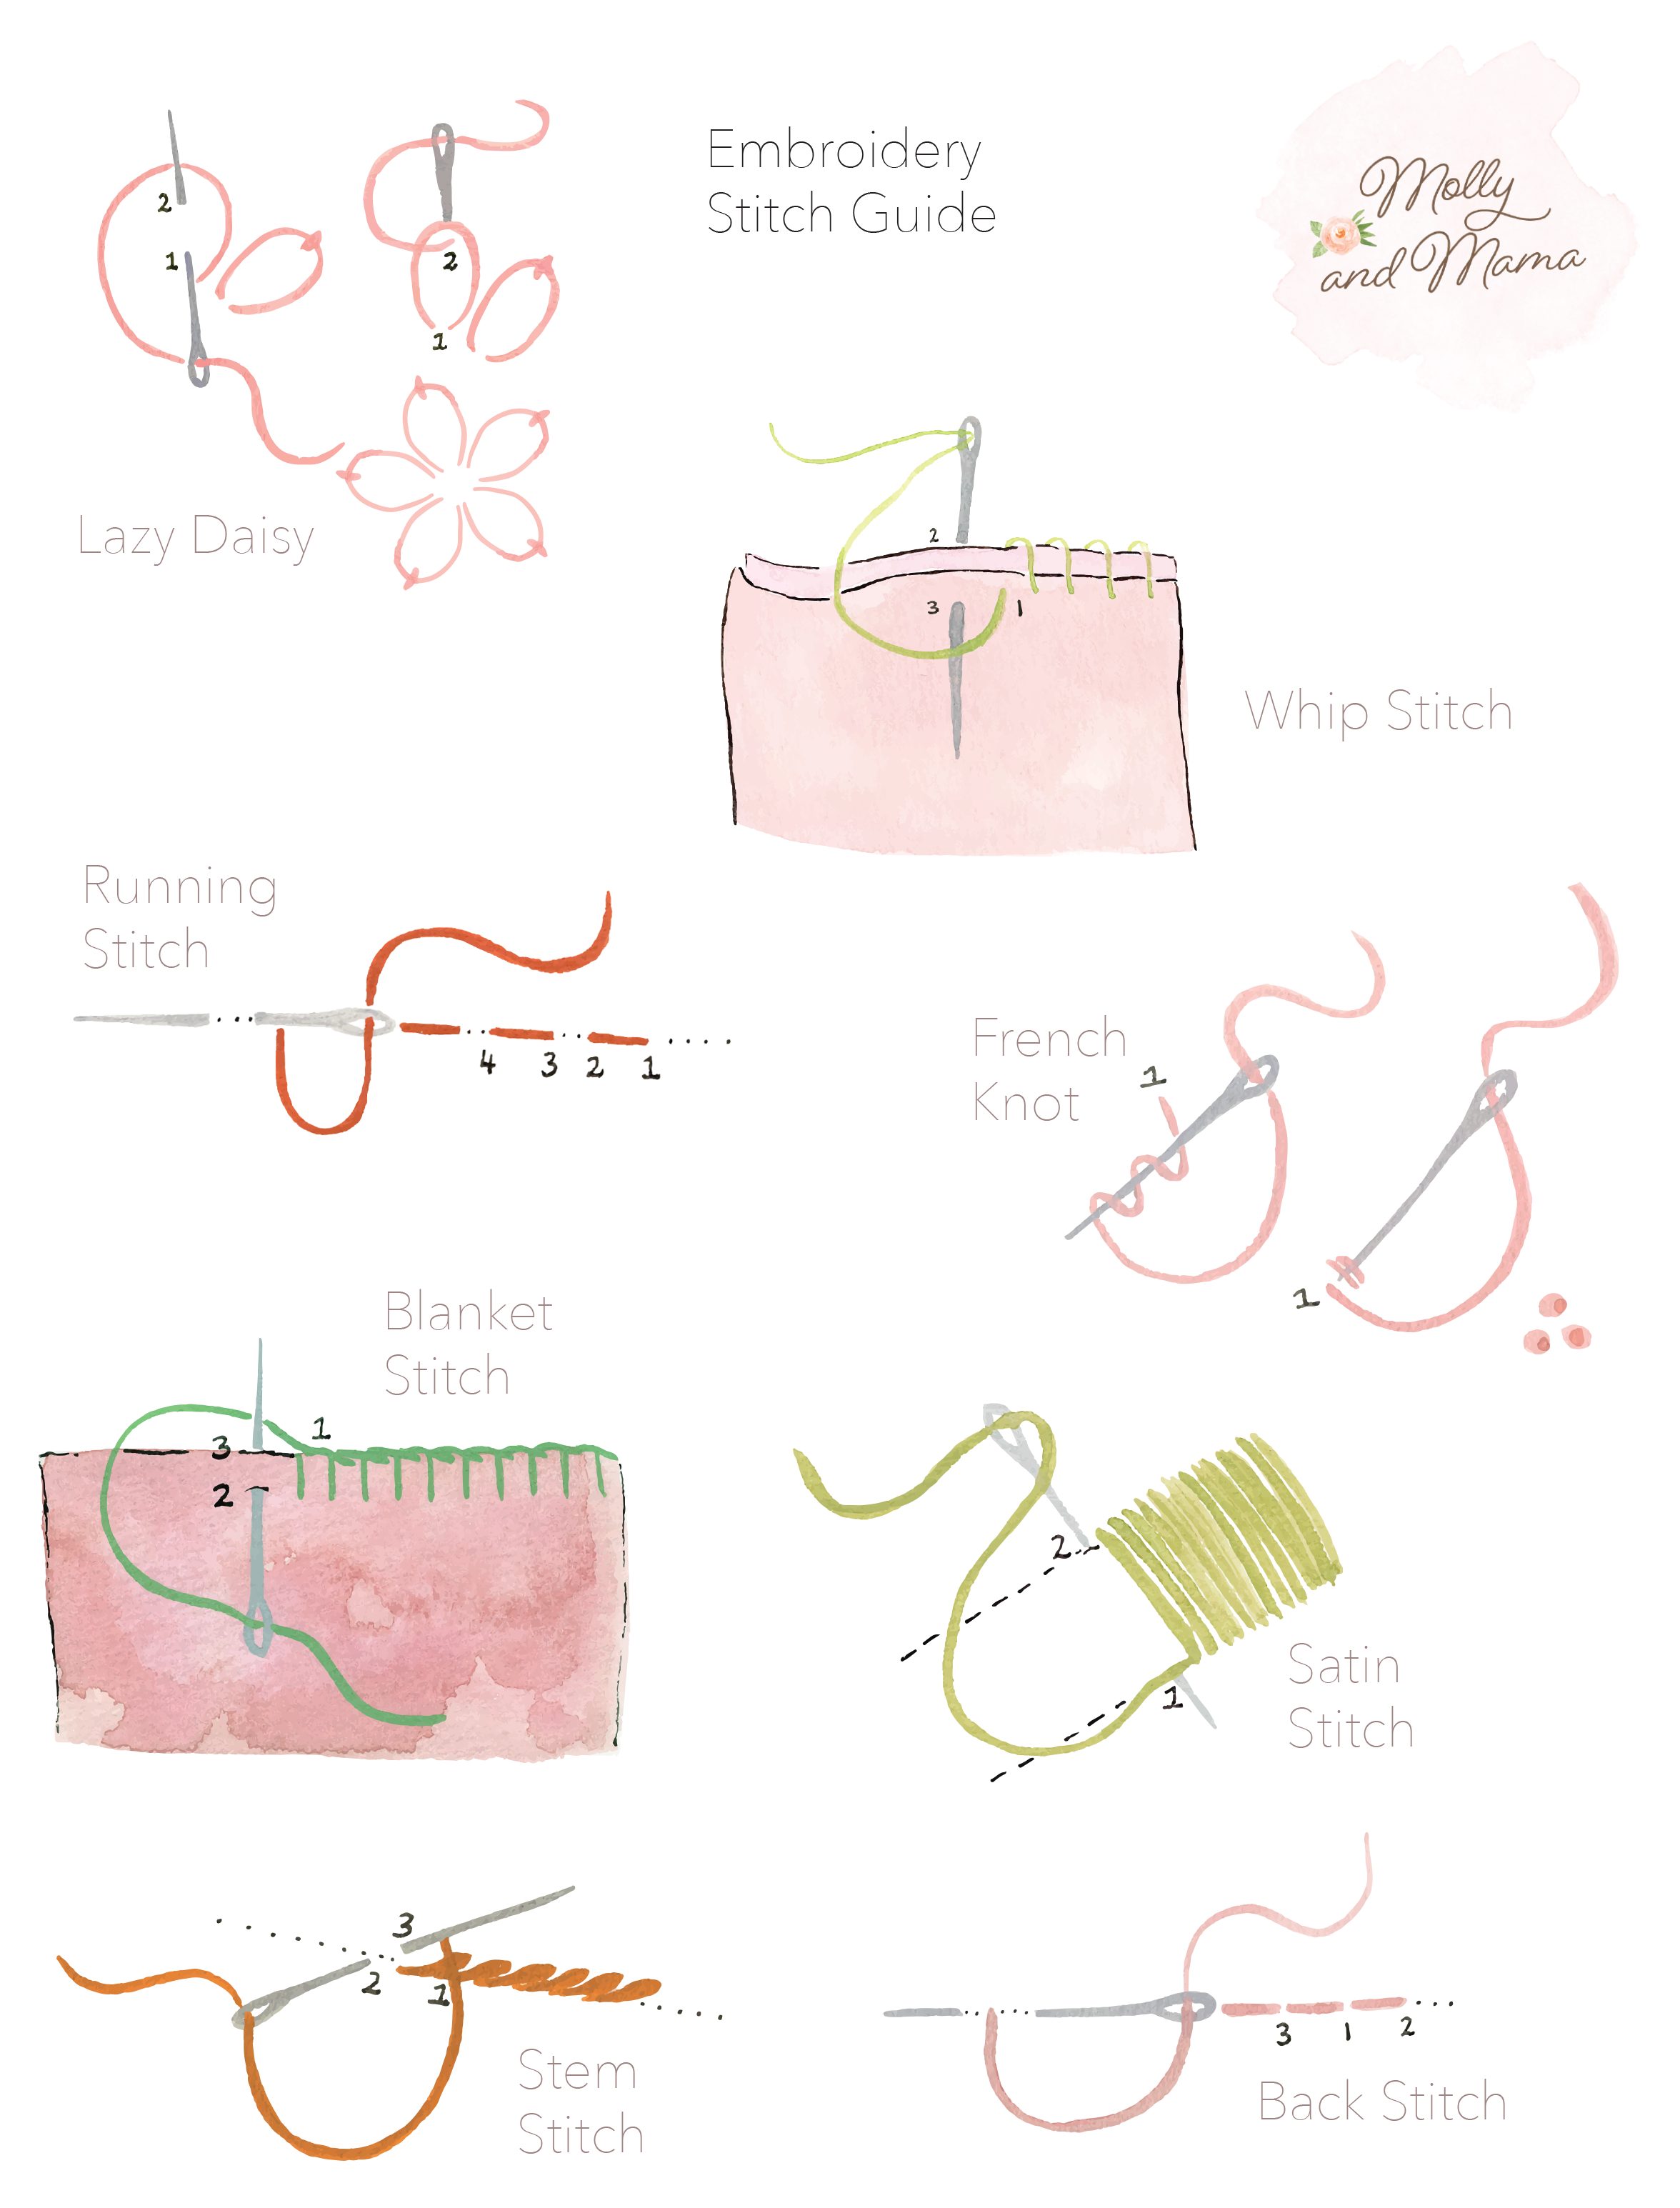
Now comes the fun part! These are the basic embroidery stitches everyone starts with. They are truly easy embroidery stitches. Practice each one. Soon, you will master them. This section is like a mini embroidery stitch dictionary for beginners. It also acts as embroidery stitch tutorials.
Running Stitch
What It Is
The running stitch is the simplest stitch. It makes a dotted line. It is like a quick dash.
How To Do It
- Bring your needle up from the back of the fabric. This is your start point.
- Push your needle down a short distance away. This makes one small stitch.
- Bring your needle back up a short distance from where you went down. Keep the spacing even.
- Repeat steps 2 and 3. You can also “load” several stitches onto your needle at once. Push the needle up and down quickly, picking up small bits of fabric. Then pull the needle all the way through.
When To Use It
Use the running stitch for outlines. It is great for adding texture. You can also use it for simple borders. It is quick for filling large areas too.
Backstitch
What It Is
The backstitch makes a solid, unbroken line. It is stronger than the running stitch. It is a very common stitch.
How To Do It
- Bring your needle up from the back of the fabric.
- Push your needle down a short distance away. This makes your first stitch.
- Bring your needle up again. Come up one stitch length away from where you just came up.
- Now, push your needle back down into the end of your very first stitch. This makes a solid line.
- Repeat. Come up one stitch length forward, then go back down into the end of the last stitch.
When To Use It
The backstitch is perfect for outlines. Use it for letters and thin lines. It gives a very clear edge to your designs.
Stem Stitch
What It Is
The stem stitch makes a ropelike line. It looks twisted and neat. It is good for curving lines.
How To Do It
- Bring your needle up from the back of the fabric.
- Push your needle down a short distance away.
- Bring your needle back up about halfway between where you started and where you went down. Make sure the thread is below your needle.
- Pull the needle through. This makes one part of the rope.
- Repeat. Push the needle down ahead, then bring it up halfway back, keeping the thread below.
When To Use It
Use the stem stitch for flower stems. It is also good for vines, curly hair, and outlines that need a bit of texture.
Satin Stitch
What It Is
The satin stitch fills an area with smooth, solid color. It makes a shiny, flat surface.
How To Do It
- Outline the shape you want to fill. You can use a backstitch for this.
- Bring your needle up on one side of the shape.
- Push your needle down on the opposite side of the shape. Make the stitch go straight across.
- Bring your needle up again very close to where your last stitch came out. Keep the stitches very close together.
- Repeat. Lay each stitch parallel to the last. Fill the whole shape with these smooth stitches.
When To Use It
The satin stitch is best for filling small to medium shapes. Use it for leaves, flower petals, or small blocks of color. It gives a rich look.
French Knot
What It Is
A French knot makes a small, raised dot. It adds texture and dimension. It looks like a tiny bead.
How To Do It
- Bring your needle up from the back of the fabric.
- Hold the thread taut with your non-stitching hand.
- Wrap the thread around your needle 1-3 times. More wraps make a bigger knot.
- Push the needle back down into the fabric very close to where it came up. Do not go into the same hole.
- Keep the wrapped thread tight with your non-stitching hand. Pull the needle through slowly. The knot will form.
When To Use It
French knots are great for flower centers. Use them for eyes, tiny buttons, or speckles. They add a delicate touch.
Lazy Daisy Stitch (Detached Chain Stitch)
What It Is
The lazy daisy stitch is a single loop, like a petal. It is often used to make simple flowers.
How To Do It
- Bring your needle up from the back of the fabric.
- Push your needle back down into the same spot, or very close to it. Do not pull the thread all the way through yet. Leave a loop of thread on the surface.
- Bring your needle up again from the back, just outside the loop. This will be the tip of your petal.
- Catch the loop with your needle. Pull the thread through.
- Make a small straight stitch over the end of the loop. This “tacks” the loop down. Push the needle down.
When To Use It
Use the lazy daisy stitch for flower petals. It is also good for leaves or small decorative elements.
Fly Stitch
What It Is
The fly stitch makes a V-shape with a small straight stitch in the middle. It is good for open, airy designs.
How To Do It
- Bring your needle up from the back of the fabric. This is point A.
- Push your needle down at point B. This is diagonal from A. Do not pull through.
- Bring your needle up at point C. This is diagonal from A, opposite B. Your thread should be under the needle.
- Pull the needle through. This forms a V-shape.
- Push the needle down at point D, just below the center of the V. This makes a small straight “tail” stitch.
When To Use It
Use the fly stitch for open leaves, borders, or scattered elements. It can also create texture.
Straight Stitch (Seed Stitch)
What It Is
The straight stitch is simply a line from one point to another. When many straight stitches are made close together, they form a “seed stitch” filling.
How To Do It
- Bring your needle up from the back of the fabric.
- Push your needle down at a different point. This makes one straight line.
- For seed stitch, make many small straight stitches. Do them in different directions. Keep them random and close.
When To Use It
Use single straight stitches for small details, like rays of sun or tiny stars. Use seed stitch for filling areas with texture. It is a very easy way to add density.
Cross Stitch
What It Is
Cross stitch makes an X shape. It is a very popular form of embroidery on its own.
How To Do It
- Bring your needle up from the back of the fabric.
- Push your needle down diagonally across. This makes half of the X.
- Bring your needle up diagonally from where you just went down. This sets up the second leg.
- Push your needle down to complete the X.
- You can do a row of half stitches first, then go back to complete them. Keep all the top legs going in the same direction.
When To Use It
Cross stitch is great for geometric patterns. It is often used to create pixel-art style designs. It works well on fabric with an even weave.
Blanket Stitch
What It Is
The blanket stitch makes loops along an edge. It is often used to finish edges or add decorative borders.
How To Do It
- Bring your needle up from the back of the fabric near the edge.
- Push your needle down a short distance away, keeping the thread under the needle.
- Bring your needle up directly above where you went down. You are making an L-shape. The thread forms a loop.
- Pull the thread through the loop. This locks the stitch.
- Repeat along the edge. Keep the spacing and height even.
When To Use It
Use the blanket stitch to finish fabric edges. It is also good for appliqué. It adds a decorative border.
Split Stitch
What It Is
The split stitch makes a textured, solid line. It looks like a tiny braid. It is good for fine outlines.
How To Do It
- Bring your needle up from the back of the fabric.
- Push your needle down a short distance away.
- Bring your needle up again. Come up through the middle of your first stitch. You will split the thread.
- Pull the needle through.
- Push your needle down a short distance ahead.
- Repeat. Always come up through the middle of the previous stitch.
When To Use It
Use the split stitch for fine lines and outlines. It is great for words or slender designs. It has a nice textured look.
Popular Embroidery Stitches for Beginners
Many of the stitches we just learned are popular embroidery stitches. The backstitch is probably the most used for outlines. The satin stitch makes smooth fillings. French knots add sweet details. Running stitch and straight stitch are quick ways to add texture. As you practice, you will find your favorites. Do not be afraid to mix and match them in one design. This is how you make your work unique.
Your Hand Embroidery Stitch Guide
Think of this whole post as your first hand embroidery stitch guide. It gives you a strong start. Keep practicing these core stitches. They are the building blocks for more complex designs. You can make almost anything with just these few stitches.
Here is a quick overview of some basic stitches:
| Stitch Name | Appearance | Common Use |
|---|---|---|
| Running Stitch | Dotted line | Outlines, textures, filling |
| Backstitch | Solid, unbroken line | Outlines, lettering, fine details |
| Stem Stitch | Twisted, ropelike line | Stems, vines, curved outlines |
| Satin Stitch | Smooth, solid filled area | Filling small shapes, shiny surfaces |
| French Knot | Small, raised dot | Flower centers, eyes, texture |
| Lazy Daisy Stitch | Single loop (petal shape) | Flower petals, small leaves, decorative |
| Fly Stitch | V-shape with a tail | Open leaves, borders, scattered elements |
| Straight Stitch | Simple line | Small details, texture (seed stitch) |
| Cross Stitch | X-shape | Geometric patterns, pixel art |
| Blanket Stitch | Loops along an edge | Edge finishing, appliqué, borders |
| Split Stitch | Textured, braided line | Fine outlines, lettering, hair |
Compiling Your Embroidery Stitch Dictionary
As you learn more, you will start building your own embroidery stitch dictionary. This means knowing what each stitch does. You will learn types of embroidery stitches. You might even want to make a stitch sampler. A sampler is a piece of fabric with rows of different stitches. This is a great way to remember them. It is also a good reference tool. Keep notes on which threads and needles you like for each stitch.
Quick Tips for Learning Embroidery Stitches
Learning embroidery stitches takes time and practice. Here are some tips to help you along the way:
- Start Small: Do not try a huge project first. Pick a simple design. Use just one or two stitches.
- Practice Makes Perfect: The more you stitch, the better you get. Stitch a little bit each day.
- Use a Hoop: Always use an embroidery hoop. It keeps your fabric tight. This makes stitching much easier and neater.
- Good Lighting: Make sure you have bright light. This helps you see your stitches clearly. It also helps prevent eye strain.
- Watch Videos:
Embroidery stitch tutorialsonline are very helpful. Watch how others do the stitches. Pause and replay sections as needed. - Do Not Be Afraid of Mistakes: Everyone makes mistakes. If a stitch does not look right, gently unpick it. Then try again. It is part of the learning process.
- Enjoy the Process: Embroidery is a relaxing hobby. Let yourself enjoy the calm and focus. Do not worry too much about perfection at first.
Bringing It All Together: Beginner Projects
Now that you know some beginner embroidery techniques, what can you make? Here are some simple ideas:
- Dish Towel Borders: Add a simple running stitch or backstitch border to a plain dish towel.
- Fabric Patches: Stitch a small heart or star onto a piece of scrap fabric. Then, sew this patch onto a bag or jacket.
- Personalized Cards: Stitch a small design onto cardstock. Use a thin needle for this.
- Simple Pincushion: Make two small squares of fabric. Stitch a simple design on one. Sew them together and stuff with filling.
- Initial Monogram: Stitch your initial onto a small piece of fabric. Use backstitch or stem stitch. Frame it or sew it onto something else.
These small projects help you practice your easy embroidery stitches. They also give you a finished piece to show off!
Frequently Asked Questions (FAQ)
Q1: What is the easiest embroidery stitch for beginners?
The running stitch is the easiest. It is like a simple dotted line. It is a good first stitch to learn.
Q2: How long does it take to learn embroidery stitches?
You can learn a few basic stitches in just an hour. To feel truly comfortable, it takes more practice. Many people feel good after a few weeks of regular stitching. It depends on how much you practice.
Q3: Can I use regular sewing thread for embroidery?
You can, but it is not ideal. Regular sewing thread is thin. It does not give the same look as embroidery floss. Embroidery floss is thicker. It has a nicer sheen. It also comes in more colors.
Q4: Why does my thread keep tangling?
Thread tangling is common. You might be using too long of a thread. Try cutting shorter pieces, around 18 inches. Also, let your needle hang down often. This lets the thread untwist.
Q5: Do I need to use an embroidery hoop?
Yes, using an embroidery hoop is very helpful. It keeps your fabric tight and smooth. This stops your fabric from puckering. It helps your stitches look even and neat.
Q6: How do I choose the right fabric for beginners?
Choose a plain, light-colored cotton fabric. Muslin or a simple quilting cotton works well. These fabrics are easy to see your stitches on. They are also easy to push the needle through.
You now have a great start to your embroidery journey! Grab your needle and thread. Begin making something beautiful. Happy stitching!