
Framing embroidery in a hoop is a great way to show off your stitching. It’s a simple and cheap way to turn your needlework into finished art. Many people wonder, “Can I really frame embroidery in a hoop?” or “Is it hard to do myself?” Yes, you absolutely can, and it’s much easier than you think! This guide will walk you through making your beautiful stitches ready for display. It’s perfect for making lovely craft room decor ideas or making embroidery hoop wall art.
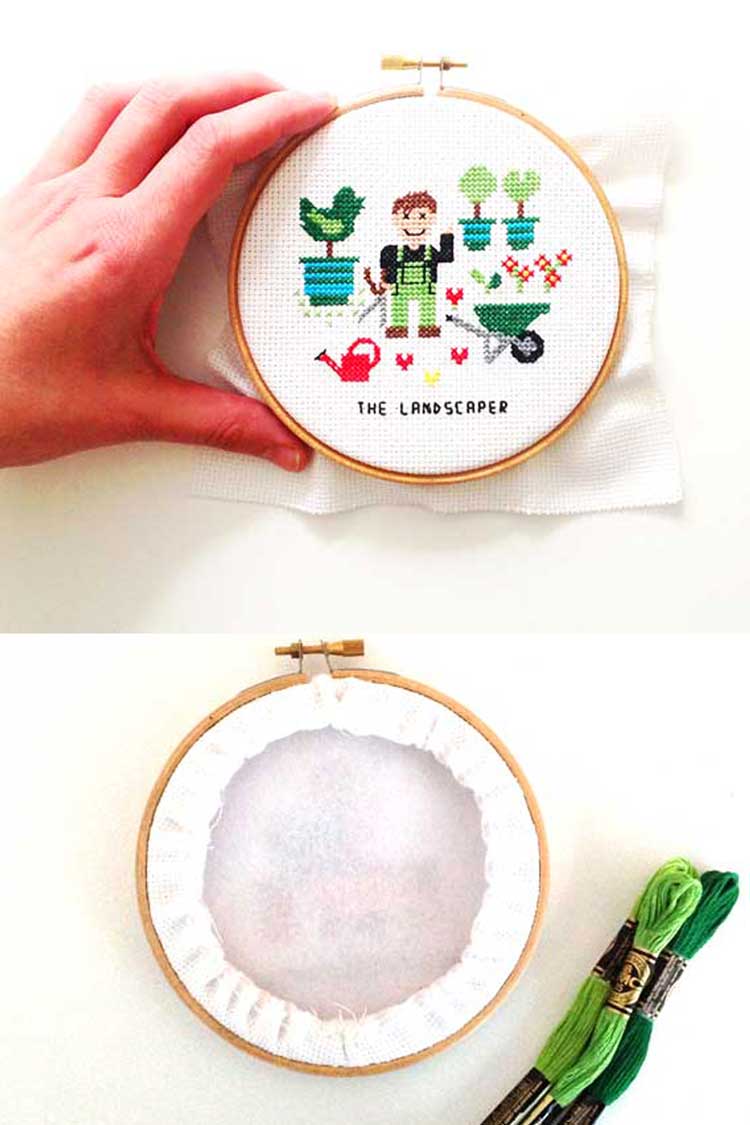
Image Source: studio-koekoek.com
The Charm of Hoop Framing
Hoop framing is popular for many good reasons. It keeps the look of embroidery right in the tool it was made in. This gives a simple, rustic feel. It’s also very budget-friendly. You already have the hoop you used for stitching. Turning your finished piece into finishing embroidery hoop art this way is fast and satisfying. It’s a popular method for displaying hoop embroidery.
Gather Your Things
Before you start, get everything ready. Having your tools nearby makes the job smooth. You will need a few basic craft supplies.
Things You Need
- Your finished embroidery in its hoop.
- Sharp fabric scissors.
- Strong thread (like embroidery floss or sewing thread).
- A sewing needle.
- Optional: Craft glue (like Tacky Glue).
- Optional: Felt or another piece of fabric for the back.
- Optional: Ribbon or twine for hanging.
- Optional: Iron and ironing board.
Getting Your Embroidery Ready
Your embroidery needs to be clean and neat before framing. This is part of the finishing embroidery hoop art process.
Cleaning Your Work
Did you handle your fabric a lot? It might need a gentle wash. Use cool water and a little mild soap. Rinse it well. Do not twist or wring it. Lay it flat on a clean towel to dry.
Making It Smooth
Once dry, your fabric needs to be smooth. This is very important. A smooth surface looks best.
Ironing is Key
Iron your embroidery gently. Place it face down on a soft towel. This protects the stitches. Use a medium heat. Do not press too hard. Make sure the fabric around the design is flat.
Putting the Piece in the Hoop
Now you will place your ironed embroidery back into the hoop. Make sure it is centered just right. This step is about securing embroidery in hoop.
Taking the Hoop Apart
Loosen the screw at the top of your hoop. Separate the two rings.
Placing the Fabric
Lay the inner ring on a flat surface. Place your ironed fabric over the inner ring. Make sure your design is in the center. Put the outer ring over the fabric and the inner ring.
Getting It Just Right
Push the outer ring down over the inner ring. Your fabric should be held between them. Gently pull the fabric edges to make the fabric tight. Make sure your design is centered. Check that it is straight. The fabric should feel like a drum. It should not be loose or wrinkled.
Tightening the Hoop
Once it looks perfect, tighten the screw at the top of the outer hoop. Tighten it firmly. But do not over-tighten it. Too tight can warp the hoop. Check the fabric tension again. Pull the edges a little more if needed. Then tighten the screw a final time. Your embroidery should be tight and smooth inside the hoop. This is a key part of securing embroidery in hoop.
Trimming the Extra Fabric
You have extra fabric hanging outside the hoop. You need to trim this away. This makes the back neat.
Cutting Around the Edge
Use your sharp fabric scissors. Cut the extra fabric about 1 to 1.5 inches (2.5 to 4 cm) from the edge of the outer hoop. You will have a circle of fabric around the back of the hoop.
Finishing the Back of the Hoop
The back of your hoop does not look nice yet. You have the cut fabric edge showing. Backing fabric in hoop makes it look clean. It also protects your stitches. There are a few ways to do this. These are methods for fabric finishing for hoops.
Why Backing Matters
Finishing the back gives a clean look. It protects your stitches from dust. It also makes it easier for attaching hanging hardware to hoop. A nice back makes your DIY embroidery framing look complete.
Methods for Backing Fabric in Hoop
Here are two common ways to finish the back.
Method 1: The Running Stitch Method
This is a very common way. It pulls the fabric edge to the back center.
Steps for Running Stitch Backing
- Thread your needle with strong thread. Do not make it too long.
- Tie a knot at one end of the thread.
- Start stitching around the edge of the fabric circle you cut. Make small running stitches. Stitch about a half inch (1 cm) from the cut edge.
- Go all the way around the fabric circle.
- Once you are back to where you started, gently pull the thread tight. This will gather the fabric towards the center of the hoop back.
- Keep pulling until the fabric edge is tucked inside the hoop rim. It should lay flat against the back of the embroidery.
- Secure the thread. Stitch across the gathered fabric a few times. Tie a firm knot in the center. Cut the extra thread.
This method creates a tidy gathered back. It is good for fabric finishing for hoops.
Method 2: The Glue and Felt Method
This method uses glue and a piece of felt. It creates a flat back.
Steps for Glue and Felt Backing
- Gather the fabric as in Method 1 using a running stitch. Pull it tight and secure the thread. This keeps the edges neat and out of the way.
- Get a piece of felt or other stiff fabric. The color can match your fabric or be a contrast.
- Place the hoop back down on the felt. Use a pen to trace around the outer edge of the hoop.
- Cut out the felt circle. Cut just inside the line you drew. This makes the felt slightly smaller than the hoop. It will fit neatly inside the back.
- Apply craft glue to the back of the hoop. Put glue on the wood rim and the gathered fabric center. Do not use too much glue.
- Carefully place the felt circle onto the glue. Press it down firmly. Make sure the felt covers all the raw fabric edges.
- Let the glue dry completely. This might take a few hours. Check the glue bottle for drying time.
This method makes a very clean, flat back. It is excellent for backing fabric in hoop and makes DIY embroidery framing look professional.
Getting Ready to Hang Your Art
Now your framed embroidery looks nice from the front and the back. It is ready for display. You need a way to hang it. This step is about attaching hanging hardware to hoop.
Options for Hanging Hardware
You have a few easy choices for hanging embroidery hoops.
Simple Ribbon or Twine
This is perhaps the easiest way.
Steps for Adding Ribbon
- Cut a piece of ribbon, twine, or string. Make it as long as you need. It will form a loop for hanging. About 10-12 inches is usually good.
- Thread one end of the ribbon through the metal tightening screw part at the top of the hoop.
- Bring the two ends of the ribbon together. Tie a knot at the top.
- You now have a loop. You can hang the hoop from this loop on a nail or hook.
This is a quick and simple way for hanging embroidery hoops.
Using a Picture Hanger
You can use small picture hanging hardware.
Steps for Adding a Hanger
- Get a small saw-tooth hanger or a small D-ring hanger.
- Find the spot on the back of the hoop you want to attach it. The top, near the screw, is standard.
- Carefully nail or screw the hanger into the wood hoop. Be careful not to split the wood. Small nails or screws are best.
- Some hangers have sticky backs. Peel off the backing and press firmly onto the wood. Make sure the glue is strong enough.
This method for attaching hanging hardware to hoop gives a sturdy hanging point.
Showing Off Your Finished Work
Your beautiful finishing embroidery hoop art is now ready for display. You can put it anywhere you like! Making embroidery hoop wall art is fun.
Where to Display
- Hang it on a wall.
- Lean it on a shelf.
- Place it on a small easel.
- Use it as part of a gallery wall.
Ideas for Displaying Hoop Embroidery
You do not just have to hang one.
- Hang a group of hoops together. Mix sizes and colors.
- Combine hoops with other wall art. Photos or paintings look great with embroidery.
- Hang smaller hoops inside larger ones for a layered look.
- Use them to add color to a wall.
- Think about your craft room decor ideas. Hoops are perfect there!
Displaying hoop embroidery in groups adds a lot of visual interest.
Tips for Success
- Always wash and iron your fabric before framing. It makes a big difference.
- Make sure the fabric is drum-tight in the hoop before finishing the back.
- Use sharp scissors for trimming. This prevents fraying.
- If using glue, let it dry fully before hanging.
- For hanging, make sure the knot is strong or the hardware is secure.
Making Your Work Last
You want your framed embroidery to look good for a long time.
Caring for Your Framed Piece
- Keep it out of direct sunlight. Sunlight can fade fabric and thread colors.
- Keep it away from damp places. Moisture can damage the fabric or hoop.
- Dust it gently. Use a soft brush or a can of compressed air.
- Do not spray cleaners on it.
Summary of Framing Steps
Here is a quick look at the main steps for DIY embroidery framing:
| Step | Action | Purpose |
|---|---|---|
| 1. Prepare Embroidery | Wash and iron fabric. | Clean and smooth the surface. |
| 2. Place in Hoop | Put fabric in hoop, center, tighten screw. | Securing embroidery in hoop tightly. |
| 3. Trim Extra Fabric | Cut fabric edge about 1-1.5 inches out. | Get ready for finishing the back. |
| 4. Finish the Back | Use running stitch or glue/felt method. | Backing fabric in hoop, neat finish. |
| 5. Add Hanging Hardware | Tie ribbon or attach a hook. | Attaching hanging hardware to hoop. |
| 6. Display | Hang on wall, place on shelf, etc. | Displaying hoop embroidery, making embroidery hoop wall art. |
Following these steps carefully helps you create beautiful finishing embroidery hoop art.
More About Backing Methods
Let’s look closer at backing fabric in hoop. Both methods work well. Your choice might depend on how you want the back to look.
Running Stitch Method Details
This method is very simple. It uses basic sewing. The gathered fabric back is traditional. It uses only thread and a needle besides the hoop and fabric. It is great for fabric finishing for hoops if you want a quick, simple look. Make sure your stitches are small and strong. This makes the gathering neat. Pull the thread evenly all the way around. Secure the knot firmly in the middle. You can add a small piece of felt or fabric over the center knot if you like. Just glue or stitch it on. This hides the knot and any raw edges that did not gather perfectly.
Glue and Felt Method Details
This method gives a very clean, flat back. It looks polished. Using felt is popular because felt does not fray. You can use other fabrics too. Cotton or linen work, but you might need to turn the edges under before gluing to prevent fraying. Cutting the felt circle correctly is important. It needs to be slightly smaller than the hoop edge. This way, it fits inside the rim. It hides the gathered fabric edge neatly. Use a good craft glue that dries clear and strong. Put the glue on the wood hoop and the gathered fabric. Press the felt down firmly. Smooth out any bubbles. Let it dry completely under a book or heavy object to keep it flat. This method is excellent for making the back look as good as the front. It adds to the finished quality of your DIY embroidery framing.
Different Ways to Hang
Attaching hanging hardware to hoop gives you flexibility in hanging embroidery hoops.
Ribbon/Twine Hanging
This is simple and adjustable. You can make the loop long or short. You can choose different ribbon colors or types of twine. This adds to the look. A thick ribbon can be part of the design. A thin string makes the hoop look like it floats on the wall.
Picture Hanger Hanging
Using a saw-tooth or D-ring hanger is more permanent. It hangs flat against the wall. This might be better if you are placing the hoop in a tight spot or want it very flush with the wall. Make sure the hanger is centered correctly at the top. This way, the hoop hangs straight. Be very careful when nailing into the wood. The wood of embroidery hoops can split easily. Pre-drilling a tiny pilot hole can help if you are using screws, but often the small nails that come with hangers work fine with care.
Planning Your Display
Think about where your finishing embroidery hoop art will go. How will you use it for craft room decor ideas or making embroidery hoop wall art?
Single Hoop Display
A single hoop can be a strong statement piece. Choose a good spot where it can be seen well. Make sure the hook or nail you use is strong enough.
Group Display (Gallery Wall)
This is a popular trend for displaying hoop embroidery. You can mix sizes, shapes, and styles. Plan the layout on the floor first. Move the hoops around until it looks good. Take a picture of your layout. Then transfer it to the wall. You can use paper templates the size of your hoops. Tape them on the wall to help place your hooks.
- Mix different hoop sizes (small, medium, large).
- Use different hoop shapes (round, oval).
- Include other items like small pictures, signs, or objects.
- Think about color. Group colors together or spread them out.
- Make the layout tight or spread out.
Creating a gallery wall of hanging embroidery hoops can fill a large space nicely. It makes a lovely focal point. It’s a fun way to show off many pieces of your DIY embroidery framing.
More on Fabric Choice
The fabric you stitch on affects the final look. When you are backing fabric in hoop, the type of fabric edge you are dealing with matters. Cotton and linen are common. They fray easily when cut. Gathering them with the running stitch method works well to control this. Felt does not fray. This makes it easy to cut and glue for the flat back method. Think about your fabric when choosing a backing method for fabric finishing for hoops.
Detailed Steps for Securing
Let’s look more closely at securing embroidery in hoop. This step is crucial for the final look.
- Loosen the screw enough to easily get the outer hoop off the inner one.
- Place the inner hoop on a flat surface.
- Center your ironed embroidery over the inner hoop. Look through the hoop opening. Make sure your design is perfectly placed.
- Hold the fabric gently but firmly against the inner hoop.
- Place the outer hoop over the fabric and inner hoop. Push down evenly. You might need to press quite hard depending on the hoop size. Push down until the outer hoop is seated around the inner hoop.
- The fabric will feel loose now. That is okay.
- Gently pull the edges of the fabric radiating out from the hoop. Pull a little from the top, then the bottom, then the sides. Then pull from all around. Do this slowly.
- As you pull, the fabric inside the hoop will get tighter. The wrinkles will disappear.
- Watch your design. Make sure it stays centered and does not get skewed.
- Once the fabric is smooth and tight like a drum head, begin tightening the screw at the top.
- Tighten it a little bit. Then pull the fabric edges again. This helps get it really tight.
- Tighten the screw more. Keep pulling the fabric edges gently. Work your way around the hoop.
- Tighten the screw firmly for the final time. The fabric should be very taut. Tap it with your finger – it should make a slight drum sound.
- Double-check the centering and tension. If it’s not right, loosen the screw and start this step again. It is worth taking time here.
Properly securing embroidery in hoop ensures your finished piece looks its best.
The Final Touches
Once the back is finished and the hanger is added, take a last look at your finishing embroidery hoop art. Trim any stray threads from the front. Wipe away any marks from the hoop. Your DIY embroidery framing is complete!
More About Display
Think about the setting for displaying hoop embroidery.
- In a sewing room: Perfect craft room decor ideas. Show off your hobby!
- In a living room: A small framed piece adds a personal touch.
- In a child’s room: Frame a cute design for easy wall art.
- As a gift: A framed hoop makes a thoughtful handmade present.
Making embroidery hoop wall art is simple with a hoop. It’s a great way to decorate your home or make gifts.
Frequently Asked Questions
Here are some common questions about framing embroidery in a hoop.
What kind of hoop is best for framing?
Wooden hoops are usually preferred for framing. They look nice and are sturdy. The outer hoop often has a screw to tighten. Bamboo or plastic hoops can also be used, but wood is traditional and looks great as a frame.
Should I wash my embroidery before framing?
Yes, it is highly recommended. Washing removes dirt and oils from your hands. This helps the fabric and threads stay clean over time. Always wash gently in cool water.
How tight should the fabric be in the hoop?
The fabric should be quite tight, like a drum. It should be smooth with no wrinkles. If it is loose, your design might sag over time.
Can I use glue instead of sewing to finish the back?
Yes, you can use glue for the backing fabric. The glue and felt method uses glue. If you use the running stitch method, you still need to sew to gather the fabric. But you could potentially glue the gathered edge down instead of stitching it completely, though stitching is more secure. Using felt glued over the back is a very popular and clean method.
How do I attach ribbon for hanging?
Cut a piece of ribbon. Thread one end through the metal screw assembly at the top of the hoop. Bring both ends together. Tie a knot at the top, creating a loop.
My fabric is thick, will it still fit in the hoop?
Most standard hoops can hold common embroidery fabrics like cotton or linen. If you used a very thick fabric or added extra batting, it might be harder to get the outer hoop on. Make sure the hoop parts fit together well before you start stitching, especially if using thick materials.
How do I keep my framed embroidery clean on the wall?
Dust it gently from time to time. You can use a soft brush, a lint roller carefully on the fabric surface (not the stitches), or a can of compressed air from a distance.
Can I frame any embroidery design this way?
Yes, almost any embroidery design can be framed in a hoop. It works best for designs that fit within the hoop’s circle or oval shape. Make sure you leave enough extra fabric around your design when you start stitching. You need this fabric later for trimming and backing.
This guide covers the key steps for DIY embroidery framing using a hoop. By following these steps, your beautiful needlework will be ready to hang as lovely craft room decor ideas or other making embroidery hoop wall art. It’s a simple, effective way of displaying hoop embroidery and a great way of finishing embroidery hoop art. The techniques for backing fabric in hoop and attaching hanging hardware to hoop are easy to learn. Enjoy showing off your stitches!