
Can you hem blue jeans with a sewing machine? Absolutely! You can easily hem blue jeans using a sewing machine right at home. This guide will walk you through the simple steps to achieve a professional-looking finish, whether you need to shorten your favorite pair or give an old pair a new lease on life. Denim hemming is a fundamental skill for anyone looking to tailor jeans or perform pant alterations.
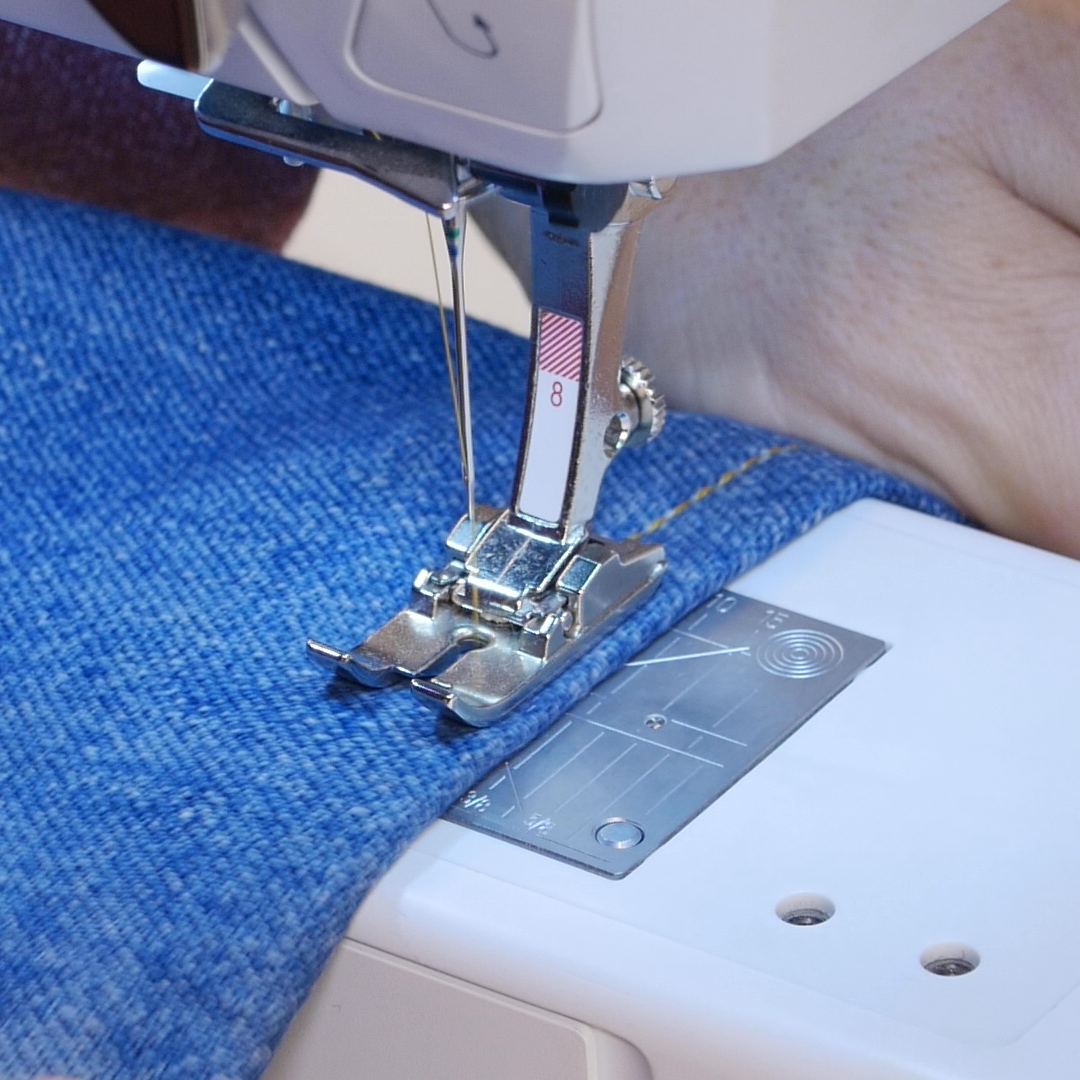
Image Source: weallsew.com
Why Hem Your Own Jeans?
DIY jeans projects, like hemming, are incredibly rewarding. Not only do you save money compared to going to a tailor, but you also gain the satisfaction of creating a custom fit. Plus, learning to hem blue jeans is a foundational skill in denim sewing, opening up a world of pant alterations and customizations.
Benefits of DIY Denim Hemming:
- Cost-Effective: Avoid expensive tailor fees.
- Custom Fit: Achieve the perfect length for your legs.
- Preserve Original Look: Keep the original hem for an authentic appearance.
- Skill Building: Master a valuable sewing jeans technique.
- Repurpose Clothing: Give old jeans a new, perfect fit.
Gathering Your Supplies
Before you start sewing a hem on your jeans, gather everything you’ll need. Having all your supplies ready makes the process smoother and more enjoyable.
Essential Supplies for Hemming Jeans:
- Sewing Machine: A sturdy machine capable of handling denim is ideal.
- Denim Needles: These are stronger and sharper than regular needles, designed for thick fabrics.
- Heavy-Duty Thread: Use polyester or cotton-wrapped polyester thread in a color that matches your jeans.
- Measuring Tape: For accurate measurement of your desired jean leg length.
- Fabric Scissors or Rotary Cutter and Mat: For precise fabric cutting.
- Fabric Marking Tool: Tailor’s chalk, a washable fabric marker, or even a pencil.
- Straight Pins: To hold the fabric in place while sewing.
- Seam Ripper: For undoing stitches if you need to adjust or start over.
- Iron and Ironing Board: To press seams and create crisp folds.
- Your Blue Jeans: The star of the show!
Preparing Your Jeans for Hemming
Proper preparation is key to a successful denim hemming project. This ensures accuracy and a neat finish.
Step 1: Decide on Your Desired Jean Leg Length
Try on your jeans with the shoes you’ll most likely wear them with. Stand in front of a mirror and decide where you want the hem to fall. Mark this point with a pin or your fabric marker.
- Consider the Break: Do you want your jeans to have no break (just touching the top of your shoe), a slight break, or a full break? This affects where you’ll mark the hem.
- Account for the Fold: Remember you’ll be folding the fabric up, so mark the finished length, not where you’ll cut.
Step 2: Measure and Mark for Cutting
Once you have your desired finished length, you need to add extra fabric for the hem fold. A standard hem allowance for jeans is about 1 inch to 1.5 inches.
- Lay your jeans flat on a table or the floor.
- Measure from your marked desired length down to the original hem.
- Mark your new finished length.
- From that new finished length mark, measure down an additional 1 to 1.5 inches for your hem allowance. Mark this point. This is where you will cut.
- Use your fabric marker to draw a straight line across the leg at this cutting point. Repeat for the other leg, ensuring the measurement is the same.
Step 3: Cut Off the Excess Fabric
Using your sharp fabric scissors or rotary cutter, carefully cut along the marked line. Try to make the cut as straight and even as possible.
Step 4: Remove the Original Hem (Optional but Recommended)
For a cleaner, more professional finish, it’s best to remove the original, thicker hem. This prevents bulkiness and makes machine sewing jeans much easier.
- Use your seam ripper to carefully unpick the stitches of the original hem.
- Gently pull away the folded fabric.
- If there are any loose threads, trim them neatly with your scissors.
Tip: If you want to preserve the original, worn look of your jeans, you can try to reattach the original hem. This is a more advanced technique and requires careful alignment. For beginners, removing the old hem is generally simpler.
Step 5: Press the New Hem Allowance
Now, fold the fabric up along the edge of the fabric where the original hem used to be. This fold should be about 1 inch to 1.5 inches, depending on how much you allowed. Press this fold firmly with your iron. This creates a crisp line for your next fold.
Sewing the New Hem
This is where the denim sewing magic happens! With your machine ready, you’re about to secure your new hem.
Step 1: Fold and Pin the Hem
- Fold the fabric up again, this time to meet the desired finished jean leg length you marked earlier.
- Ensure the folded edge is smooth and aligns with your original mark.
- Use straight pins to secure the folded hem in place. Place pins perpendicular to the folded edge. For extra security, you can pin about every 1-2 inches.
Step 2: Prepare Your Sewing Machine
Sewing machine tips for denim are crucial for a smooth process.
- Install the Denim Needle: Make sure you have a fresh, sharp denim needle (size 90/14 or 100/16 is usually good for jeans).
- Use Heavy-Duty Thread: Thread your machine with your chosen heavy-duty thread.
- Select the Right Stitch: A straight stitch is typically best for hemming jeans.
- Adjust Tension: You might need to adjust your machine’s tension slightly. Test on a scrap piece of denim first. Usually, a slightly lower top tension or slightly higher bobbin tension works well for denim.
- Set Stitch Length: A slightly longer stitch length (around 2.5-3.0 mm) can be more durable on denim.
Step 3: Stitch the Hem
- Place the pinned jean leg under the sewing machine foot. Align the edge of the fabric with the presser foot.
- Start sewing at a slow and steady pace.
- Sew along the top folded edge of the hem.
- When you reach a seam (like the side seam or inseam), you might encounter thick layers of denim. You can use a “hump jumper” or a piece of folded fabric to help lift the presser foot to be parallel with the needle before sewing over the thick part. This prevents the needle from breaking and the machine from jamming.
- Backstitch at the beginning and end of your seam to secure the stitches.
- Carefully remove the pins as you sew.
Step 4: Reinforce the Seam (Optional)
For added durability, especially at the side seams where jeans often wear out, you can add a second line of stitching.
- Double Stitch: Sew a second line of stitching about 1/8 inch away from your first seam. This mimics the look of the original hem and adds strength.
- Zigzag Stitch: Alternatively, you can use a zigzag stitch along the raw edge of the hem allowance before folding and stitching the hem. This encloses the raw edge and prevents fraying. Then, fold and stitch as usual.
Step 5: Finishing Touches
- Trim any excess threads with your scissors.
- Give the hem a final press with your iron. This sets the stitches and gives a neat, professional finish.
Advanced Techniques for the Authentic Jean Hem
Want to replicate the original look of your jeans? Here are some tips for a more authentic finish.
Reattaching the Original Hem
This is a popular method for DIY jeans enthusiasts who want to maintain the iconic look of the original hem.
- Careful Removal: When removing the original hem, try to unpick only the stitches holding the folded part to the leg. Leave the side seam stitches intact if possible.
- Measure Precisely: Note the width of the original hem.
- Fold the New Hem: Fold the raw edge of the fabric up by the width of the original hem. Press firmly.
- Align and Pin: Align the folded edge of your new hem with the bottom edge of the original hem you’ve carefully preserved (or the original seam line if you removed it completely). Pin securely.
- Sewing: Use a strong thread and a denim needle. Sew as close to the original stitch line as possible. You might need to use a seam ripper to carefully remove the original stitches as you sew. This requires patience and a steady hand.
Table: Comparing Hemming Methods
| Method | Difficulty | Time Investment | Authentic Look | Bulk |
|---|---|---|---|---|
| Simple Fold & Stitch | Easy | Moderate | Fair | Moderate |
| Fold with Original Hem | Moderate | High | Excellent | Low |
| Double Stitch (No Original) | Easy | Moderate | Good | Moderate |
| Zigzag Edge + Fold & Stitch | Easy | Moderate | Fair | Low |
The “Jean Leg Length” Challenge: Working with Thick Seams
When sewing jeans, especially around the inseam and side seams, you’ll encounter multiple layers of denim and possibly felled seams. This can be tricky for sewing machines.
Tips for Thick Seams:
- Use a Hump Jumper (Seam Leveler): This small tool slides under your presser foot to create an even surface when sewing over thick areas.
- Sew Slowly: Don’t rush through these sections.
- Manual Handwheel: If your machine struggles, you can sometimes turn the handwheel manually for extra control over the needle.
- Stronger Needles: Ensure your denim needle is new and sharp.
- Lower Presser Foot Pressure: Some machines allow you to adjust the pressure of the presser foot. Lowering it slightly can help.
Choosing Thread Color for Denim Sewing
The thread color can significantly impact the final look of your hem.
- Matching Thread: For a subtle, modern look, use a thread that closely matches the color of your jeans.
- Contrast Thread: Many classic jeans feature a contrasting thread, often a golden yellow or orange. This adds a traditional, vintage touch. When reattaching an original hem, try to match the original thread color if possible.
- Heavy-Duty Polyester: This type of thread is strong and durable, perfect for the stress denim undergoes.
Troubleshooting Common Hemming Issues
Even with the best intentions, you might encounter a few bumps along the way. Here’s how to handle them.
Uneven Hem Lines
If your hemline looks wavy or uneven after sewing:
- Cause: Fabric shifted during sewing, or the original fabric was stretched unevenly.
- Solution: Carefully unpick the stitches with a seam ripper and re-pin the hem, ensuring the fabric is smooth and not stretched before sewing. Using a walking foot on your machine can also help feed the layers evenly.
Broken Needles
A broken needle is a common problem with denim:
- Cause: Sewing over pins, using a dull or incorrect needle type, or pushing the fabric too hard through the machine.
- Solution: Always remove pins before they reach the needle. Use a fresh denim needle of the appropriate size. Never force the fabric; let the machine feed it.
Puckered Stitches
If your stitches look bunched up or puckered:
- Cause: Thread tension is too tight, or the stitch length is too short.
- Solution: Loosen your upper thread tension slightly or increase your stitch length. Test on a scrap piece of denim.
Machine Skipping Stitches
If your machine is skipping stitches:
- Cause: Dull needle, incorrect needle type, or dirt in the bobbin case.
- Solution: Install a new denim needle. Ensure the needle is inserted correctly. Clean your bobbin area.
FAQs: Your Questions Answered
Here are some common questions about hemming blue jeans.
Q1: What size needle should I use for hemming jeans?
A1: For most denim, a size 90/14 or 100/16 denim needle is recommended. If you’re working with very thick denim or multiple layers, a 100/16 or even a specialized heavy-duty needle might be better.
Q2: Can I hem jeans without a sewing machine?
A2: Yes, you can hem jeans by hand. It will take more time and effort, but it’s certainly possible. A strong, neat hand stitch like a backstitch or a whipstitch can be used. However, for durability and a professional finish, a sewing machine is highly recommended for denim hemming.
Q3: How much fabric should I leave for the hem?
A3: A good rule of thumb is to leave 1 to 1.5 inches of fabric for the hem allowance. This gives you enough room to create a double fold for a neat finish or to reattach the original hem.
Q4: What is the best thread for sewing jeans?
A4: Heavy-duty polyester thread or a cotton-wrapped polyester thread is ideal for sewing jeans because it’s strong and durable enough to withstand the wear and tear that jeans experience.
Q5: How do I get a straight hem when sewing jeans?
A5: Accurate measuring, precise cutting, and careful pinning are key. Use your fabric marker to draw a straight line before cutting. When pinning, ensure the fabric is not stretched and align the edges evenly. Using a walking foot on your sewing machine can also help prevent uneven feeding of the fabric layers.
Q6: Can I shorten jeans without cutting the original hem?
A6: Yes, you can. This is often called a “blind hem” or “invisible hem” method, though it’s not truly invisible on denim. You can fold the fabric up to the desired length, press, and then sew from the inside of the leg using a stitch that catches only a few threads of the outer fabric. Another popular way is to detach the original hem, shorten the leg, and then reattach the original hem.
Conclusion
Hem blue jeans with a sewing machine is a straightforward and accessible skill for anyone looking to achieve a perfect fit or refresh their wardrobe. By following these steps, gathering the right supplies, and paying attention to detail, you can confidently tackle denim hemming and enjoy custom-fitted jeans. Whether you’re a beginner embarking on your first DIY jeans project or an experienced sewer looking to refine your techniques for pant alterations, this guide provides the knowledge to master machine sewing jeans. Happy hemming!