
Are you wondering how to insert a bobbin into your Brother sewing machine? It’s a straightforward process, and once you get the hang of it, you’ll be sewing in no time. This guide will walk you through the steps of Brother sewing machine bobbin insertion, ensuring you correctly load your bobbin for smooth stitching. We’ll cover everything from finding the right bobbin to the final threading.
Sewing machines, especially reliable ones like Brother models, require precise setup to function correctly. A significant part of this setup involves the bobbin. The bobbin is the small spool that holds the lower thread, working in conjunction with the top thread to create a stitch. If your bobbin isn’t inserted or threaded properly, you’ll likely experience skipped stitches, thread breakage, or an uneven stitch quality. This guide aims to demystify the process of installing bobbin Brother sewing machine, making it accessible even for beginners. We will explore the Brother sewing machine bobbin setup, the Brother sewing machine bobbin holder, and the crucial steps involved in Brother sewing machine bobbin loading.
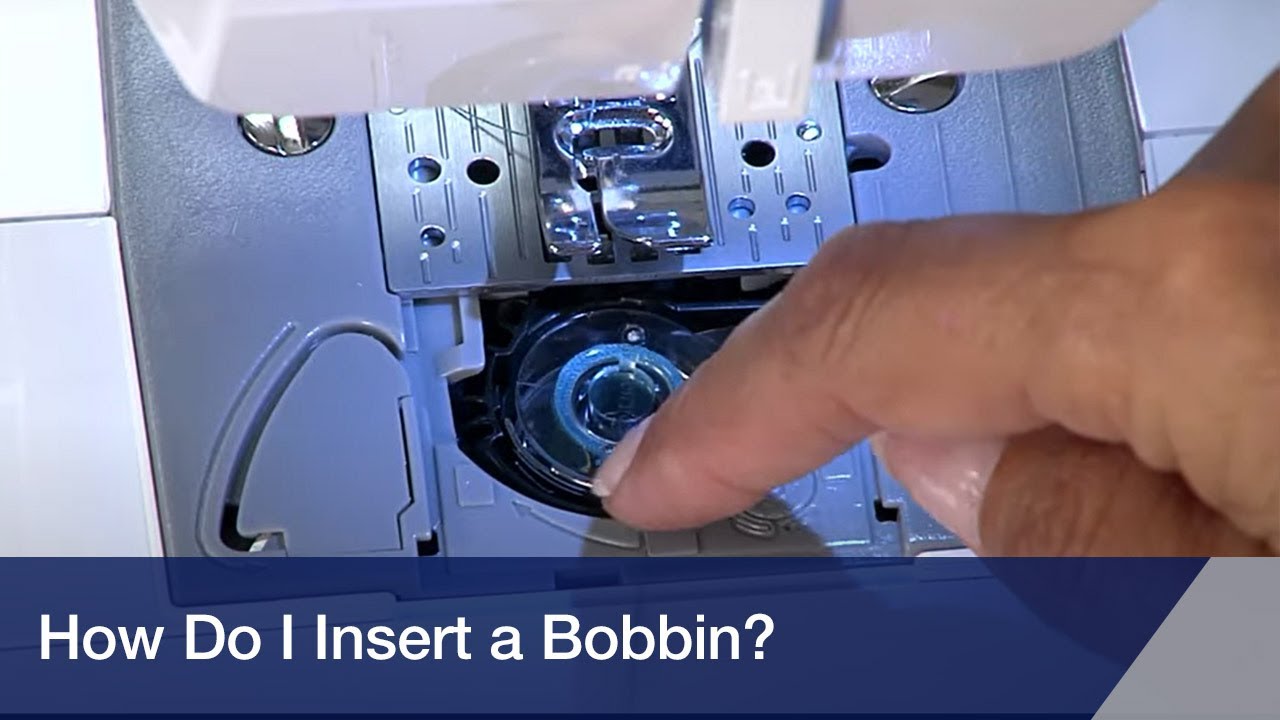
Image Source: i.ytimg.com
Getting Your Bobbin Ready: The First Step in Bobbin Setup
Before you can insert the bobbin, it needs to be wound. Most Brother sewing machines have a dedicated Brother sewing machine bobbin winding mechanism. It’s essential to use the correct type of bobbin for your specific Brother sewing machine model. Using the wrong size or type can cause damage or prevent the machine from working.
Choosing the Right Bobbin
Brother sewing machines typically use a specific type of bobbin. These are often clear plastic bobbins, but metal ones can also be used depending on the model.
- Check your manual: The best way to know the correct bobbin type is to consult your Brother sewing machine’s user manual. It will specify the bobbin size and material.
- Visual inspection: Bobbins usually have a part number or model designation on them. You can often match this with information online or at a sewing supply store.
- Common Brother Bobbin Types: While it varies, some common types include Class 15, SA156, SA157, and others. Always confirm for your specific machine.
The Bobbin Winding Process
Winding a bobbin is crucial for a successful sewing experience. Here’s a general overview of how to wind a bobbin on a Brother sewing machine:
- Place the bobbin on the bobbin winder spindle: Locate the bobbin winder spindle on your machine. It’s usually a small metal or plastic post.
- Guide the thread: Take the end of your spool thread and pass it through the thread guides on your machine, just as you would for regular sewing, but then direct it to the bobbin.
- Thread the bobbin: Wrap the thread around the bobbin a few times in the direction indicated by your machine’s diagram (usually counter-clockwise).
- Engage the bobbin winder: You might need to push the bobbin winder spindle to the right or left to engage it.
- Start winding: Press the foot pedal. The machine will wind the thread onto the bobbin.
- Cut the thread: Once the bobbin is nearly full (or when the thread is evenly wound), stop the machine. Cut the thread coming from the spool.
- Finish winding: Wind a little more thread to secure the end, then cut the thread again.
- Disengage and remove: Move the bobbin winder spindle back to its original position and remove the wound bobbin. Trim the excess thread hanging from the bobbin.
Tip: Ensure the thread is wound evenly and not too tightly or too loosely. Overfilling can cause thread to snag or break.
Mastering Bobbin Placement: Where Does it Go?
Once your bobbin is wound, it’s time to prepare for insertion. The location and orientation of the bobbin are critical for proper stitch formation. Brother sewing machines generally fall into two main categories regarding bobbin placement: top-loading (drop-in) and front-loading.
Top-Loading (Drop-In) Bobbin Systems
Many modern Brother sewing machines feature a top-loading or “drop-in” bobbin system. This is often considered more user-friendly.
How to thread a Brother sewing machine bobbin in a drop-in system:
- Remove the needle plate: Lift off the accessory tray (if applicable) and then remove the needle plate that covers the bobbin area. This usually slides or lifts off easily.
- Locate the bobbin case: You’ll see a clear plastic cover, often with markings. Remove this cover. Beneath it is the bobbin case.
- Insert the bobbin: Place the wound bobbin into the bobbin case with the thread unwinding in the correct direction. For most Brother drop-in systems, this means the thread should be coming off the top of the bobbin, unwinding counter-clockwise. Look for an arrow or diagram on the bobbin case or machine that shows the correct direction.
- Guide the thread: You’ll see a small slot or hook on the bobbin case. Guide the bobbin thread through this slot and pull it until about 4-6 inches of thread is extending from the case.
- Replace the bobbin case and cover: Gently place the bobbin case back into its housing. Then, replace the clear plastic cover.
Brother sewing machine bobbin placement in a drop-in system: The bobbin sits within a specially designed bobbin case, which then fits into the machine’s bobbin race. The correct orientation is key.
Table 1: Bobbin Direction for Common Brother Drop-In Systems
| Bobbin Orientation | Thread Direction (When viewed from the side) | Common Brother Models (Examples) |
|---|---|---|
| Thread unwinding counter-clockwise | Thread comes off the top of the bobbin | XL series, CS series, LS series |
Note: Always double-check your machine’s manual as variations exist.
Front-Loading Bobbin Systems
Older or some entry-level Brother sewing machines may have a front-loading bobbin system. In these machines, the bobbin is housed in a removable Brother sewing machine bobbin case, which is then inserted into a bobbin compartment below the needle.
How to thread a Brother sewing machine bobbin in a front-loading system:
- Access the bobbin compartment: Open the small compartment door at the front or bottom of the sewing machine.
- Remove the bobbin case: Gently pull out the metal or plastic bobbin case.
- Insert the bobbin: Place the wound bobbin into the bobbin case. For most Brother front-loading systems, the thread should be coming off the top of the bobbin, unwinding counter-clockwise. Ensure the thread tail is seated correctly in the small tension slot of the bobbin case.
- Guide the thread: Pull about 4-6 inches of thread through the bobbin case and out of the tension slot.
- Insert the bobbin case: Slide the bobbin case back into its compartment in the machine. There’s usually a small lever or notch that helps guide it into the correct position. Make sure it’s seated securely.
- Close the compartment door: Close the compartment door.
Brother sewing machine bobbin holder: In front-loading systems, the bobbin case acts as the Brother sewing machine bobbin holder. It’s a separate, removable piece that carries the bobbin and influences the lower thread tension.
Table 2: Bobbin Direction for Common Brother Front-Loading Systems
| Bobbin Orientation | Thread Direction (When viewed from the side) | Common Brother Models (Examples) |
|---|---|---|
| Thread unwinding counter-clockwise | Thread comes off the top of the bobbin | XL2000 series, PS series |
Note: Again, your machine’s manual is the ultimate guide.
The Crucial Step: Bobbin Insertion and Threading
Now that you know where the bobbin goes, let’s focus on the actual insertion and the subsequent threading of the lower thread. This is a critical part of the Brother sewing machine bobbin loading process.
Installing the Bobbin: A Detailed Look
Regardless of the system, the core principle of installing bobbin Brother sewing machine is to ensure the bobbin is seated correctly and the thread is routed properly to engage with the machine’s mechanisms.
For Drop-In Systems:
- Open the bobbin cover: Lift off the clear plastic cover.
- Insert the bobbin: Place the bobbin into the bobbin case with the thread unwinding counter-clockwise. The thread tail should be coming from the top of the bobbin.
- Guide the thread: You’ll see a groove or slot on the bobbin case. Guide the thread through this slot. Pull approximately 4 to 6 inches of thread forward.
- Set the bobbin case: Ensure the bobbin case is correctly positioned in the machine. There might be a small notch that aligns with a projection in the bobbin area.
- Replace the cover: Put the clear plastic cover back in place.
For Front-Loading Systems:
- Open the bobbin compartment: Open the access door.
- Remove the bobbin case: Take out the bobbin case.
- Insert the bobbin: Place the bobbin into the bobbin case, ensuring the thread unwinds counter-clockwise from the top.
- Thread the bobbin case: Guide the thread through the tension slot of the bobbin case. Pull about 4 to 6 inches of thread forward.
- Insert the bobbin case: Slide the bobbin case back into the bobbin compartment. Ensure it clicks into place or is seated firmly, often aligning a small projection on the case with a corresponding slot in the machine.
- Close the compartment door: Close the access door.
Bringing Up the Bobbin Thread
After the bobbin is in place, you need to bring the bobbin thread up to meet the top thread. This is a vital part of how to thread a Brother sewing machine bobbin.
- Hold the top thread: With one hand, gently hold the end of the thread coming from the spool on top of the machine.
- Lower and raise the needle: Turn the handwheel towards you (one full rotation) to lower the needle into the bobbin area and then back up again. As you raise the needle, the bobbin thread should loop up.
- Catch the bobbin thread: Use your fingers or tweezers to catch the loop of bobbin thread that has come up through the needle plate.
- Pull out the bobbin thread: Pull the bobbin thread out and lay it alongside the top thread, usually towards the back of the machine.
Now you have both the top thread and the bobbin thread ready to start sewing.
Common Issues and Troubleshooting with Bobbins
Even with careful insertion, sometimes things don’t go as planned. Here are common issues related to the bobbin and how to address them.
Bobbin Thread Breaking
- Cause: Bobbin not inserted correctly, thread snagging on the bobbin case, wrong bobbin type, burr on the bobbin case or machine, or the bobbin wound unevenly.
- Solution: Re-insert the bobbin, ensuring it’s the correct type and wound smoothly. Check the bobbin case for any damage or rough spots. Ensure the thread is routed correctly through any guides or slots.
Skipped Stitches
- Cause: Needle is blunt, bent, or inserted incorrectly. Bobbin isn’t seated properly. Thread tension is off. The machine needs cleaning and oiling.
- Solution: Ensure the bobbin is seated correctly and the thread is routed properly. Check the needle and replace if necessary. Adjust upper and lower tension (refer to your manual). Clean and oil your machine.
Thread Nesting (Bird Nesting)
- Cause: This typically happens when the top thread is too loose or the bobbin thread is too tight, or when the bobbin isn’t seated correctly, preventing the top thread from being caught properly. The top thread loops underneath the fabric.
- Solution: Ensure the bobbin is inserted correctly and the thread is routed through the tension disc of the bobbin case. Check and adjust the upper thread tension, usually tightening it slightly. Make sure the bobbin itself is wound neatly.
Bobbin Not Spinning Freely
- Cause: Lint or debris in the bobbin area, a damaged bobbin case, or the bobbin is wound too tightly.
- Solution: Clean the bobbin area thoroughly. Inspect the bobbin case for any damage. Ensure the bobbin is wound evenly and not overly tight.
Maintaining Your Bobbin System
Regular maintenance ensures your Brother sewing machine bobbin holder and the entire bobbin system work efficiently.
Cleaning the Bobbin Area
Lint and dust are the enemies of smooth sewing. Regularly clean the bobbin area, especially after long sewing sessions or when changing thread colors.
- Remove the bobbin: Take out the bobbin.
- Remove the bobbin case (if applicable): For front-loading machines, remove the bobbin case. For drop-in systems, you might be able to clean around the bobbin case without removing it, but often removing the needle plate and bobbin case allows for better access.
- Use a brush: Use a small cleaning brush (often supplied with your machine) to sweep away lint and dust.
- Use tweezers: For stubborn lint, use tweezers.
- Blow out debris: You can use a can of compressed air to blow out any remaining dust, holding the can upright.
- Wipe down: Use a soft, dry cloth to wipe down accessible parts.
Oiling the Bobbin Area
Some machines require occasional oiling in the bobbin area. Consult your Brother sewing machine manual to determine if and where your machine needs oil. Typically, a tiny drop of sewing machine oil is applied to the bobbin race or hook mechanism.
Advanced Bobbin Techniques and Considerations
Once you’re comfortable with the basics, you might explore other aspects of bobbin use.
Using Different Bobbin Thread Colors
While you’ll usually match bobbin thread to your top thread for neatness, you can intentionally use contrasting colors for decorative effects on the underside of your fabric, or for appliqué where the bobbin thread might show.
Specialty Bobbins
Some Brother sewing machines can handle specialty bobbins, such as clear bobbins for certain applications or pre-wound bobbins. Always check your manual to ensure compatibility.
The Role of the Bobbin Tension
The bobbin contributes significantly to the overall stitch tension. If your stitches are too tight or too loose on the underside, even after adjusting the top thread tension, the bobbin tension might be the culprit. Adjusting bobbin tension is usually done by a professional or requires specific knowledge of your machine’s bobbin case, as it often involves a tiny screw on the case itself. For most users, ensuring the bobbin is inserted correctly and the thread is routed through the bobbin case’s tension slot is sufficient.
Frequently Asked Questions (FAQ)
Q1: What if my Brother sewing machine bobbin won’t turn?
A1: Check for lint or debris in the bobbin area. Ensure the bobbin is inserted correctly and the thread isn’t tangled around it. Make sure the bobbin case is seated properly. If it’s a front-loading machine, ensure the bobbin case is correctly in place.
Q2: Can I use any bobbin in my Brother sewing machine?
A2: No, you must use the specific type and size of bobbin recommended for your Brother sewing machine model. Using the wrong bobbin can cause poor stitch quality or damage the machine. Always refer to your user manual.
Q3: How do I know if I’ve threaded the bobbin correctly in the bobbin case?
A3: The thread should be coming off the top of the bobbin, unwinding counter-clockwise for most Brother machines. It should also be routed through the tension slot on the bobbin case and held with a little tension. When you pull the thread, the bobbin should rotate smoothly but with some resistance.
Q4: Why is my bobbin thread coming up through the fabric?
A4: This usually indicates that the upper thread tension is too loose or the bobbin is not inserted correctly. Re-thread your machine, ensuring the bobbin is seated properly and the thread is routed through the bobbin case’s tension mechanism. Adjust the upper thread tension to a tighter setting.
Q5: How do I know which way to put the bobbin in my Brother sewing machine?
A5: For most Brother sewing machines, the bobbin should be placed with the thread unwinding from the top of the bobbin in a counter-clockwise direction. Look for directional arrows on your machine or in your manual.
By following these detailed steps and tips, you’ll become proficient in how to insert a bobbin in a Brother sewing machine. Proper Brother sewing machine bobbin insertion is fundamental to achieving beautiful, consistent stitches and enjoying your sewing experience to the fullest. Remember to always consult your specific model’s manual for the most accurate guidance.