
Image Source: oliverands.com
Mastering How To Knot Sewing: A Step-by-Step Guide
A sewing knot is a simple way to tie your thread. It holds your stitches in place. You need to know how to knot sewing for many reasons. Knots start your sewing line. They also finish it. This stops your fabric from coming apart. Yes, you can learn sewing knots easily. Anyone who sews needs to know these basic skills. This guide will show you how.
The Power of Good Knots in Sewing
Good knots are very important in sewing. They are like strong anchors. They hold your stitches tight. Without a good knot, your sewing can fall apart. This means your hard work goes to waste. A strong knot makes your sewing last. It stops seams from unraveling. This is key for any sewing project. From a simple patch to a fancy dress, knots matter.
Why Secure Stitching Knots Are Essential
Strong knots keep your stitches safe. They stop them from slipping. They also stop them from coming undone. Think of a button on a shirt. If the knot is weak, the button will fall off. Secure stitching knots make your work last. They add strength to every stitch. This means your sewn items are durable. They can stand up to wear and tear. Good knots give you peace of mind.
Getting Ready: Your Knotting Tools
You do not need many tools for knots. A few simple items will help.
- Needle: Choose the right size. It should fit your thread.
- Thread: Pick good quality thread. It should match your fabric.
- Fabric: Have a piece ready to practice on.
- Scissors: Small sharp ones are best. They trim thread ends neatly.
Basic Hand Sewing Knot Techniques
There are many ways to make knots. Some are for starting. Some are for finishing. Others are for special uses. Let’s look at the basic hand sewing knot techniques first. These are simple. They are great for beginners.
How to Start Sewing Knot: The Basic Knot
This is often the first knot you learn. It is simple. It makes a small bump. This bump stops the thread. It keeps it from pulling through the fabric. This is a common way to begin.
Steps for the Basic Start Knot:
- Thread Your Needle: Put your thread through the needle eye.
- Pull about 18 to 24 inches of thread.
- Cut the thread from the spool.
- Hold the Thread End: Take the long end of the thread.
- Hold it in your non-dominant hand.
- You will hold it near the tip.
- Wrap the Thread: Wrap the thread around your index finger.
- Wrap it once or twice.
- Wrap it close to your fingertip.
- Roll the Thread: Use your thumb.
- Roll the wrapped thread down your finger.
- Roll it towards your palm.
- This makes a small coil.
- Pull the Loop: Keep holding the coil with your thumb.
- Use your other hand.
- Pull the needle and the rest of the thread.
- Pull it gently through the coil.
- A small knot will form at the end.
- Tighten the Knot: Pull the knot tight.
- Make sure it is firm.
- It should be at the very end of your thread.
- This is your start sewing knot.
This knot is quick. It is easy to learn. It works for many simple projects. It is a true beginner sewing knot.
The Double Knot for Extra Hold
Sometimes, you need a stronger start. A double knot gives more grip. It is just two basic knots. You tie one. Then you tie another right over it.
Steps for the Double Knot:
- Make a Basic Knot: Follow the steps above.
- Tie a single basic knot at the end of your thread.
- Make Another Knot: Do the same steps again.
- Make a second basic knot.
- Make it right on top of the first one.
- They should sit very close together.
- Pull Tight: Tug on the thread.
- Make both knots firm.
- This creates a slightly larger knot.
- It offers more stopping power.
This double knot is great for thicker fabrics. It also works well for items that get a lot of use. It helps in preventing unraveling thread from the start.
Mastering Finishing Knots: How to Finish Sewing Knot
Ending your sewing neatly is as important as starting it. A good finishing knot hides your work. It also keeps it secure. You do not want your stitches to come loose.
The Simple Backstitch Knot
This is a common way to end a line of stitches. It is strong. It is also quite simple.
Steps for the Simple Backstitch Knot:
- Stitch to the End: Sew your line of stitches.
- Stop when you are at the end.
- Bring your needle to the back side of the fabric.
- Make a Small Stitch: Take a tiny stitch.
- Make it very close to your last full stitch.
- Go through only a few threads of fabric.
- Do not pull the needle all the way through yet.
- Form a Loop: A small loop of thread will be on the back.
- This loop forms near your needle.
- Go Through the Loop: Pass your needle through this loop.
- Go under the loop.
- Pull to Tighten: Pull your needle all the way.
- Pull gently but firmly.
- A small knot will form.
- It will sit flat against the fabric.
- Repeat (Optional): For extra strength, repeat steps 2-5.
- Make another tiny stitch.
- Form a loop.
- Go through it.
- This makes a stronger, reinforced thread knot.
- Trim Thread: Cut the extra thread close to the knot.
- Be careful not to cut your fabric.
This knot is excellent for most hand sewing. It is a reliable secure stitching knot.
The Hidden Knot for Clean Finishes
Sometimes you want no knot to show at all. This is where the hidden knot comes in. It is great for very neat work. It creates invisible sewing knots.
Steps for the Hidden Knot:
- Finish Your Stitches: Sew your line of stitches.
- End your last stitch on the back of the fabric.
- Take a Small Bite: Pick up just one or two threads of the fabric.
- Do not go all the way through.
- Make this bite very small.
- Do it right near your last stitch.
- Create a Loop: Pull the needle through.
- Stop when a loop of thread forms.
- This loop will be on the back of your fabric.
- Pass Through Loop: Pass your needle through this loop.
- Go under the loop.
- Pull Slowly: Gently pull the needle.
- The knot will start to form.
- It will pull tight against the fabric.
- This knot sits flat.
- Bury the Thread: Do not cut the thread yet.
- Take your needle.
- Poke it back into the fabric.
- Poke it right next to the knot.
- Run the needle through the fabric for about an inch.
- Run it between the fabric layers.
- Come out further away.
- Trim Flush: Pull the thread gently.
- Cut the thread very close to the fabric.
- The end of the thread will disappear inside the fabric.
- The knot is now hidden.
This method gives a very clean look. It is perfect for visible seams. It is a true example of invisible sewing knots.
Specialized Sewing Thread Knots
Beyond the basic knots, there are other useful ones. These knots solve specific problems. Or they are used for special crafts.
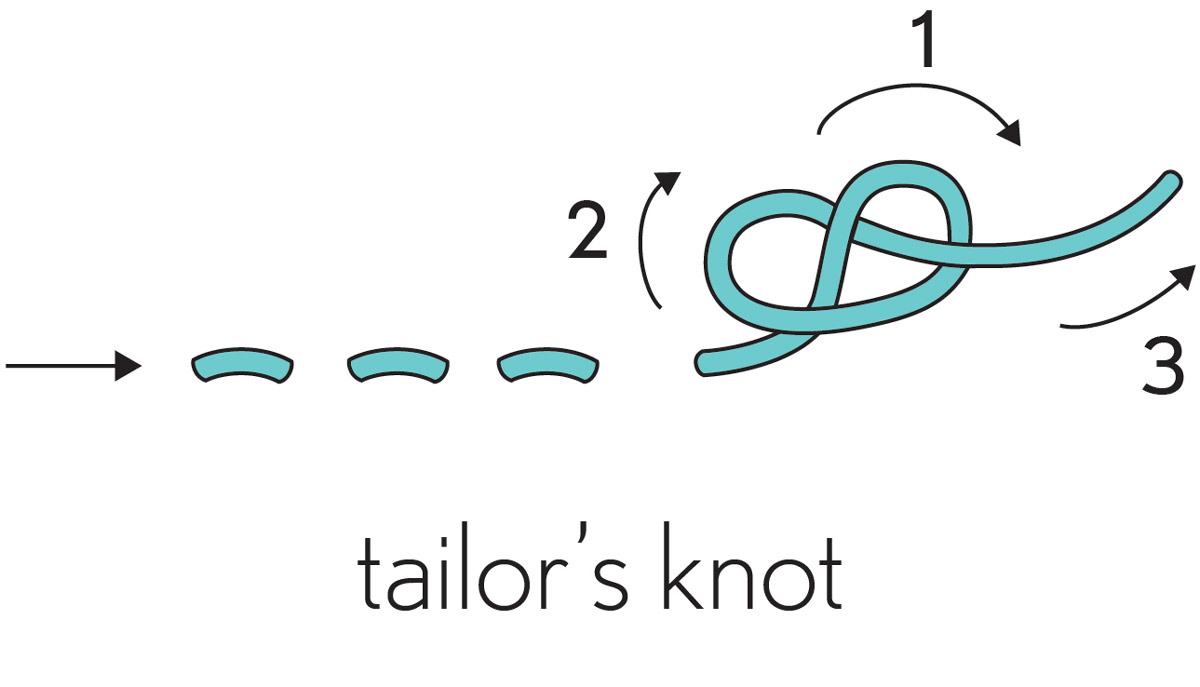
The Tailor’s Knot (or Quilter’s Knot)
This knot is similar to the basic knot. But it is often made on the needle. It is quick. It is strong. Many quilters like this knot. It is a key quilting knotting method.
Steps for the Tailor’s Knot:
- Hold Needle: Hold your needle in your dominant hand.
- Hold it near the eye.
- Lay Thread: Lay the thread end over the needle shaft.
- Lay it about half an inch from the eye.
- The thread comes from the needle eye, then goes over the shaft.
- Wrap Thread: Wrap the thread around the needle.
- Wrap it 3 to 5 times.
- Wrap it over the end of the thread you laid down.
- Wrap it tightly.
- Hold Wraps: Pinch the wrapped threads.
- Pinch them between your thumb and forefinger.
- Pinch them firmly on the needle.
- Pull Needle: Pull the needle through the wraps.
- Pull the needle away from the wrapped thread.
- Keep pinching the wraps as you pull.
- This helps the knot form neatly.
- Slide Down: Slide the formed knot down to the end of the thread.
- Gently pull the thread to tighten the knot.
- A small, compact knot forms at the thread end.
This knot is fast once you get the hang of it. It creates a neat and secure start knot for sewing. It is a good option when you need reinforced thread knots for quilt piecing.
The Surgeon’s Knot for Strong Connections
The surgeon’s knot is very strong. It is two simple knots wrapped together. It is good for thick threads. It is also good for joining two threads. This makes reinforced thread knots.
Steps for the Surgeon’s Knot (for joining two threads):
- Overlap Ends: Lay the ends of two threads over each other.
- Overlap them by about 2 inches.
- First Tie: Take one thread end.
- Tie a simple knot around the other thread.
- Make sure to wrap it twice through the loop.
- Pull it gently tight.
- Second Tie: Take the other thread end.
- Tie a simple knot around the first thread.
- Again, wrap it twice through its own loop.
- Pull it gently tight.
- Pull Together: Hold both threads near the knots.
- Pull the two main threads apart.
- The two knots will slide together.
- They will lock tightly.
- Trim: Trim the short ends close to the knot.
This knot is excellent for adding length to your thread. It is also very strong for mending. It makes very secure stitching knots.
The Loop Knot for Buttonholes or Cords
This knot starts a loop. It is often used for making buttonholes by hand. It also makes a loop for hanging things.
Steps for the Loop Knot:
- Take a Stitch: Push your needle up through the fabric.
- Go down a short distance away.
- Do not pull the thread all the way through.
- Leave a loop on the surface.
- Go Through Loop: Pass your needle through this loop.
- Go from the outside of the loop towards the center.
- Wrap Needle: Wrap the thread around the needle tip.
- Wrap it once or twice.
- Pull Tight: Pull the needle through.
- Pull until a small knot forms at the base of the loop.
- This knot holds the loop in place.
This knot is specific. It is not for general sewing lines. But it is useful for specific hand sewing knot techniques.
Table of Common Sewing Thread Knots
| Knot Name | Main Use | Start/Finish | Strength | Notes |
|---|---|---|---|---|
| Basic Start Knot | General hand sewing start | Start | Medium | Easiest for beginners. Small lump. |
| Double Knot | Stronger start for projects | Start | High | Two basic knots for extra hold. |
| Simple Backstitch Knot | General hand sewing finish | Finish | Medium | Flat, secure finish. |
| Hidden Knot | Invisible finish | Finish | Medium | Buried thread, very clean look. |
| Tailor’s Knot | Quilting, quick starts | Start | High | Made on needle, very compact. |
| Surgeon’s Knot | Joining threads, strength | Both | Very High | Double wrap, very secure for heavy use. |
| Loop Knot | Buttonholes, cord loops | Specific | Medium | Creates a loop, not a stitch line anchor. |
Deciphering When to Use Which Knot
Choosing the right knot is important. The best knot depends on your project.
- For simple mending: A basic start knot and a simple backstitch knot are usually fine.
- For clothing or items used a lot: Use a double knot to start. Use a hidden knot or a repeated backstitch knot to finish. These are secure stitching knots.
- For quilting: The tailor’s knot is very popular for starting. It is fast and secure. Quilting knotting methods often use this.
- For thin fabrics: Try to use smaller knots. The hidden knot is great for these. It prevents bulk. It creates invisible sewing knots.
- For heavy fabrics or strong repairs: Consider the surgeon’s knot for joining threads. Use a double or tailor’s knot to start. Make sure your finishing knot is very robust. These are reinforced thread knots.
Preventing Unraveling Thread: Tips for Success
Even with the best knots, thread can sometimes unravel. Here are tips to stop this.
Choose Good Thread
Quality matters. Cheap thread can break easily. It can also fray. A good quality sewing thread knot holds better. It is less likely to unravel.
Cut Ends Neatly
Always use sharp scissors. A clean cut means less fraying. Frayed ends are harder to knot. They are also more likely to come undone.
Use the Right Needle Size
Your needle should fit your thread. If the needle is too small, it can fray the thread. If it is too big, it leaves large holes. These holes can let the thread slip.
Wax Your Thread (Optional)
You can run your thread through beeswax. This coats the thread. It makes it stronger. It also makes it less likely to tangle. This is a good trick for hand sewing knot techniques. It adds to preventing unraveling thread.
Don’t Over-Pull Knots
Pull your knots firm. But do not pull too hard. Over-pulling can weaken the thread. It can also make the knot break. Just a firm tug is enough.
Bury Thread Tails
For finishing knots, bury the thread. This is key for invisible sewing knots. It also locks the end down. It gives the knot extra security. It greatly helps in preventing unraveling thread.
Interpreting Common Knot Problems
Knots can be tricky at first. Do not get frustrated. Here are common issues and how to fix them.
Knot Slips Through Fabric
- Problem: Your knot is too small. It pulls right through the fabric.
- Fix: Make a double knot. Or use the tailor’s knot. These knots are bigger. They have more surface area to grip. This makes them secure stitching knots.
Knot Comes Undone
- Problem: The knot was not pulled tight enough. Or it was tied too loosely.
- Fix: Always pull your knot firmly. Make sure it is snug. Repeat the knot if needed. This creates reinforced thread knots.
Thread Tangles When Knotting
- Problem: The thread is too long. Or it is old and weak.
- Fix: Use shorter lengths of thread. About 18-24 inches is ideal. Try waxing your thread. This smooths it out. It makes hand sewing knot techniques easier.
Knot is Too Bulky
- Problem: The knot is big and stands out.
- Fix: Try the hidden knot method for finishing. For starting, choose a smaller knot. Or bury the starting knot inside the seam allowance. This makes for invisible sewing knots.
Needle Gets Stuck
- Problem: You are pulling the knot too tight against the fabric.
- Fix: Do not pull the thread extremely hard when forming the knot. Let the knot seat gently. Then give a firm, final tug.
Grasping Advanced Tips for Neatness
Once you know the basics, you can refine your skills.
Always Test Your Knot
Before you start sewing a long line, test your knot. Give it a gentle tug. Does it hold? If yes, great. If not, retie it. This saves time later.
Use Self-Threading Needles for Easy Knotting
If you struggle with threading, use self-threading needles. They have a small slit at the top. This makes putting thread in simple. It gets you to the knotting step faster.
Practice on Scrap Fabric
Do not practice on your good fabric. Use a scrap piece. This lets you make mistakes. You can practice all the sewing thread knots. Keep doing it until it feels natural. Practice makes perfect for all hand sewing knot techniques.
Learn to Feel the Knot
With time, you will learn how a good knot feels. It will feel firm. It will feel secure. This feeling tells you it is right.
Consider a Thimble
A thimble protects your finger. It also helps push the needle through fabric. This is especially useful when burying thread for invisible sewing knots.
Conclusion: Your Journey to Knot Mastery
Mastering how to knot sewing is a core skill. It makes all your sewing better. From your very first stitch to your last, a good knot makes a difference. You now have many tools. You know about starting knots, like the basic knot and double knot. You know how to finish sewing knot methods, like the backstitch knot and hidden knot. You have learned specialized secure stitching knots, such as the tailor’s and surgeon’s knots. You also have tips for preventing unraveling thread.
Keep practicing these hand sewing knot techniques. Each stitch you make gets better. Each knot you tie gets stronger. Soon, you will tie knots without thinking. Your sewing projects will be neat. They will be durable. They will last a long time. Happy sewing!
Frequently Asked Questions (FAQ)
Q1: What is the easiest knot to start sewing with?
The easiest knot to start sewing is the basic knot. You wrap the thread around your finger. Then you roll it off. Pull the needle through the loop. It is simple and fast.
Q2: How can I make my sewing knots invisible?
To make knots invisible, use the hidden knot method. This involves making a small knot on the back of the fabric. Then you run the thread inside the fabric for a short distance before cutting it. This hides the knot and the thread end.
Q3: Why does my thread keep unraveling even with a knot?
Thread unravels for a few reasons. Your knot might not be tight enough. The thread quality might be poor. Or your needle might be too big. Use good quality thread. Pull your knots firmly. Make sure your needle matches your thread.
Q4: Can I use the same knot for starting and finishing?
You can use a basic knot to start. And a small backstitch knot to finish. But some knots are better for one use. The hidden knot is great for finishing. A double knot is strong for starting. Using the right knot for the job gives the best results.
Q5: Are there specific knots for quilting?
Yes, the tailor’s knot is very popular for quilting. It is a quick and secure starting knot. Quilters also use special methods for tying off quilt layers. These are specific quilting knotting methods.
Q6: How long should my sewing thread be?
For hand sewing, about 18 to 24 inches of thread is a good length. Longer threads tangle more easily. Shorter threads mean more knots, but less tangling.
Q7: What is a reinforced thread knot?
A reinforced thread knot is a knot that is extra strong. This can be a double knot to start. Or repeating a finishing knot several times. A surgeon’s knot is also a type of reinforced knot for joining threads. These knots add more durability.