
Image Source: cutesycrafts.com
Easy Start: Your First Steps On How To Learn Embroidery
Ready to stitch? Your first look at embroidery begins here. What is embroidery? It is a craft. You use a needle and thread. You make pretty designs on cloth. Can I learn embroidery easily? Yes, you surely can. Many people find it simple to pick up. Who can learn embroidery? Anyone can learn. Kids, teens, and adults all enjoy it. This guide is perfect for embroidery for beginners. It shows you how to start. You will learn the basics. You will be making beautiful things soon. It is a fun hobby. Let’s begin your creative journey.
The Right Tools: Your Embroidery Arsenal
Before you start, get your tools ready. You do not need many things. These are the basic items. They help you make your first stitches. Having the right tools makes learning easier.
Gathering Your Embroidery Supplies List
Here is what you need. These are core items.
-
Embroidery Hoops:
- A hoop holds your fabric tight. This makes it flat.
- A flat fabric is easy to stitch.
- Hoops come in different sizes.
- They are often made of wood or plastic.
- Get a small or medium one. A 6-inch hoop is good.
- It is easy to hold. It fits most first projects.
- You put your fabric between two rings.
- Then you tighten a screw. This keeps the fabric snug.
- This is a must-have tool. It helps your stitches look neat.
-
Embroidery Needles:
- These needles have big eyes. The eye is the hole for the thread.
- A big eye makes threading easy.
- They are sharp. They push through fabric easily.
- Sizes go from 1 (largest) to 12 (smallest).
- For beginners, a size 7 or 8 needle is good.
- These are strong enough. They work well with embroidery floss.
- Get a pack of mixed sizes. You can try them out.
- Choose a needle that feels right. It should be comfortable to hold.
-
Embroidery Floss:
- This is the thread you use. It is made of six strands.
- It is often cotton. It has a nice shine.
- Floss comes in many colors. Pick colors you like.
- DMC is a popular brand. It has good quality.
- Each skein (small bundle) has about 8 meters of thread.
- You pull strands apart. You use 2 or 3 strands often.
- This makes your stitches thicker or thinner.
- You can buy small packs of mixed colors. This is good for starting.
- You will want many colors later. Floss is fun to collect.
-
Fabric:
- You need fabric to stitch on. Plain cotton is best for starting.
- Cotton is easy to work with. It is not too thick. It is not too thin.
- Look for cotton fabric. It should be without much stretch.
- Linen or even old pillowcases work.
- A light color is good. It helps you see your stitches.
- Make sure it is clean. Iron it flat before you start.
- You can buy small pieces. Craft stores sell them.
- Just get a piece about 10×10 inches. This is enough for a few projects.
-
Small Scissors:
- You need sharp scissors. They cut your thread cleanly.
- Small ones are best. They are easy to handle.
- Embroidery scissors are often cute. They have pointed tips.
- Keep them just for thread. This keeps them sharp.
- Any small, sharp pair will do. Kitchen scissors are too big.
-
Other Little Tools:
- Pencil or fabric marker: You will draw your design. A light pencil works. A special fabric pen is better. It disappears later.
- Thimble (optional): This goes on your finger. It helps push the needle. Some people love them. Others do not use them.
- Needle threader (optional): This tool helps you put thread through the needle eye. It is good for small eyes. It is helpful for tired eyes.
These tools are all you need. They are easy to find. You can buy them at craft stores. Or you can buy them online.
| Item | Why You Need It | Tips for Beginners |
|---|---|---|
| Embroidery Hoop | Holds fabric tight for easy stitching. | Get a 6-inch size. Wood or plastic is fine. |
| Embroidery Needles | Big eye for easy threading, sharp tip. | Sizes 7 or 8 are good. Get a variety pack. |
| Embroidery Floss | Colored threads for design. | Cotton floss is best. Start with 2-3 strands. |
| Fabric | Surface to stitch on. | Plain cotton, light color, no stretch. |
| Small Scissors | To cut threads neatly. | Keep them sharp. Use only for thread. |
| Pencil/Fabric Pen | To draw your design on fabric. | Light pencil or washable fabric marker. |
| Thimble (optional) | Protects finger when pushing needle. | Try one out. Not everyone likes them. |
| Needle Threader | Helps put thread through needle eye. | Useful for small needle eyes. |
Picking a Good Beginner Embroidery Kit
Instead of buying items one by one, you can get a kit.
A beginner embroidery kit is a great choice. It has everything you need.
What’s in them?
* A kit often has a hoop.
* It has needles.
* It has pre-selected floss colors.
* It usually has a piece of fabric.
* Sometimes, the design is already printed on the fabric. This saves time.
* It always comes with instructions. These tell you how to do the stitches.
Why they are good for a start:
* They are easy. You do not have to pick colors.
* They are simple. You get a clear design to follow.
* They are often cheaper. Buying things separately can cost more.
* They help you learn quickly. The instructions are very clear.
* Look for kits that say “beginner” or “easy.”
* Choose a design you like. This will keep you interested.
* Many kits have flower designs. Others have animals or simple words.
Using a kit is a simple way to jump right in. It removes the stress of choosing.
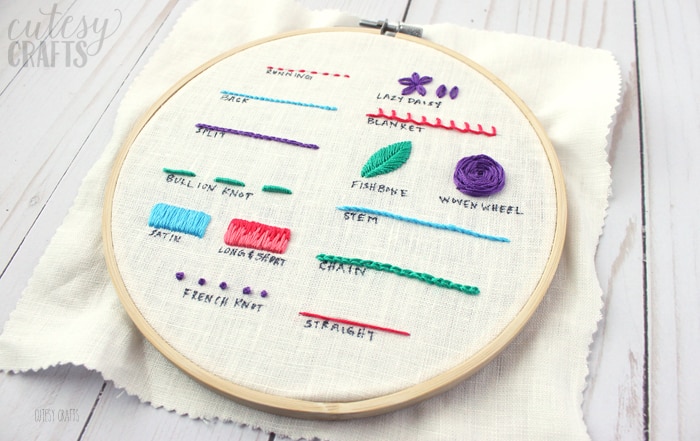
Your First Threads: Mastering Basic Embroidery Stitches
Now you have your tools. It is time to learn stitches. Do not worry. They are easy. Start with simple ones. These form the building blocks. You can make many things with just a few stitches. These are the most useful basic embroidery stitches.
Getting Started with Simple Stitches
Here are some key stitches. Practice them on a scrap piece of fabric.
* Running Stitch:
* This is the simplest stitch. It looks like a dashed line.
* It is great for outlines. It can also fill small spaces.
* How to do it:
* Bring your needle up from the back of the fabric.
* Push it down a short distance away.
* Then bring it up again, a short distance from where you went down.
* Repeat this action. You make small, even stitches.
* Keep the length of the stitches the same. This makes it neat.
* This stitch is fast to do. It is very useful.
-
Backstitch:
- This stitch makes a solid line. It is stronger than running stitch.
- It is perfect for outlines. It is good for lettering too.
- How to do it:
- Bring your needle up at point A.
- Go down at point B (a short distance away).
- Now, bring your needle up at point C. Point C is the same distance from B as B is from A.
- Go down at point A (where your first stitch ended).
- Repeat: Up one stitch length forward. Down into the end of the last stitch.
- This creates a continuous, unbroken line. It is very clean.
-
Stem Stitch:
- This stitch makes a rope-like line. It is very pretty.
- It is great for flower stems. It is good for curving lines.
- How to do it:
- Bring your needle up at point A.
- Go down at point B.
- Come up halfway between A and B. Keep the working thread below your needle.
- Pull the thread through. You will see a twist.
- Repeat: Go down a bit further. Come up halfway along the last stitch.
- The thread always stays on the same side of the line.
- This stitch builds a slightly raised line. It looks very natural.
-
Satin Stitch:
- This stitch fills an area with smooth color. It looks like satin fabric.
- It is great for leaves, petals, or shapes.
- How to do it:
- Draw a shape first.
- Bring your needle up on one edge of the shape.
- Go down on the opposite edge.
- Make stitches close together. They should be side by side.
- They must be perfectly parallel. This makes it smooth.
- Keep your tension even. Do not pull too tight.
- This stitch takes practice. It creates a beautiful, solid block of color.
-
French Knot:
- This stitch makes a small raised dot. It adds a nice texture.
- It is good for flower centers. It can be eyes on a creature.
- How to do it:
- Bring your needle up.
- Wrap the thread around the needle 1 or 2 times.
- Hold the wrapped thread tight.
- Put the needle back into the fabric. Go down right next to where you came up. Not in the same hole.
- Pull the needle through slowly. Keep holding the knot.
- A small knot will form on the surface.
- This stitch can be tricky at first. Practice it a few times.
These five stitches are excellent for embroidery for beginners. Master them, and you can make many designs.
Where to Find Hand Embroidery Tutorials
Learning from a picture is one thing. Seeing it in action is better.
Many places offer hand embroidery tutorials:
* Videos:
* YouTube is full of free videos. Search for “beginner embroidery stitches.”
* Look for channels that show the stitches up close.
* Pause, rewind, and watch again. This helps a lot.
* Many people learn best by watching.
* Books:
* Libraries and bookstores have embroidery books.
* They have clear pictures. They show step-by-step guides.
* They often have design ideas too.
* Look for books titled “Embroidery for Beginners.”
* Websites:
* Many craft blogs have free tutorials.
* They give written steps. They often have photos or GIFs.
* Look for sites like DMC or other floss makers. They have guides.
* Online Courses:
* Some artists offer full courses. These cost money.
* They give deeper lessons. They cover many topics.
* This is good if you want to get very serious.
* Local Classes:
* Some craft stores offer in-person classes.
* A teacher can help you directly. They can fix your mistakes.
* This is a great way to meet other crafters.
Remember to be patient. Learning a new skill takes time. Your stitches will get better with practice.
Creating Beauty: Your Easy Embroidery Projects
You know some stitches. Now, make something real! Starting with an easy embroidery project builds confidence. Do not aim for a masterpiece right away. Aim for fun.
Picking Your First Design
-
Using Simple Embroidery Designs****:
- Start small. A design that fits in a 4-inch hoop is good.
- Simple outlines are great. Think of a heart, a flower, or a single letter.
- Designs with only one or two stitch types are best.
- Many beginner kits have simple designs.
- You can find free designs online. Search “free beginner embroidery patterns.”
- Do not pick anything too detailed. Save that for later.
- The goal is to practice. Not to be perfect.
-
Transfer Methods:
- How do you get the design onto your fabric?
- Light Box Method: Put your design under the fabric. Put a light source under both. Trace the lines. A sunny window works like a light box too. Tape your fabric and design to the window.
- Tracing Paper: Draw your design on thin tracing paper. Pin it to your fabric. Stitch right through the paper. Then gently tear the paper away.
- Water-Soluble Pen: Draw your design with a special pen. The ink washes away with water. This is very easy. Make sure it is truly washable! Test it on a scrap of fabric first.
- Iron-On Transfers: Some patterns come as iron-on. You iron them onto your fabric. They leave a temporary guide.
- For your first project, a simple pencil trace or a water-soluble pen is best.
Fun Projects to Try
Here are some easy embroidery projects ideas. They are great for beginners.
-
Small Hoops for Display:
- Stitch a simple design in a 4- or 6-inch hoop.
- Use the hoop itself as the frame.
- Stitch a single word like “HOME” or “LOVE.”
- Add a few small hearts or stars.
- This is fast. You get a finished piece quickly.
- You can hang it on a wall. Or give it as a gift.
-
Decorated Tea Towels:
- Plain cotton tea towels are cheap. They are easy to stitch on.
- Stitch a small fruit, a flower, or a simple initial.
- You can add a little bit of embroidery to the corner.
- These are practical. They make great gifts.
-
Simple Patches:
- Stitch a design onto a small piece of felt.
- Cut around the design when done.
- You can sew this patch onto a jacket. Or a backpack.
- Think of a simple star, a cloud, or a tiny rainbow.
-
Personalized Gift Tags:
- Cut small pieces of cardstock or stiff felt.
- Embroider a letter or a small symbol.
- Attach to a gift. This makes presents special.
-
Basic Coasters:
- Stitch a design onto a small square of fabric.
- Add another piece of fabric to the back.
- Sew the edges together. You have a custom coaster.
- Great for practicing simple shapes like circles or squares.
-
Initial on a Bag:
- Take a plain canvas tote bag.
- Embroider your initial, or a friend’s initial, on it.
- Use backstitch for the letter. Add a few small flowers with satin stitch.
- This makes a simple bag unique.
-
Small Bookmarks:
- Cut a narrow strip of fabric.
- Embroider a thin vine, a few small leaves, or a single initial.
- Hem the edges. Add a tassel if you like.
- They are quick and useful.
When you finish a project, take pride in it. It shows your hard work. Every stitch you make teaches you something new.
Growing Your Skills: Ways to Learn Embroidery Online
The internet is a vast resource. You can learn embroidery online easily. Many free and paid options exist. This makes learning very flexible. You can learn at your own speed. You can learn from your home.
Online Courses and Classes
- Structured Learning: These courses offer lessons in order. They start with basics. They build up to harder things.
- Platforms: Websites like Skillshare, Domestika, and Craftsy offer many courses.
- Instructors: You learn from skilled embroidery artists. They share their best tips.
- Cost: Most courses cost money. But they offer good value. You get clear instructions. You get a full learning path.
- Support: Some courses have community forums. You can ask questions. You can share your work.
YouTube Channels
- Free and Easy: YouTube is a goldmine for free tutorials.
- Visual Learning: Seeing the stitches in motion is very helpful.
- Search Terms: Look for “beginner embroidery,” “hand embroidery stitches,” or “embroidery for dummies.”
- Many Styles: You can find videos for different embroidery styles. From modern to traditional.
- Tips and Tricks: Many channels offer great embroidery tips for beginners. They show how to handle floss. They show how to start and end threads.
- Pause and Replay: You can stop the video. You can rewatch tricky parts. This is a big plus.
Blogs and Forums
- Written Guides: Many blogs offer step-by-step guides. They have photos for each step.
- Search for Topics: You can search for specific stitches or project ideas.
- Troubleshooting: Forums are places to ask questions. Other crafters share advice. If you get stuck, ask there.
- Inspiration: Blogs often show finished projects. This can give you new ideas.
- Pattern Libraries: Some blogs offer free simple embroidery designs to download.
Social Media Groups
- Connect with Others: Facebook groups are popular. Search for “hand embroidery group.”
- Share Your Work: Post pictures of your projects. Get feedback.
- Ask Questions: Get quick answers from a large community.
- Get Inspired: See what others are making. This can motivate you.
- Challenges: Some groups host stitch-alongs or challenges. This is a fun way to try new things.
- Pinterest: This is a visual search engine. It is full of embroidery ideas. You can find patterns. You can find color ideas. You can find finished projects. Make boards to save your favorite pins.
Learning online gives you many choices. Pick what works best for you. Some like videos. Others prefer reading. Mix and match different resources.
Smart Stitching: Embroidery Tips for Beginners
Here are some helpful hints. These embroidery tips for beginners will make your journey smoother. They will help you avoid common problems.
Patience is Key
- Embroidery is not a race. It is a slow craft.
- Take your time. Do not rush your stitches.
- Each stitch is a small step. Enjoy the process.
- If you get frustrated, take a break. Come back later.
- Your first projects might not be perfect. That is okay.
- Every stitch you make teaches you something.
Start Small
- Do not pick a huge, complex project first.
- Choose a simple embroidery design. A small one.
- This lets you finish fast. It gives you a sense of success.
- It helps you practice stitches without feeling overwhelmed.
- Small projects mean less fabric. Less floss. Less money spent.
Use Good Light
- Always stitch in a well-lit area.
- Natural daylight is best. Sit near a window.
- If it is dark, use a good lamp. A bright, focused light is good.
- This helps you see your stitches clearly. It saves your eyes.
- It helps you avoid mistakes. It makes the work more enjoyable.
Practice Often
- The more you stitch, the better you get.
- Even 15 minutes a day helps.
- Keep a small practice piece. Try new stitches on it.
- Do not worry about wasting floss. It is part of learning.
- Muscle memory builds up. Your hands will learn the movements.
Keep Your Floss Neat
- Embroidery floss can tangle easily.
- Store it carefully. Use floss bobbins or bags.
- When you cut a piece of floss, do not make it too long.
- About 18 inches (45 cm) is a good length.
- Longer pieces tangle. They fray. This makes stitching harder.
- Separate your strands slowly. Do not pull them too hard.
Use Enough Strands
- Embroidery floss has 6 strands.
- For most projects, use 2 or 3 strands.
- Two strands give a fine look. Three strands give a bolder look.
- If your stitches look too thin, use more strands.
- If they look too bulky, use fewer.
- The project instructions will often tell you.
Fix Mistakes
- It is okay to make mistakes. Everyone does.
- Use a seam ripper or small scissors. Carefully unpick stitches.
- Do not pull them out. This can damage the fabric.
- Go slow. Take out one stitch at a time.
- It is better to unpick a few stitches than to leave a mistake you do not like.
Learn How to Start and End Thread
- You need to secure your thread. No knots for starting.
- Starting: Leave a short “tail” on the back. Stitch over it a few times. Or use a “waste knot” method. Stitch a few times. Cut the knot off.
- Ending: Weave your needle through the back of nearby stitches. Do this a few times. Trim the extra thread close to the fabric.
- This makes your work neat. It keeps it from unraveling.
Enjoy the Process
- Embroidery is a craft for joy.
- Put on some music. Listen to a podcast.
- Let your mind relax. Focus on the stitches.
- It can be a calming hobby. It reduces stress.
- Do not compare your work to others. Your journey is your own.
These tips will guide you. They will help you stitch with more ease.
Crafting a Passion: Starting Embroidery Hobby
Embroidery is more than just making pretty things. It is a rewarding hobby. Starting embroidery hobby can bring you peace. It can bring you creativity. It can connect you with others.
Enjoying the Process
- Mindfulness: The act of stitching makes you focus. It takes your mind off worries. It is like meditation.
- Creativity: You get to choose colors. You get to make designs. You bring your ideas to life. This is very satisfying.
- Sense of Accomplishment: Finishing a project feels great. You made something with your hands. You can see your progress.
- Stress Relief: Many people find stitching very calming. The rhythm of the needle going in and out is soothing.
- Portable Craft: You can take your embroidery almost anywhere. Stitch on the couch. Stitch in a park. Stitch while waiting.
Sharing Your Work
- Gifts: Hand-embroidered items make wonderful gifts. They show you put thought and time into them.
- Decor: Your finished pieces can brighten your home. Hang them on walls. Frame them. Use them on cushions.
- Online Galleries: Share your work on Instagram or Pinterest. Use hashtags like #handembroidery or #beginnerembroidery. This lets others see your art.
- Show and Tell: Share with friends and family. They will be amazed at what you made.
Joining a Community
- Online Groups: As mentioned, join Facebook groups. Follow embroidery artists on social media.
- Local Guilds: Some cities have embroidery guilds. These are groups of people who love to stitch. They meet regularly.
- Workshops: Attend local workshops. Learn new skills. Meet other crafters.
- Inspiration and Support: Being part of a community offers support. You can get advice. You can get new ideas. You can make friends.
- Learning from Others: See what experienced stitchers do. Ask them questions. This speeds up your learning.
Starting embroidery hobby is a step into a wonderful world. It is a timeless art. It is a way to express yourself. It is a way to relax. Give it a try. You might just find your new favorite pastime.
FAQs About Starting Embroidery
Here are answers to common questions beginners ask.
H4: Is embroidery hard to learn?
No, it is not hard. It is easy to start. You can learn basic stitches quickly. Practice helps you get better fast.
H4: What is the best fabric for beginners?
Plain cotton fabric is best. It is easy to stitch on. It does not stretch much. Choose a light color to see your stitches well.
H4: How long does it take to finish a project?
It depends on the project. A small design might take a few hours. A big one can take many days or weeks. Start with small, easy embroidery projects for quick wins.
H4: Can I use regular sewing thread?
You can, but it is not ideal. Regular sewing thread is thin. It does not have the same look as embroidery floss. Floss is thicker and has a nicer shine. It comes in many colors.
H4: How do I transfer a design to fabric?
You can use a pencil or a fabric marker. You can trace over a light box. Or use tracing paper. Some designs are iron-on. Water-soluble pens are good. They wash away later.
H4: What is the most important stitch to learn first?
The running stitch and the backstitch are key. They are simple. You can use them for many things. They make good outlines.
H4: Do I need a hoop?
Yes, a hoop is very helpful. It holds the fabric tight. This makes stitching much easier. Your stitches will look neater.
H4: Where can I find simple designs?
Look for simple embroidery designs online. Pinterest is a good place. Many craft blogs offer free patterns. Beginner kits also come with easy designs.
H4: What if I make a mistake?
It is okay. Everyone makes mistakes. Use small scissors or a seam ripper. Carefully unpick the stitches. Then restitch them. Do not pull too hard.
H4: Can I learn embroidery just by watching videos?
Yes, many people learn this way. YouTube has many hand embroidery tutorials. They show you how to do each stitch. They show how to start. They show how to finish.
H4: Is embroidery an expensive hobby?
No, it is quite cheap to start. A beginner embroidery kit is affordable. Basic supplies like floss and needles are not costly. It becomes more expensive if you buy many tools or very fancy threads.
H4: How many strands of floss should I use?
Most projects use 2 or 3 strands. This gives a good look. For fine details, use 1 strand. For a bolder look, use more. The pattern usually tells you.
H4: How do I store my floss?
You can wrap floss around bobbins. These are small plastic or cardboard cards. You can put them in a clear storage box. This keeps them neat. It stops tangles.
H4: Can I wash embroidered items?
Yes, you can. Use cold water and gentle soap. Hand wash is best. Do not wring or twist. Let it air dry flat. Some colors might bleed if not colorfast. Check your floss type.
H4: How can I find other people who do embroidery?
Join online communities. Look for Facebook groups. Search for local craft groups. Some stores offer classes. This is a great way to meet new stitching friends.