
What is a bobbin? A bobbin is a small spool that holds the lower thread in your sewing machine. Can I use any bobbin? No, you need to use the correct type of bobbin for your specific sewing machine model. Who is this guide for? This guide is for anyone who wants to learn how to load and wind a bobbin on their sewing machine.
Learning to sew can feel like a big step, but it’s actually quite simple once you get the hang of the basics. One of the very first things you’ll need to master is how to properly load and wind a bobbin. This small but mighty component is crucial for creating beautiful stitches. Without a well-wound bobbin, your sewing machine simply won’t work as it should. This guide will walk you through the entire process, step-by-step, making winding a bobbin as easy as pie.
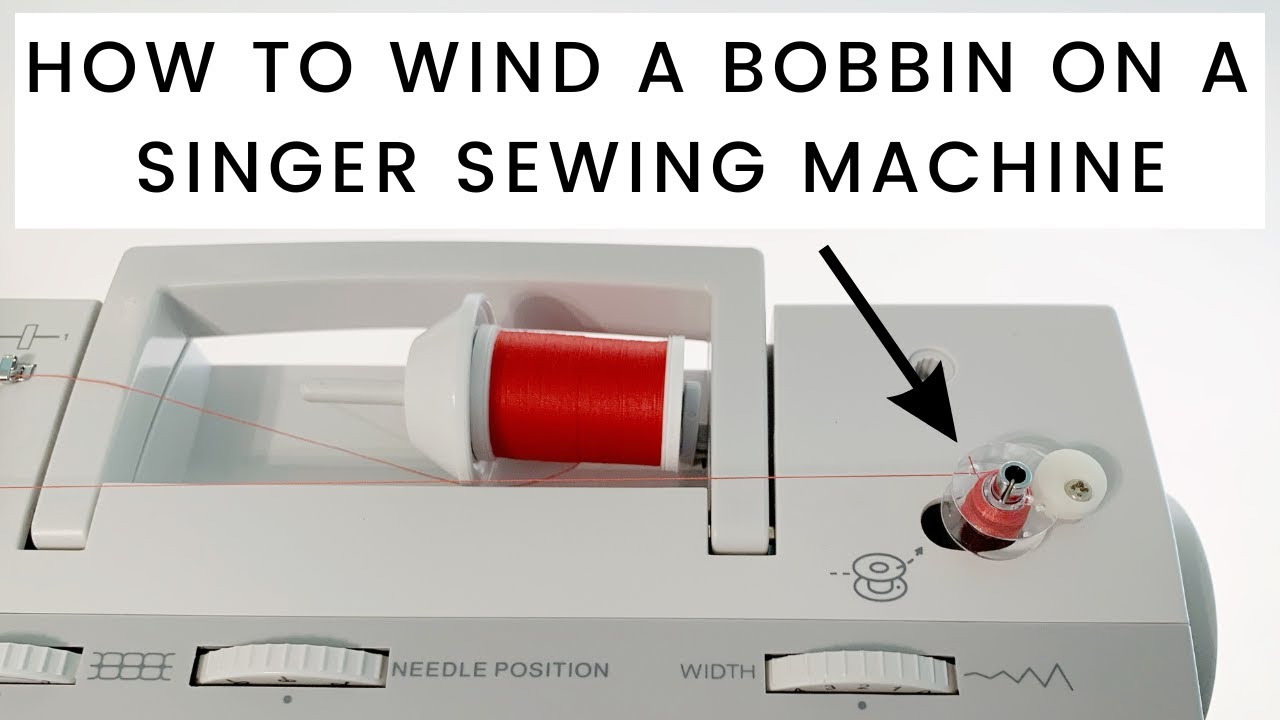
Image Source: i.ytimg.com
Getting Ready to Wind
Before you start threading a bobbin, a little preparation goes a long way. Making sure you have the right materials and your machine is set up correctly will prevent frustration and ensure smooth sailing.
Choosing the Right Bobbin
Not all bobbins are created equal! Different sewing machines use different sewing bobbin types.
- Material: Bobbins can be made of plastic, metal, or even wood. Plastic bobbins are common and generally work well. Metal bobbins are often used for specific tasks like free-motion quilting because they are heavier and can spin at high speeds.
- Size and Shape: The most important factor is the size and shape. Your sewing machine manual will specify the correct bobbin type. Using the wrong bobbin can cause skipped stitches, thread jams, or even damage to your machine.
- Pre-wound vs. Self-wound: You can buy pre-wound bobbins, which are convenient if you don’t want to wind them yourself. However, winding your own allows you to use any thread color you like.
Key Takeaway: Always refer to your sewing machine’s manual to find out the correct bobbin type.
Preparing Your Thread
The thread you choose for your bobbin matters.
- Type of Thread: For general sewing, all-purpose polyester thread is a good choice for both the top and bobbin. For special fabrics or projects, you might need different thread types.
- Quality: Use good quality thread. Cheap thread can break easily, leading to frustrating interruptions and poor stitch quality.
- Color Consistency: It’s generally best to match your bobbin thread color to your top thread color, especially if your project will be seen on both sides. For example, if you’re sewing a light-colored fabric with light-colored top thread, use light-colored bobbin thread.
Locating the Bobbin Winder
Every sewing machine has a sewing machine bobbin winder. This is a special mechanism designed to wrap thread evenly onto the bobbin.
- The Spool Pin: This is where you’ll place your spool of thread. Most machines have a main spool pin and a secondary one for winding bobbins.
- The Bobbin Winder Assembly: This usually includes a bobbin winder spindle (where the bobbin slides on) and a small tension disc or guide. You’ll often find a small lever or button that engages the winder.
The Step-by-Step Process of Winding a Bobbin
Now that you’re prepped, let’s get to the actual how to fill a bobbin part! Follow these steps carefully for a perfectly wound bobbin.
Step 1: Place the Bobbin
Slide a compatible bobbin onto the bobbin winder spindle. It should fit snugly. Make sure the bobbin is oriented correctly; usually, the side with the little hole or notch faces outwards, away from the spindle.
Step 2: Secure the Thread
This is a crucial step for ensuring even winding and proper bobbin winding tension.
- Start with the Thread Spool: Place your spool of thread on the spool pin.
- Thread Through the Guides: Follow the numbered thread guides on your machine. These guides are specifically designed to route the thread correctly to the bobbin winder.
- Pass Through the Tension Disc: This is the critical point for bobbin winding tension. The thread needs to go through the small tension discs that are part of the bobbin winder assembly. There might be a small slit or gap where the thread should be inserted. This disc applies the necessary tension to the thread as it winds.
- Loop Through the Bobbin Hole: Take the end of the thread and pass it through the small hole in the side of the bobbin. It’s often easiest to do this from the inside of the bobbin to the outside.
- Pull the Tail: Pull about 3-4 inches of thread through the bobbin hole.
Step 3: Engage the Bobbin Winder
Your sewing machine will have a way to switch from regular sewing to bobbin winding.
- The Winder Clutch: Most machines have a clutch mechanism. When you push the bobbin winder spindle towards the side, it engages the winder and disengages the needle. You might hear a click.
- Starting the Wind: Hold the tail end of the thread firmly with your fingers. Gently press the foot pedal to start the bobbin winding speed.
Step 4: Wind the Bobbin
As the bobbin starts to wind, keep holding that thread tail for the first few wraps. This helps to secure the thread and prevent bobbin unwinding later.
- Initial Wraps: Allow the bobbin to wind a few times, ensuring the thread catches the tail.
- Trimming the Tail: Once a few wraps are on, you can gently trim the excess thread tail close to the bobbin, but be careful not to cut the thread that’s actively winding.
- Even Winding: The machine should wind the thread evenly across the bobbin. Most machines have an automatic thread cutter or a stopper that will disengage the winder when the bobbin is full. If not, keep an eye on it and stop when the bobbin looks full but not overstuffed. Overfilling can cause problems.
- Bobbin Winding Speed: Be mindful of the bobbin winding speed. While a faster speed can save time, a moderate speed often results in more even winding and better tension. Experiment to see what works best for your machine and thread.
Step 5: Finishing and Cutting
Once the bobbin is full, the machine will usually stop automatically, or you’ll need to stop it.
- Disengage the Winder: Push the bobbin winder spindle back to its original position. This re-engages the sewing mechanism.
- Cut the Thread: Cut the thread connecting the spool to the bobbin. Many machines have a small blade near the bobbin winder for this purpose.
- Remove the Bobbin: Gently slide the wound bobbin off the spindle.
Troubleshooting Common Bobbin Winding Issues
Even with a guide, you might encounter a few hiccups. Here’s how to fix them.
Uneven Winding
- Cause: Thread not going through the tension discs correctly, or thread is catching on something.
- Solution: Double-check that the thread is properly seated in the bobbin winder tension discs. Ensure the thread spool is mounted securely and not wobbling.
Bobbin Not Winding at All
- Cause: Bobbin winder not engaged, or thread is not threaded correctly.
- Solution: Make sure the bobbin winder spindle is fully engaged. Reread Step 2 to ensure the thread is threaded through all guides and the bobbin hole.
Thread Breaking During Winding
- Cause: Poor quality thread, sharp edges on the bobbin or winder, or excessive tension.
- Solution: Try a different spool of thread. Check the bobbin for any rough spots or burrs. Ensure the thread is not too tight as it winds.
Bobbin Stops Winding Before It’s Full
- Cause: The automatic stopper on your machine might be set too low, or there’s an issue with the winder mechanism.
- Solution: Consult your machine’s manual to adjust the automatic stopper, if applicable. If the problem persists, the machine may need servicing.
Bobbin Unwinding Spontaneously
- Cause: The thread tail wasn’t secured properly at the start of winding, or the bobbin wasn’t placed on the spindle correctly.
- Solution: Make sure you hold the thread tail for the first few wraps and trim it appropriately. Always ensure the bobbin is on the spindle correctly.
Inserting the Wound Bobbin into the Sewing Machine
Winding is only half the battle! The next essential step is correctly placing the bobbin into its bobbin holder (also known as the bobbin case or shuttle).
Understanding Bobbin Case Placement
There are two main types of sewing machine bobbin systems:
-
Top-Loading (Front-Loading) Bobbin: This is the most common type on modern machines. The bobbin case is located directly underneath the needle plate.
- Procedure:
- Remove the needle plate (usually a small cover).
- Locate the bobbin case.
- Place the wound bobbin into the bobbin case. The thread should be coming off the bobbin in a specific direction (usually counter-clockwise, but check your manual).
- Guide the thread through the small slit in the bobbin case and pull a few inches through.
- Re-attach the needle plate.
- You will then need to bring the bobbin thread up to the top.
- Procedure:
-
Front-Loading (Drop-In) Bobbin: This system is also very common and often considered easier. The bobbin is inserted directly into a visible compartment.
- Procedure:
- Locate the bobbin cover, usually a clear plastic piece.
- Place the wound bobbin into the compartment. The thread should be coming off the bobbin in a counter-clockwise direction (again, check your manual for confirmation).
- Guide the thread through the designated slot and pull a few inches through.
- Replace the bobbin cover.
- You will still need to bring the bobbin thread up to the top.
- Procedure:
Bringing Up the Bobbin Thread
After placing the bobbin, you need to pull the bobbin thread up through the needle plate so both the top thread and bobbin thread are accessible for sewing.
- Hold the Top Thread: With one hand, gently hold the tail of the top thread.
- Turn the Handwheel: Use the other hand to slowly turn the sewing machine’s handwheel towards you. This action will lower the needle and then bring it back up.
- Catch the Bobbin Thread: As the needle goes down and comes back up, it will catch the bobbin thread and pull a loop of it up through the needle plate.
- Pull the Loop: Use your fingers or tweezers to gently pull this loop of bobbin thread up and out.
- Position the Threads: Once you have a good length of bobbin thread, pull both the top thread and the bobbin thread towards the back of the machine, placing them under the presser foot.
You are now ready to sew!
The Importance of Bobbin Tension
Proper bobbin winding tension isn’t just about how the thread is wound; it also relates to the tension of the bobbin case itself. While most sewing machines have pre-set bobbin tension that works well, some allow for adjustment.
- What is Bobbin Tension? It refers to how tightly the thread is held within the bobbin case as it passes through the machine.
- Signs of Incorrect Bobbin Tension:
- Too Loose: You’ll see loops of bobbin thread on the top side of your fabric, or the bobbin thread might pull out very easily.
- Too Tight: The bobbin thread might be very difficult to pull out, or you might see puckering on the fabric with the bobbin thread showing on the top.
- Adjusting Bobbin Tension: This is usually done by slightly turning a small screw on the bobbin case. Always make very small adjustments (a quarter turn at a time) and test your stitches after each change. Consult your sewing machine manual for specific instructions on adjusting bobbin tension.
Different Sewing Bobbin Types and Their Uses
Let’s delve a little deeper into sewing bobbin types. Knowing these can help you select the right bobbin for various sewing tasks.
| Bobbin Type | Material | Characteristics | Best For |
|---|---|---|---|
| Standard Plastic | Plastic | Lightweight, common, inexpensive | General sewing, everyday projects |
| Metal | Metal | Heavier, durable, can spin at high speeds | Free-motion quilting, embroidery, some industrial uses |
| Clear Plastic | Plastic | Allows you to see thread supply easily | Monitoring thread levels, especially for long projects |
| Pre-wound | Varies | Ready to use, comes in various colors | Convenience, quick projects, when you don’t want to wind |
| Jumbo/Oversize | Varies | Larger capacity, holds more thread | Long seams, quilting, heavy-duty sewing |
Important Note: Always confirm compatibility with your sewing machine manual before using any bobbin type other than the standard one that came with your machine.
FAQ: Your Bobbin Winding Questions Answered
Here are some common questions about winding a bobbin:
Q1: How much thread should I put on a bobbin?
A: Wind the bobbin until it’s almost full, but not overflowing. Most machines have an automatic shut-off. If yours doesn’t, stop when the thread reaches the edge of the bobbin’s plastic casing, or when it looks like the thread might start to pile up. Overfilling can cause issues.
Q2: What if my bobbin thread keeps jamming?
A: Check that you’re using the correct bobbin type and that it’s seated correctly. Ensure the thread is going through the tension discs on the winder and that the thread tail is secured. Also, make sure you’ve correctly threaded the top thread and brought up the bobbin thread.
Q3: Can I use different thread weights on my bobbin?
A: Yes, but it’s important to match the thread weight to your top thread as much as possible for balanced stitches. Using a very thin bobbin thread with a thick top thread can lead to problems. Some projects specifically call for different weights.
Q4: How do I know if I’m winding the bobbin too loose or too tight?
A: When winding, the thread should be snug but not strained. If the thread is loose, it can unravel easily. If it’s too tight, it might be difficult to pull off the bobbin, which can affect stitch quality. You’ll get a feel for it with practice.
Q5: What is the best bobbin winding speed?
A: There isn’t one “best” speed for all machines. A moderate speed generally produces the most even results. Experiment with your machine’s foot pedal to find a comfortable speed that allows the thread to wind smoothly onto the bobbin.
Final Thoughts
Mastering how to load a bobbin on a sewing machine is a fundamental skill that opens the door to countless sewing projects. By following these steps, paying attention to the details of winding a bobbin, and using the correct sewing machine bobbin winder, you’ll be well on your way to creating neat, strong stitches. Don’t be discouraged if your first few attempts aren’t perfect. Like any new skill, practice makes perfect, and soon, threading a bobbin will become second nature. Happy sewing!