
So, how do you load the bobbin on a Singer sewing machine? And how do you insert the bobbin into a Singer machine? Loading a bobbin into your Singer sewing machine means putting the lower thread supply into its special spot so the machine can make stitches. How you insert it depends on the type of bobbin system your machine has – either a drop-in type where the bobbin goes directly into a spot under the needle plate, or a front-loading type where the bobbin goes into a metal bobbin case first, and then the case is put into a slot near the front of the machine. This guide will walk you through winding the bobbin and loading it correctly for both types, helping you get ready to sew without headaches.
Putting the bobbin in right is a simple but important step. It stops many common sewing problems like tangled threads or stitches that look bad. Let’s break down how to do it properly.
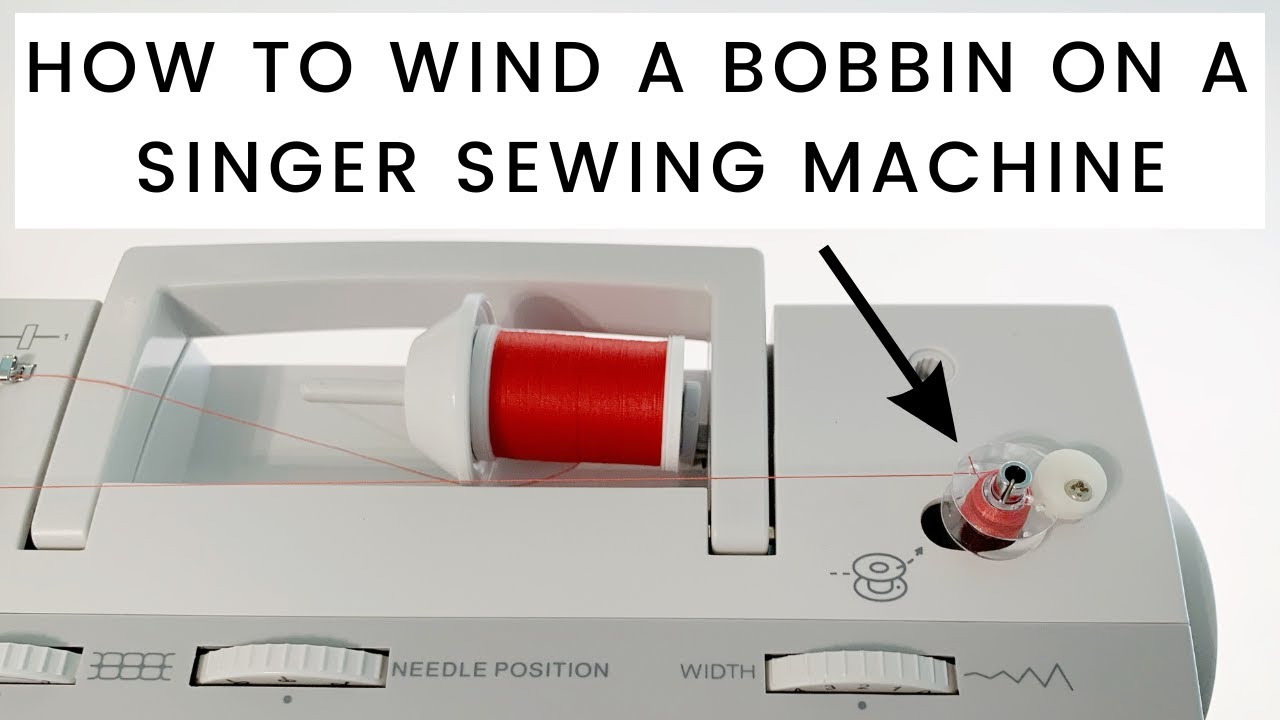
Image Source: i.ytimg.com
Comprehending Bobbin Systems
Singer sewing machines use one of two main bobbin setups. Knowing which one your machine has is the first step.
Type 1: Drop-In Bobbin
- Look: Machines with a drop-in bobbin have a clear plastic cover plate right under the needle. You open this cover to see where the bobbin sits flat.
- Parts: Just the bobbin itself. It sits directly in the sewing machine bobbin area.
- Easy Use: These are often seen on newer machines. They are easy to access and put the bobbin in quickly.
- Benefits: Simple to see how much thread is left. Less likely to have tension issues if loaded right.
Type 2: Front-Loading Bobbin
- Look: Machines with a front-loading bobbin usually have a door or cover on the front or side of the machine arm, often near the needle plate but on the side. Behind this door is where the bobbin and its case go.
- Parts: A bobbin and a metal bobbin case. The bobbin sits inside the case, then the case goes into the machine.
- Classic Design: This setup is common on older machines and many heavy-duty models.
- Benefits: Allows easy adjust bobbin tension on the case itself (a small screw). Can be very durable.
No matter which type you have, you first need thread on your bobbin. This is called winding bobbin.
Winding the Bobbin Correctly
Before you can load a bobbin, you need to fill it with thread. This process, winding bobbin, is the same for most Singer machines, no matter the bobbin type.
Things You Need
- Your Singer sewing machine
- An empty bobbin that fits your machine (Singer bobbins are best)
- A spool of thread you want to use
- Your machine’s power cord
Steps for Winding Bobbin
- Put Thread Spool On: Find the spool pin on top of your machine. Place your thread spool onto the pin. Make sure the thread comes off the spool in the right direction. Look for a picture or arrow on your machine. Often, if the spool pin is upright, the thread comes from the back. If the pin is sideways, the thread might come off the front.
- Guide the Thread: Find the thread guides for bobbin winding. These are special hooks or discs. Follow the path shown in your machine’s manual or on the machine itself. The thread usually goes through a guide near the spool, then around a small tension disc made just for winding bobbins. This disc helps make sure the thread wraps tightly and smoothly onto the bobbin.
- Put Bobbin On Spindle: Find the bobbin winding spindle. It’s a small pin that sticks up, often near the handwheel. Place the empty bobbin onto this spindle. There might be a notch or hole on the bobbin that fits onto a pin on the spindle.
- Start Winding: Take the end of the thread coming from the tension disc. Put the thread end through a small hole on the edge of the bobbin. Hold onto this thread end for a few seconds when you start.
- Slide the Spindle: Most Singer machines have a bobbin spindle that slides. Push the spindle towards the right (towards the handwheel). This locks the bobbin winding system into place and often disengages the needle so it doesn’t move while you wind. Check your manual to see if you need to loosen the handwheel instead.
- Press the Pedal: Gently press down on the foot pedal. The bobbin will start to spin and wind thread. Let it wind a few turns, then stop.
- Trim the Tail: Once the bobbin has a few turns of thread, you can stop and carefully cut off the short thread end you were holding at the hole in the bobbin.
- Fill the Bobbin: Start pressing the pedal again. Let the bobbin fill with thread. Watch it. Try not to overfill the bobbin. It should fill evenly. If it fills on one side only, check your thread path, especially the tension disc.
- Stop When Full: Most Singer machines stop winding automatically when the bobbin is full. If yours doesn’t, stop when the bobbin looks nicely filled, just below the edge.
- Slide Spindle Back: Slide the bobbin spindle back to the left (away from the handwheel).
- Remove Bobbin: Take the full bobbin off the spindle. Cut the thread connecting it to the spool.
Tips for Good Bobbin Winding
- Use the same type and weight of thread in your bobbin as on top. This is important for good stitches.
- Wind bobbins at a medium, steady speed. Going too fast can cause uneven winding or heat up the thread.
- Make sure the thread goes through the bobbin winding tension disc. This makes the thread wrap tightly, stopping loops or loose thread later.
- Don’t wind too much thread. An overfilled bobbin can cause problems when you load it.
- Use only bobbins made for your specific Singer machine model. Using the wrong size or shape bobbin can cause serious issues.
Once your bobbin is wound, you are ready for the next step: loading it into the machine.
Loading the Drop-In Bobbin
If your Singer machine has a drop-in bobbin system, follow these steps for drop-in bobbin loading. This is generally easier and quicker than the front-loading type.
Finding the Drop-In Bobbin Area
- Look at the flat sewing surface of your machine, directly under the needle.
- You will see a cover plate, often clear plastic.
- Open or slide off this plate. This is the sewing machine bobbin area.
Steps for Drop-In Bobbin Loading
- Lift the Needle: Use the handwheel to turn the needle to its highest position. This moves parts underneath so you can access the bobbin area easily.
- Open the Cover: Slide or lift the clear plastic cover plate to open the bobbin area.
- Take the Bobbin: Pick up your freshly wound bobbin.
- Check Thread Direction: This is VERY important for drop-in bobbins. Look at the bobbin as you hold it. The thread coming off the bobbin needs to pull in a specific direction for the machine to work right. On most Singer drop-in systems, the thread should come off the left side of the bobbin, making the bobbin look like it’s spinning counter-clockwise if you were pulling the thread. There is often a picture on the machine showing the correct direction. Always check your manual or the machine’s diagram.
- Place the Bobbin: Gently drop the bobbin into its holder in the bobbin area. It should sit flat.
- Guide the Thread into the Channel: Find the thread guide path around the bobbin holder. It’s usually a small slit or groove. Take the thread tail coming from the bobbin edge and pull it through this channel. The channel guides the thread under a tension spring. Follow the path completely. There are usually numbers or arrows showing you where to pull the thread.
- Pull Thread Tail: Pull the thread tail out a few inches (about 4-6 inches) past the guides. Leave this tail hanging free.
- Close the Cover: Put the clear plastic cover plate back into place. It should click or slide smoothly.
Your drop-in bobbin is now loaded! You just need to do the main machine threading and then pull the bobbin thread up. This is part of the overall sewing machine threading guide.
Tips for Drop-In Bobbin Loading
- Always put the bobbin in with the thread coming off in the correct direction (usually counter-clockwise when looking down). This is the most common reason for problems with drop-in bobbins.
- Make sure the thread snaps or slides smoothly into the tension path/channel around the bobbin holder. If it’s not in this channel, the machine won’t sew right.
- Don’t force the bobbin in. It should drop in easily and sit flat.
- Keep the sewing machine bobbin area clean from lint and dust. Use a small brush often.
Setting Up the Front-Loading Bobbin
If your Singer machine uses a front-loading system, you will use a bobbin case. This setup involves putting the bobbin into the case first, then putting the case into the machine. This process covers front-loading bobbin setup.
Finding the Front-Loading Bobbin Area
- Look on the front or side of your machine, usually under the needle plate but not directly below it.
- Find a door or cover that opens.
- Inside, you’ll see a metal part that holds the bobbin case. This is where the bobbin case insertion happens.
Steps for Loading the Bobbin Case
- Take the Bobbin Case: Get your metal bobbin case.
- Take the Bobbin: Pick up your freshly wound bobbin.
- Check Thread Direction: This is also important for front-loading, but the direction is different from drop-in. Hold the bobbin. For front-loading systems, the thread usually needs to come off the right side of the bobbin, making the bobbin look like it’s spinning clockwise if you were pulling the thread. There is usually a slot on the bobbin case where you pull the thread through. Again, check your manual or the bobbin case itself for a diagram.
- Place Bobbin in Case: Put the bobbin into the bobbin case. It should fit snugly.
- Guide Thread into Slot: Find the small slot on the edge of the bobbin case. Pull the thread tail from the bobbin into and through this slot.
- Pull Thread Under Spring: After going through the slot, the thread needs to go under a small, flat spring on the side of the bobbin case. This spring provides the bobbin thread tension. Pull the thread firmly until it slips completely under this tension spring. You will see the thread lying flat against the case, held by the spring. There is usually a second, wider slot or opening the thread should end up in after going under the spring.
Steps for Bobbin Case Insertion
Now that the bobbin is correctly loaded into the case, you need to put the case into the machine.
- Lift the Needle: Turn the handwheel to move the needle to its highest point.
- Open the Cover: Open the front or side door on your machine to access the bobbin area.
- Hold the Bobbin Case: Hold the bobbin case by the little latch or handle that sticks out. This latch often helps hold the bobbin in the case until it’s inserted.
- Insert the Case: Push the bobbin case into the round opening in the machine’s bobbin area. Line up the bobbin case with the center pin inside the machine’s bobbin holder. The case should slide onto this pin.
- Listen for a Click: Push the case firmly but gently until it clicks into place. The little latch on the bobbin case should spring open or release when it’s correctly seated. If it doesn’t click or lock, it’s not in right. Don’t force it. Take it out and try again. Make sure the little finger or arm on the bobbin case (opposite the latch) lines up with a notch in the machine’s bobbin holder.
- Leave Thread Tail: Leave a thread tail (about 4-6 inches) hanging out of the bobbin case after it’s inserted.
- Close the Cover: Close the door or cover over the bobbin area.
Your front-loading bobbin is now set up and inserted! The next step is typically part of the main sewing machine threading guide, which is bringing the bobbin thread up to the needle plate.
Tips for Front-Loading Bobbin Setup
- Always load the bobbin into the case with the thread coming off in the correct direction (usually clockwise). This is vital for getting the thread under the tension spring correctly.
- Make sure the thread goes fully under the tension spring on the bobbin case. If it’s not under the spring, the bottom stitches will be loose and messy.
- Ensure the bobbin case clicks or locks into place when you insert it. If it’s loose, it can cause big problems.
- Hold the bobbin case by the latch when putting it in. Release the latch only when the case is fully seated.
- Keep the bobbin case and the machine’s sewing machine bobbin area clean from lint.
Completing the Sewing Machine Threading Guide
After the bobbin is loaded (either type), you still need to thread the upper thread and bring the bobbin thread up. This finishes the main sewing machine threading guide.
- Thread the Top: Follow the steps in your machine’s manual to thread the upper thread from the spool pin, through all the guides, the tension discs, the take-up lever, and down through the needle eye. Make sure the presser foot is up when you thread the top.
- Bring Up Bobbin Thread: Hold the end of the upper thread tail that is coming out of the needle.
- Lower and Raise Needle: Turn the handwheel slowly towards you (the sewing direction). Watch the needle go down into the bobbin area. The upper thread will form a loop around the bobbin thread.
- Catch the Loop: As the needle comes back up, the loop of bobbin thread will appear. Use your finger, a pin, or small scissors to catch this loop.
- Pull Up Thread: Gently pull the upper thread tail upwards. This will bring the loop of bobbin thread up through the needle plate hole.
- Pull Both Threads: Pull both the upper thread tail and the bobbin thread tail out about 4-6 inches.
- Place Under Foot: Slide both thread tails under the presser foot and towards the back of the machine.
You are now fully threaded and ready to sew!
Singer Bobbin Problems and Fixes
Even when you think you’ve done everything right, you might run into Singer bobbin problems. Here are some common issues and what usually causes them, often related to winding or loading.
Problem: Thread is Looping or Tangled on the Bottom of the Fabric (Bird’s Nest)
- Cause 1: The top thread is not threaded correctly, especially missing a guide or not being fully seated in the tension discs or take-up lever.
- Fix 1: Unthread the top completely. With the presser foot UP, re-thread the machine carefully, following every step in the manual. Make sure the thread is pulled firmly into the tension discs.
- Cause 2: The bobbin thread is not under the tension spring (front-loading) or not in the tension channel (drop-in).
- Fix 2: For front-loading, take out the bobbin case, remove the bobbin, and re-load the bobbin case, making sure the thread snaps under the tension spring. For drop-in, open the cover and make sure the thread is correctly seated in the guides/channel around the bobbin holder.
Problem: Stitches are Uneven, Loose, or Skipping
- Cause 1: Bobbin is wound unevenly or too loosely.
- Fix 1: Re-wind the bobbin, making sure the thread goes through the bobbin winding tension disc and winds smoothly.
- Cause 2: Bobbin thread tension is wrong.
- Fix 2: For front-loading, you can try to adjust bobbin tension using the tiny screw on the bobbin case. Turn it slightly right (clockwise) to increase tension, left (counter-clockwise) to decrease. Make very small turns. For drop-in, you cannot easily adjust bobbin tension; the issue is usually winding or incorrect loading into the tension channel.
- Cause 3: Wrong bobbin type for the machine.
- Fix 3: Use only bobbins made specifically for your Singer model.
- Cause 4: Machine needs cleaning, especially the sewing machine bobbin area. Lint can mess up thread movement and tension.
- Fix 4: Clean out the bobbin area with a brush, following your manual.
Problem: Thread Breaks Often
- Cause 1: Bobbin is wound too full or too tightly.
- Fix 1: Re-wind the bobbin, being careful not to overfill or wind too tightly.
- Cause 2: Thread is catching on something in the bobbin area.
- Fix 2: Check the sewing machine bobbin area for lint, broken thread bits, or damage. Clean thoroughly. Check the bobbin case (front-loading) or bobbin holder (drop-in) for nicks or rough spots.
- Cause 3: Bobbin case (front-loading) is not inserted correctly.
- Fix 3: Remove and re-insert the bobbin case, ensuring it clicks into place.
Problem: Bobbin Winder Not Working or Bobbin Winding Badly
- Cause 1: Thread not routed correctly through bobbin winding guides/tension.
- Fix 1: Check your manual for the exact path for winding bobbin. Make sure the thread is in the winding tension disc.
- Cause 2: Bobbin spindle not pushed fully into winding position.
- Fix 2: Make sure the bobbin spindle is pushed all the way over towards the handwheel. If your machine requires loosening the handwheel, make sure that’s done.
Many Singer bobbin problems are solved by simply re-winding the bobbin and re-loading it very carefully, following the correct steps for your machine’s bobbin type and ensuring the thread direction is right and it’s properly seated in its tension path.
Maintaining the Sewing Machine Bobbin Area
Keeping the sewing machine bobbin area clean is very important. Lint and small bits of thread can build up. This can cause problems with thread tension, skipping stitches, or even machine jams.
- Clean Often: Clean the bobbin area after every few sewing projects, or anytime you change the bobbin and see lint.
- Use the Right Tools: Use a small brush (often comes with the machine) to gently sweep out lint. Avoid using canned air directly into the machine’s insides, as it can blow lint deeper into the machine parts.
- Check for Damage: While cleaning, look for any rough spots or nicks on the metal or plastic parts in the bobbin area or on the bobbin case itself. These can snag thread. If you find damage, you might need a new bobbin case or to have the machine serviced.
- Lubrication: Some older front-loading machines require oiling in the bobbin race area. Check your manual. If it does, use only proper sewing machine oil, just a drop or two, after cleaning. Drop-in bobbin systems often do not need oiling in that area.
A clean bobbin area helps the thread move smoothly, leading to better stitches and fewer Singer bobbin problems.
Interpreting Your Sewing Machine Threading Guide
Your machine’s manual is the best sewing machine threading guide. It shows the exact path for both upper and bobbin threading.
- Look at Diagrams: Pay close attention to the pictures or diagrams in your manual. They show the precise route the thread must take.
- Follow Steps: Go step-by-step. Don’t skip any guides or discs.
- Tension is Key: Both upper and bobbin thread need the right amount of tension to form a balanced stitch. Correct threading through the tension discs and bobbin path ensures this.
Remember, the bobbin thread forms the bottom half of your stitch. If the bobbin is wound or loaded wrong, the bottom of your fabric will show the problems (loose loops, tangles, etc.). If the top thread is the problem, issues will often show on the top of the fabric, but can also pull the bobbin thread into a tangle underneath.
Adjust Bobbin Tension (Front-Loading Only)
For machines with a front-loading bobbin setup and a metal bobbin case, you have the ability to adjust bobbin tension. This is done with a very small screw on the side of the bobbin case.
- When to Adjust: You might need to adjust it if your stitches look unbalanced even after ensuring correct threading and cleaning. If the bobbin thread is showing too much on the top of the fabric, the bobbin tension is likely too loose. If the top thread is showing too much on the bottom, the bobbin tension might be too tight (or the top tension is too loose).
- How to Adjust:
- Use a very small screwdriver that fits the screw snugly.
- To increase tension (if bottom thread is too loose): Turn the screw a tiny bit to the right (clockwise). Think “righty-tighty”.
- To decrease tension (if bottom thread is too tight): Turn the screw a tiny bit to the left (counter-clockwise). Think “lefty-loosey”.
- Test: Sew a test seam on a scrap piece of your fabric after making a tiny adjustment. Check the stitches. Adjust a tiny bit more if needed.
- Caution: Make only tiny adjustments. It’s easy to mess up the tension screw setting. If you are unsure, it’s often better to check top threading and cleaning first, or consult a service tech. Most sewing is done with standard bobbin tension settings.
Drop-in bobbins do not have an easy way to adjust bobbin tension. Their tension is set by the design of the tension channel they sit in. Problems with drop-in bobbin tension are almost always caused by winding issues, lint, or failing to guide the thread correctly into the tension channel around the bobbin holder.
Table: Comparing Bobbin Types
Let’s look at the two bobbin types side-by-side.
| Feature | Drop-In Bobbin System | Front-Loading Bobbin System (with case) |
|---|---|---|
| Location | Under a clear cover on the sewing bed | Behind a door on the front/side arm |
| Parts Needed | Bobbin | Bobbin and Bobbin Case |
| Loading Steps | Place bobbin directly into holder | Place bobbin into case, then case into machine |
| Thread Direction | Usually counter-clockwise (from top) | Usually clockwise (when putting in case) |
| Visibility | Easy to see thread level | Harder to see thread level |
| Tension Adjust | No easy adjustment (set by machine) | Tiny screw on case allows fine tuning |
| Common Issue | Wrong thread direction, not in channel | Thread not under case tension spring |
| Cleaning | Easy access, sweeps out lint | Area behind door needs cleaning |
This table gives a quick look at the main differences when you need to how to insert bobbin Singer for each type.
Putting it All Together: Your Bobbin Routine
To avoid Singer bobbin problems and ensure smooth sewing, make this your routine:
- Wind Bobbin: Always wind bobbins using the machine’s winding system, going through the proper guides and tension. Don’t overfill.
- Load Bobbin/Case:
- Drop-In: Place bobbin with correct thread direction (usually counter-clockwise) into the holder. Guide thread firmly into the tension channel/path.
- Front-Loading: Put bobbin into the bobbin case with correct thread direction (usually clockwise). Pull thread under the tension spring on the case. Insert the case into the machine, ensuring it clicks.
- Close Covers: Close the clear plate or the front door.
- Complete Threading: Thread the top thread correctly.
- Bring Up Bobbin Thread: Use the handwheel to lower and raise the needle to catch the bobbin thread loop. Pull both threads under the presser foot.
- Test: Sew a small sample stitch on scrap fabric before starting your project. Check the stitches on both the top and bottom of the fabric.
Following these steps carefully each time you change your bobbin will prevent most issues and keep your Singer machine sewing beautifully. Getting the bobbin loaded right is a fundamental part of the sewing machine threading guide for any project.
Keeping it Clean
We talked about cleaning the sewing machine bobbin area. This step cannot be stressed enough. Lint and dust build up over time. This soft fluff might seem harmless, but it can pack together tightly. Inside the bobbin area, there are moving parts that help make stitches. Packed lint slows these parts down. It can also block the path where the bobbin thread needs to glide smoothly.
Think of the bobbin tension paths or springs like a small channel. If that channel gets fuzzy with lint, the thread can’t move freely. This changes the pull on the thread. The machine expects a certain pull for a good stitch. If the pull is wrong because of lint, the stitches will look bad. You might see loops, skipped stitches, or the thread could break.
So, make cleaning the sewing machine bobbin area part of your loading routine, especially after using fluffy fabrics or sewing for a long time. A few seconds with a brush can save you lots of time fixing problems later.
FAQ: Common Questions About Singer Bobbins
Q: Can I use any bobbin in my Singer machine?
A: No. Using the wrong bobbin is a very common cause of Singer bobbin problems. Singer machines need bobbins of a specific size and shape, and sometimes made of a specific material (plastic or metal). Check your machine’s manual or look for markings on your old bobbins or the machine itself to find the correct type (like Class 15, Class 66, etc.). Always buy bobbins that match what your manual says or what came with your machine.
Q: My bobbin thread is looping on the bottom. What’s wrong?
A: This is almost always a problem with the top thread, not the bobbin thread itself. It means the top thread doesn’t have enough tension. The most common reason is that the top thread missed a guide or is not seated properly in the tension discs or the take-up lever. Completely re-thread the top of your machine, making sure the presser foot is UP when you thread the tension discs. If that doesn’t fix it, then check the bobbin loading (thread direction, seated in tension path).
Q: The bobbin case (front-loading) won’t fit in the machine.
A: Make sure the needle is in its highest position. Ensure the bobbin is correctly inside the case. Check that the small “finger” or arm on the bobbin case is lined up with the notch in the machine’s bobbin holder. Don’t force it. If it still won’t go, there might be lint buildup or something is out of place.
Q: How do I know if my bobbin tension is right?
A: Sew a test sample stitch on a scrap of the fabric you will use. Look at the stitches on both the top and bottom sides.
* Good Tension: The stitches look the same on both sides, with the knot hidden neatly between the two layers of fabric.
* Bobbin Tension Too Loose (Front-loading) or Thread Not in Channel (Drop-in): Loops of bobbin thread show on the top of the fabric.
* Bobbin Tension Too Tight (Front-loading): The top thread lies flat on top, and the bobbin thread lies flat on the bottom, with little loops showing the top thread pulled to the underside.
For front-loading machines, make very small adjustments to the screw on the bobbin case to adjust bobbin tension if needed. For drop-in machines, re-check winding and loading.
Q: How much thread should I wind on a bobbin?
A: Fill it until it is almost full, but not so much that the thread goes over the edges. Overfilling can cause issues. If your machine has an auto-stop bobbin winder, trust it to stop when ready.
Q: My thread keeps breaking while winding the bobbin.
A: This could happen if the thread is catching on something rough on the spool, the machine’s path, or the bobbin itself. Check for nicks. Make sure the thread is going smoothly through the winding tension disc. Winding too fast can also cause thread breaks.
Learning how to load bobbin on Singer sewing machine, whether it’s drop-in bobbin loading or front-loading bobbin setup, is a key skill. By following these steps and tips, you can avoid many common issues and enjoy smooth, happy sewing with your Singer. Keeping the sewing machine bobbin area clean is also a big help in preventing problems and ensuring your stitches look great.