
Machine applique is a fun way to add fabric shapes to your projects. It uses your embroidery machine to guide you. You put fabric down. The machine stitches the edges. This lets you put pictures or shapes on shirts, bags, quilts, and more. This guide shows you how to do machine applique with an embroidery machine. It is a step-by-step process. It is simple and easy to follow. You will learn the main machine embroidery applique steps. This makes it a great applique embroidery machine tutorial for beginners.
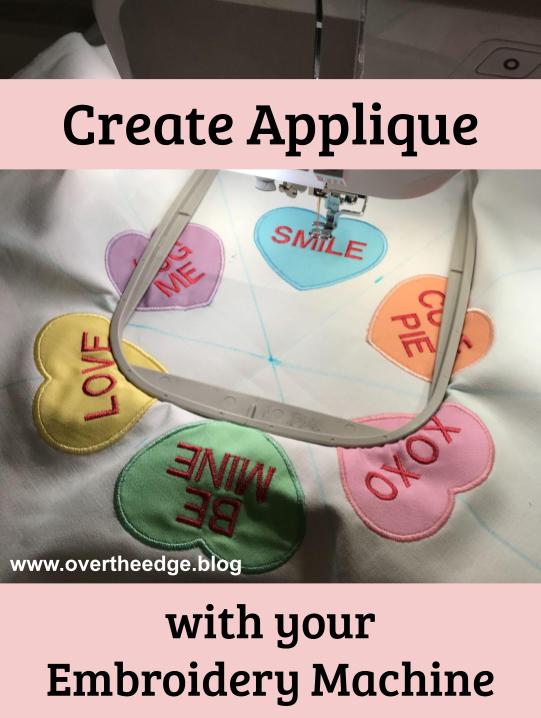
Image Source: overtheedge.blog
Getting Ready to Applique
Before you start, you need a few things. Make sure you have them ready. This makes the process smooth.
What You Will Need
- Your embroidery machine
- An embroidery hoop
- An applique design file
- Fabric for your base project (like a shirt or quilt square)
- Fabric for the applique shape (often called the applique fabric)
- Embroidery thread (for the outline stitches)
- Bobbin thread
- Needle (a sharp embroidery needle works well)
- Stabilizer (this is important!)
- Small, sharp scissors (for trimming)
- Temporary spray adhesive or fabric glue stick
- An iron and ironing board (sometimes helpful)
Choosing Your Design and Fabric
You need an embroidery machine applique design. These designs tell the machine where to stitch. They have special steps just for applique. You can find many designs online. Pick a design you like.
Think about your fabrics. The base fabric is where the design goes. The applique fabric is the shape you will cut out. Choose colors and patterns you like. Make sure the applique fabric is big enough. It needs to cover the whole shape the machine will stitch.
Choosing the Right Support
Stabilizer is very important for machine embroidery. It holds your fabric steady. It stops the fabric from puckering. For applique, stabilizer is a must. It helps the stitches look clean. It keeps your project from getting wrinkled.
What is Embroidery Machine Applique Stabilizer?
Embroidery machine applique stabilizer is a material you put under your fabric. It gives support while the machine stitches. It helps the fabric stay flat in the hoop. There are different types of stabilizer.
Finding the Best Stabilizer
The best stabilizer for machine applique depends on your fabric.
* Cut-away stabilizer: This stays with the fabric after you finish. You cut the extra away. Use this for knit fabrics or stretchy fabrics. It gives lasting support. It stops stretching.
* Tear-away stabilizer: This tears away easily when you finish. Use this for stable fabrics like cotton. It is easy to remove.
* Wash-away stabilizer: This dissolves in water. Use this if you do not want any stabilizer left behind. Good for delicate fabrics or things that will be washed.
Often, a medium-weight tear-away or cut-away works well. You might use two layers for extra support. Always test a small piece first. See how your fabric acts with the stabilizer.
The Step-by-Step Process
Now let’s do the applique! Follow these machine embroidery applique steps. This is your applique embroidery machine tutorial.
Step 1: Prepare Your Fabric and Hoop
First, get your base fabric ready. Iron it flat. Put the correct stabilizer behind it. Choose the stabilizer you picked. Put it in your hoop. Hoop the fabric and stabilizer together. Make sure it is tight like a drum. But do not stretch the fabric. Stretching can cause puckers. Center your fabric in the hoop. Put the hoop on your machine.
Step 2: Stitch the Placement Line
Load your applique design into the machine. Select the first color stop. This stop is usually a single stitch line. It shows where the applique fabric goes. This is called the placement stitch. It marks the shape outline on your base fabric. Start the machine. It will sew this outline stitch. This stitch line shows you where to put your applique fabric.
Step 3: Place the Applique Fabric
Take the hoop off the machine. Do not unhoop the fabric. Look at the placement line. It is a stitched shape on your base fabric. Get your applique fabric ready. Cut a piece that is bigger than this stitched shape. It needs to cover the whole shape by at least half an inch on all sides. Put this piece of applique fabric over the placement line. Make sure it covers all the stitches.
Use a little temporary spray adhesive. Or use a fabric glue stick. Put it on the back of the applique fabric. This holds it in place. Put the applique fabric down carefully. Smooth it out. Make sure it is flat. There should be no wrinkles. This is the applique fabric placement step. Put the hoop back on the machine.
Step 4: Stitch the Tack-Down Line
Select the second color stop on your design. This is the tack-down stitch. It sews over the applique fabric. It sews right on the placement line. This stitch holds the applique fabric in place. It stitches the fabric to the base fabric. Start the machine. It will sew this tack-down stitch.
Step 5: Trim the Applique Fabric
Take the hoop off the machine again. Do not unhoop the fabric. Now you see the tack-down stitch. It shows the exact shape. You need to cut away the extra applique fabric. This is the trimming applique fabric step. This is a key part. Use small, sharp scissors. Applique scissors are best. They have a paddle on one blade. This helps you not cut the base fabric.
Carefully cut around the tack-down line. Cut close to the stitches. But be careful not to cut the stitches themselves. Cut away all the extra applique fabric outside the shape. If you trim too far away, the final stitch might not cover the edge. If you cut too close, you might cut the stitch. Take your time. Trim neatly around the whole shape. Put the hoop back on the machine.
Step 6: Stitch the Finishing Line
Select the last color stop on your design. This is the finishing stitch. It sews over the edge you just trimmed. This stitch hides the raw edge of the applique fabric. It gives the shape a clean, finished look. Many designs use a satin stitch machine applique. A satin stitch is a wide, close zig-zag stitch. It makes a smooth border. Some designs might use a zig-zag stitch or a bean stitch instead. Start the machine. It will sew this final stitch around the shape.
Step 7: Finish Up
The machine is done stitching. Take the hoop off. Take the fabric out of the hoop. Remove the extra stabilizer. If you used tear-away, gently tear it away from the back. If you used cut-away, carefully cut it away. Leave about a quarter inch around the design. If you used wash-away, wet the area to make it dissolve. Press your finished project. Now you have a beautiful applique shape!
Exploring In-the-Hoop Applique
Some projects are made entirely on the embroidery machine. These are called in-the-hoop applique projects. They often make small items. Examples are keychains, coasters, patches, or little bags.
With in-the-hoop applique, the whole project is made inside the hoop. The machine stitches the applique layers. It might also stitch other parts. It could add batting for puffiness. It could add a back fabric layer. You take the item out of the hoop. Maybe you do a little turning or closing a small gap. Then it is finished. The steps for the applique part are the same: placement stitch, fabric placement, tack-down stitch, trimming, and finishing stitch. But the design file includes steps for the whole item. This is a neat way to make quick gifts or small projects.
Getting Better: Tips for Machine Applique
Practice makes perfect. Here are some tips for machine applique. They can help you get great results every time.
Use Good Quality Supplies
- Designs: Start with designs made for applique. Good designs have clear steps.
- Fabric: Use fabrics that do not fray too much. Cotton works well. Pre-wash your fabrics. This helps stop shrinking later.
- Thread: Use good quality embroidery thread. It stitches smoothly. Match your bobbin thread to your top thread color. Or use white bobbin thread if the back will not show.
- Needle: Use a sharp needle. Change it often. A dull needle can make holes in your fabric.
Applique Fabric Placement Tips
- Cut the applique fabric piece larger than the placement line. Give yourself plenty of room to trim. A piece about 1 inch bigger all around is usually good.
- Use temporary adhesive. This stops the fabric from shifting. Spray the back lightly. Or use a glue stick around the edges.
Trimming Applique Fabric Tips
- Use very sharp scissors. Small scissors give you more control.
- Applique scissors with a ‘duckbill’ or paddle blade are helpful. The paddle pushes the base fabric away. This stops you from cutting it by mistake.
- Cut close to the tack-down stitch. But do not cut the stitch itself. Go slowly and carefully.
Stabilizer Tips
- Always use stabilizer. Do not skip this step.
- Match the stabilizer to your fabric type.
- Sometimes, two layers of stabilizer are better than one. Especially for complex designs or stretchy fabrics.
- Make sure the stabilizer is hooped well with the fabric. No wrinkles.
Stitch Tips (Satin Stitch Machine Applique)
- The final stitch covers the raw edge. If you see fabric sticking out, your trimming might have been too far from the stitch. If the stitch does not cover the edge, the stitch might be too narrow in the design.
- A satin stitch is dense. It uses a lot of thread. Make sure you have enough bobbin thread.
- Sometimes, you might need to adjust the tension. If the stitches look loose or bumpy, check your tension settings. Read your machine manual.
General Tips
- Do a test stitch. If you are new to applique, try the design on scrap fabric first. This helps you practice the steps. You can also check your tension and fabric choices.
- Keep your machine clean. Dust and lint can affect stitch quality.
- Watch videos. Seeing someone do it can help you understand the steps better.
- Start simple. Pick an easy design with a few shapes. Work up to more complex designs.
Common Questions About Machine Applique
You might have some questions as you learn. Here are answers to some common ones.
How thick can my applique fabric be?
Use medium weight fabrics like cotton or felt. Very thick fabrics like denim can be hard for the machine to stitch through neatly. Very thin fabrics might show the edges through the final stitch.
Can I layer applique?
Yes! Many designs layer shapes. The machine stitches one shape. You add fabric, trim it, and the machine finishes it. Then the machine stitches the placement for the next shape. You follow the steps for each layer.
What if my fabric shifts when trimming?
This is why temporary adhesive is helpful. It holds the fabric. Trim carefully without pulling the fabric. If the fabric moves, your final stitch might not cover the edge well.
Can I use scraps for applique fabric?
Yes, applique is great for using up fabric scraps! Just make sure the piece is big enough to cover the placement stitch area.
What is the difference between applique and in-the-hoop?
Applique adds fabric shapes to an existing item (like a shirt). In-the-hoop applique often makes a whole item (like a coaster or patch) within the hoop. The applique steps (placement, tack-down, trim, finish) are part of the larger in-the-hoop process.
Why is my satin stitch not smooth?
Check your tension. Make sure your stabilizer is right for the fabric. Make sure your applique fabric was trimmed close but not too close. Sometimes, a water-soluble topper on top of fluffy fabric can help.
Table: Stabilizer Types for Applique
Here is a simple table about stabilizers.
| Stabilizer Type | Best For | How to Remove | Notes |
|---|---|---|---|
| Cut-Away | Stretchy fabrics, knits | Cut away extra | Stays with fabric, gives lasting support |
| Tear-Away | Stable fabrics (cotton, felt) | Tear away extra | Easy to remove, good for non-stretchy |
| Wash-Away | Delicate fabrics, towels | Dissolves in water | Leaves no trace, good for fluffy items |
Most people start with a medium weight tear-away or cut-away.
Wrapping Up Your Applique Journey
Learning to machine applique is fun. It adds so much to your projects. This applique embroidery machine tutorial gives you the main steps. Remember the key machine embroidery applique steps: place fabric, tack down, trim, and finish. Choosing the right embroidery machine applique stabilizer is important. Take your time trimming applique fabric. This makes a big difference. Practice your applique fabric placement. Soon, you will be adding beautiful shapes to everything! Use these tips for machine applique to help you along the way. Happy stitching!