
Can you make a fabric bow without sewing? Yes, absolutely! You can easily make fabric bows without needing a needle and thread. This guide will show you simple ways to do it using just fabric and glue. We’ll even cover how to make a no sew hair bow or a quick no sew fabric bow for gifts. It’s much easier and faster than you might think!
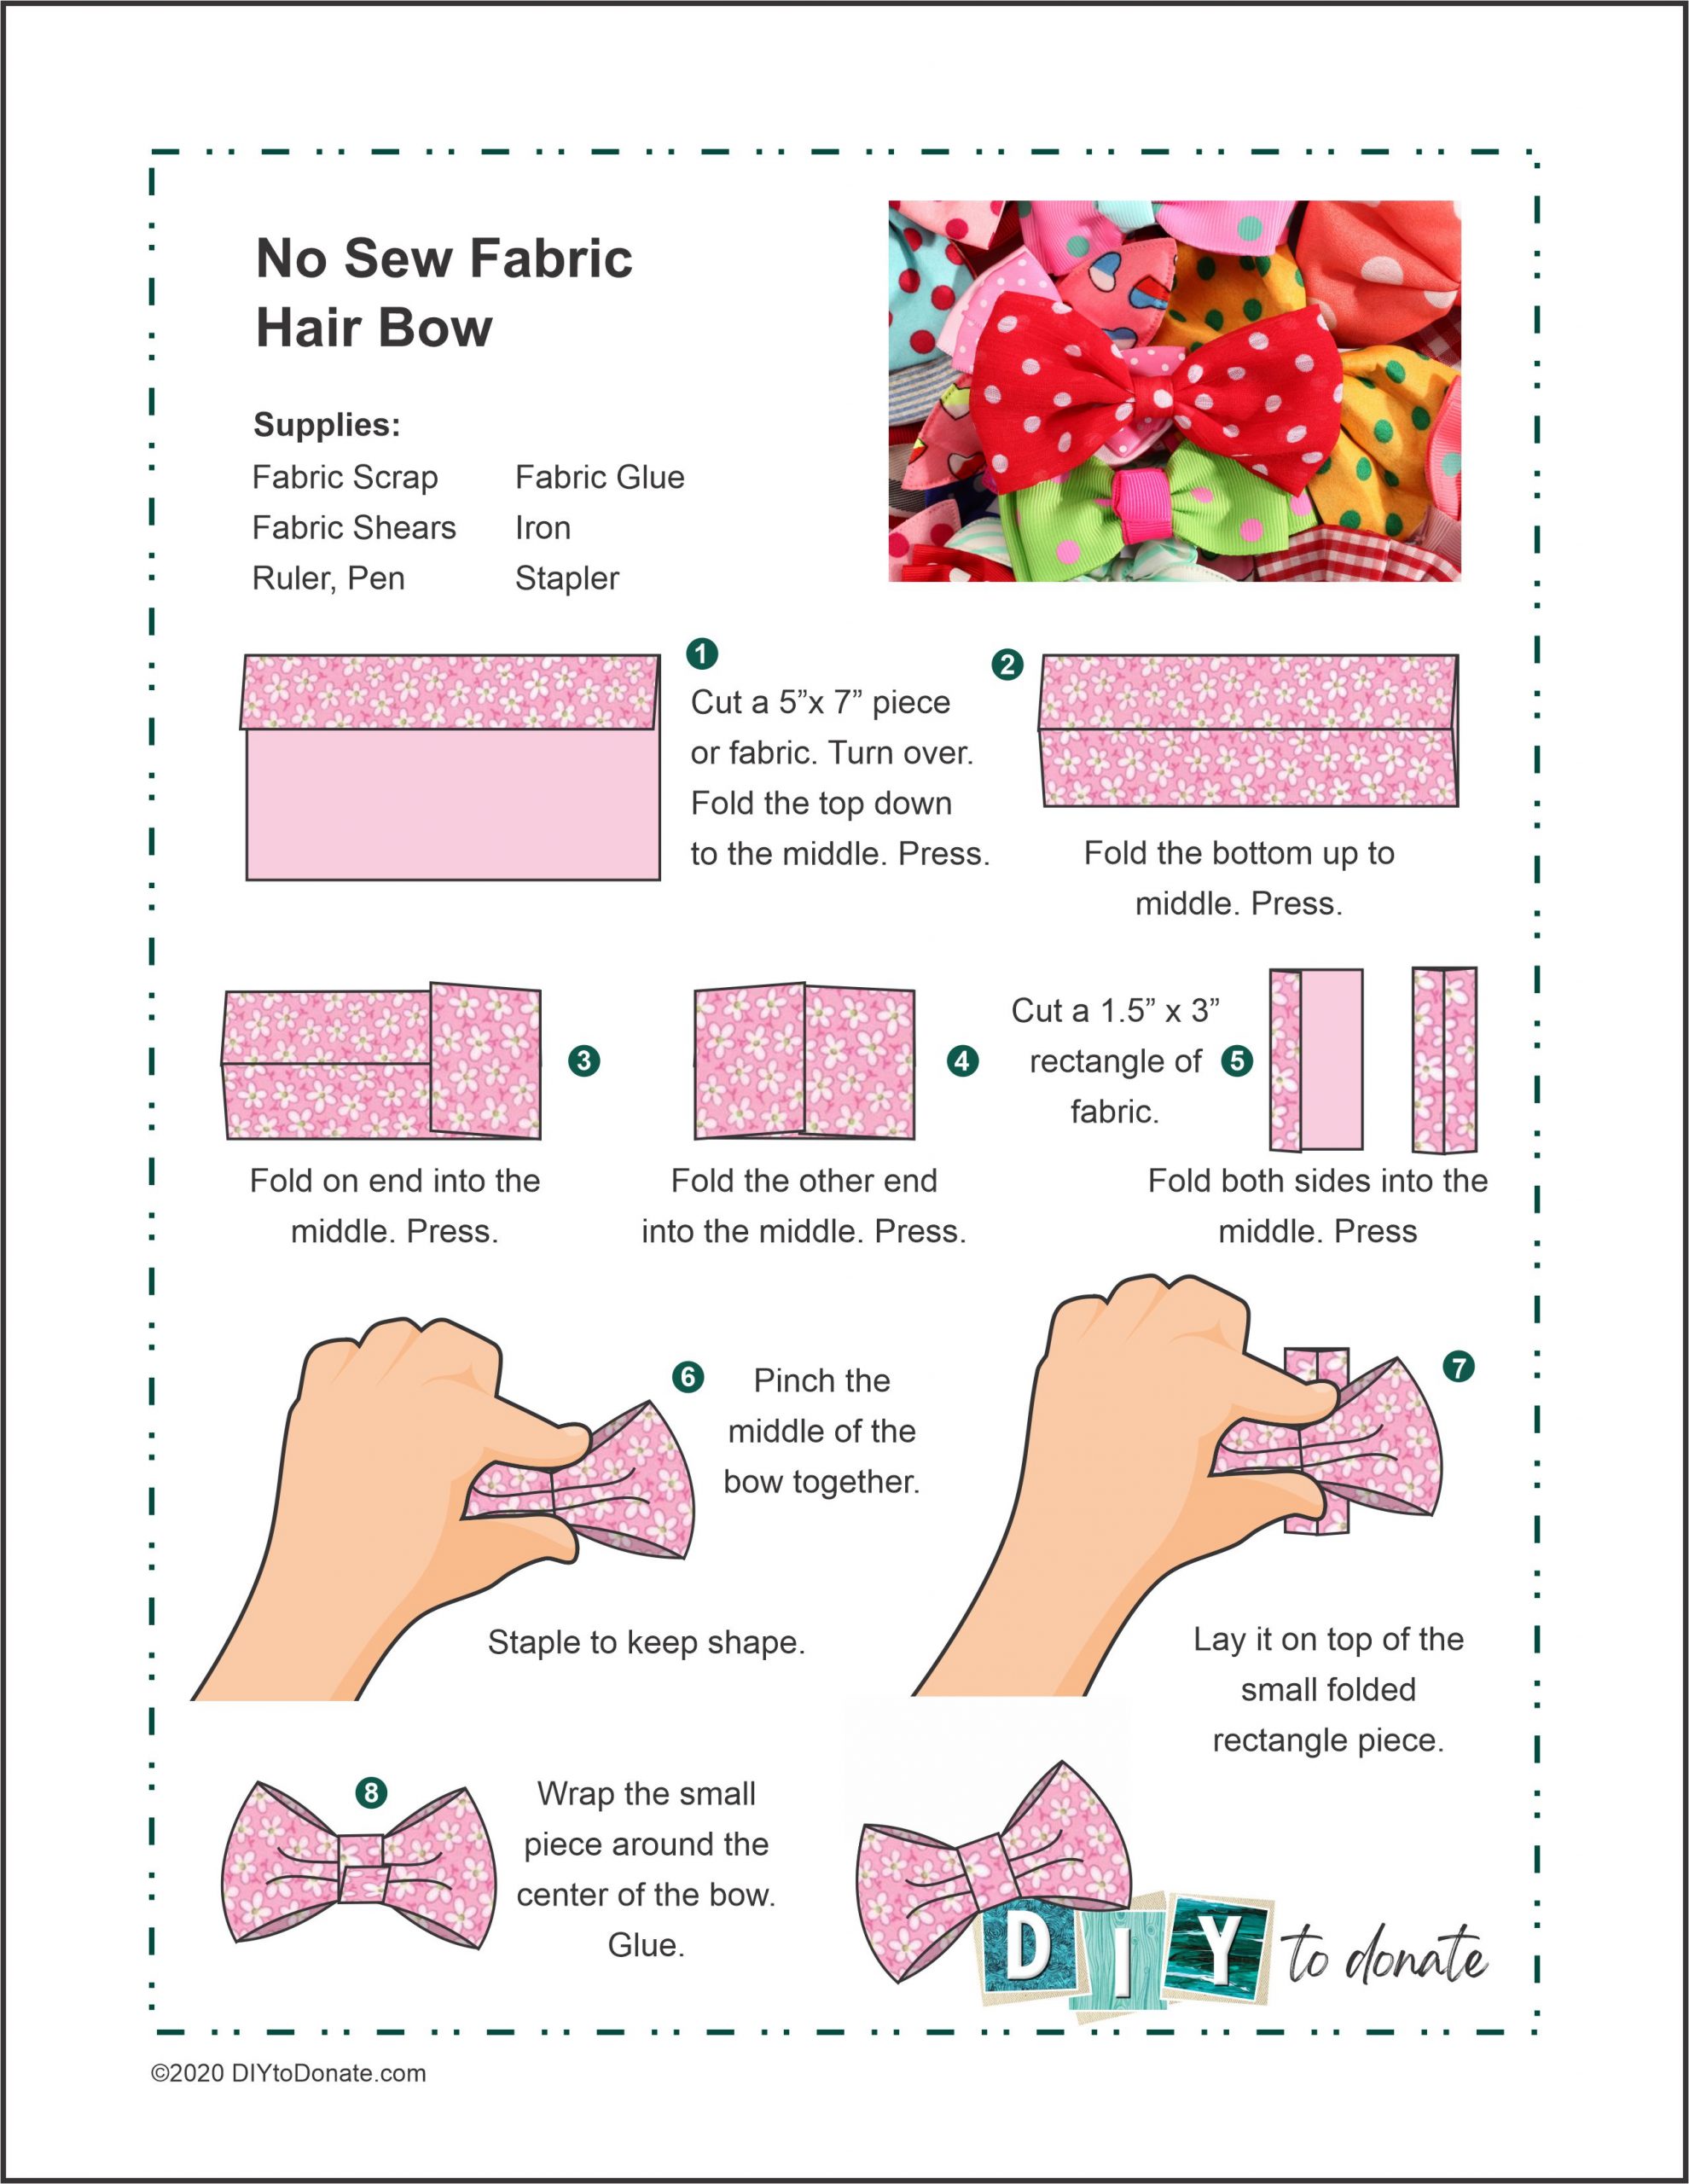
Image Source: diytodonate.com
Grasping Why No-Sew Works
Making things without sewing is super popular right now. Why? Because it’s fast and easy! You don’t need special skills. You also don’t need fancy tools. Sewing machines can be costly. Learning to sew takes time. But you can make fabric bows without stitching in minutes.
This method is great for lots of reasons:
* It’s quick. You can make many bows fast.
* It’s simple. Anyone can do it. Kids can help too!
* It’s cheap. You can use fabric scraps.
* It’s helpful. Make bows for gifts, clothes, or crafts.
* It’s easy DIY fabric bow no sew. You feel good making something yourself.
This fabric bow making no sew method opens up a world of projects. You can add a cute bow to almost anything!
Getting Ready: What You Need
You don’t need a lot of stuff to make these bows. The main things are fabric and something to stick it together.
Here is a simple list of tools and materials:
- Fabric: Scraps work perfectly! Cotton is a good start. You can also use felt, satin, or even fabric ribbon.
- Scissors: Sharp ones cut fabric best.
- Glue: Hot glue is fast and strong. Fabric glue also works, but takes longer to dry. Craft glue can work for some fabrics. We will talk more about glue later.
- Ruler or Tape Measure: To measure your fabric pieces.
- Pencil or Fabric Marker: To mark lines on fabric.
- Optional:
- Pins or clips to hold fabric.
- An old mat or surface to protect your table from glue.
- Tweezers for handling small pieces.
- Stuff to decorate (like beads or buttons).
- Hair clips or safety pins if making hair bows or brooches.
Gather your things before you start. This makes the process smooth. Making a fabric bow without stitching should be fun, not stressful!
Making a Simple Bow: The Basic Method
Let’s start with the easiest kind of bow. This is your simple no sew fabric bow. It’s perfect for beginners. It’s also very quick! This method uses glue, often hot glue, so it’s a hot glue fabric bow tutorial too.
Here are the steps:
H4: Step 1: Cut Your Fabric
First, you need two pieces of fabric.
- One piece will be the main bow shape. This needs to be a rectangle.
- The second piece will be the small strip for the middle of the bow. This needs to be a smaller rectangle.
Think about how big you want your bow.
* For a small bow (like for a hair clip), the main rectangle might be 6 inches long and 3 inches wide. The middle strip might be 2 inches long and 1 inch wide.
* For a medium bow (like for a gift), the main rectangle might be 10 inches long and 5 inches wide. The middle strip might be 3 inches long and 1.5 inches wide.
You can change these sizes. Just make sure the main piece is much bigger than the middle piece. The main piece’s length should be about twice its width, or a bit more. The middle piece should be long enough to wrap around the center and narrow.
Use your ruler and marker to draw the rectangles on your fabric. Then, cut them out with your sharp scissors. Try to cut straight lines. This makes the bow look neat.
H4: Step 2: Make the Main Bow Shape
Take the large rectangle piece of fabric.
- Lay it flat with the side you want to show face down.
- Put a little bit of glue right in the middle of the rectangle. If using hot glue, use just a small dot or thin line. Hot glue dries fast!
- Take one short end of the fabric. Fold it towards the center where the glue is. Press it down onto the glue. The edge should meet the center point.
- Now take the other short end. Fold it towards the center too. Overlap it slightly on top of the first edge you glued, or have it meet right next to it. Press it down onto the glue.
What you have now looks a bit like a flattened tube or a loop with ends overlapping in the middle. This is the base of your bow shape. It should look like two loops side-by-side.
H4: Step 3: Pinch the Center
This step gives the bow its classic shape.
- Turn the fabric piece over so the side you want to show is now facing up.
- Find the middle where you glued the ends down.
- Pinch this middle part together. Squeeze it like you are folding it into little accordion pleats. Make three little folds in the middle.
- Hold these folds tightly. You can use a clip to hold it if needed.
This pinching creates the volume and shape of the bow. You’ll see the two loops on the sides puff up a bit.
H4: Step 4: Add the Center Strip
Now, take the small rectangle you cut for the middle.
- Put a small dab of glue (again, be careful with hot glue) on one end of this small strip, on the back side.
- Place this glued end onto the pinched center of your main bow shape, on the back side of the bow. Press it firmly.
- Wrap the small strip tightly around the pinched center of the bow. Keep wrapping until you reach the back again.
- Trim any extra length from the small strip if it’s too long. Leave just enough to overlap slightly.
- Put another small dab of glue on the end of the strip you just trimmed.
- Fold that end down and glue it onto the back of the bow center, where the strip started or overlapped. Press it well to secure it.
This middle strip hides the messy pinched part and holds the bow shape firmly. You now have a finished fabric bow without stitching!
This simple no sew fabric bow is ready to use. It’s a quick no sew fabric bow method that works every time.
Using Different Glues
The type of glue you use matters for a no sew fabric bow. Hot glue is popular because it dries super fast. But other glues work too.
Let’s look at options:
| Glue Type | Pros | Cons | Best Use For No-Sew Bows |
|---|---|---|---|
| Hot Glue | Dries in seconds, strong hold | Can be messy, can show through thin fabric, hot! | Quick bows, sturdy fabrics, adding things like clips |
| Fabric Glue | Flexible when dry, good for fabric | Takes longer to dry (read the bottle!), can soak through thin fabric | Fabric that needs a softer feel, less rush projects |
| Craft Glue (PVA/White Glue) | Easy to clean up, low cost | Can be less strong, takes long to dry, can make fabric stiff | Using with felt or thicker, less-fraying fabrics |
| Fray Check | Stops edges from fraying | Not a strong glue for holding shapes | Use on edges before gluing or as a finish |
For this hot glue fabric bow tutorial, we focus on hot glue. It makes the ‘quick’ part true! Always use a low-temp hot glue gun if kids are helping. Use glue carefully. Too much glue makes the bow hard and can show.
Making a No Sew Hair Bow
One great use for these fabric creations is as hair accessories. Learning how to make a no sew hair bow is simple once you know the basic bow shape.
You will need:
* A simple fabric bow (made using the steps above).
* A hair clip (like an alligator clip or a barrette).
* Hot glue gun and glue sticks.
Here’s how to turn your bow into a hair bow:
H4: Step 1: Get Your Bow Ready
Make your simple fabric bow first. Use a size that looks good for a hair clip. Smaller bows work well for kids. Bigger ones can be fun statement pieces. Choose a fabric that isn’t too heavy for a hair clip. Cotton or light satin works well.
H4: Step 2: Add Glue to the Clip
Open your hair clip. Put a line of hot glue along the top, flat part of the clip. This is the part that will touch the back of the bow. Be careful not to get glue in the clip’s hinge or teeth.
H4: Step 3: Attach the Bow
Quickly, before the hot glue cools, press the back of your fabric bow onto the glued part of the hair clip. Make sure the bow is centered on the clip. Hold it in place for a few seconds while the glue cools and sets.
That’s it! You have made a no sew hair bow. This easy DIY fabric bow no sew method is perfect for making matching bows for outfits or using up tiny fabric scraps.
You can attach bows to headbands too! Just glue the bow onto a plain plastic or fabric-covered headband.
Making No Sew Fabric Bows for Gifts
Fabric bows add a special touch to wrapped presents. A no sew fabric bow for gifts feels more personal than a plastic ribbon bow. Using the fabric bow making no sew method, you can make bows that match your wrapping paper or the gift itself!
For gift bows, you might want to make them a bit larger or puffier. You can use the basic method but cut bigger fabric pieces.
Here are some ideas for gift bows:
- Bigger Basic Bows: Just scale up the sizes from the simple bow tutorial. A rectangle maybe 15 inches by 7 inches can make a nice sized bow for a medium gift box.
- Layered Bows: Make two basic bows of different sizes. Glue the smaller one on top of the bigger one. This adds depth.
- Using Fabric Ribbon: If you have actual fabric ribbon (like grosgrain or satin ribbon), you can make a no sew fabric ribbon bow using the same simple steps. Just fold the ribbon ends to the center and glue, then wrap the middle strip. Ribbon is often less likely to fray than cut fabric.
H4: Attaching Gift Bows
How do you put the bow on the gift?
- Glue: You can glue the bow directly onto the wrapping paper. Use enough glue to hold it, but not so much it makes a hard lump or soaks through. Hot glue works here too, but use it fast!
- Tape: Put a strong double-sided tape on the back of the bow’s center. Press it onto the gift.
- Ribbon/String: Glue or tie a piece of ribbon or string to the back of the bow. Then tie this ribbon around the gift box. This is good if you don’t want to glue onto the wrapping paper.
Making a simple no sew fabric bow for a gift adds beauty and shows you put extra thought into it.
Trying Different No-Sew Styles
Once you know the basic method, you can make fabric bows without sewing in other shapes.
H4: The Layered Bow
This gives your bow more body and color.
- Make two or three simple bows using different sized rectangles. Make sure each rectangle is smaller than the last. You can use different fabrics or colors.
- Stack the bows on top of each other, with the largest on the bottom and the smallest on top.
- Put a small amount of glue in the center of the bottom bow.
- Press the next size bow onto the glue, lining up the centers.
- Repeat for any other layers.
- Finally, wrap one middle strip around the center of all the layers together, gluing it on the back. Or, wrap a middle strip around each bow before stacking and gluing the stacks together. Wrapping one strip around all layers holds everything very securely.
H4: The Puffy Bow
To make a puffier bow, you can use more fabric or a stiffer fabric. Another trick is to add a little stuffing.
- Cut your main rectangle.
- Instead of just folding the ends to the center, fold them past the center so they overlap a bit more, creating bigger loops. Glue in place.
- Before pinching the center, you can add a tiny bit of cotton batting or fabric scraps into the loops to make them puff out more.
- Then pinch the center and wrap with the middle strip as usual.
H4: Using Different Fabrics
The type of fabric changes the bow’s look.
- Cotton: Easy to work with, many patterns. Can fray.
- Felt: Doesn’t fray! Great for simple shapes. Less drape.
- Satin/Silk: Looks fancy. Can be slippery and hard to cut. Frays easily. Needs careful handling and often Fray Check.
- Grosgrain Ribbon: Very easy! Already cut. Stiff and holds shape well. Basically a pre-made no sew fabric ribbon bow material.
- Burlap: Rustic look. Frays a lot! Use fray check or glue generously near edges.
Experiment to see what you like best! The fabric bow making no sew method works with many materials.
Tips for Making Your Bows Perfect
Even though it’s simple, a few tips help make your no sew fabric bow look great.
- Cut Cleanly: Use sharp scissors. Cut along your marked lines carefully. Clean edges look better.
- Use Glue Wisely:
- Don’t use too much glue! A little goes a long way, especially with hot glue. Too much makes the bow hard and can show through.
- Place glue carefully where it won’t be seen (usually on the back or in the middle fold).
- Press firmly but not so hard you squish the shape you just made.
- Mind the Fray: Some fabrics, like cotton or satin, fray at the cut edges.
- You can use Fray Check liquid on the edges before you start folding and gluing. Let it dry.
- You can fold the raw edges inwards slightly before gluing the ends to the center. This hides the raw edge.
- Using fabric ribbon helps, as the edges are often finished.
- Shape as You Go: Pinch and shape the loops of the bow while the glue is still a little soft or right after you wrap the center strip. Gently pull and adjust until the bow looks the way you want.
- Hide the Middle Glue: Make sure the middle strip is wrapped tightly and the glued end is on the back, tucked under the strip itself if possible. This makes the front look clean.
Following these tips helps you make fabric bows without sewing that look professional and last.
More Places to Use Your No-Sew Bows
Beyond hair and gifts, where else can these easy DIY fabric bow no sew creations go? Lots of places!
- On Clothes: Glue a small bow onto a shirt collar, a headband, a plain hat, or the corner of a pocket.
- On Bags: Add a bow to a tote bag handle or a backpack zipper.
- Home Decor: Glue bows onto pillows, curtains (use fabric glue here), picture frames, or small baskets.
- Card Making/Scrapbooking: Small fabric bows add texture and fun to paper crafts.
- Jewelry: Glue tiny bows onto earring posts or rings.
- Pet Accessories: Glue a bow onto a pet collar (make sure it’s safe and secure!).
- Party Decor: Make many bows for banners, napkin rings, or chair backs.
Because they are quick no sew fabric bows, you can make them for any holiday or event! Use red and green fabric for Christmas, pastels for Easter, or team colors for game day.
Understanding Common Troubles and Fixes
Sometimes things don’t go perfectly when you make fabric bows without sewing. Don’t worry! Most problems are easy to fix.
H4: Problem: Glue Shows on the Front
This happens if you use too much glue or if the fabric is very thin.
* Fix: Use less glue next time! For thin fabric, use fabric glue or a special glue meant for sheer materials. Try placing the glue even more carefully in the center where the fabric layers are thickest.
H4: Problem: Bow Looks Flat, Not Puffy
The loops aren’t standing out enough.
* Fix: Make sure you pinched the center well. Those little folds create the puff. Try making the main fabric rectangle wider for more dramatic loops. For extra puff, add a tiny bit of stuffing before pinching.
H4: Problem: Fabric Edges Fray
Cut edges are getting messy threads.
* Fix: Use Fray Check liquid on the edges before you start. Let it dry completely. Or, choose fabrics that don’t fray, like felt or knit fabric. If using a fraying fabric, fold the raw edges inward towards the center when you make the main shape, hiding them inside.
H4: Problem: Middle Strip Won’t Stay or Looks Messy
The strip that wraps the middle is tricky.
* Fix: Make sure you glue the start and end of the strip firmly on the back. Wrap it tightly! Trim the end neatly so it lays flat when glued down. Use a fabric glue that stays flexible if hot glue makes it too stiff and hard to wrap.
Practice makes perfect! Your first no sew fabric ribbon bow or simple fabric bow without stitching might not be perfect, but each one will get better.
Going Deeper: A Detailed Walkthrough
Let’s do one more super detailed example for a medium-sized simple bow, like a nice fabric bow for gifts.
H4: Planning Your Medium Gift Bow
- Fabric: Choose a medium weight cotton or a nice satin. Let’s use cotton with a pretty pattern.
- Size Goal: A bow about 5-6 inches wide.
- Fabric Pieces Needed:
- Main piece: Rectangle, maybe 14 inches long by 7 inches wide.
- Middle piece: Rectangle, maybe 4 inches long by 1.5 inches wide.
- Glue: Hot glue for speed.
- Other: Scissors, ruler, marker, hot glue gun, safe surface.
H4: Step-by-Step Creation
H5: Measure and Mark
- Get your cotton fabric. Smooth it out flat.
- Use your ruler and marker to draw a rectangle 14 inches long and 7 inches wide.
- Draw a second rectangle 4 inches long and 1.5 inches wide.
- Make sure your marks are light if using a regular pencil, or use a washable fabric marker.
H5: Cut Carefully
- Use sharp scissors.
- Cut along the lines you drew. Take your time to make the edges straight.
- You now have your two fabric pieces. Set the small one aside for a moment.
H5: Prep for Folding (Optional Fray Check)
- If your cotton is fraying a lot, you can put a little Fray Check liquid along the cut edges of the large rectangle.
- Let the Fray Check dry fully. This takes maybe 15-30 minutes. Skip this if your fabric doesn’t fray much or if you’re in a hurry (quick no sew fabric bow!).
H5: Fold and Glue the Main Shape
- Lay the large rectangle with the patterned side down.
- Find the center point along the 14-inch length.
- Turn on your hot glue gun and let it heat up.
- Put a small line or dot of hot glue right in the center of the fabric. Work fast!
- Take one short end of the fabric (an end of the 14-inch side). Fold it over to the center point where the glue is. Press it down gently onto the glue.
- Put another small line or dot of hot glue next to the first one in the center.
- Take the other short end. Fold it over to the center point. Overlap it slightly on top of the first folded end, or have the edges meet right in the middle. Press it down onto the glue.
- Hold for a few seconds until the glue cools and holds firm. You should have a shape that looks like two loops.
H5: Pinch the Center to Shape
- Turn the fabric piece over so the patterned side is up.
- Look at the center where the two ends meet.
- Use your fingers to pinch this center part. Fold it like an accordion. Try to make about three small folds in the middle.
- Hold this pinched part tightly. You can use a clip here if it helps you. You will see the loops on the sides start to form the bow shape.
H5: Wrap the Middle Strip
- Take your small rectangle piece (4 inches by 1.5 inches).
- Turn your main bow shape over again, so the back is facing up. The pinched part should be clear.
- Put a small dab of hot glue on one end of the small strip, on the back side.
- Press this glued end onto the back center of the main bow shape, covering the pinched part. Hold for a moment.
- Keep wrapping the small strip around the pinched center of the bow. Wrap it snugly but not so tight that you flatten the bow.
- When you reach the back again, see how much strip is left. Trim any extra length, leaving about a half-inch overlap.
- Put a small dab of hot glue on the end you just trimmed.
- Fold that end down and glue it onto the back of the bow center, overlapping the start of the strip. Press firmly.
H5: Final Touches
- Turn the bow back over.
- Gently fluff and shape the loops with your fingers. Make sure the center strip is straight.
- Check the back to make sure the glue is secure.
Your quick no sew fabric bow is ready! This is a simple no sew fabric bow, perfect for adding to a gift. It’s a full hot glue fabric bow tutorial using the most common method.
Crafting with Scraps: Using What You Have
The fabric bow making no sew method is perfect for using up fabric scraps. Small pieces that aren’t good for bigger projects can become beautiful bows. This saves money and reduces waste. Look through your leftover fabrics! You might find the perfect material for a no sew fabric ribbon bow or a colorful no sew hair bow.
Think about old clothes, tablecloths, or curtains you don’t use anymore. These can be cut up and turned into lovely bows. It’s a green way to craft!
Frequently Asked Questions About No-Sew Bows
H3: FAQ Section
H4: What kind of fabric works best?
Cotton is a great start. Felt is easy because it doesn’t fray. Stiffer fabrics hold shape better. Thin fabrics like satin can be used but might need Fray Check and careful glue use.
H4: How do I stop the edges from fraying?
Use Fray Check liquid on the cut edges and let it dry before making the bow. Or, use fabrics that don’t fray like felt or knit fabrics. You can also hide the raw edges by folding them under when you make the main bow shape.
H4: Can I use other glues instead of hot glue?
Yes, you can use fabric glue or even some strong craft glues. Hot glue dries fastest which is great for quick projects. Fabric glue stays softer but takes longer to dry. Always test the glue on a scrap first.
H4: How do I make a big bow for a wreath or decor?
Just scale up the fabric sizes! Use larger rectangles for the main bow shape and the center strip. You might need more glue or maybe even a few hidden stitches (if you don’t mind a tiny bit of sewing just for structure, though it defeats the “no sew” goal!) or strong craft wire to hold the shape before adding the center wrap. The fabric bow making no sew method works for bigger bows too, you just need more material.
H4: My bow is flat, how can I make it puffy?
Make sure you are pinching the center tightly to create folds. You can also insert a small amount of stuffing (like poly-fill or fabric scraps) into the loops before you pinch the center. Using a stiffer fabric helps too.
H4: How do I attach the bow to things?
For hair: Glue onto a hair clip or headband. For gifts: Glue onto the package, use double-sided tape, or tie it on with ribbon attached to the bow’s back. For crafts/clothing: Use fabric glue or hot glue depending on the item.
H4: Can I make a no sew fabric ribbon bow from actual ribbon?
Absolutely! Fabric ribbon is perfect for this. The no sew method described works just the same with ribbon. It’s often easier as the edges are already finished.
Wrapping It Up
Making fabric bows without sewing is a wonderful, easy craft. It’s fast, fun, and lets you use up fabric scraps. Whether you need a quick no sew fabric bow for a gift, a cute no sew hair bow, or decorations for crafts, the simple no sew fabric bow method using glue (especially this hot glue fabric bow tutorial) is your friend.
You’ve learned the basic steps, how to attach them, and even how to troubleshoot. Now go make some beautiful bows! It’s truly an easy DIY fabric bow no sew project anyone can enjoy. Happy crafting!