
Making a bracelet with embroidery thread is a fun and easy craft. What is embroidery thread? It is a type of colorful string, also called embroidery floss. It comes in many bright colors. Can I use it for bracelets? Yes, it is perfect for making pretty wristbands! Many people use it to make friendship bracelets. This guide will show you how to start. It is great for beginner jewelry making with thread.
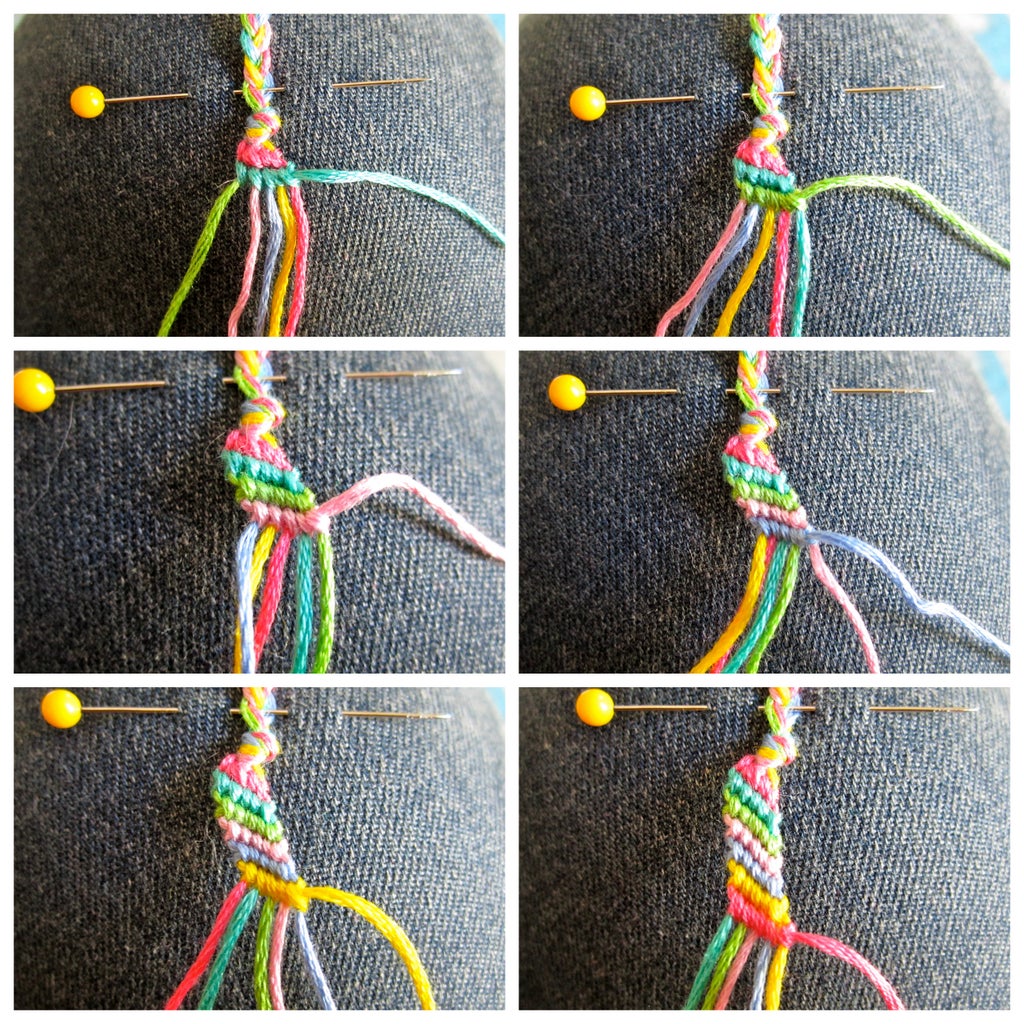
Image Source: content.instructables.com
Why Pick Embroidery Thread for Bracelets?
Embroidery thread is a top choice for making bracelets. Here is why.
It is Easy to Find and Cheap
You can buy embroidery thread almost anywhere. Craft stores, big shops, and even online stores sell it. It costs very little. This makes it a great hobby for anyone. You do not need much money to start.
Many Colors to Choose From
Embroidery floss comes in hundreds of colors. You can pick any shade you like. This helps you make unique bracelets. You can mix and match colors. You can make them match your clothes. Or make them show your favorite teams.
Great for All Ages
Making bracelets is a calm and fun activity. It is good for kids and adults. Embroidery floss crafts for kids are very popular. It helps them use their hands. It lets them be creative. It is a safe and easy craft.
Makes Special Gifts
Handmade bracelets make lovely gifts. You can give them to friends and family. A friendship bracelet shows you care. It is a thoughtful present. Each one is a bit different. It feels special because you made it.
Helps Your Mind
This craft is good for your mind. It helps you focus. It makes you feel calm. It is a good way to relax. It can make you feel happy.
Essential Items for Bracelet Making
You do not need many tools to start. Most things are easy to find.
Your Main Material: Embroidery Floss
- Colors: Get many colors! Pick what you like. Most projects use 6-strand floss. This means it has 6 tiny strands twisted together. You can separate them if a pattern needs it.
- Amount: How much do you need? This depends on the bracelet. For a simple one, a whole skein (or bundle) of each color is enough. You can always get more later.
Tools You Will Need
- Scissors: Good, sharp scissors are a must. They help you cut thread cleanly. This stops ends from fraying.
- Measuring Tape or Ruler: You need this to measure your string. You also need it to measure your wrist. This makes sure your bracelet is the right size.
- Something to Hold Your Work: You need a way to keep your strings still. This helps you make neat knots. Here are common choices:
- Clipboard: This is very popular. You clip your strings to the board.
- Safety Pin: Pin your strings to a pillow, your pants, or a cushion.
- Tape: Use strong tape to stick your strings to a table.
- Macrame Board: A special board with pegs. It is great for macrame bracelet instructions.
Fun Extras (Optional)
- Beads: Small beads can add sparkle. They can make your bracelet unique. Make sure the hole in the bead is big enough for your thread.
- Charms: Tiny metal or plastic charms. You can tie them onto your bracelet.
- Buttons: Use a button as a special closure.
- Glue: A tiny bit of craft glue can seal ends. This stops fraying. It makes your bracelet last longer.
Basic Knots for Bracelet Making
Making bracelets is all about knots. Do not worry. They are easy to learn. Once you know a few, you can make many designs. These knots are key for knotting embroidery thread jewelry.
The Overhand Knot
This is the simplest knot.
1. Make a loop with your string.
2. Pass the end of the string through the loop.
3. Pull it tight.
You use this knot to start and end bracelets. It can also be a simple knot in a design.
The Lark’s Head Knot
This knot is often used to attach strings to a loop or a starting ring.
1. Fold a string in half.
2. Place the loop end under a main string or ring.
3. Pull the two loose ends through the loop.
4. Pull tight.
This makes a neat way to start many DIY thread bracelet designs.
The Half Knot
This knot is the base for many patterns. It is one part of a full knot.
1. Take two strings. Let’s call them string A (left) and string B (right).
2. Make a ‘4’ shape with string A over string B.
3. Take string A under string B and up through the loop of the ‘4’.
4. Pull both strings tight. String A goes around string B.
This knot is good for spiral designs.
The Forward Knot (FK)
This is a key knot for many friendship bracelet patterns. It makes a diagonal line.
1. Pick two strings. Let string A be the one you are knotting with. Let string B be the string you are knotting around.
2. Make a ‘4’ shape with string A over string B.
3. Pull string A under string B and up through the loop of the ‘4’. Pull gently to the top of string B. This is one half knot.
4. Do this exact same step again with string A. Make another ‘4’ over string B. Pull string A under and through. Pull it tight.
You do two half knots to make one full forward knot. The color of string A will show.
The Backward Knot (BK)
This is the opposite of the forward knot. It also makes a diagonal line.
1. Pick two strings. Let string A be the one you are knotting with. Let string B be the string you are knotting around.
2. Make a ‘P’ shape (or a reversed ‘4’) with string A over string B.
3. Pull string A under string B and up through the loop of the ‘P’. Pull gently to the top of string B. This is one half knot.
4. Do this exact same step again with string A. Make another ‘P’ over string B. Pull string A under and through. Pull it tight.
You do two half knots to make one full backward knot. The color of string A will show.
The Forward-Backward Knot (FBK)
This knot is also called a half hitch knot. It is used in chevron patterns.
1. Do one Forward Knot with string A over string B.
2. Then, do one Backward Knot with string A over string B.
The color of string A will move inward.
The Backward-Forward Knot (BFK)
This is the opposite of the FBK.
1. Do one Backward Knot with string A over string B.
2. Then, do one Forward Knot with string A over string B.
The color of string A will move inward from the other side.
Simple Bracelet Designs for Beginners
Let us start with some easy designs. These are perfect if you are new to making handmade cotton thread bracelets.
The Basic Braided Bracelet
This is the simplest way to make a bracelet. It is a great braided string bracelet tutorial.
* Items to Grab:
* Three strands of embroidery floss. You can use one color or three different colors.
* Scissors.
* Something to hold your strings.
* Starting Your Braid:
1. Cut three pieces of string. Make each string about 24-30 inches long. (This length works for most wrists. You will trim the extra.)
2. Line up the three strings.
3. Tie an overhand knot near one end. Leave about 3-4 inches of loose string above the knot. This forms a loop. This loop will be part of your clasp.
4. Tape the knot to a table. Or clip it to a clipboard. Or pin it to a pillow.
* Braiding Steps:
1. Separate your three strings. Call them Left, Middle, and Right.
2. Move the Left string over the Middle string. The old Middle string is now on the left.
3. Move the Right string over the new Middle string. The old Middle string is now on the right.
4. Keep doing this: Left over Middle, then Right over Middle.
5. Pull gently after each move. Keep the braid tight and even.
* Tying It Off:
1. Braid until the bracelet is long enough to fit around your wrist. Make it a bit shorter than your wrist size. You will add a knot at the end.
2. Tie an overhand knot to hold the braid. Leave about 3-4 inches of loose string after this knot.
3. You can try it on. Put the starting loop over the knot you just made. If it fits, you are good.
4. Trim any extra string.
Step-by-Step Guides for Popular Designs
Now let us try some classic friendship bracelet patterns. These use the forward and backward knots.
The Classic Friendship Bracelet: Candy Stripe
This bracelet makes pretty diagonal stripes. It uses only the forward knot.
Gathering Your Items
- Embroidery floss: Choose as many colors as you want stripes. For example, 4 colors (A, B, C, D).
- Scissors.
- Something to hold your strings.
Setting Up Your Strings
- Cut two strands of each color. For 4 colors, you will have 8 strings total. Each string should be about 36 inches long. (This is longer than the braid, as knotting uses more string).
- Gather all your strings.
- Tie an overhand knot near one end. Leave about 3-4 inches of loose string for tying later.
- Tape, clip, or pin your knot to a surface.
- Arrange your strings in the order you want your stripes to appear. For example, A, B, C, D, A, B, C, D. The order will repeat. The first string on the far left will make the first stripe.
Making the Forward Knot (FK)
You will work from left to right.
1. Take the first string on the left (String A). This is your knotting string.
2. Take the next string to its right (String B). This is the string you will knot around.
3. Make a Forward Knot (FK) with String A around String B. Remember, this is two half knots. String A will now be on the right of String B.
4. Move String A to the next string on its right (String C).
5. Make another FK with String A around String C.
6. Keep doing this. Knot String A around every string to its right. You will make an FK on each string.
7. When String A reaches the far right, you have completed one row (one stripe). String A is now at the far right.
Continuing the Pattern
- Now, the new first string on the left will be the color of the next stripe (String B from your original lineup).
- Take this new first string. Make a Forward Knot on every string to its right. Work your way across.
- Keep repeating this process. Each time you finish a row, the color you started with will be on the far right. The next color in line will be on the far left, ready to start a new row.
- The stripes will slant to the right. This is a very common woven thread bracelet idea.
Finishing Your Bracelet
- Keep knotting until your bracelet is long enough. Wrap it around your wrist to check.
- Tie an overhand knot at the end of the knotted part. Leave about 3-4 inches of loose string.
- You can make a braid with the loose ends. Or, you can just use the loose ends to tie it on.
- Trim extra string.
The Chevron Bracelet: V-Shape Design
This bracelet makes a “V” or zigzag shape. It uses both forward and backward knots.
What You Will Need
- Embroidery floss: Choose colors you like. You need an even number of strings, with each color repeated twice. For example, 4 colors (A, B, C, D) would mean you need 2 A strings, 2 B strings, 2 C strings, 2 D strings.
- Scissors.
- A way to hold your strings.
Preparing Your Strings
- Cut your strings. Make them about 40 inches long each. You need 2 strings of each color.
- Arrange your strings. Lay them out so the colors mirror each other. For example: A, B, C, D, D, C, B, A. The middle two strings will be the same color (D and D).
- Tie an overhand knot near one end. Leave 3-4 inches loose.
- Secure your strings.
The Forward Knot (FK) and Backward Knot (BK)
You will work from the outside in.
1. Left Side: Take the first string on the far left (String A).
2. Knot String A with a Forward Knot (FK) around String B. (Two FK half knots).
3. Then, knot String A with an FK around String C.
4. Keep going. Knot String A with an FK around String D. String A should now be in the middle of your left section.
5. Right Side: Take the first string on the far right (the other String A).
6. Knot this String A with a Backward Knot (BK) around the next string to its left (the other String B). (Two BK half knots).
7. Then, knot String A with a BK around the next string (the other String C).
8. Keep going. Knot String A with a BK around the other String D. String A should now be in the middle of your right section.
Joining the Middle
- Now you have two strings of the same color in the middle. These are the two A strings you just used.
- Take the String A from the left side. Make a Forward Knot (FK) around the String A from the right side.
- This joins the two halves. It forms the point of your “V” shape.
Completing the Chevron Pattern
- After the middle knot, the next colors in line will be on the outside. (The B strings).
- Start again with the new far-left string (String B). Make FKs moving right until it meets the other String B in the middle.
- Start again with the new far-right string (the other String B). Make BKs moving left until it meets the other String B in the middle.
- Join the two middle B strings with an FK.
- Keep repeating these steps. Your chevron pattern will grow. This is another classic DIY thread bracelet design.
How to End Your Bracelet
- When your bracelet is long enough, tie an overhand knot at the end of the knotted part.
- You can braid the loose ends for tying.
- Or, you can make a loop closure. Use a button. Or, make two braids and tie them together.
- Trim extra string.
Adding Flair: Beads and Charms
You can make your bracelets even more special. Add beads or small charms.
How to Add Beads
Adding beads can be tricky but looks great.
1. Pick the Right Bead: Make sure the hole is big enough. Your embroidery thread needs to pass through it.
2. When to Add: Add a bead in the middle of a knot. For example, in a forward knot:
* Do the first half of the forward knot. (Make the ‘4’, pull through, pull gently).
* Slide your bead onto the knotting string. Push it down close to the knot you just made.
* Then, do the second half of the forward knot. Make sure the bead is snug.
3. Placement: You can add beads at the start, end, or in the middle. You can add them in a pattern. Or just put one bead for a simple touch.
Attaching Charms
- Small Charms: Some charms have a tiny loop. You can use a thin string to tie the charm to your bracelet. Do this at the end or at a knot point.
- Sew-On Charms: Some charms have holes like buttons. You can sew them on with a needle and thread. Do this after the bracelet is done.
- Jump Rings: If your charm has no loop, use a small metal jump ring. Open it, put the charm on, then loop it onto a knot. Close the ring.
Making Adjustable Closures
An adjustable closure makes your bracelet fit anyone. This is great for gifts.
1. Sliding Knot Closure (for a single bracelet):
* Finish your bracelet. Do not tie a final knot.
* Take the two ends of your bracelet. Overlap them by 2-3 inches.
* Take a new, short piece of embroidery floss (about 6 inches).
* Make square knots (see macrame bracelet instructions for how to do square knots) around the two main bracelet ends. Make 3-4 square knots. This creates a tube of knots.
* Tie off the ends of the short string. Trim closely.
* Now, you can pull the two bracelet ends through the square knot tube. This makes it longer or shorter.
2. Braided Ties:
* Instead of one big knot at the end, make three small braids.
* You can then tie these braids together to close the bracelet.
Advanced Techniques and Inspirations
Once you are good at the basics, you can try new things.
Exploring More Friendship Bracelet Patterns
There are hundreds of friendship bracelet patterns.
* Heart patterns: Make tiny hearts in your bracelet.
* Letter patterns: Spell out names or words. These often use charts.
* Spiral patterns: Use a series of half knots to make a spiral.
* Woven designs: Some complex patterns look like fine weaving. They are still made with knots. These are amazing woven thread bracelet ideas.
Beyond Basic Knots
- Macrame: This is a type of knotting art. Macrame bracelet instructions often use square knots and half hitch knots. They can make very detailed bracelets. You can use thicker cords for macrame.
- Kumihimo: This is an old Japanese braiding art. A kumihimo cord bracelet is made on a special disc. The disc has notches. You move cords from notch to notch. This makes a round or flat braid. It is different from hand knotting. It creates beautiful patterns. You can buy kumihimo kits.
Caring for Your Handmade Bracelets
Your handmade cotton thread bracelets are special. They need a little care to last.
Keeping Them Clean
- Hand Wash: Most embroidery thread is colorfast. This means colors do not run. You can wash your bracelet by hand. Use a little mild soap and cool water.
- Gentle Cleaning: Gently rub the bracelet. Rinse it well.
- Air Dry: Do not put it in a dryer. Lay it flat on a towel. Let it air dry fully.
Storing Your Bracelets
- Avoid Sunlight: Keep your bracelets out of direct sun. Sun can fade colors.
- Store Flat or Hung: Store them flat in a drawer. Or hang them on a hook. This keeps them from getting tangled.
- Keep Dry: Do not store them in wet places. Mold can grow on natural fibers.
What to Avoid
- Harsh Chemicals: Do not use bleach or strong cleaners. They can damage the thread.
- Excessive Wetness: Try not to wear them in pools with chlorine. Or in very salty ocean water often. This can weaken the fibers.
- Snagging: Be careful not to snag them on rough surfaces.
Troubleshooting Common Bracelet Problems
Sometimes things go wrong. Do not worry! Here are some common problems and fixes.
Knots Too Loose or Too Tight
- Loose Knots: You might not be pulling the knots tight enough. Make sure each knot is snug. But do not pull so hard it deforms the thread.
- Tight Knots: You might be pulling too hard. This can make the bracelet stiff. It can also make it hard to do the next knot. Try to keep an even, firm pull. Practice helps you find the right tension.
Strings Getting Tangled
- Keep Them Separate: When you work, keep your unknotted strings apart.
- Use Clips: Small hair clips can hold unused strings.
- Work in Sections: If your strings are very long, coil them up. Use a rubber band to hold the coil. Only uncoil as you need more string.
- Shorten Strings: If strings are too long, they tangle easily. For your next bracelet, cut them a bit shorter.
Bracelet Too Short or Too Long
- Measuring is Key: Always measure your wrist before you start. Add a few inches for the knots and tying. It is better to have too much string than too little.
- Add an Extension: If your bracelet is too short, you can add an extra braid at the end. Or attach a short piece of chain.
- Trim Excess: If it is too long, simply trim the extra string. Make sure it fits before you cut too much!
Uneven Sides or Width
- Consistent Tension: This is the most common reason for unevenness. Try to pull each knot with the same amount of force.
- Check Your Knots: Make sure you are doing the knots correctly. Each forward knot should look the same.
- Practice: Like anything new, practice makes perfect. Your first few bracelets might not be perfect. But you will get better with each one.
Sparking Your Creativity: Design Tips
Once you have the basics down, let your imagination go wild!
Playing with Colors
- Color Themes: Pick colors for a theme. Like ocean colors (blues, greens). Or sunset colors (reds, oranges, yellows).
- Ombre Effect: Use colors that go from light to dark. Or from one color to another.
- Contrast: Use very different colors next to each other. This makes them pop.
- Subtle Blends: Use colors that are very close. This makes a soft, gentle look.
Mixing Techniques
- Combine a braided section with a knotted section.
- Add beads to a basic braided bracelet.
- Make a chevron pattern and add a special bead in the middle of each “V”.
Getting Ideas from the World
- Nature: Look at flowers, leaves, or stones. What colors do you see?
- Art and Clothing: Look at patterns in clothes, paintings, or decor.
- Online Galleries: Websites like Pinterest have endless DIY thread bracelet designs and friendship bracelet patterns.
- Trial and Error: Just try something! If it doesn’t work, learn from it. Then try again.
Making bracelets with embroidery thread is a rewarding hobby. It is fun, easy, and lets you make unique things. With practice, you will make beautiful pieces of beginner jewelry making with thread. Enjoy your crafting journey!
Frequently Asked Questions (FAQ)
H4: Can I use regular yarn instead of embroidery floss?
You can, but embroidery floss is best. Regular yarn is often thicker. It might be fuzzy. This can make your knots look messy. Embroidery floss is smooth and strong. It holds knots better.
H4: How long should the strings be for a bracelet?
This depends on the pattern and your wrist size.
* For simple braids: About 24-30 inches for each string.
* For knotted patterns (like candy stripe or chevron): About 36-40 inches for each string. Knotting uses more string.
It is always better to cut too long than too short. You can always trim extra.
H4: How do I make the bracelet bigger or smaller?
- For Length: Measure your wrist. Make the knotted part slightly shorter than your wrist. This allows for the tying ends. If it is too small, you can add more knots or braids to the ends. If it is too big, you can make the ending braids or knots longer and trim more.
- For Width: The width depends on how many strings you use in your pattern. More strings make a wider bracelet. Fewer strings make it thinner.
H4: Is it okay if my bracelet gets wet?
Yes, embroidery floss bracelets are usually fine with water. The colors are often colorfast. This means they will not run. But long-term exposure to water can make them wear out faster. Chlorine from pools can weaken the thread. Saltwater can also be harsh. It is best to take them off for swimming if you want them to last a very long time.
H4: How do I clean my embroidery floss bracelet?
Clean it gently. Use a little mild soap, like dish soap, and cool water. Gently rub the bracelet between your fingers. Rinse it well under cool water. Then, lay it flat on a clean towel. Let it air dry completely. Do not put it in a dryer.
H4: What if my knots are not lining up straight?
This is common for beginners. It means your tension is not even. Try to pull each knot with the same firmness. Do not pull too hard, and do not let it be too loose. Practice helps a lot! Your hands will learn the right feel.
H4: Can I mix different types of thread?
Yes, you can! You can mix embroidery floss with thin yarn, or even thin ribbon. Just make sure the different materials have similar thickness. This helps the knots look even. Different textures can make a cool bracelet.