
Image Source: i.ytimg.com
DIY Tassel: How To Make A Tassel With Embroidery Thread
Can you make a tassel with embroidery thread? Absolutely! Making a tassel with embroidery thread is a fun and easy way to add a decorative touch to many crafts. This guide will show you precisely how to make a beautiful tassel using embroidery floss.
Embroidery thread is a fantastic material for creating tassels. It’s readily available in a rainbow of colors, affordable, and surprisingly durable. Whether you’re a seasoned crafter or just starting out, this tassel making tutorial will equip you with the skills to craft stunning thread tassels for all your projects. From embellishing handmade cards and jewelry to adding flair to keychains and home decor, a DIY tassel can elevate any item. This comprehensive guide will cover everything you need to know about how to make tassels for crafts using embroidery floss.
Gathering Your Supplies for Your Embroidery Floss Tassel
Before you start your embroidery thread crafts, having the right materials is key to a successful and enjoyable experience. For your very own DIY tassel, you’ll need a few simple items.
Here’s a checklist of what you’ll need:
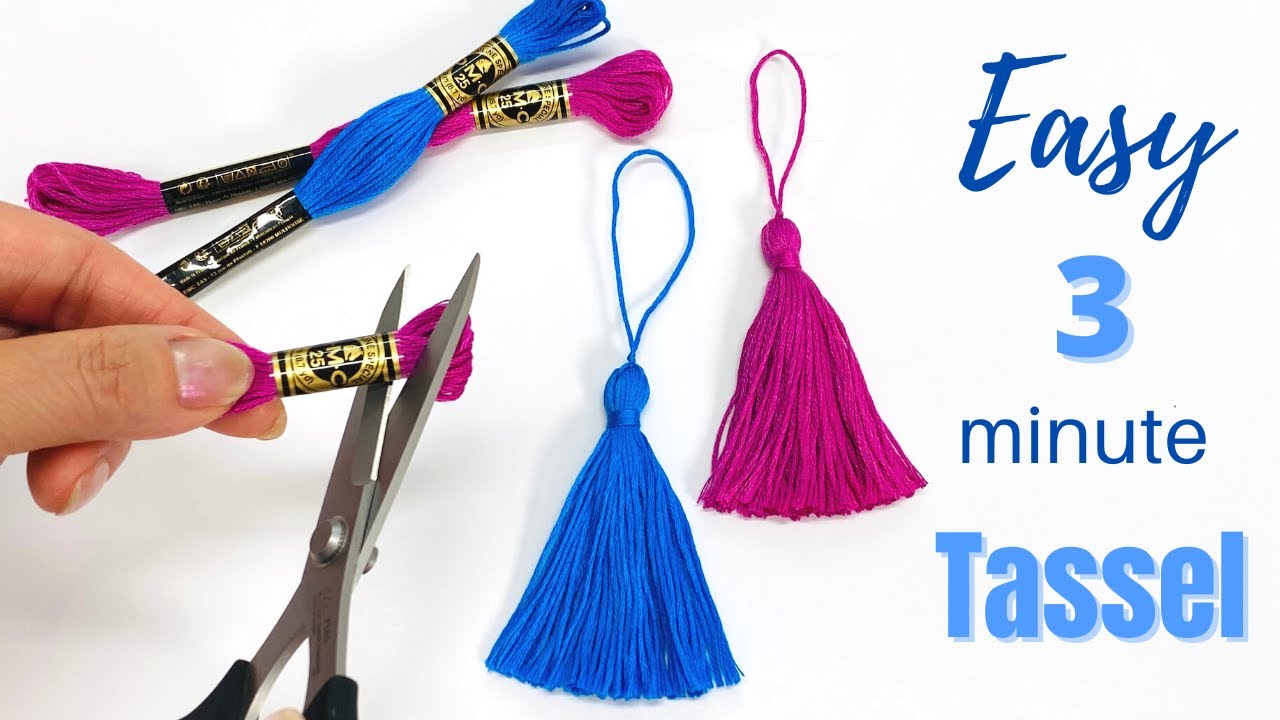
- Embroidery Floss: Choose your desired colors. You can use a single color or mix and match for a unique look. A standard skein of embroidery floss contains six strands; you can use all six together for a fuller tassel or separate them for a finer thread tassel.
- Scissors: Sharp scissors are essential for clean cuts. Fabric scissors or embroidery scissors work best.
- Ruler or Measuring Tape: To ensure your tassel strands are a consistent length.
- Cardboard or a Tassel Maker: This will be used to wrap the embroidery floss. You can easily cut a piece of sturdy cardboard into a rectangular shape. Alternatively, specialized tassel makers are available and make the process very quick.
- A Small Piece of Sturdy Cardboard (Optional but Recommended): This will be used for tying the top of the tassel.
- Embroidery Needle (Optional): Can be useful for threading the hanging loop.
Step-by-Step Guide: Crafting Your Tassel
Now that you have your supplies, let’s dive into the fun part – making your embroidery floss tassel! This process is straightforward and rewarding.
Step 1: Preparing Your Wrapping Guide
First, decide on the desired length of your tassel. The length of your wrapping guide will determine the final length of your thread tassel.
- Using Cardboard: Cut a piece of sturdy cardboard to your desired tassel length plus an extra inch or two. The width of the cardboard will determine how thick your tassel is. A wider piece means more wraps and a fuller tassel.
- Using a Tassel Maker: Follow the manufacturer’s instructions for your specific tassel maker. They are usually designed with notches or guides to help you wrap and create uniform tassels.
Step 2: Wrapping the Embroidery Floss
This is where your embroidery thread truly comes to life. The more you wrap, the fuller and more luxurious your tassel will be.
- Securing the Starting End: Take the end of your embroidery floss. Leave a tail of about 4-6 inches hanging off the top edge of your cardboard or tassel maker. This tail will be part of your hanging loop.
- Wrapping Technique: Begin wrapping the embroidery floss around the cardboard or tassel maker, keeping the initial tail out of the way. Wrap the floss smoothly and closely together.
- Building the Tassel: Continue wrapping. For a standard, full tassel, you’ll want to make at least 50-100 wraps. If you’re using a thinner thread tassel style, fewer wraps might suffice. You can use a single strand of floss or multiple strands together for a thicker effect. If you run out of one color, tie off the end securely and start with a new strand, hiding the knot within the wrapped floss.
- Evenness is Key: Try to wrap as evenly as possible to ensure your finished tassel looks neat.
Table: Recommended Wraps for Tassel Thickness
| Desired Tassel Thickness | Number of Embroidery Floss Strands | Approximate Number of Wraps |
|---|---|---|
| Thin/Delicate | 1-2 strands | 30-50 |
| Medium | 3-4 strands | 50-80 |
| Full/Lush | 5-6 strands | 80-120+ |
Step 3: Securing the Top of the Tassel
This is a crucial step in how to tie a tassel. You need to create a secure knot at the top that holds all the wrapped threads together.
- Prepare a Separate Tie: Cut a piece of embroidery floss, about 10-12 inches long. This will be used to create the hanging loop and secure the top. If you want a substantial hanging loop, use a longer piece.
- Threading the Tie (Optional but helpful): You can thread this piece through an embroidery needle.
- Positioning the Tie: Slide the center of this separate piece of floss under all the wrapped threads at the top of your cardboard or tassel maker, close to where you secured the starting tail. Make sure the two ends of the tie are sticking out.
- Creating the Knot:
- Method 1 (Simple Knot): Bring the two ends of the tie together at the top and tie a tight knot. Repeat this knot a couple of times for extra security.
- Method 2 (Wrapped Knot for a Neater Look): Take one end of the tie and wrap it tightly around the bundle of floss just below the top edge of your cardboard. Wrap it several times, working your way down a little. Then, thread the end of this tie through the small loop you created at the bottom of your wrapping. Pull the other end of the tie (the one that wasn’t wrapped) firmly. This will pull the loop you just made up towards the top, cinching the floss securely. Trim the excess ends of this tie, leaving a small tail if desired.
- Using the Starting Tail: If you left a generous starting tail in Step 2, you can use this tail in conjunction with your separate tie piece to create a very secure top knot and a ready-made hanging loop.
Step 4: Cutting the Tassel Free
Now it’s time to release your beautiful creation!
- Sliding off the Guide: Carefully slide the wrapped floss off the cardboard or tassel maker. Be mindful of the starting tail and the securing tie you just made.
- Making the Cut: Take your sharp scissors. Slide one blade of the scissors under the wrapped threads at the bottom of the bundle, opposite the tied end. Cut through all the threads in one clean motion. This will create the fringe of your tassel.
Step 5: Creating the Hanging Loop (If not already done)
If your securing tie didn’t create a loop, or you want a more substantial one, you can add one now.
- Using the Starting Tail: If you left a long starting tail, simply fold it in half to create a loop and tie a secure knot close to the main tassel body.
- Using an Embroidery Needle: Take another piece of embroidery floss (or a contrasting color for a decorative element). Thread it through an embroidery needle. Insert the needle from the back of the secured top knot, bringing it out through the loop of your securing tie (or through the starting tail if you’re using that). Thread the needle back through the same loop and pull it through, creating a hanging loop. Tie off the ends securely.
Step 6: Trimming and Finishing Your Thread Tassel
The final touches make all the difference in turning a good tassel into a great one.
- Evening the Ends: Your cut ends might be a little uneven. Hold the tassel by its top knot and gently trim the bottom fringe with your scissors to create a perfectly straight and even edge. You can also leave them slightly uneven for a more bohemian look.
- Fluffing: Gently separate and fluff the individual strands of embroidery floss to give your tassel a full and luxurious appearance.
Congratulations! You have successfully made a beautiful DIY tassel with embroidery thread. This homemade tassel is now ready to be attached to your projects.
Variations and Creative Ideas for Your Embroidery Floss Tassel
Once you’ve mastered the basic technique of how to make a tassel with embroidery thread, you can explore many creative variations.
Color Combinations
- Ombre Effect: Gradually change colors as you wrap the floss. Start with one color and, as you wrap, introduce a new color, blending them together.
- Striped Tassel: Wrap alternating sections of different colored embroidery floss.
- Two-Tone Tassel: Use two distinct colors, one for the main body and another for the top knot and hanging loop, or even for a contrasting band around the tassel.
Tassel Size and Shape
- Mini Tassels: Use less floss and a shorter wrapping guide to create tiny tassels perfect for earrings or charm bracelets.
- Giant Tassels: Use more floss and a wider guide for statement pieces like large wall hangings or decorative pillows.
- Braided Tassel: Before cutting the fringe, you can braid the wrapped floss into sections for a more intricate look.
Adding Embellishments
- Beads: Thread beads onto the hanging loop or weave them into the fringe.
- Charms: Attach small charms to the top knot or hanging loop.
- Wrapped Tassel Top: Instead of a simple knot, wrap a contrasting color of embroidery floss or yarn tightly around the top section of the tassel for a decorative band.
Popular Craft Projects Featuring Embroidery Floss Tassels
A homemade tassel can be a versatile addition to a wide range of crafts. Here are some popular ideas:
- Jewelry: Attach them to earrings, necklaces, or bracelets.
- Keychains: Create stylish keychains by attaching a tassel to a key ring.
- Bookmarks: Decorate the end of a bookmark with a colorful tassel.
- Home Decor: Use them to embellish cushions, curtains, lampshades, or create wall hangings.
- Gift Wrapping: Add a handmade tassel to a gift to make it extra special.
- Zipper Pulls: Attach them to jackets, bags, or purses as decorative pulls.
- Card Making: A small, delicate tassel can add a unique touch to handmade cards.
Troubleshooting Common Tassel-Making Issues
Even with clear instructions, sometimes things don’t go as planned. Here are solutions to common problems encountered when making an embroidery floss tassel.
Problem: My tassel looks thin and sparse.
- Solution: This is usually due to not enough wraps. Next time, increase the number of wraps significantly. Also, ensure you are using all six strands of the embroidery floss together, or even consider using two separate skeins of floss at once for an extra-full look.
Problem: The top knot is coming undone.
- Solution: The knot needs to be extra secure. When tying the knot at the top, make sure you pull it very tightly. Consider doing a double or triple knot. For the wrapped knot method, ensure the wrapping is tight and the final pull is strong. Using a bit of fabric glue or clear nail polish on the knot can also help prevent it from unraveling.
Problem: The fringe is uneven after cutting.
- Solution: This can happen if the scissors aren’t sharp enough or if the floss isn’t held taut. Use very sharp scissors. When cutting, try to hold the bundle firmly and make one swift, clean cut. After cutting, gently trim any stray long strands to even out the fringe.
Problem: The hanging loop is too small or weak.
- Solution: When preparing your tying piece, use a longer length of floss. When creating the loop, ensure you leave enough space for hanging. If the loop feels weak, reinforce it by tying a second, smaller loop around the initial one, or by threading a small jump ring through the top knot for extra durability.
Frequently Asked Questions (FAQ)
Q: What is the best type of thread for making tassels?
A: Embroidery floss is excellent for tassels due to its variety of colors, affordability, and the ability to use multiple strands for thickness. Other good options include embroidery thread, yarn, and even fine cord.
Q: How long should the embroidery floss be for wrapping?
A: The length of your wrapping guide (cardboard or tassel maker) dictates the final tassel length. Ensure it’s longer than your desired finished tassel length by at least an inch or two to allow for trimming and secure tying.
Q: Can I make a tassel with different types of thread at the same time?
A: Yes! You can combine embroidery floss with thin yarn or even silk threads for unique textures and looks. Just be mindful of how they lay together and ensure your cutting and tying methods can handle the different thicknesses.
Q: How do I attach a tassel to a project?
A: Use the hanging loop at the top of the tassel. You can thread it through a hole in your project (like a bead or a fabric piece) and tie it off, or use a needle and thread to securely stitch the loop to your item.
Q: What is a good way to store finished tassels?
A: To keep your tassels from getting tangled, store them by hanging them or by gently wrapping them around a piece of cardstock, securing the loop. Avoid stuffing them into a drawer where they can easily become a jumbled mess.
Making a DIY tassel with embroidery thread is a simple yet impactful craft. With this detailed tassel making tutorial, you’re well-equipped to create beautiful and personalized thread tassels for any creative endeavor. Enjoy exploring the endless possibilities of embroidery thread crafts!