
Image Source: a.she-buy.com
How To Make A Veil Without Sewing: DIY No-Sew Tutorial
Yes, you absolutely can make a veil without sewing! Making a veil without a needle and thread is a popular and simple option. This guide will show you easy no sew veil methods using glue and other simple techniques. If you’re looking for a DIY veil no sew option, this is the perfect place to start. These techniques allow you to create a beautiful homemade veil no sew style quickly and easily, perfect for quick veil making. We’ll cover everything you need to know about making a simple veil without sewing.
Why Choose the No-Sew Path?
Making a veil yourself doesn’t have to be hard work. Sewing can take a lot of time and practice. If you don’t sew, or just want something fast, going the no-sew route is great. It’s perfect for quick veil making. You can save money by making your own veil. Plus, it’s a fun project you can finish in an afternoon. This method is ideal for anyone wanting a DIY veil no sew. You can make a beautiful veil for any event, even a bridal veil without sewing.
What You Will Need
Gathering your supplies is the first step. Most items are easy to find at craft stores or online. You don’t need many things for making a simple veil without sewing.
Here is a list of the main items you’ll need:
| Item | Purpose | Notes |
|---|---|---|
| Tulle | The main fabric of the veil | Choose a soft type for good drape |
| Hair Comb | Attaches the veil to your hair | Plastic or metal works, size matters |
| Fabric Glue | Holds the tulle to the comb | Look for one made for fabric, like fabric glue for veil |
| Scissors | Cutting the tulle neatly | Sharp ones work best |
| Measuring Tape | Getting the right veil length | Use a soft, flexible one |
| Clips or Clothespins | Holding fabric while glue dries | Small binder clips are good |
| Optional Decor | To make your veil special | Crystals, pearls, lace trims |
| Iron & Ironing Board | For pressing tulle (optional) | Use a low heat setting, no steam |
Having everything ready before you start makes the process smooth. This list gives you a clear idea for your DIY veil no sew project.
Picking the Right Tulle
Tulle is key to how your veil looks. There are different kinds. Some are stiff, some are soft. For a tulle veil no sew, soft tulle usually looks best. It hangs nicely and is easy to work with.
- Bridal Illusion Tulle: This is the most common type for wedding veils. It’s soft, light, and comes in many colors like white, ivory, and diamond white. It drapes beautifully and is easy to gather. This is a great choice for a bridal veil without sewing.
- English Net: This is softer than bridal illusion tulle. It has small holes and is very flowy. It costs more but gives a luxurious look.
- Shimmer Tulle: This tulle has a little sparkle added. It can make your veil catch the light beautifully.
- Nylon Tulle: This is often stiffer and less expensive. It might be okay for shorter veils or specific shapes, but it doesn’t drape as well as softer types.
When choosing tulle, think about:
* How it drapes: Does it fall softly?
* The color: Does it match your dress or outfit?
* The feel: Is it soft against your skin?
For most homemade veil no sew projects, soft bridal illusion tulle is the top pick. You will need enough tulle for the length and width you want. Veil widths are often 54, 72, or 108 inches wide. The wider the tulle, the fuller the veil will be. You can usually buy tulle by the yard.
Choosing Your Hair Comb
The hair comb is what keeps your veil in place. Choosing the right one is important for comfort and hold.
- Plastic Combs: These are lightweight and cheap. They work well for simple, light veils. Make sure the plastic isn’t too smooth so the glue sticks well.
- Metal Combs: These are stronger and can hold heavier veils better. They often have teeth that grip hair well. Some have a wrap at the top that helps the glue stick. Metal combs can be a bit heavier than plastic ones.
Think about:
* Your hair type: Do you need a strong grip?
* The weight of your veil: Will it be very long or have decorations?
* Comfort: Will the comb sit nicely on your head?
A standard comb size is usually about 3-4 inches wide. This is a good size for most veils. The comb should have teeth that can go into your hair and hold tight. The top part, where you glue veil comb, should be flat or have a bar to apply glue. This step is key to attach veil without sewing.
All About Glue for Your Veil
Since we are making a veil without sewing, glue is very important! You need the right glue to attach veil without sewing securely.
- Fabric Glue: This is often the best choice for a tulle veil no sew. Look for a strong, flexible fabric glue. It should dry clear. Make sure it says it works on synthetic fabrics like tulle. Fabric glue for veil is made to hold cloth together without stitches. It stays a bit flexible after drying, which is good for fabric that moves.
- Hot Glue: Hot glue can be fast, but use it carefully. It can be too stiff when dry. It might even show through the tulle if you use too much. Use a low-temp hot glue gun and very little glue if you choose this. Make sure the glue will stick to both the comb and the tulle. Some hot glues don’t stick well to all plastics or metals.
- Craft Glue: Regular craft glue might not be strong enough for a veil, especially a longer one. It might also not be flexible enough. It’s usually better to use a glue made specifically for fabric or a very strong craft adhesive that works on multiple materials.
Tips for using glue:
* Read the glue’s instructions carefully.
* Test a small spot first (on extra tulle and the comb) to see how it dries and holds.
* Use just enough glue. Too much can make it messy or stiff.
* Let the glue dry completely as the instructions say. This is very important for a secure hold when you glue veil comb.
Using the right fabric glue for veil is essential for a strong and lasting attach veil without sewing.
Making a Simple No-Sew Veil: Step-by-Step
Ready to start making a simple veil without sewing? This is the basic method for a single-tier veil. It’s easy and perfect for a DIY veil no sew project.
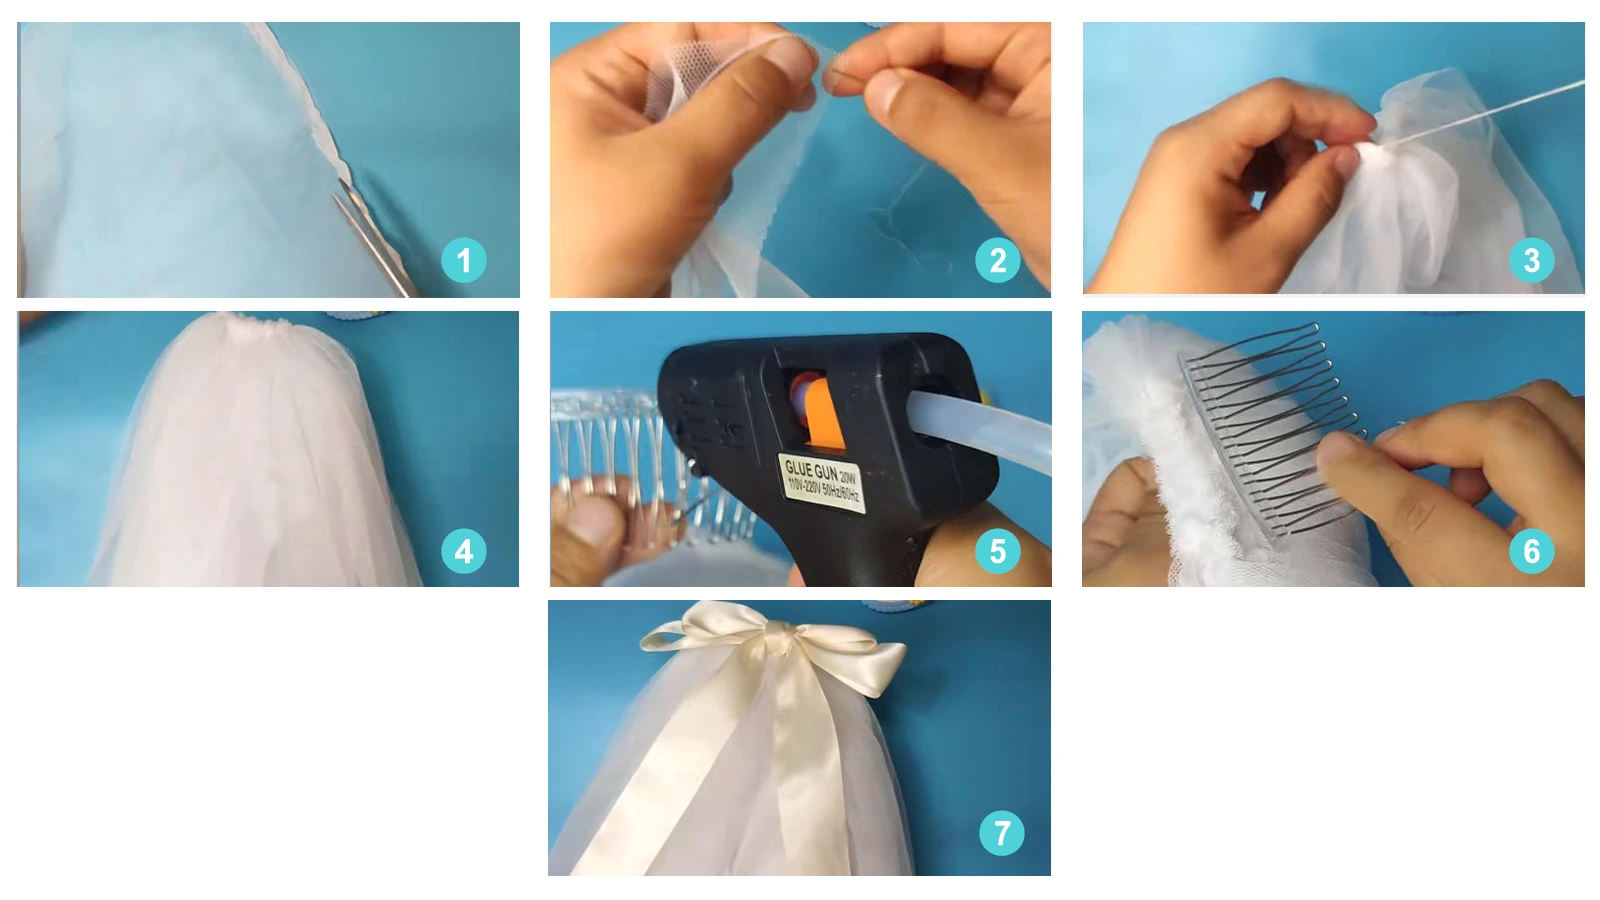
Step 1: Measure and Cut Your Tulle
Decide how long you want your veil. Measure from where you want the comb to sit on your head down to where you want the veil to end. Add a few inches extra just in case.
Use your measuring tape to measure the length on your tulle. The width of the tulle roll will be the width of your veil. Common widths are 54, 72, or 108 inches. A wider width makes a fuller veil.
Lay the tulle flat. Use sharp scissors to cut the tulle to your measured length. Cut straight across the width. This gives you a rectangle of tulle. This rectangle will become your tulle veil no sew.
Step 2: Prepare the Edge to Attach
You will attach one short edge of the tulle rectangle to the comb. This edge needs to be gathered so the veil looks full at the top. There are a couple of ways to do this without sewing:
- Folding Method: This is the simplest for making a simple veil without sewing. At one short edge of the tulle rectangle, make small accordion-style folds. Fold the edge back and forth, like making a paper fan. Make the folds about 1/2 to 1 inch deep. Keep making folds across the entire width of the tulle’s edge. This gathers the fabric nicely.
- Gathering String (Optional No-Sew Helper): You can use a strong thread or thin ribbon. Lay it along the edge you plan to attach. Fold the edge of the tulle over the string. You can use a tiny bit of temporary fabric glue or clips to hold the fold. Then, gently pull the string from one end. This will gather the tulle edge along the string. This is another way to prepare for how you will attach veil without sewing. Once gathered, you can use the gathered edge directly on the comb. You don’t need to leave the string in place permanently; it just helps create the gathers evenly.
Use clips or clothespins to hold the gathered edge together while you work on the next step. Keep the gathered part tight and neat.
Step 3: Prepare the Comb
Take your hair comb. Identify the side that will face outwards when the veil is worn. You will apply glue to the top bar of this side. If your comb has a wrap or loops, you can apply glue there too. This gives the glue more to grip onto. If it’s a smooth plastic comb, you might gently rough up the top bar a tiny bit with fine sandpaper. This helps the glue stick better. Clean off any dust if you rough it up. This step prepares the comb so you can effectively glue veil comb.
Step 4: Apply Glue to the Comb
Now it’s time to glue veil comb. Apply a line of your chosen fabric glue for veil along the top bar of the comb. Apply the glue only to the side that will touch the tulle. Don’t use too much glue. A thin, even line is best. If using hot glue, work quickly but carefully, applying just a small amount. The goal is to have enough glue to hold the gathered tulle.
Step 5: Attach the Gathered Tulle
Carefully take your gathered tulle edge. Press the gathered edge firmly onto the line of glue on the comb. Make sure the entire width of your gathered tulle edge is touching the glue on the comb. You can use clips or pins to hold the tulle in place on the comb while the glue sets. Make sure the gathered tulle is centered on the comb if that’s how you want it to look. This is the main part of how you attach veil without sewing. Press gently but firmly to ensure good contact between the tulle and the glue on the comb.
Step 6: Let the Glue Dry Completely
This is a very important step for no sew veil methods. The glue must be completely dry for a strong hold. Follow the drying time on your glue’s package. This might take a few hours, or even 24 hours for some glues. Do not move the veil or the comb while the glue is drying. Lay it flat on a surface where it won’t be disturbed. Patience here means a much stronger hold for your homemade veil no sew.
Step 7: Finish and Refine
Once the glue is fully dry, gently remove any clips you used. Check that the tulle is securely attached all along the comb. You can add a piece of ribbon over the gathered tulle and the comb bar to cover the attachment point and make it look neater. Use a little glue to secure the ribbon.
You can also trim the edges of the veil if needed to make them even. Some people like rounded corners; you can cut these carefully. Your basic tulle veil no sew is now finished! This whole process is part of making a simple veil without sewing.
Other No-Sew Veil Ideas
The basic method can be changed to make different styles of veils. These are all no sew veil methods you can try.
H4: Making a Blusher Veil
A blusher is a shorter layer of the veil that can be worn over the face. For a no-sew blusher:
- Cut two pieces of tulle: one for the long back layer and one shorter piece for the blusher.
- Measure the blusher layer to be the length you want it (usually elbow or fingertip length).
- Gather one edge of the longer tulle piece as described in the basic steps.
- Gather one edge of the shorter blusher piece.
- Place the gathered edge of the longer layer on the comb and glue it down.
- Place the gathered edge of the blusher layer on top of the long layer’s gathered edge on the comb. Glue it down firmly.
- Let the glue dry completely.
This way, both layers are attached to the single comb without sewing. This is a great DIY veil no sew idea for a classic look.
H4: Adding Multiple Tiers
You can add even more layers following the same idea as the blusher. Just cut more pieces of tulle at different lengths, gather one edge of each piece, and layer them on the comb before gluing them all down together. Always put the longest layer closest to the comb teeth and the shortest layer on top. This is another way to use no sew veil methods for a fuller veil.
H4: Decorating Your No-Sew Veil
You can add beautiful decorations to your veil without sewing.
- Adding Crystals or Pearls: Use a strong craft glue or jewel-it glue that dries clear. Apply small dots of glue where you want the gems. Carefully place the crystals or pearls onto the glue dots. Use a toothpick or craft tweezers for small pieces. Do this after the main veil is attached to the comb and fully dry.
- Attaching Lace Appliques: Use fabric glue for veil. Apply a thin layer of glue to the back of the lace applique, especially around the edges. Place the applique on the tulle and press gently. You might need to hold it in place with pins or clips while the glue dries.
- Gluing Trim to the Edge: If you want a finished edge, you can glue ribbon or lace trim along the bottom or sides of the veil. Use a strong fabric glue for veil. Apply glue in sections along the edge and carefully press the trim onto it. Take your time to keep the trim straight and smooth.
Decorating lets you make your homemade veil no sew truly special.
Tips for a Professional Look
Even though you’re not sewing, you can make your veil look polished and well-made.
- Use Good Quality Tulle: Soft tulle hangs better and looks more expensive.
- Cut Neatly: Sharp scissors make clean cuts. If you’re cutting a rounded edge, draw a guide line first.
- Gather Evenly: Try to make your folds or gathers the same size. This makes the top of the veil look neat on the comb.
- Hide the Attachment: Cover the glued area on the comb with a piece of ribbon, trim, or a small piece of matching fabric. Glue this piece over the gathered tulle and the comb’s bar. This makes the glue veil comb area look tidy.
- Don’t Rush Drying: Giving the glue enough time to cure is key to a strong hold. This prevents the veil from coming apart.
- Iron the Tulle: If your tulle is very wrinkled, you can iron it on a very low heat setting without steam. Test a small piece first! High heat will melt tulle. Place a thin towel or pressing cloth over the tulle for extra safety. This step can make your tulle veil no sew lay flat and smooth.
- Think About Weight: If you’re making a very long or heavily decorated veil, make sure your comb is strong enough (metal is better) and your glue is extra strong. This ensures your bridal veil without sewing stays put.
Following these tips helps ensure your DIY veil no sew project looks great and lasts.
Troubleshooting Common Issues
Even with simple no sew veil methods, sometimes things don’t go perfectly. Here are a few common issues and how to fix them.
- Tulle won’t stay attached to the comb:
- Did the glue dry completely? If not, add a little more glue carefully and let it dry for the full recommended time.
- Was the comb clean? Glue won’t stick well to dirt or oil. Clean the comb before applying glue.
- Is the glue right for the materials? Make sure your fabric glue for veil works on both the tulle and the comb material (plastic or metal).
- Did you use enough glue? A thin line is good, but it needs to cover the contact area. Add a bit more if needed, but avoid making a large blob.
- Gathered edge looks messy:
- Try gathering again, making your folds more even. You can gently unglue (if the glue isn’t fully set) or cut a new piece of tulle to try again. Using the string method might help make gathers more uniform for your homemade veil no sew.
- Tulle edges are fraying:
- Tulle doesn’t usually fray like woven fabric. If it looks messy, your scissors might not be sharp enough. Use very sharp scissors for a clean cut.
- Glue shows through the tulle:
- You likely used too much glue. For future projects, use less glue. If it’s already dried and visible, you might be able to carefully cover the area with a ribbon or decoration. This highlights why testing your fabric glue for veil first is a good idea.
- Veil feels too flat or not full enough:
- This depends on the width of your tulle and how much you gathered it. For a fuller look, use wider tulle (72″ or 108″) and gather more of that width onto the comb. For your next quick veil making, try a wider tulle.
Don’t worry if your first try isn’t perfect. Making a simple veil without sewing is forgiving. You can often adjust or try again.
Caring for Your No-Sew Veil
Once your DIY veil no sew is finished and fully dry, you need to store it correctly to keep it nice.
- Storage: Hang your veil from the comb using a clip on a hanger. Store it in a garment bag to keep it clean and prevent snags. Keep it away from direct sunlight, which can yellow the tulle over time. Storing it hanging helps prevent wrinkles.
- Removing Wrinkles: Tulle can get wrinkled. You can hang it in a steamy bathroom (not in the shower itself!) for about 20-30 minutes. The steam will help wrinkles fall out. You can also use a garment steamer held several inches away from the fabric. If using an iron, use the lowest heat setting possible, no steam, and place a pressing cloth between the iron and the tulle. Test a small, hidden area first! Extreme heat will melt tulle.
- Cleaning: Tulle is delicate. Spot clean small marks very gently with a little mild soap and water. Avoid washing the whole veil unless absolutely necessary, and only if your glue is truly waterproof (check the label!). Gentle handling is key for a tulle veil no sew.
Taking good care of your homemade veil no sew ensures it looks beautiful for your special day.
Conclusion: Your Easy, Beautiful Veil
Making a veil without sewing is a fantastic option for many reasons. It’s one of the easiest no sew veil methods available. It saves you time and money compared to buying a veil or tackling complex sewing. With just some tulle, a comb, and the right glue, you can create a beautiful DIY veil no sew that looks store-bought.
Whether you need a simple, elegant single-tier veil or want to add a blusher or decorations, the techniques for making a simple veil without sewing are versatile. You can create a lovely tulle veil no sew in just an afternoon, making it perfect for quick veil making.
Remember to choose good quality materials, take your time with the glue, and let it dry completely. By following these steps, you can successfully attach veil without sewing and have a gorgeous bridal veil without sewing that you made yourself. Enjoy the process and the lovely result!
Frequently Asked Questions (FAQ)
H5: How long does it take to make a no-sew veil?
Making the veil itself can take less than an hour, depending on the style. The longest part is waiting for the glue to dry. This can take from a few hours up to 24 hours. So, the total time is mostly drying time. This makes it great for quick veil making.
H5: What kind of glue is best for attaching tulle to a comb?
A strong, flexible fabric glue for veil that dries clear is usually best. Look for one that is made for synthetic fabrics. Hot glue can work but can be less flexible and might show through.
H5: Can I use any hair comb?
Choose a comb that feels sturdy and has teeth that will hold well in your hair. Plastic or metal combs work. The top part of the comb should have a bar or loops where you can apply glue. A size of 3-4 inches wide is common.
H5: How much tulle do I need?
This depends on the length and fullness you want. Measure the length from where you want the comb to sit down to the desired hem. For width, consider if you want standard (54″), medium (72″), or full (108″). Buy that much length based on your desired width. For example, if you want a 3-foot veil that’s 108 inches wide, buy 3 feet (1 yard) of 108-inch wide tulle.
H5: Will the glue show on the tulle?
Using too much glue can make it visible. Using a glue that dries clear and applying it in a thin, even layer helps. Covering the attached area on the comb with ribbon or trim is a great way to hide the glue and make it look neat.
H5: Can I add lace or other decorations?
Yes! You can glue lace appliques, crystals, pearls, or trim onto your tulle veil no sew using appropriate craft or fabric glue. Do this after the main veil is attached to the comb and the glue is dry.
H5: Is a no-sew veil strong enough for a wedding?
Absolutely! If you use the right strong fabric glue for veil and let it dry completely, the bond can be very secure. Many people successfully make their own bridal veil without sewing using these methods. Proper attachment to the comb is key.
H5: How do I remove wrinkles from my finished veil?
Hanging the veil, especially in a steamy bathroom, is the safest way. A garment steamer used carefully from a distance also works. Avoid high heat from an iron.
H5: What if my veil comes undone from the comb?
If the glue failed, gently remove any old glue bits and re-glue the tulle to the comb, making sure to use enough glue this time and letting it dry fully for the recommended time. Ensure the surfaces (comb and tulle) were clean before gluing. This is usually due to insufficient drying time or using the wrong type of glue.