
Image Source: content.instructables.com
How To Make Bracelets From Embroidery Thread Easily
Do you want to make cool bracelets? Making bracelets from embroidery thread is very easy. You can use simple tools and basic knots. Many people ask, “What do I need to start?” You need embroidery floss, scissors, and tape. Others wonder, “Is it hard to make them?” No, it is not hard at all! Even kids can make them. You can learn fast. These bracelets are fun to make and great gifts. They are often called DIY friendship bracelets. Let’s learn how to make them now!
Assembling Your Tools and Materials
Making bracelets is fun. It needs very few things. You likely have most items at home. Getting ready is the first step. This part is simple.
Picking Your Thread
Embroidery floss is key. It comes in many colors. It has six strands. You can use all six or split them. DMC is a popular brand. It offers many vibrant colors. You can find DMC floss bracelet designs that are very pretty. Think about the colors you want to use. Bright colors are fun. Earth tones can be calming.
Here are some popular thread choices:
- Embroidery Floss: This is the best choice. It is cheap. It comes in many colors. It is easy to find.
- Craft String: Some craft stores sell general craft string. This can also work. It might be thicker.
- Perle Cotton: This thread is a bit shinier. It is also good. It might cost a little more.
Tip: Buy extra thread. You might need more than you think. It is good to have extra for mistakes.
Other Handy Tools
You need a few simple tools. They help keep your work neat. They also make it easier to knot.
Table: Essential Tools for Bracelet Making
| Tool Name | What It Is For |
|---|---|
| Scissors | To cut your thread pieces. |
| Tape or Clip | To hold your bracelet still while you work. |
| Measuring Tape | To measure thread length and wrist size. |
| Clipboard | Helps hold threads steady and flat. |
Why stability matters: Holding your work still is important. It makes your knots even. It stops the bracelet from twisting. A clipboard works well. You can tape the threads to it. You can also use a safety pin. Pin your threads to a pillow or your pants. Just make sure it is steady.
Fathoming Basic Knotting Techniques
All thread bracelets use knots. Learning a few simple knots is key. Once you know them, you can make many designs. These knots are the base for knotting techniques for bracelets. They are easy to learn. Practice them first.
The Simple Square Knot
The square knot is basic. It is often used to start and finish. It is also used in some patterns. It makes a strong, flat knot.
Steps to make a square knot:
- Take two threads. Lay them side by side.
- Take the right thread. Cross it over the left.
- Bring the new right thread under the left.
- Then bring it up through the loop. Pull gently.
- Now take the left thread. Cross it over the right.
- Bring the new left thread under the right.
- Then bring it up through the loop. Pull gently.
- You have a square knot. It looks like a flat square.
The Forward Knot (FK)
This knot points right. It is used a lot in patterns. It is also called a half hitch knot.
Steps to make a forward knot:
- Hold the main string tight. This is your anchor string.
- Take your working string. This is the one you will knot.
- Make a ‘4’ shape over the anchor string. The working string goes over.
- Bring the working string under the anchor string.
- Then bring it up through the ‘4’ loop.
- Pull the working string up and right. Pull it tight.
- Do this again. Make two forward knots for each stitch.
The Backward Knot (BK)
This knot points left. It is like the forward knot. It just goes the other way.
Steps to make a backward knot:
- Hold your anchor string tight.
- Take your working string.
- Make a backward ‘4’ shape. The working string goes under.
- Bring the working string over the anchor string.
- Then bring it up through the loop.
- Pull the working string up and left. Pull it tight.
- Do this again. Make two backward knots for each stitch.
The Forward-Backward Knot (FBK)
This knot is also called a “left-right knot.” It moves the knotting string to the right.
Steps to make a forward-backward knot:
- Make one forward knot. Do steps 1-6 for the forward knot.
- Now, make one backward knot. Do steps 1-6 for the backward knot.
- The working string will now be on the right side.
The Backward-Forward Knot (BFK)
This knot is also called a “right-left knot.” It moves the knotting string to the left.
Steps to make a backward-forward knot:
- Make one backward knot. Do steps 1-6 for the backward knot.
- Now, make one forward knot. Do steps 1-6 for the forward knot.
- The working string will now be on the left side.
Practice Makes Perfect: Try these knots first. Do them a few times. This will make your bracelets look much better. Even tension is key. All knots should be pulled with the same force. This makes the bracelet even.
Crafting Easy Bracelet Designs
Now that you know the knots, let’s make some bracelets! These designs are great for beginner bracelet making with thread. They use simple steps.
The Simple Braided Bracelet
This is the easiest bracelet to make. It is perfect for first-timers. It uses the same braid you might do with hair. This covers braided string bracelets instructions.
What you need:
- 3 pieces of embroidery floss. Each piece should be about 30 inches long.
- Scissors.
- Tape or a clip.
Steps to make a braided bracelet:
- Cut the threads: Cut three pieces of thread. Make them all the same length. About 30 inches is good.
- Gather and tie: Line up the three threads. Tie them together at one end. Make a simple knot. Leave a small loop. This loop will help you tie it later.
- Secure the start: Tape the knotted end to a table. You can also clip it to a clipboard. Make sure it is steady.
- Start braiding:
- Take the right thread. Cross it over the middle thread. Now the right thread is in the middle.
- Take the left thread. Cross it over the new middle thread. Now the left thread is in the middle.
- Keep braiding: Repeat these steps. Keep crossing the outside thread over the middle.
- Check length: Braid until the bracelet is long enough. Wrap it around your wrist to check. Leave a little extra for tying.
- Finish the end: Tie all three threads together. Make a simple knot. Cut off extra thread. Leave enough to tie.
Tip for braiding: Keep your hands close to the knots. This makes them tight.
The Twisted Bracelet
This bracelet is also very simple. It makes a cool spiral look.
What you need:
- Two pieces of embroidery floss. Use different colors for a nice effect. Each about 40 inches long.
- Scissors.
- Tape or a clip.
Steps to make a twisted bracelet:
- Cut the threads: Cut two pieces of thread. Make them equal in length.
- Tie them: Tie the two threads together at one end. Make a knot. Leave a small loop.
- Secure: Tape the knot to a table. Or use a clip.
- Start twisting:
- Separate the two threads. Hold one in your left hand. Hold the other in your right hand.
- Twist both threads very tightly. Twist them in the same direction. For example, twist both clockwise.
- Twist them until they start to kink. They should want to coil up.
- Bring them together: Hold the knotted end. Bring the two twisted threads together. Let them twist around each other. They will naturally coil.
- Smooth it: Run your hand down the length. This helps the twist be even.
- Finish: Tie a knot at the end. Cut off extra thread.
Fun fact: The more you twist each string, the tighter the final coil will be.
The Candy Stripe Bracelet
This is a classic friendship bracelet. It makes diagonal stripes. It is great for DIY friendship bracelets. It uses only forward knots.
What you need:
- Several colors of embroidery floss. Three to five colors work well. Each piece about 36 inches long.
- Scissors.
- Tape or a clip.
Steps to make a candy stripe bracelet:
- Prepare threads: Choose your colors. Let’s say you pick red, blue, green. Cut each thread to about 36 inches.
- Arrange colors: Arrange the threads in the order you want your stripes. For example, red, blue, green, red, blue, green. The first thread will make the first stripe.
- Tie and secure: Tie all threads together at one end. Make a knot. Leave a loop. Tape it down firmly.
- Start knotting:
- Take the first thread on the far left. (e.g., your first red thread).
- Use this thread to make two forward knots on the thread next to it (your first blue thread). Pull them tight.
- Now the red thread is in the second spot.
- Use this same red thread. Make two forward knots on the next thread (your first green thread). Pull them tight.
- Keep going. Make two forward knots on each thread across the row. The red thread will move all the way to the right.
- Start a new row: Once the first thread is on the far right, it is done for this row.
- Take the new first thread on the far left (e.g., your next red thread, or if you only have one of each color, the blue thread).
- Repeat step 4. Make two forward knots on each thread across the row.
- Keep going: Continue making rows. The colors will form diagonal stripes. They will follow the order you set at the start.
- Finish: When the bracelet is long enough, tie all threads together. Make a knot. Trim the ends.
Tip: Keep your knots even. This makes the stripes straight.
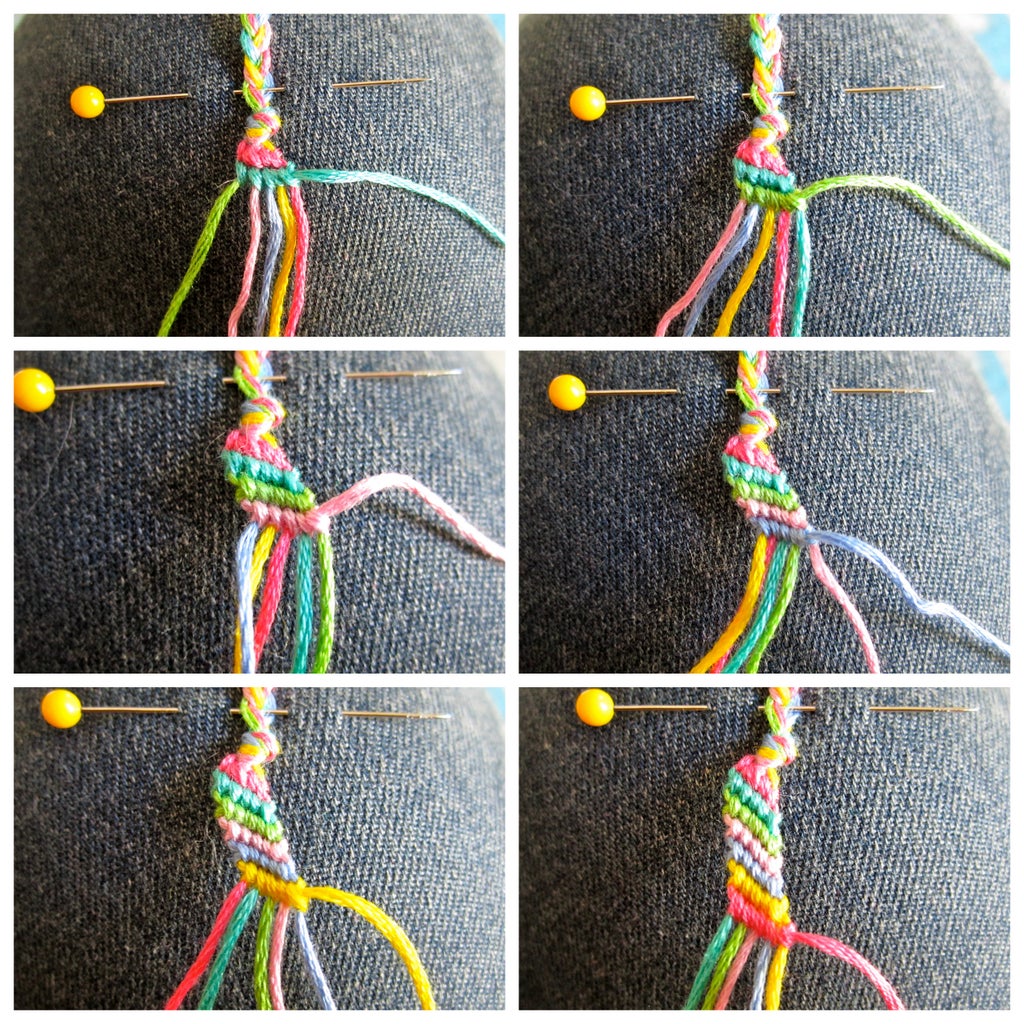
The Chevron Bracelet
This design makes V-shapes. It is a step up from the candy stripe. It uses both forward and backward knots. It is a common embroidery floss bracelet pattern.
What you need:
- Several colors of embroidery floss. At least two colors. You need an even number of strands. For example, 4, 6, or 8 strands. Each piece about 36-40 inches long.
- Scissors.
- Tape or a clip.
Steps to make a chevron bracelet:
- Prepare threads: Choose an even number of threads. For example, six threads (three colors, two of each).
- Arrange colors: Lay out your threads. Arrange them so they are mirrored.
- Example for 6 threads: Color A, Color B, Color C, Color C, Color B, Color A.
- The two middle threads will be the same color.
- Tie and secure: Tie all threads together at one end. Make a knot. Leave a loop. Tape it down firmly.
- Start the left side:
- Take the far left thread (Color A).
- Make two forward knots on the thread next to it (Color B).
- Then, make two forward knots on the next thread (Color C).
- The Color A thread is now in the middle, ready to meet its partner.
- Start the right side:
- Take the far right thread (Color A).
- Make two backward knots on the thread next to it (Color B).
- Then, make two backward knots on the next thread (Color C).
- The Color A thread is now in the middle, ready to meet its partner.
- Join the halves:
- You now have two of the same color threads in the middle (both Color A).
- Take one of these Color A threads. Make one forward knot on the other Color A thread. (Some people do a backward knot on the second half, then a forward knot to finish, forming a forward-backward knot or similar joining knot, but a simple forward knot works too).
- This completes one V-row.
- Start a new row:
- Now the next color (Color B) is on the far left.
- Repeat steps 4, 5, and 6 with Color B.
- Keep going: Continue making rows. You will see the V-shapes form.
- Finish: When the bracelet is long enough, tie all threads together. Make a knot. Trim ends.
Key to chevron: Always use the outermost thread to knot inward. Meet in the middle.
Deciphering More Complex Designs and Patterns
Once you master the basic knots, a world of embroidery floss bracelet patterns opens up. You can find many patterns online. Websites and books offer free and paid designs. Many patterns use charts. These charts show you which knot to make and with which color.
How to Follow a Pattern Chart
Pattern charts use symbols. Each symbol stands for a certain knot. The color of the symbol tells you what color thread to use.
Common symbols:
- Arrow pointing right (>): Forward knot (FK)
- Arrow pointing left (<): Backward knot (BK)
- Arrow pointing right then left (><): Forward-backward knot (FBK)
- Arrow pointing left then right (<>): Backward-forward knot (BFK)
Reading a chart:
- The chart shows threads in a line. This is your starting order.
- Each row on the chart is a row of knots on your bracelet.
- You usually work from left to right.
- Find the first knot symbol. It will show the color of the working thread. It also shows the color of the anchor thread.
- Make that knot.
- Move to the next knot in the row.
- When you finish a row, start the next row. The threads will have shifted positions.
Example Chart Snippet (Simplified for illustration):
| Row 1 | A > B | A > C | B > D |
|---|---|---|---|
| Row 2 | B < A | B < C | A > D |
- This means: In row 1, using thread A, make a forward knot on thread B. Then, using thread A, make a forward knot on thread C. Then, using thread B, make a forward knot on thread D.
- Then in row 2, using thread B, make a backward knot on thread A. And so on.
Following charts needs focus. Go slow. Double-check your knots. This helps avoid mistakes.
Creating Your Own DMC Floss Bracelet Designs
After making many patterns, you might want to create your own. This is fun!
Tips for designing:
- Pick colors: Start with a color palette. Two to four colors are good.
- Draw it out: Draw your threads as lines. Then, draw arrows for knots.
- Experiment: Try different knot combinations. See what shapes they make.
- Symmetry: Many designs use symmetry. They are the same on both sides. This makes them look balanced.
- Start simple: Begin with small designs. Then move to bigger ones.
Inspiration: Look at other handmade thread jewelry tutorials. See how others use knots. This can give you new ideas.
Perfecting the Finishing Touches
Finishing your bracelet well is important. It makes it look professional. It also makes it last longer.
Tying Off the Bracelet
There are several ways to finish. The easiest is a simple knot.
Method 1: Simple Tie-Off
- When your bracelet is long enough, take all threads.
- Tie them together in a big knot. Tie it close to the last row of knots.
- You can make a braid on each end. Then tie these braids together to wear.
- Or, you can leave long tails. Then tie a square knot around your wrist.
Method 2: Loop and Knot Closure
- At the start, tie a knot. Leave a loop. This loop will go over your end knot.
- At the end, braid the remaining threads for about 2-3 inches. Or, make a long series of square knots using two outside threads. This creates a toggle.
- Tie a big knot at the end of this toggle. This knot should be big enough to not slip through the starting loop.
Adding Clasps or Loops
For a more polished look, add a clasp.
Table: Common Bracelet Closures
| Closure Type | How It Works | Why Use It |
|---|---|---|
| Tie-On | Braided ends tie directly around the wrist. | Easiest, most traditional for friendship bracelets. |
| Button & Loop | A button is sewn onto one end, a loop is on the other. | Cute, good for thicker bracelets. |
| Sliding Knot | Two square knots slide to adjust size. | Adjustable, no clasp needed. |
| Metal Clasp | Metal parts (lobster clasp, toggle) attach to loops. | Professional, secure, reusable. |
Making a sliding knot: This is a very popular finish for craft string bracelet projects.
- Make your bracelet. Stop about 2-3 inches before the end length.
- Divide your remaining threads into two halves.
- Take the threads from one half. Put them under the other half’s threads.
- Use a new, small piece of thread (about 6 inches).
- Make 3-4 square knots around both halves of the bracelet. This creates a tube.
- Trim the excess string from this new small piece.
- Now, the two halves of the bracelet can slide through this tube. This lets you adjust the size.
To add a metal clasp:
- Before you tie the final knot, make a small braid or a few square knots.
- Form a small loop.
- Attach a jump ring (a small metal circle) to the loop.
- Attach your clasp to the jump ring.
- On the other end of the bracelet, just attach another jump ring. This is where the clasp will hook.
Helpful Advice for Great Bracelets
Making bracelets is a skill. Like any skill, it gets better with practice. Here are some tips to help you make your best bracelets.
Keep Tension Even
This is one of the most important tips. “Tension” means how tight you pull your knots. If some knots are tight and some are loose, the bracelet will look bumpy. It might also twist. Try to pull every knot with the same amount of force. This makes a smooth, flat bracelet.
Staying Organized with Threads
When you have many threads, they can get messy. They can tangle easily.
- Use a clip or tape: Always secure your starting knot. This keeps threads from moving around.
- Hang them: If you are not using a clipboard, hang your threads. Pin them to something firm.
- Roll up unused threads: If a thread is very long and you are not using it right away, roll it up. Use a small rubber band or a clothespin to hold it. This keeps it out of the way.
Fixing Mistakes
Everyone makes mistakes! Do not worry. Most can be fixed.
- Untie knots: If you make a wrong knot, gently untie it. Use a pin or needle to loosen tight knots.
- Go slow: Work slowly. Check your work often. This helps catch mistakes early.
- Don’t cut too short: It is always better to have threads that are too long than too short. You can always trim later.
Using Different Thread Types
While embroidery floss is great, you can try other threads.
- Macrame thread bracelets: These often use thicker cords. The knots are bigger. They make bold, chunky bracelets. The knotting principles are similar.
- Waxed linen: This thread is strong. It does not fray easily. It gives a natural, rustic look.
- Jewelry cord: These are thin, strong cords. They are good for delicate bracelets.
Adding Beads and Charms
Make your bracelets unique. Add beads or charms!
- Simple beads: Use beads with a hole big enough for your thread.
- How to add:
- Knot around the bead.
- String the bead onto one of your working threads.
- Make a knot right after the bead to hold it in place.
- Continue your pattern.
- Charms: Small metal charms can be added the same way. Or, you can attach them with a jump ring at the end.
Exploring More Easy Embroidery Floss Crafts
Embroidery floss is not just for bracelets. You can use it for many other fun projects. These are great easy embroidery floss crafts.
Keychains
Make small braided or knotted designs. Add a keyring. They are cute gifts.
Hair Ties
Braid floss around plain elastic hair ties. This makes them colorful and unique.
Bookmarks
Braid a long piece of floss. Add a tassel or a charm at the end. Use it as a bookmark.
Wrapped Items
Wrap floss around pencils, headbands, or even small branches. This adds color and texture.
Tassels
Make tassels! Wrap floss around your fingers. Tie it off. Cut the loops. Tassels are great for earrings, necklaces, or keychains.
Accessing More Handmade Thread Jewelry Tutorials
The internet is full of learning tools.
- YouTube: Search for “friendship bracelet tutorial” or “macrame knots.” You will find many video guides.
- Pinterest: This site is great for visual ideas. Search for “DIY thread bracelets” or “floss crafts.”
- Blogs: Many craft blogs offer step-by-step guides with pictures.
- Books: Libraries and craft stores have books on knotting and bracelet making.
These resources can help you learn new knotting techniques. They also give ideas for craft string bracelet projects. Keep learning and trying new things.
Frequently Asked Questions (FAQ)
Here are some common questions about making bracelets from embroidery thread.
Q1: How long does it take to make one bracelet?
A1: It depends on the design. A simple braided bracelet takes 15-30 minutes. A candy stripe or chevron can take 1-3 hours. More complex patterns take longer. Practice makes you faster.
Q2: How much thread do I need for one bracelet?
A2: A good rule of thumb is 30-40 inches per thread for a normal wrist. If your wrist is big, or if the design uses long knots, use more. It’s better to have too much than too little. You can always trim extra.
Q3: Can I wash my embroidery floss bracelet?
A3: Yes, you can. Hand wash them with mild soap and cold water. Rinse well. Let them air dry. Do not put them in a washing machine or dryer. The colors might bleed.
Q4: My bracelet is twisting. What am I doing wrong?
A4: Twisting often happens when your tension is uneven. Or, if you are only making one type of knot (like only forward knots) for many rows. Try to keep your knots firm and even. For some patterns, like candy stripe, the natural twist is part of the design. But if it twists too much, check your knotting pressure.
Q5: Can I use different types of thread together?
A5: Yes, you can! Mix embroidery floss with thinner yarns or even fine wire. Just make sure the textures work well. Different thicknesses will make your bracelet look unique. Experiment to see what you like.
Q6: What if I run out of thread in the middle of a bracelet?
A6: This can happen. Cut a new piece of thread. Tie it to the short thread with a small, secure knot. Push the knot tightly into the back of your bracelet. Keep knotting over it. This hides the join.
Q7: Are these bracelets durable?
A7: Yes, they are quite durable. They can last a long time with care. Avoid harsh chemicals. Take them off for swimming or showering often. This keeps them looking good.
Making bracelets from embroidery thread is a rewarding hobby. It is easy to start. It lets you be creative. You can make gifts for friends and family. Or you can simply enjoy wearing your own handmade art. Start simple. Practice your knots. Soon, you will be making beautiful designs!