
Embroidery thread, also known as embroidery floss, is a colorful string. It is often made from cotton. It has six strands. People use it for sewing designs onto fabric. Yes, you can use embroidery thread for bracelets! It is a great choice. It is strong, comes in many colors, and is easy to work with. This guide is for anyone who wants to make simple, beautiful DIY thread jewelry. You will learn easy steps to create your own handmade thread accessories. We will cover many popular styles. These include classic friendship bracelet patterns and even Macrame thread bracelets. Get ready to turn simple string into art!
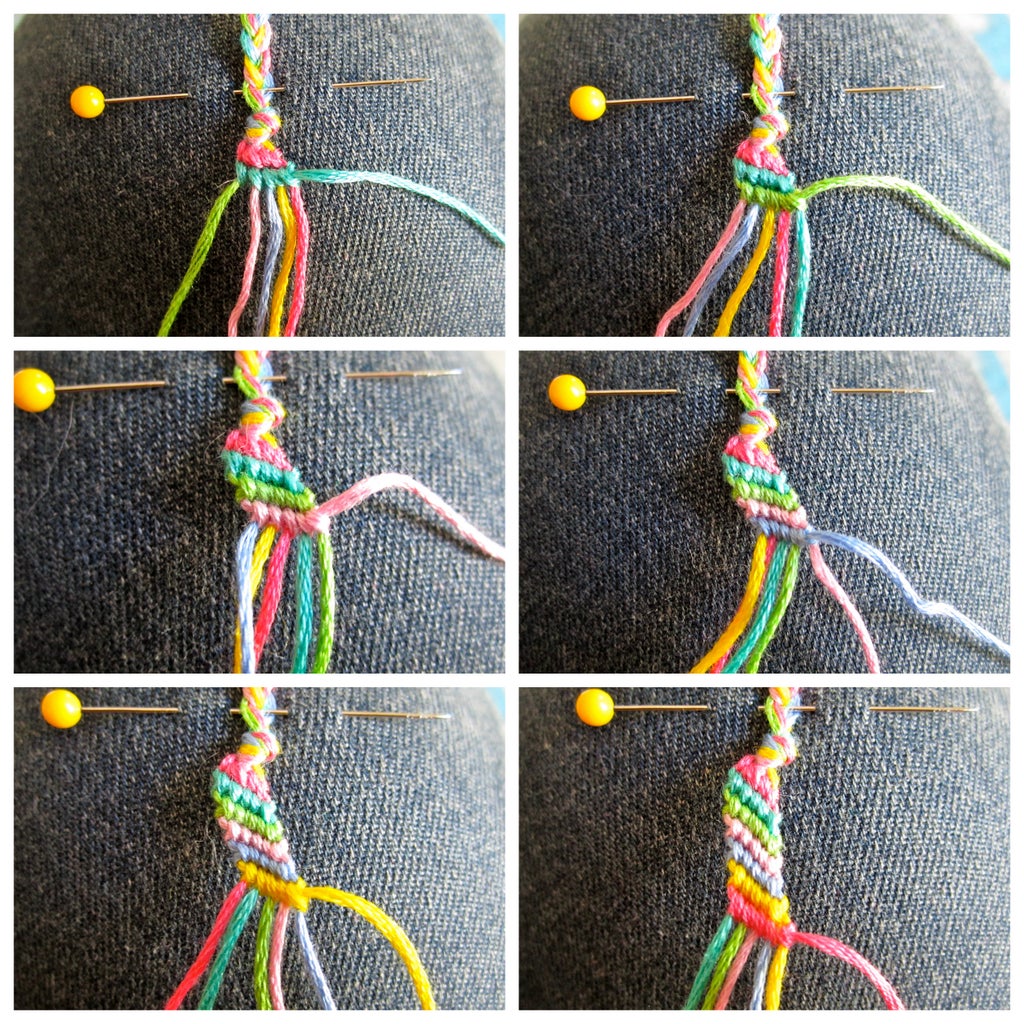
Image Source: content.instructables.com
Why Choose Embroidery Thread for Bracelets?
Making bracelets from embroidery thread is fun. It is also very rewarding. This craft offers many good reasons to start.
The Appeal of Simplicity
Embroidery thread is easy to use. It is soft and smooth. This makes it kind to your hands. You do not need fancy tools. Just basic supplies will do. This means anyone can start. It is perfect for beginners. You can make simple designs. Or, you can try more complex ones. The process itself is calming. It is a great way to relax.
Cost-Effectiveness
Embroidery floss is cheap. You can buy many colors for little money. This makes it a great hobby. You do not need to spend a lot to get started. Many craft stores sell large packs. This lets you build a big color collection. You can make many bracelets. You can even give them as gifts. This low cost helps you try new ideas. You can make mistakes without worry.
Endless Color Options
Embroidery thread comes in almost every color. You can find bright colors. You can find soft colors. You can also find colors with sparkle. This huge range lets you be very creative. You can mix colors to match any outfit. You can make bracelets for friends. You can pick colors that mean something special. This wide choice makes each bracelet unique.
Essential Tools and Materials
Before you start, gather your supplies. You do not need much. These items are easy to find.
What You Will Need
Having the right things ready makes crafting easy. Here is a list of what you will need.
Embroidery Floss Explained
This is your main material. Embroidery floss is usually cotton. It has six strands twisted together. You can separate these strands. This lets you make thinner bracelets. Or, you can use all six strands for a thicker look. Each skein (small bundle) has about 8 meters (8.7 yards) of thread. Pick colors you love. This is where your creativity begins. Many embroidery floss crafts for beginners start with this simple thread.
| Floss Type | Description | Best For |
|---|---|---|
| Cotton Floss | Standard, soft, matte finish | Most bracelet types, detailed knots |
| Metallic Floss | Shiny, adds sparkle | Accents, special occasion bracelets |
| Variegated Floss | Colors change along the thread | Unique, self-striping designs |
| Pearl Cotton | Thicker, lustrous finish, fewer strands | Chunky bracelets, defined stitches |
Scissors
You need sharp scissors. They help you cut the thread cleanly. Small sewing scissors work well. Craft scissors are also fine. Make sure they are easy to handle. Good cuts prevent fraying. Fraying can make your work messy.
Measuring Tape or Ruler
You need to measure your thread. This tool helps you cut the right lengths. It ensures your bracelet will fit. It also helps you make sure your threads are even. This makes your work look neat.
Clipboard or Tape
You need something to hold your work. A clipboard is great. It holds the threads still while you knot. You can also use masking tape. Tape your starting knot to a table. A safety pin can also work. Pin your threads to a pillow or your jeans. This keeps your threads tight. Tight threads make neat knots.
Starting Your Bracelet Journey: Basic Techniques
Every great bracelet starts with a good beginning. Here are the first steps. These steps lay the groundwork for all your designs. They are part of any easy string bracelet tutorial.
Measuring and Cutting Your Floss
Correct measurement is key. It stops you from running out of thread. It also stops waste.
- Step 1: Decide on bracelet length. A common bracelet is about 6-7 inches (15-18 cm) long. But you need more thread than that. Knots use up a lot of thread.
- Step 2: Estimate thread length. For most knots, you need threads that are about 4 to 6 times the finished bracelet length. If your bracelet is 6 inches, cut threads 24-36 inches long. It is better to cut too long than too short. You can always trim extra.
- Step 3: Count your threads. Most designs use 3 or more threads. Count how many threads your pattern needs. Cut each thread to the same length.
- Step 4: Keep threads separate. If you are using many colors, keep them sorted. This prevents tangles.
The Simple Knot Start
This is the easiest way to begin. It works for many simple braided or knotted bracelets. It is one of the basic knotted thread bracelet techniques.
- Step 1: Gather your cut threads. Line up all your threads. Make sure the ends are even.
- Step 2: Fold the threads in half. If you want a loop at the start, fold them. This creates a loop at the halfway point. If no loop is needed, just line them up.
- Step 3: Make an overhand knot. Tie all the threads together in a simple knot. Make this knot about 1/2 inch (1 cm) from the end (or from the fold if you made a loop). Pull it tight. This knot secures your threads.
- Step 4: Secure your work. Use your clipboard or tape. Clip the knot to the top of the clipboard. Or, tape it down to a table. This holds your work steady.
The Loop Start (For Adjustability)
A loop start makes your bracelet adjustable. It is great for gifts. It uses the simple knot start, but done in a specific way.
- Step 1: Gather your threads. Take all your threads.
- Step 2: Make a large loop. Create a loop about 1 inch (2.5 cm) long at one end. This loop will be the closure for your bracelet.
- Step 3: Tie a knot below the loop. Tie an overhand knot that holds this loop in place. This knot should be about 1 inch (2.5 cm) from the ends of the threads. Pull it tight.
- Step 4: Secure your work. Clip or tape the loop to your work surface. The loop should be at the top. Your threads will hang down. Now you are ready to start knotting or braiding.
Popular Bracelet Styles and Methods
Now comes the fun part: making the bracelet! Here are different styles you can try. Each one uses different knotted thread bracelet techniques.
The Classic Braided Bracelet
Braiding is a basic skill. It is easy to learn. Braided embroidery floss bracelets are simple yet charming.
Simple 3-Strand Braid
This is the braid you likely already know. It is very easy.
- Step 1: Choose three threads. You can use three different colors or three of the same color.
- Step 2: Secure the threads. Use a simple knot start. Secure the knot to your clipboard.
- Step 3: Arrange the threads. Lay your three threads flat. Imagine them as Left (L), Middle (M), and Right (R).
- Step 4: Start braiding.
- Cross the Right (R) thread over the Middle (M) thread. The old M thread is now R. The old R thread is now M.
- Cross the Left (L) thread over the new Middle (M) thread. The old M thread is now L. The old L thread is now M.
- Step 5: Continue braiding. Repeat these two steps. Keep your tension even. This makes the braid look neat. Braid until your bracelet is the right length.
- Step 6: Finish the braid. Tie a final overhand knot at the end. Make it tight. You can add a button or a loop here later.
Flat 4-Strand Braid
This braid uses four threads. It makes a wider, flatter bracelet.
- Step 1: Choose four threads. Cut them to length and secure with a simple knot.
- Step 2: Arrange the threads. Lay them flat. Name them 1, 2, 3, 4 from left to right.
- Step 3: Start braiding.
- Take thread 1 (far left). Pass it under thread 2.
- Then, pass thread 1 over thread 3.
- Next, pass thread 4 (far right) over thread 3 (the one thread 1 just went over).
- Then, pass thread 4 under thread 2 (the thread 1 just went under).
- Step 4: Repeat. Keep doing these steps. Each time, you are weaving the outer threads towards the center. This creates a flat, basket-like pattern. Braid until long enough.
- Step 5: Finish. Tie an overhand knot to secure.
Round 4-Strand Braid
This braid makes a round, cord-like bracelet. It is a bit trickier but very pretty.
- Step 1: Choose four threads. Secure them with a simple knot.
- Step 2: Arrange threads. Hold the four threads like a plus sign (+) or cross. One thread points up, one down, one left, one right.
- Step 3: Start braiding.
- Take the top thread. Bring it down under the left thread.
- Then bring it over the right thread. Now it is at the bottom.
- Rotate your work 90 degrees to the left. The thread you just moved is now on the top.
- Step 4: Repeat. Repeat the steps. Top thread goes under left, then over right. Rotate. Keep going. This creates a tight, round braid.
- Step 5: Finish. Tie a knot to end it.
Friendship Bracelet Basics: The Forward Knot
Friendship bracelets are famous for their knots. They use a simple knot, often called a forward knot or half-hitch. These friendship bracelet patterns are fun to learn.
How to Make a Forward Knot
The forward knot (or F knot) is the building block.
- Step 1: Choose two threads. Let’s say Thread A (the one you are knotting with) and Thread B (the one you are knotting on).
- Step 2: Make a “4” shape. Take Thread A. Lay it over Thread B to make the shape of a “4.”
- Step 3: Loop under. Pass Thread A under Thread B.
- Step 4: Pull up. Pull Thread A up through the “4” loop you made. Pull it tight towards the top. It should sit snugly against the starting knot.
- Step 5: Repeat. To make a full forward knot, you must do this twice. Make the exact same “4” shape and pull Thread A through again. Pull it tight. Two “4”s make one strong forward knot. Thread A will now sit to the right of Thread B.
Simple Stripe Pattern (Using Forward Knots)
This is a great first pattern for friendship bracelets.
- Step 1: Choose colors. Pick 3-5 colors. Cut two strands of each color. Secure with a loop start.
- Step 2: Arrange threads. Lay out your threads. For example, if you have 3 colors (Red, Blue, Yellow), arrange them: Red, Red, Blue, Blue, Yellow, Yellow.
- Step 3: Start knotting.
- Take the far left thread (Red). This is your knotting thread.
- Make a forward knot (two “4” shapes) onto the next Red thread.
- Then, make a forward knot onto the first Blue thread.
- Continue making forward knots with this same Red thread onto each thread until it reaches the far right side.
- Step 4: Next row. Once the first Red thread has gone all the way across, it is now the far right thread. It rests there.
- Step 5: Repeat. Take the new far left thread (the second Red thread). Repeat the process. Knot it across all threads to the right.
- Step 6: Change colors. When you have knotted all the Red threads across, the next color (Blue) will be on the far left. Start knotting with the first Blue thread across the row.
- Step 7: Continue. Keep making rows, changing colors as they come to the far left. This creates horizontal stripes.
- Step 8: Finish. When your bracelet is long enough, tie a sturdy knot. You can braid the ends, or make another loop to match your start.
Mastering Macrame Knots
Macrame uses knots to create patterns. Macrame thread bracelets are often chunky and very textured. The square knot is key.
The Square Knot (Foundation for Macrame Thread Bracelets)
This knot creates a flat, strong line.
- Step 1: Set up threads. You need four threads. You will have two “working” threads on the outside. Two “filler” threads will be in the middle. The filler threads run straight through. Only the working threads tie the knots. Secure all four threads at the top.
- Step 2: Make the first half of the knot.
- Take the left working thread (Thread A). Lay it over the two middle filler threads. It should make a “4” shape.
- Take the right working thread (Thread B). Lay it over the end of Thread A.
- Then, pass Thread B under the two middle filler threads.
- Pull Thread B up through the loop created by Thread A (the open part of the “4”).
- Pull both Thread A and Thread B tight. This is one half of the square knot.
- Step 3: Make the second half of the knot.
- Now, take the right working thread (which was Thread B, now on the left). Lay it over the two middle filler threads to make a backwards “4” shape.
- Take the left working thread (which was Thread A, now on the right). Lay it over the end of the first thread.
- Then, pass it under the two middle filler threads.
- Pull it up through the loop created by the first thread (the open part of the backwards “4”).
- Pull both working threads tight.
- Step 4: Continue. Repeat these two halves. First, left over center, right over, under, through. Then, right over center, left over, under, through. Each full knot creates a small square.
- Step 5: Finish. When long enough, tie an overhand knot with all four threads.
Half Hitch Knot (Used in some woven styles)
The half hitch is also called a lark’s head knot in some crafts. In macrame, it’s often used to make rows or bars.
- Step 1: Choose threads. You need a “holding” thread (horizontal) and a “knotting” thread (vertical).
- Step 2: First half hitch.
- Take the knotting thread. Bring it over the holding thread.
- Then, bring it under the holding thread.
- Pull the end through the loop you just made.
- Pull tight towards the top. This makes a small loop on the holding thread.
- Step 3: Second half hitch. Repeat step 2 with the same knotting thread and holding thread. Doing two half hitches creates a strong, neat knot.
- Step 4: Continue. You can use a row of these knots to create diagonal lines or fill in areas. This is often seen in woven thread bracelet instructions that use macrame techniques.
Weaving Wonders
True woven thread bracelet instructions often use a loom. But you can also “finger weave” simpler patterns.
Basic Woven Pattern (Finger Weaving)
This method creates a flat, interwoven look without a loom.
- Step 1: Set up threads. Choose an even number of threads, 4 or 6 work well. Secure them with a simple knot.
- Step 2: Divide threads. Separate your threads into two groups. Group A (left) and Group B (right).
- Step 3: Weave.
- Take one thread from Group A. Weave it over the first thread in Group B, under the second, over the third, and so on.
- Once woven, this thread is now part of Group B.
- Now take one thread from the new Group A (which has one less thread). Weave it across the new Group B in the same over/under pattern.
- Step 4: Repeat. Keep weaving one thread from one side across to the other. Each pass forms a row in your woven fabric. Keep the tension even.
- Step 5: Finish. When done, tie a sturdy knot with all threads.
Adding Beads for Extra Flair
Beads add sparkle and texture. Beaded embroidery thread designs are very popular.
Stringing Beads
This is the simplest way to add beads.
- Step 1: Choose your beads. Make sure the holes in your beads are big enough for your embroidery thread. Use smaller beads for single strands, larger beads for multiple strands.
- Step 2: Thread the bead. After knotting a section of your bracelet, slide a bead onto one or more of your threads.
- Step 3: Secure the bead. Tie a small overhand knot directly after the bead. This keeps the bead in place. You can also tie a knot before the bead.
- Step 4: Continue. Keep knotting or braiding your bracelet. Add beads whenever you like.
Knotting Around Beads
This method lets beads be the main focus, surrounded by knots.
- Step 1: Prepare threads. Use two threads for this. Or, use one main thread and a thinner thread for knotting.
- Step 2: String a bead. Place a bead onto your main thread.
- Step 3: Tie a knot. Use the second thread (or the other end of the main thread) to tie a knot around the main thread just before the bead. A square knot or a simple overhand knot works well. Pull it tight.
- Step 4: Tie another knot. Make another knot just after the bead. This traps the bead between two knots.
- Step 5: Space out beads. You can leave space between beads by knotting a section of plain thread. Then, add another bead. This creates a “bead, knot, bead” pattern.
- Step 6: Finish. End with a knot.
Advanced Tips for Stunning Bracelets
Once you master the basics, try these tips. They will make your bracelets look even better.
Mixing Colors Smartly
Color choice is important. It sets the mood of your bracelet.
- Color Wheel: Use a color wheel. Colors next to each other (like blue and green) create a calm look. Colors opposite each other (like blue and orange) create a bold, high-contrast look.
- Ombre Effect: Use shades of the same color. Go from light blue to dark blue. This creates a smooth color change.
- Repeating Patterns: Decide on a color order. Then, repeat that order. This makes your design feel balanced.
- Accent Colors: Use one bright color with many duller ones. The bright color will pop.
Adding Charms or Pendants
Charms make your bracelets special.
- Before the Knot: Some charms have a loop. You can slide these onto your threads before you start knotting. They will be fixed at the top of your bracelet.
- During Knotting: For charms with jump rings, you can add them mid-way. Open the jump ring. Slip it onto a loop you create in your knotting. Close the jump ring securely. This works well for macrame designs.
- After Finishing: You can attach charms after the bracelet is done. Use a small jump ring or split ring. Attach it to a loop in your final knot or braid.
Finishing Touches: Clasps and Closures
How you finish your bracelet matters. It makes it easy to wear.
Tie-on Closure
This is the simplest closure.
- Method: Just tie the ends of the bracelet around your wrist.
- Tip: Braid the ends into pigtails for a neater look. Then tie these pigtails.
Button Closure
A button adds a nice touch.
- Method: Start your bracelet with a loop. Make sure the loop is big enough for your button to pass through. When the bracelet is done, tie a button securely to the other end.
- Tip: Choose a button that matches your bracelet colors.
Sliding Knot Closure
This closure makes bracelets adjustable. It is very popular for friendship bracelets.
- Step 1: Finish your bracelet. Make your bracelet the main length you want. Do not tie a final knot.
- Step 2: Braid ends. Braid the loose ends of your bracelet for about 2-3 inches (5-7.5 cm). Do this on both sides. You will have two braided “tails.”
- Step 3: Overlap tails. Lay the two braided tails over each other. They should point in opposite directions.
- Step 4: Add new thread. Take a new, short piece of embroidery thread (about 10 inches or 25 cm).
- Step 5: Tie square knots. Use this new short thread to tie 3-5 square knots around both braided tails where they overlap. Treat the two braided tails as your “filler” threads for the square knot.
- Step 6: Secure knot. Trim the ends of the new thread. You can dab a tiny bit of glue on the knot ends to secure them.
- Result: The two braided tails can now slide through the square knots. This makes the bracelet bigger or smaller to fit any wrist. This is one of the more advanced knotted thread bracelet techniques for finishing.
Caring for Your Handmade Creations
Your handmade thread accessories are special. With proper care, they will last a long time.
- Gentle Washing: If your bracelet gets dirty, wash it gently. Use mild soap and cool water. Rub it softly.
- Air Dry: Do not put it in a dryer. Lay it flat on a towel to air dry. Direct sunlight can fade colors.
- Storage: Store your bracelets flat or hang them. This stops tangles. Keep them out of direct sunlight when not worn.
- Avoid Harsh Chemicals: Take off your bracelet before swimming in chlorinated pools. Avoid contact with strong perfumes or lotions. These can harm the thread.
Final Thoughts on Your Crafting Adventure
Making bracelets with embroidery thread is a journey. It starts with simple knots and colors. It can lead to complex and beautiful designs. Each bracelet you make shows your creativity. It holds a piece of your effort and joy. Whether you make a simple braided piece or a detailed macrame one, you are creating something unique. These easy string bracelet tutorials are just a start. Keep trying new patterns. Mix colors in new ways. Add beads or charms. The possibilities are endless. Enjoy the process. Share your creations. And most importantly, have fun making your own wearable art!
Frequently Asked Questions (FAQ)
Here are common questions about making bracelets with embroidery thread.
Q1: How much embroidery floss do I need for one bracelet?
A1: It depends on the pattern. For a simple braided bracelet, about 2-3 feet (60-90 cm) per strand is a good start. For knotted friendship bracelets, each working strand can be 4-6 feet (1.2-1.8 meters) long. It’s always better to cut too much than too little.
Q2: Can I use regular sewing thread instead of embroidery floss?
A2: No. Regular sewing thread is much thinner. It is not strong enough for bracelets. Embroidery floss has multiple strands. This makes it thicker and stronger. It holds knots better.
Q3: My knots are not tight enough. What am I doing wrong?
A3: Make sure you pull each knot very tight. Use a firm, even pull. Also, ensure your starting point is held very still. A clipboard or tape helps a lot. If threads are loose, knots will be loose.
Q4: How do I stop the ends of my bracelet from fraying?
A4: After tying your final knot, you can put a tiny drop of clear craft glue or clear nail polish on the knot. This seals the ends. You can also singe the very tips with a flame if your floss is synthetic (be very careful!). Cotton floss will burn, so glue is safer.
Q5: Can I make these bracelets waterproof?
A5: Embroidery floss is usually cotton. Cotton is not truly waterproof. It will dry, but repeated wetting can make it wear out faster. For waterproof bracelets, you might use waxed cord or nylon string. Those are different materials.
Q6: What if my bracelet ends up too short or too long?
A6: For a bracelet that is too short, you can add more length. You can braid the ends. Or, you can add extra loops or knots for the closure. If it is too long, you can trim the ends. Or, you can use an adjustable sliding knot closure. This helps it fit different wrist sizes.