
Making your own embroidery patches can be a fun hobby or a way to add personal touches to clothing, bags, and more. If you’re wondering how to make embroidery patches easily today, the good news is that modern tools, especially machine embroidery, have made the Embroidery patch making process much more accessible than ever before. You don’t need to be an expert sewer to start. With the right Embroidery patch supplies and simple steps, anyone can create cool patches. This guide will walk you through everything you need to know to start Creating custom embroidered patches right at home.
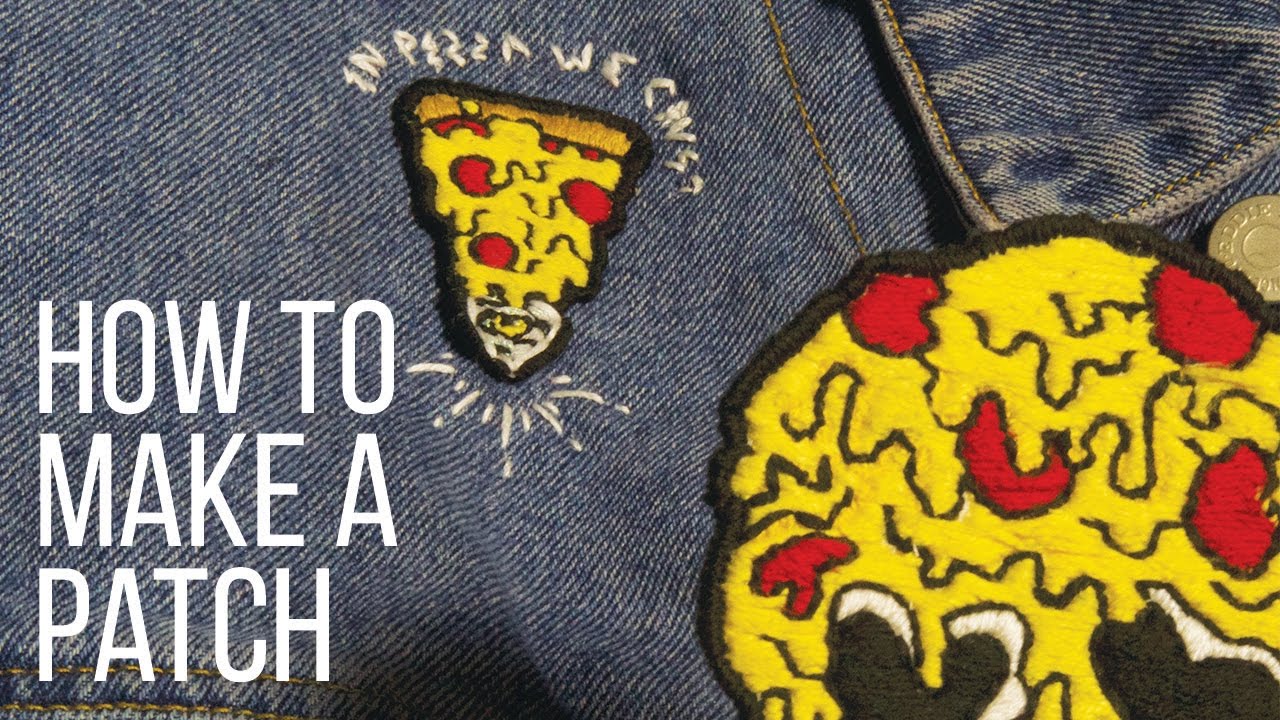
Image Source: i.ytimg.com
Assembling Your Tools
To make patches, you need some basic things. These are your main Embroidery patch supplies. Having everything ready helps the process go smoothly.
- Embroidery Machine: This is key for Machine embroidery patches. You can’t do this method without one.
- Design Software: You need a way to create or change your patch design.
- Fabric: Strong fabric works best. Twill is a popular choice. Felt also works well.
- Embroidery Thread: Use good quality thread. Rayon or polyester threads are common for patches.
- Embroidery Stabilizer Types for Patches: Stabilizer is very important. It holds the fabric steady while the machine sews. There are different types.
- Backing Material: This goes on the back of the patch. It can make it an Iron on patch backing material or just a clean finish.
- Sharp Scissors: You need small, sharp scissors to cut the patch out cleanly.
- Embroidery Hoop: This comes with your machine. It holds the fabric and stabilizer tight.
Grasping the Patch Making Steps
Making an embroidered patch follows a clear series of steps. This is the Embroidery patch making process from start to finish.
- Plan your design.
- Get your design ready for the machine (digitizing).
- Gather your fabric and stabilizer.
- Set up your machine.
- Sew the design.
- Take the patch out of the hoop.
- Trim the patch.
- Finish the edges.
- Add backing material.
Let’s look at each step closely.
Step 1: Planning Your Design
First, think about what you want your patch to look like.
- What picture or words do you want?
- How big should it be?
- What colors will you use?
- What shape will the final patch be?
Keep the size in mind. Very small details might not sew well on a patch. Simple designs often look best.
Step 2: Preparing Your Design
This step is called Embroidery digitizing for patches. This is a key part of making Machine embroidery patches. Your machine cannot just read a picture. It needs special instructions telling it where to put each stitch, what color thread to use, and in what order to sew.
- What is digitizing? It’s the process of turning your image or text into a stitch file. This file works with your specific embroidery machine.
- Do I need special software? Yes, you need embroidery digitizing software. Some machines come with basic software. You can also buy more advanced programs.
- Can I get someone else to do it? Yes, many services offer custom embroidery digitizing. This is good if you don’t want to buy software or learn how to use it.
- What makes a good patch design file? The digitizing needs to include a border stitch. This stitch will hold the edges of the patch together later. It also needs underlay stitches. These stitches help the design look full and cover the fabric well. The design file should be saved in a format your machine can read (like DST, PES, JEF, etc.).
If you are Creating custom embroidered patches, the digitizing step is where your idea becomes a sewable file.
Step 3: Preparing Fabric and Stabilizer
You need the right fabric and stabilizer for your patch.
- Fabric Choice: Twill is common. It is strong and does not stretch much. Canvas or even felt can work. Make sure it is a fabric that holds stitches well.
- Stabilizer Choice: This is very important for patches. The right Embroidery stabilizer types for patches help the fabric stay flat and prevent stitches from sinking or fabric from puckering.
- Cut-Away Stabilizer: This is strong. You cut it away from the back after sewing. It gives good support for designs with many stitches.
- Tear-Away Stabilizer: You can tear this away easily after sewing. It is good for designs with fewer stitches or on more stable fabrics.
- Heat-Away or Water-Soluble Stabilizer: These dissolve with heat or water. They are good for delicate fabrics or when you don’t want any stabilizer left behind. For patches, a cut-away or tear-away is usually used under the fabric. Sometimes a water-soluble topping is used on top to keep stitches from sinking into the fabric nap (like on felt).
You will hoop the fabric and stabilizer together. Cut a piece of fabric and a piece of stabilizer bigger than your hoop.
Step 4: Setting Up Your Machine
Now, get your embroidery machine ready.
- Put the correct stabilizer under the fabric. Make sure the fabric is right side up.
- Place the fabric and stabilizer tightly in the embroidery hoop. Make it drum-tight, but not so tight that it stretches the fabric out of shape.
- Load the digitized design file onto your machine.
- Thread the machine with the first color the design needs.
Step 5: Sewing the Design
This is where the magic happens!
- Attach the hoop to the machine.
- Double-check that the design position on the screen looks correct for where you want it on the fabric in the hoop.
- Start the machine. It will follow the instructions from the design file.
- The machine will stop when it needs a color change. Change the thread to the next color the design calls for.
- Keep sewing and changing threads until the whole design is finished.
- The last step the machine sews is usually the border stitch. This stitch goes around the whole design. It makes a defined edge for your patch.
This is the core of making Machine embroidery patches. The machine does the work, but you need to oversee it, change threads, and fix any problems that come up.
Step 6: Taking the Patch Out of the Hoop
Once the machine finishes the last stitch, take the hoop off the machine. Carefully remove the fabric and stabilizer from the hoop.
Step 7: Trimming the Patch
Now you need to cut the patch out. This step is part of How to finish embroidery patches.
- Leave a small edge of fabric around the border stitch. Don’t cut right next to the stitches yet.
- Use sharp scissors.
Step 8: Finishing the Edges
This is another important part of How to finish embroidery patches. You need to finish the raw edge of the fabric left after trimming.
- Method 1: Merrowed Edge (Serged Edge): This is the classic patch look. It is a thick, stitched border that wraps around the edge of the patch. It hides the raw fabric edge. You usually need a special machine or service to get this type of edge.
- Method 2: Satin Stitch Edge: Your digitized design likely included a satin stitch border as the final step. This stitch is dense and wide. If you trim the fabric carefully right outside this border stitch, the stitches will cover the raw edge. This is the most common way to finish edges when making patches at home with an embroidery machine. Trim carefully, close to the stitches, without cutting the stitches themselves.
- Method 3: Heat Cutting: For some synthetic fabrics, you can use a heat tool (like a wood-burning tool with a knife tip) to cut around the edge. This melts the fabric edge slightly, sealing it and preventing fraying. Do this very carefully in a well-aired space, as it creates fumes. Practice on scraps first.
If you used a dense satin stitch border, trimming close to the edge is the simplest way to achieve a finished look.
Step 9: Adding Backing Material
After the patch is cut and the edges are finished, you add a backing. This makes the patch stronger and covers the back of the stitches and stabilizer.
- Types of Backing:
- Plain Fabric: You can cut a piece of felt or another thin fabric and sew or glue it to the back.
- Non-Woven Material: Some non-woven materials give a clean, stiff back.
- *Iron on patch backing material*: This is a popular choice. It has glue on one side. You iron it onto the back of the patch. This allows the patch to be ironed onto clothing or other items. There are different types of iron-on backing, some stronger than others. Follow the instructions that come with the specific material you buy.
- Peel-and-Stick Backing: This has a strong adhesive with a paper cover you peel off. It makes the patch like a sticker. This is good for items you can’t iron or sew.
To add backing, cut the material slightly smaller than the patch. Attach it to the back. For iron-on, follow the heat and time settings recommended for the material.
This completes the Embroidery patch making process. You now have a finished patch ready to be attached to something.
Attaching Your New Patch
You have made a great patch! Now, how do you put it onto something? There are a few ways of Attaching embroidery patches.
- Iron-On: If you used Iron on patch backing material, place the patch where you want it. Cover it with a pressing cloth (a thin piece of cotton fabric). Press down firmly with a hot iron. Use the temperature setting the backing material recommends. Hold the iron still for the recommended time (often 15-30 seconds). Let it cool completely. It is often a good idea to also press the back of the item if possible. Iron-on is easy, but might not be as permanent as sewing, especially on items that are washed often.
- Sew-On: You can simply sew the patch onto fabric. Use your sewing machine or sew by hand. Sew close to the edge of the patch, just inside the border stitch. This is the most secure way to attach a patch, especially for items that will get a lot of use or washing.
- Adhesive (Peel-and-Stick): If your backing was peel-and-stick, just remove the paper cover and press the patch firmly onto the surface. This works best on clean, smooth surfaces. It might not be permanent through washing.
- Fabric Glue: You can use strong fabric glue. Apply a thin, even layer to the back of the patch. Place it on the item and press down. Let it dry completely. This might not hold up well to washing.
For best results, especially on clothing, sewing the patch on, even after ironing, adds extra security.
Woven Patch vs Embroidered Patch: Knowing the Difference
Sometimes people wonder about the difference between a Woven patch vs embroidered patch. They look similar but are made differently.
- Embroidered Patch: Made by stitching thread onto a fabric base. The design is raised, with texture from the stitches. Parts of the fabric base might show through if the design isn’t 100% covered in stitches. This guide is all about making these.
- Woven Patch: Made on a loom, like weaving fabric. The design is part of the weave itself. The threads form the picture. The surface is flatter and smoother than an embroidered patch. Woven patches can have finer details than embroidered ones because the threads are thinner and closer together.
Embroidered patches have a classic, textured look. Woven patches are better for very detailed designs or small text. Both are great ways to add designs to items.
Creating Custom Embroidered Patches: Your Ideas Come Alive
Making your own patches means you can create anything you imagine. Creating custom embroidered patches lets you personalize items, make gifts, or even start a small business.
- Start with an Idea: Draw it out or find a picture you like.
- Think About Size: Will it fit where you want to put it?
- Pick Your Colors: Choose thread colors that make your design pop.
- Get it Digitized: Either do it yourself with software or send it to a service. Make sure the digitizer knows it’s for a patch and includes the border stitch.
- Gather Your Supplies: Get the right fabric, stabilizer, thread, and backing.
- Sew and Finish: Follow the steps above to make your patch.
The ability to make custom patches opens up many creative possibilities.
Choosing the Right Stabilizer: A Deeper Dive
Let’s look more at the Embroidery stabilizer types for patches. Using the correct stabilizer prevents many problems.
| Stabilizer Type | What it’s like | Good for Patches? | How to Remove/Finish |
|---|---|---|---|
| Cut-Away | Holds fabric firm | Yes, good for dense designs and preventing stretch. | Cut away excess carefully. |
| Tear-Away | Tears easily | Yes, good for lighter designs or stable fabrics. | Tear away excess gently. |
| Water-Soluble (Film) | Thin film, dissolves with water | Yes, as a topping to keep stitches on top of pile. | Wet it and let it dissolve. |
| Water-Soluble (Fibrous) | Looks like fabric, dissolves | Can be used as a backing for delicate work. | Rinse with water until gone. |
| Heat-Away | Melts with heat | Less common for patches; good if you can’t cut/wash. | Apply heat carefully. Use vent. |
For most homemade patches using standard fabrics like twill or felt, a medium to heavy weight cut-away stabilizer is a reliable choice to put under the fabric. If sewing on a fabric with a fuzzy surface (like felt), a water-soluble topping stabilizer placed on top of the fabric helps the stitches sit nicely on the surface instead of sinking into the fuzz.
Deciphering Iron-On Backing
Iron on patch backing material is popular for its ease of use. It is a layer with a heat-activated glue.
- How it works: When you heat it with an iron, the glue melts slightly. It then sticks to the back of your patch and to the item you are attaching it to as it cools.
- Types: Some iron-on backings are thin films, others are more like a stiff fabric with glue. The thickness and type of glue affect how well they stick and how stiff the patch becomes.
- Applying it:
- Cut the iron-on material a little smaller than your finished patch.
- Place the glue side down onto the back of the patch.
- Place the patch glue-side down onto your ironing surface.
- Cover with a pressing cloth.
- Press with a hot iron (check instructions for temperature). Apply firm pressure for the time needed.
- Let it cool completely flat before moving. This cooling step is key for the glue to bond well.
Iron-on backing makes attaching patches quick, but remember sewing offers the most permanent hold.
Maintaining Your Machine for Patch Making
Making Machine embroidery patches means relying on your machine. Keep it clean and serviced. Lint builds up, especially under the needle plate. Clean it often. Use good needles and change them regularly (every 8-10 hours of sewing time is a good rule). Use good quality threads. Taking care of your machine ensures it sews your patches properly.
Putting it All Together: The Final Review
Let’s quickly review the full Embroidery patch making process:
- Design: Create your artwork. Keep it simple for best results.
- Digitize: Turn your design into a stitch file for your machine. Make sure it has a border stitch.
- Prepare: Cut fabric and choose the right Embroidery stabilizer types for patches. Hoop them tightly.
- Sew: Run the design on your machine, changing colors as needed.
- Trim: Cut the patch out, leaving a small edge.
- Finish: Use the border stitch or heat to seal the edge. This is part of How to finish embroidery patches.
- Back: Add Iron on patch backing material or another backing.
Your custom patch is now ready for Attaching embroidery patches to whatever you like!
Making your own patches is a rewarding skill. With a little practice, you’ll get faster and better at each step. Enjoy Creating custom embroidered patches and adding your unique touch to the world!
Frequently Asked Questions (FAQ)
Q: What is the best fabric for making embroidered patches?
A: Twill is very popular because it is strong and takes stitches well. Felt also works easily, especially for simpler designs.
Q: Can I make patches without an embroidery machine?
A: Yes, you can make patches by hand embroidery. However, the method described in this guide is for Machine embroidery patches, which creates a different look and is much faster for detailed designs.
Q: How do I know which stabilizer to use?
A: For most patches on stable fabric like twill, a medium to heavy weight cut-away stabilizer underneath is best. If the fabric has a pile (like felt), use a water-soluble topping on top.
Q: Is iron-on backing permanent?
A: Iron-on backing is convenient, but often not as permanent as sewing. For items that will be washed often, sewing the patch on after ironing is recommended for the strongest hold.
Q: What is the difference between an embroidered patch and a woven patch?
A: An Embroidered patch is made by stitching thread onto a fabric base, giving it a raised texture. A Woven patch is made like fabric on a loom, with the design woven in, resulting in a flatter surface, good for fine details.
Q: Do I have to digitize my own design?
A: No, you can use pre-made patch designs or pay a service to do the Embroidery digitizing for patches for you based on your artwork.
Q: How do I make the edges look neat?
A: The key is the border stitch in your digitized design. Sewing this last and then trimming carefully right outside this dense stitch line is the most common way to finish the edges for homemade Machine embroidery patches.
Q: What are the essential Embroidery patch supplies I need to start?
A: You need an embroidery machine, design/digitizing software (or a service), fabric, embroidery thread, Embroidery stabilizer types for patches, backing material (like Iron on patch backing material), sharp scissors, and hoops.
Q: Can I create very small patches?
A: Yes, but very small patches limit the amount of detail and size of text you can include. Stitches can only be so small, so complex designs on tiny patches may not look good.
Q: What is the typical Embroidery patch making process order?
A: The process goes from planning/digitizing, preparing fabric/stabilizer, machine sewing, trimming, edge finishing (How to finish embroidery patches), and adding backing. Finally, Attaching embroidery patches to the item.