
Do you want to know how to make cool bracelets? Can you make these simple crafts easily at home? Yes, you can! Making embroidery thread bracelets is a fun and easy way to create pretty things. These DIY string bracelets are great for gifts or just for you. They are a classic craft, often called friendship bracelet patterns. You use colorful strings and simple knots to make them. You can make them fast, and they do not cost much. This guide will show you how to start making your own easy handmade jewelry today.
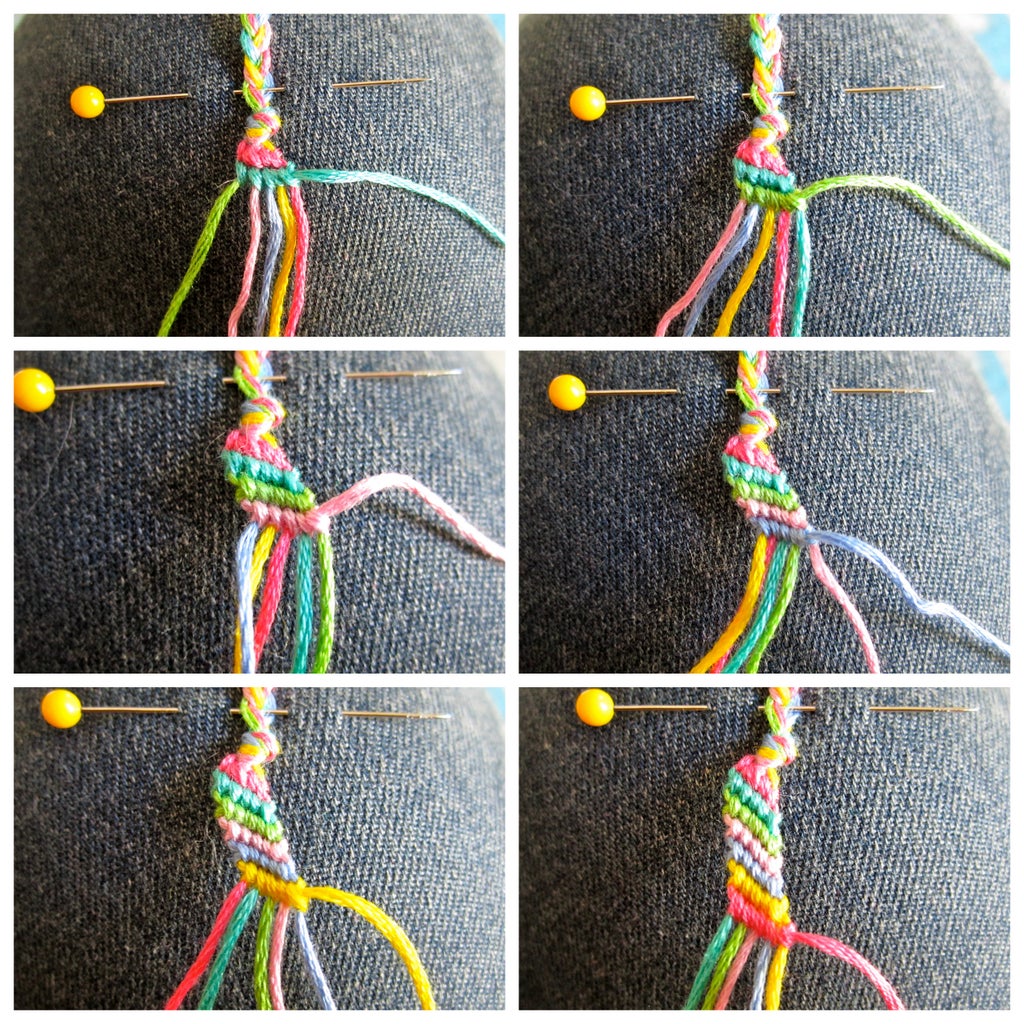
Image Source: content.instructables.com
Getting Ready to Make Bracelets
Starting your first bracelet is simple. You just need a few basic things. Having your tools ready makes the process smooth.
What You Will Need
Before you start tying knots, gather your bracelet making supplies. You probably have most of these at home already.
- Embroidery Floss: This is your main material. It comes in many colors. Pick colors you like. Make sure it is six-strand floss. This means it has six small strands twisted together. You can split them if you need thinner string.
- Scissors: You need these to cut your floss. Any sharp pair will do.
- Tape or Clip: This helps hold your bracelet steady. You can use masking tape, a clipboard, or even a safety pin.
- Measuring Tape or Ruler: This helps you cut the right length of floss.
- Optional Items:
- Beads: Small beads with holes can add sparkle.
- Charms: Tiny charms can make your bracelet special.
- Pillow or Foam Board: This gives you a soft surface to pin your work.
| Item | Purpose | Notes |
|---|---|---|
| Embroidery Floss | Main material for the bracelet | Many colors; pick 6-strand floss. |
| Scissors | Cutting floss to size | Any sharp pair works. |
| Tape/Clip | Holding the bracelet still | Masking tape, clipboard, or safety pin. |
| Measuring Tool | Getting the correct floss length | Ruler or tape measure. |
| Beads/Charms | Adding decoration | Optional, but fun. |
Getting Your Floss Ready
Now that you have your supplies, let us prepare the string. This step is important for a good start.
- Pick Your Colors: Choose a few colors you want to use. Three to six colors work well for most designs.
- Cut the Floss: Cut each strand of floss about 60 inches (150 cm) long. This length usually works for one bracelet. If you have bigger wrists, cut it a bit longer. If you are making a thick bracelet, you might need even more. It is better to cut it too long than too short. You can always trim extra.
- Bundle Your Strings: Line up all your cut strings. Make sure they are even at one end.
-
Make a Starting Loop or Knot:
- For a Loop: Fold your bundled strings in half. Make a loop at the fold. Tie a simple overhand knot about 1/2 inch (1 cm) below the fold. This loop will be one end of your bracelet. It helps with putting it on and taking it off.
- For a Knot: If you do not want a loop, tie a simple knot about 1 inch (2.5 cm) from one end of your bundled strings. This will be a starting point.
-
Secure Your Work: Use tape to stick your starting loop or knot to a table. You can also use a clip on a clipboard or a safety pin to a pillow. Make sure it is firm. This stops your work from moving while you tie knots.
Learning the Key Knots
The heart of making embroidery thread bracelets is tying knots. Most patterns use a few basic knots. Once you learn these, you can make many designs. These are types of knotted embroidery floss methods.
The Forward Knot (FK)
This knot moves your string to the right. It is the most common knot.
- Pick Two Strings: Take the string you want to knot with. Let us call this String A. It will knot around another string, String B. String B stays straight.
- Make a ‘4’ Shape: Lay String A over String B. It should look like the number ‘4’.
- Pull Through: Bring String A under String B. Then pull String A up through the loop you made.
- Pull Tight (First Half): Pull String A up and to the right. This pulls the knot tight. Slide it up to the top.
- Repeat: Do steps 2-4 one more time with the same two strings. This makes one full forward knot. It keeps String A on the right side of String B.
The Backward Knot (BK)
This knot is the opposite of the forward knot. It moves your string to the left.
- Pick Two Strings: Take String A. It will knot around String B.
- Make a ‘P’ Shape (Backward ‘4’): Lay String A over String B. It should look like a backward ‘4’ or the letter ‘P’.
- Pull Through: Bring String A under String B. Then pull String A up through the loop.
- Pull Tight (First Half): Pull String A up and to the left. This pulls the knot tight. Slide it up to the top.
- Repeat: Do steps 2-4 one more time with the same two strings. This makes one full backward knot. It keeps String A on the left side of String B.
The Forward-Backward Knot (FBK)
This knot is a mix. It makes your string stay in the same place.
- First Half (Forward): Make the first half of a forward knot. (Steps 1-4 for FK). Pull it tight.
- Second Half (Backward): Then, make the first half of a backward knot with the same strings. (Steps 1-4 for BK). Pull it tight.
- Finish: You have made a forward-backward knot. String A ends up in the same spot where it started.
The Backward-Forward Knot (BFK)
This is the opposite of the FBK. It also makes your string stay in the same place.
- First Half (Backward): Make the first half of a backward knot. (Steps 1-4 for BK). Pull it tight.
- Second Half (Forward): Then, make the first half of a forward knot with the same strings. (Steps 1-4 for FK). Pull it tight.
- Finish: You have made a backward-forward knot. String A ends up in the same spot where it started.
| Knot Type | Symbol | How it Moves String | What it Does to String |
|---|---|---|---|
| Forward Knot | (→) | Moves right | Stays on the right |
| Backward Knot | (←) | Moves left | Stays on the left |
| Forward-Backward | (↔) | Moves right, then left | Stays in place |
| Backward-Forward | (↔) | Moves left, then right | Stays in place |
Practice these knots a few times. You can use two short pieces of string. Once you feel good about them, you are ready for patterns.
Simple Friendship Bracelet Patterns
Now let us make some real bracelets! These textile bracelet instructions are easy to follow. They use the basic knots you just learned. These are great friendship bracelet patterns.
Pattern 1: The Simple Striped Bracelet
This is the easiest design. It is perfect for beginners. You will make lines of color.
- Set Up: Use any number of strings, at least two. The order of your strings will be the order of your stripes. Let us use four colors: Red, Blue, Green, Yellow. Set them up R, B, G, Y.
- Start Row 1: Pick the leftmost string (Red). This is your working string.
- Knot Across: Make a forward knot (FK) with Red around Blue. Pull tight.
- Keep Going: Make a forward knot (FK) with Red around Green. Pull tight.
- Finish Row: Make a forward knot (FK) with Red around Yellow. Pull tight.
- Now, Red is on the far right. You have made one row of red knots.
- Start Row 2: Now, pick the new leftmost string (Blue).
- Knot Across: Make forward knots (FK) with Blue around all the strings to its right (Green, Yellow, and the Red string that just moved there).
- Continue: Keep taking the leftmost string. Knot it with forward knots across all other strings until it is on the far right.
- Repeat: Each time you do this, you complete one color stripe. Keep going until your bracelet is long enough.
Pattern 2: The Candy Stripe Bracelet
This pattern creates pretty diagonal stripes. It is a classic DIY string bracelet.
- Set Up: Choose several colors, like four or five. Arrange them in the order you want your stripes to appear. For example: Pink, Orange, Yellow, Green, Blue.
- Start First Stripe: Take the leftmost string (Pink). This is your working string.
- Knot Across: Make a forward knot (FK) with Pink around the string next to it (Orange). Pull tight.
- Move On: Still with the Pink string, make a forward knot (FK) around the next string (Yellow).
- Continue: Keep making forward knots with the Pink string around each string, moving to the right, until the Pink string is on the far right of all your strings.
- Next Stripe: Now, take the new leftmost string (Orange). This is your new working string.
- Knot Across: Make forward knots (FK) with Orange around each string, moving to the right, until it is on the far right.
- Repeat: Keep taking the leftmost string and knotting it across to the right. Each time, you will see a new diagonal stripe appear.
- Finish: Keep going until your bracelet is long enough to fit your wrist.
Pattern 3: The Chevron Bracelet
This pattern makes V-shapes or zigzags. It looks fancy but is still easy.
- Set Up: Choose an even number of strings, at least four. Arrange them so the colors are mirrored.
- Example for 6 strings: Red, Blue, Green, Green, Blue, Red.
- The middle strings should be the same color.
- Find the Center: The center is where your two middle strings meet (Green and Green in the example).
- Work from Left to Center: Take the leftmost string (Red). Make forward knots (FK) with Red around each string, moving towards the center (Blue, then Green). Stop when Red reaches the left-side middle string.
- Work from Right to Center: Take the rightmost string (Red). Make backward knots (BK) with Red around each string, moving towards the center (Blue, then Green). Stop when Red reaches the right-side middle string.
- Join in the Middle: Now you have two strings of the same color (the original Red strings) meeting in the middle.
- Take the Red string that came from the left. Make a forward knot (FK) around the Red string that came from the right. This joins the two sides.
- Alternatively, you can make a backward knot (BK) with the right Red string around the left Red string. It depends on which way you want the final V to point.
- Next Row: The next pair of colors (Blue) are now the leftmost and rightmost. Repeat steps 3-5 with these strings.
- Continue: Keep taking the new outermost strings and working them to the center. Knot them together in the middle.
- Finish: Continue until your bracelet is long enough.
Pattern 4: The Spiral Staircase Bracelet
This simple bracelet makes a twisted spiral. It is very satisfying to make.
- Set Up: Use two colors or more. You can use two strings of the same color, or two different ones. For example, use two blue strings and two yellow strings. Keep one color (Blue) together, and the other (Yellow) together.
- Anchor String: Take one string that you will not knot with. This is your anchor or core string. It stays straight. Let us say you pick one Blue string as your anchor.
- Working String: Take one of your other strings (say, a Yellow string). This is your working string.
- Wrap and Knot: Make only forward knots (FK) with the Yellow working string around the Blue anchor string.
- Make one FK.
- Make another FK with the same Yellow string around the same Blue anchor.
- Keep making FKs with the Yellow string around the Blue string. As you keep making forward knots, you will see the string automatically twist. This creates the spiral.
- Change Colors (Optional): If you want stripes, keep knotting with Yellow until you like the length of the yellow spiral. Then, pick up a new working string (say, the other Blue string) and make only forward knots with it around the anchor string.
- Continue: Keep going until the bracelet is long enough.
Exploring Advanced Techniques
Once you are good at the basic knots, you can try more complex designs. These techniques add new textures and looks. This might include macrame bracelet techniques or braided thread crafts.
Simple Macrame Techniques
Macrame uses knots to create patterns. The most basic macrame knot is the square knot.
The Square Knot
The square knot looks like two bumps on top of a core string.
- Set Up: You need at least three strings: two outer working strings and one or two inner core strings. The outer strings do the knotting. The inner string(s) stay straight.
- Let us use String A (left), String B (core), String C (right).
- First Half (Left Side):
- Take String A. Cross it over String B and String C. It makes a ‘P’ shape.
- Take String C. Cross it under String A.
- Bring String C up through the loop made by String A on the left side.
- Pull Strings A and C tight. This is the first half.
- Second Half (Right Side):
- Take String C (now on the left). Cross it over String B and String A. It makes a ‘4’ shape.
- Take String A (now on the right). Cross it under String C.
- Bring String A up through the loop made by String C on the right side.
- Pull Strings C and A tight. This completes one full square knot.
By repeating the square knot, you can make a flat, strong bracelet. You can also make rows of half-square knots (just the first half) to create a spiral.
Braiding Methods
Braiding is another way to make pretty thread bracelets. It is different from knotting.
Basic Three-Strand Braid
This is the braid you might know from hair.
- Set Up: Take three strings. They can be all the same color or different.
- Start Braiding:
- Cross the right string over the middle string. Now the old middle string is on the right.
- Cross the left string over the new middle string. Now the old middle string is on the left.
- Continue: Keep crossing the outside string over the middle string. Do this alternately from the right and the left.
- Finish: Braid until your bracelet is long enough. Tie an overhand knot to secure it.
Four-Strand Braid
This braid makes a flatter, wider look.
- Set Up: Use four strings.
- Start:
- Take the rightmost string. Weave it over the string next to it, and then under the next string. It should end up in the third position from the right.
- Now, take the leftmost string. Weave it over the string next to it, and then under the next string. It should end up in the third position from the left.
- Continue: Repeat these two steps, always using the outermost string.
- Finish: Braid until your bracelet is long enough. Tie a knot.
Kumihimo Braiding (Disk Method)
Kumihimo is a Japanese form of braiding. You use a special foam disk with notches. This creates round or flat braided cords. It is a fun braided thread craft.
- Get a Kumihimo Disk: You can buy these online or at craft stores.
- Cut Strings: Cut 8 strings of embroidery floss, each about 20-30 inches (50-75 cm) long.
- Tie a Knot: Tie all 8 strings together in an overhand knot at one end.
- Load the Disk: Put the knot through the hole in the center of the disk. Place two strings in each of four notches, leaving the top and bottom sets of notches empty (typically above 32 and below 16, or at 0 and 16 if your disk is numbered differently).
- Braid (Simple Method):
- Take the bottom-right string. Move it up to the next empty notch on the top-right.
- Take the top-left string. Move it down to the next empty notch on the bottom-left.
- Rotate the disk one-quarter turn clockwise.
- Repeat the steps: bottom-right string moves up, top-left string moves down, rotate.
- Watch it Grow: As you repeat, a braid will form out of the center hole.
- Finish: When long enough, pull the strings from the disk. Tie a knot to secure it. Trim the ends.
Customizing Your Creations
Making custom thread bracelets is part of the fun! You can make each one unique.
Choosing Your Colors
Color choice is a big part of your bracelet’s look.
- Bright and Bold: Use strong colors for a fun, lively look.
- Pastel Hues: Soft colors make a gentle, calm bracelet.
- Ombre Effect: Use colors that slowly change from light to dark.
- Team Colors: Use colors of your favorite sports team or school.
- Holiday Themes: Red and green for Christmas, orange and black for Halloween.
Adding Charms and Beads
Beads and charms can make your bracelet special.
- Before Knotting: Thread beads onto a few of your strings before you start. As you knot, you can slide them into place.
- During Knotting: Stop your knotting. Thread a bead onto one or more of your core strings. Then, continue knotting around the bead.
- After Knotting: Add charms to the finished bracelet with jump rings. You can attach them to the closure or directly into the braided/knotted part.
Different Closures
How you finish your bracelet matters. It makes it easier to wear.
- Overhand Knot and Loop: This is the most common. Start with a loop, end with an overhand knot. The knot goes through the loop to close.
- Braided Ties: Braid the ends of your bracelet for a few inches. Then, tie these braids together.
- Button Closure: Instead of a loop, sew a small button to one end. Make the other end a loop big enough for the button.
- Sliding Knot Closure (Macrame Style): This makes the bracelet adjustable.
- Finish your bracelet. Do not tie a final knot.
- Gather the ends together. Overlap them by about an inch.
- Take a small, separate piece of floss (about 6 inches/15 cm).
- Tie a square knot (or several square knots) around the overlapped ends. This creates a small knot section that slides.
- Trim the extra from the small piece of floss.
- Now, you can pull the ends to make the bracelet smaller or bigger.
Personal Touches
- Name Bracelets: Learn how to spell names with knots (more advanced but possible).
- Date Bracelets: Mark special dates.
- Initials: Add small initial charms.
- Themed Bracelets: Make bracelets based on favorite movies, books, or animals.
Care for Your Handmade Jewelry
You put time into your easy handmade jewelry. Here are tips to keep your textile bracelet instructions looking good.
- Keep it Dry: Water can make colors fade or strings fray. Take off your bracelet before swimming or showering.
- Clean Gently: If it gets dirty, wash it by hand. Use a tiny bit of mild soap and cold water. Rinse well. Let it air dry completely.
- Avoid Harsh Chemicals: Do not let your bracelet touch bleach, strong cleaners, or perfumes. These can damage the floss.
- Store Properly: When not wearing it, keep your bracelet away from direct sunlight. This helps keep colors bright. You can store it in a jewelry box or a soft pouch.
- Trim Loose Ends: If small pieces of floss stick out, trim them carefully with scissors. Do not cut too close to the knots.
Common Snags and Fixes
It is normal for things to go wrong sometimes. Do not worry! Here are some common problems and how to fix them.
Knots Look Uneven
- Problem: Some knots are loose, others are tight. Your lines are wobbly.
- Fix: This often happens when you are new. Try to pull each knot with the same amount of force. It takes practice. Make sure you slide each knot firmly up to the knot above it. Do not leave gaps.
Floss Gets Tangled
- Problem: Your long strings get twisted and knotted on their own.
- Fix:
- Keep it Short: For very long strings, you can wind the extra floss into a small butterfly shape or around a small piece of cardboard.
- Hang it Down: If you are working on a table, let the unused strings hang off the edge. This helps keep them straight.
- Untangle Early: If you see a tangle forming, stop and untangle it right away. Do not pull it tighter.
Bracelet Is Too Short/Long
- Problem: You finish, but it does not fit your wrist.
- Fix:
- Measure First: Before you start, measure your wrist. Add about 1-2 inches (2.5-5 cm) for the closure.
- Test as You Go: Hold the bracelet around your wrist a few times as you work. This helps you see if it is long enough.
- Add Extra Length: If it is too short, you can add more floss to the ends and braid them for a longer tie. Or, add a chain extender to the closure.
Running Out of Floss
- Problem: One of your working strings runs out before you finish.
- Fix:
- Tie a Knot: Take the short string. Tie a small, tight knot at its end.
- Add New Floss: Take a new, long piece of floss of the same color. Tie its end to the knot you just made on the short string. Make another small, tight knot.
- Hide Ends: Trim the extra short ends very close to the knots. You can also put a tiny drop of clear craft glue on the knot for extra hold. Continue knotting. The new knot will get hidden inside your bracelet as you keep working.
More Embroidery Floss Projects
Embroidery floss is not just for bracelets. It is great for many other embroidery floss projects too!
- Keychains: Use the same knotting or braiding methods to make small keychains.
- Bookmarks: Create long, flat braided or knotted strips. Add a tassel or bead at one end.
- Hair Ties: Braid floss around elastic hair bands for colorful hair accessories.
- Pet Collars (Small Pets): Make thin, decorative collars for small pets. Make sure they are safe and comfortable.
- Zipper Pulls: Add a small braided piece to zippers on bags or jackets.
- Gift Tags: Make mini bracelets to use as special gift tags.
- Decorate Items: Wrap floss around plain pens, headbands, or even picture frames for a colorful touch.
Frequently Asked Questions (FAQ)
Q: How long do these bracelets last?
A: With good care, an embroidery floss bracelet can last for many months, even years. Avoid water and harsh chemicals to make it last longer.
Q: Can I use other types of string?
A: Yes, you can. Craft string, thin yarn, or even thin shoelaces can work. Embroidery floss is best because it is strong, smooth, and comes in many colors.
Q: Is it hard to learn the knots?
A: No, it is not hard. It just takes a little practice. Start with the forward knot. Once you get that, the others are easy to learn. Watch videos if you need a visual guide.
Q: What is the best way to cut the floss so it does not fray?
A: Use sharp scissors. When you are done, you can put a tiny drop of clear nail polish or craft glue on the very end of the string. Let it dry fully. This helps stop fraying.
Q: Can kids make these bracelets?
A: Yes! This is a great craft for kids. Simple patterns like the striped or spiral bracelet are good for younger children. It helps them with fine motor skills and following steps. Adult help might be needed for cutting long strings or tying starting knots.
Q: How do I make the bracelet bigger or smaller?
A: The length of the main knotted part is key. Measure your wrist. Add extra length for the closure. Using an adjustable sliding knot closure lets you change the size after it is made.
You are now ready to make your own easy handmade jewelry! With these textile bracelet instructions, you can create many beautiful custom thread bracelets. Grab your supplies and start knotting today. Enjoy your new hobby of making unique friendship bracelet patterns.