
Image Source: i.ytimg.com
Full Guide: How To Make Patches Embroidery Machine Fast
Do you want to know how to make patches with an embroidery machine? It’s a fun way to create custom designs for clothes, bags, or gifts. Making patches using an embroidery machine involves a few key steps: picking your materials, creating or getting your design ready, setting up your machine, stitching the design onto special fabric and stabilizer, and then finishing the patch by cutting it out and adding a backing like heat seal patch backing for iron on patch embroidery. This guide will walk you through the whole process.
Getting Started with Patch Making
Embroidery machine patch making lets you turn ideas into cool, wearable art. You can make just one patch or many copies quickly and accurately. This is great for personal use or starting a small business selling custom patch embroidery.
Using an embroidery machine makes things faster and more precise than doing it by hand. It opens up many design possibilities. Let’s look at what you need to begin this creative journey.
Essential Patch Making Materials
You need the right supplies to make nice patches. Having everything ready makes the job easier and faster.
Here are the key items:
- Embroidery Machine: You need a machine that can do embroidery. Make sure it works well.
- Patch Design Software: You need a program to make or change designs.
- Embroidery Patch Fabric: This is the material the design is sewn onto.
- Embroidery Stabilizer for Patches: This material goes behind the fabric. It keeps stitches smooth and prevents puckering.
- Embroidery Thread: Use good quality thread that will last.
- Embroidery Needles: Use needles made for embroidery machines.
- Bobbin Thread: This thread goes in the bobbin case.
- Sharp Scissors: You need these to trim fabric and threads.
- Backing Material: This goes on the back of the finished patch. Common types are heat seal patch backing, sew-on, or hook and loop.
- Temporary Adhesive Spray or Glue Stick: This helps hold things in place while hooping.
Knowing these patch making materials is the first step. They are the building blocks for your patches.
Choosing Your Patch Fabric
The fabric you use for your embroidery patches matters. It affects how the patch looks and feels.
Popular choices for embroidery patch fabric include:
- Twill: This is a strong, durable fabric. It has a diagonal weave pattern. Many official patches use twill. It’s easy to work with.
- Felt: Felt is soft and does not fray. This can make finishing easier. It comes in many colors.
- Polyester Blends: These fabrics are sturdy and hold stitches well. They come in various finishes.
Pick a fabric color that makes your thread colors stand out. Light fabrics are common, but dark fabrics can look great too with bright threads.
Selecting the Right Stabilizer
Embroidery stabilizer for patches is very important. It gives the fabric support during stitching. Without it, your design might pucker or stitches might not line up.
Different types of stabilizer work for different projects.
Here are common types:
- Cut-Away Stabilizer: You cut this away from the fabric after stitching. It gives lasting support. It’s good for detailed designs or stretchy fabrics.
- Tear-Away Stabilizer: You can tear this away easily after stitching. It’s good for stable fabrics and simpler designs.
- Wash-Away Stabilizer (Soluble): This dissolves in water. Use it on top of bumpy fabrics or for delicate items. Sometimes used as a topping on patches.
- Heat-Away Stabilizer: This melts away when you apply heat.
For most embroidery machine patch making, cut-away or tear-away stabilizers are best. You might use a topping too, especially for fabrics with pile like felt.
Creating Your Patch Design
Before you sew, you need a design. This is where your creativity shines!
Grasping Patch Design Software
Patch design software is the tool you use to make or change your designs. It lets you create the path your machine’s needle will follow.
Some popular software options include:
- Wilcom Hatch Embroidery
- Brother PE-Design
- EmbroideryWare
- Inkscape (with embroidery plugins)
- Specific software from your machine brand (like Janome, Bernina, etc.)
With this software, you can draw your own designs. You can also import images and turn them into stitches. This is key for custom patch embroidery.
Deciphering Digitizing Embroidery Patches
Digitizing embroidery patches is the process of turning artwork (like a drawing or logo) into a stitch file. This file tells your embroidery machine exactly where and how to stitch.
This step is critical for embroidery machine patch making. It involves:
- Choosing stitch types: (e.g., fill stitches for solid areas, satin stitches for outlines).
- Setting stitch direction: This affects how light reflects off the thread.
- Adding underlay stitches: These help stabilize the fabric and make the design stand out.
- Planning color changes: Deciding when the machine should stop for a new thread color.
- Creating a patch border: This is usually a satin stitch or merrowed edge simulated in the software.
Good digitizing makes a huge difference in the final patch quality. If you are new, you can buy ready-made patch designs or pay someone to digitize for you.
The output of digitizing is a design file in a format your specific embroidery machine understands (e.g., .DST, .PES, .JEF, .EXP).
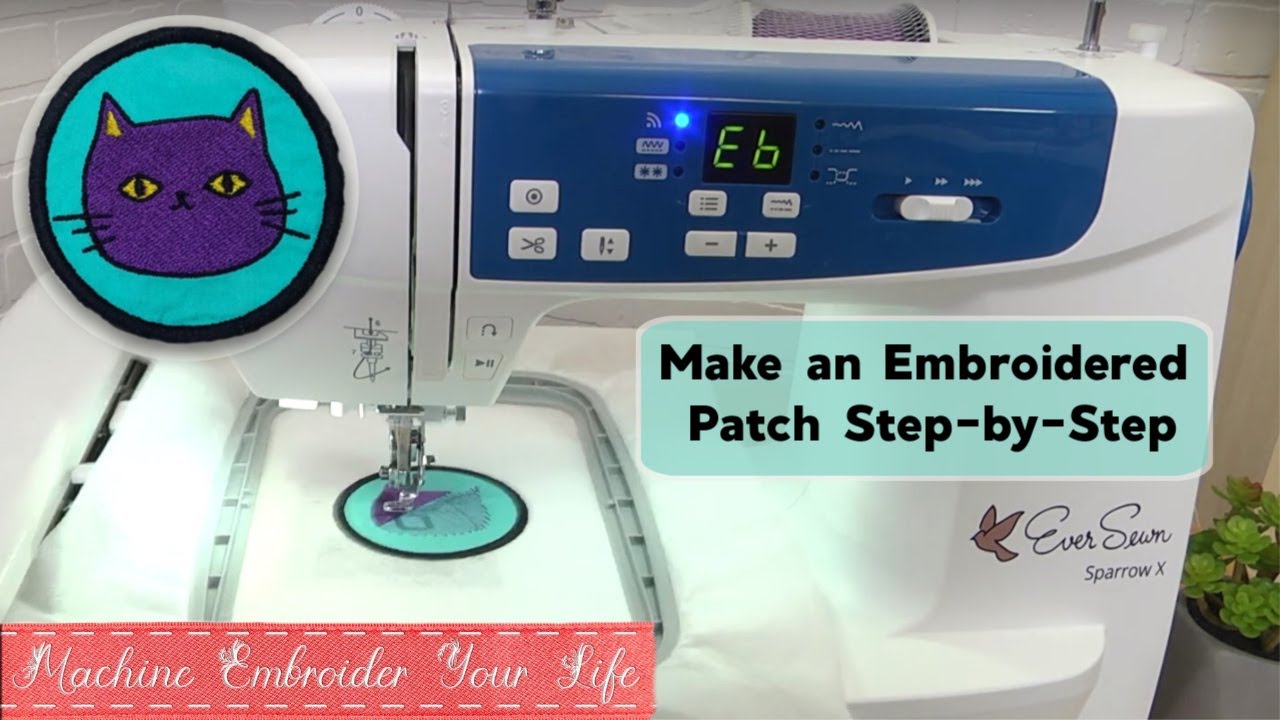
Setting Up Your Embroidery Machine
Proper setup is key to successful embroidery. This includes your machine and the fabric.
Embroidery Machine Settings for Patches
Your machine needs specific settings to stitch patches well. These settings might change based on your fabric, thread, and design.
Things to consider for embroidery machine settings for patches:
- Needle Type and Size: Use a sharp embroidery needle. Size 75/11 or 80/12 is common. For thick fabrics, you might need a larger needle.
- Thread Tension: Tension needs to be balanced. Too tight or too loose causes problems. Test on a scrap piece.
- Speed: Running the machine a bit slower can improve stitch quality, especially for detailed designs or difficult materials.
- Hoop Size: Choose a hoop that fits your design. Leave some space around the design area.
Always check your machine’s manual for recommended settings.
Hooping Your Fabric and Stabilizer
Hooping is putting the fabric and stabilizer into the embroidery hoop. This holds them tight like a drum skin. This tightness is important for preventing puckering.
Steps for hooping for patches:
- Cut your patch fabric bigger than your hoop.
- Cut your stabilizer bigger than your hoop. Use the right type (cut-away or tear-away).
- Some people spray a little temporary adhesive on the stabilizer. Then stick the fabric to the stabilizer.
- Place the outer hoop ring on a flat surface.
- Lay the fabric and stabilizer over the ring, centering your patch area.
- Push the inner hoop ring down into the outer ring.
- Pull the fabric and stabilizer gently from all sides. Make sure they are tight and smooth, with no wrinkles.
- Tighten the screw on the hoop. The material should feel like a drum head.
Hooping correctly takes practice. It’s a vital step for good embroidery machine patch making.
Running the Embroidery Process
Now your machine is ready, and your fabric is hooped. It’s time to stitch!
Loading the Design and Threading
First, get your digitized design file.
Steps:
- Load the design file into your embroidery machine. You might use a USB stick or a cable.
- The machine screen will show the design. Position it where you want it within the hooped area.
- Thread the top needle with the first color of thread the design needs.
- Make sure your bobbin has the correct bobbin thread.
Double-check that your machine is set up for the correct hoop size.
Stitching the Patch Design
Start the machine. It will begin sewing the design.
Here’s what happens:
- The machine moves the hoop.
- The needle goes up and down, forming stitches.
- Follow the design on the machine screen.
Stay near your machine while it’s running. Things can go wrong.
Monitoring and Managing Stitch-Out
Watch the machine as it sews.
Look for:
- Thread breaks: The machine might stop. Re-thread and continue.
- Tension problems: Stitches might look loops or loose. Stop and check tension.
- Puckering: If the fabric wrinkles, the hooping might not be tight enough.
- Skipped stitches: Could be a needle issue or tension.
The design will stitch layer by layer and color by color.
Handling Color Changes
The machine will stop when it needs a new color.
Steps:
- The machine stops.
- Cut the top thread.
- Thread the machine with the next color.
- Restart the machine.
The design file tells the machine when to change colors. If you want to make patches embroidery machine fast, proper digitizing and efficient thread changes help.
Finishing Your Embroidery Patch
The stitching is done! Now you need to turn the embroidered fabric into a finished patch.
Removing and Trimming the Patch
Take the hoop off the machine. Remove the fabric and stabilizer from the hoop.
Steps for finishing:
- Gently pull or cut the stabilizer away from the back of the embroidery. For cut-away, trim neatly close to the stitches. For tear-away, carefully tear it away.
- Remove any topping stabilizer from the front.
- Now, trim the patch. This is where you shape it. You can cut just outside the border stitches.
There are different ways to trim and finish the edge:
- Satin Stitch Border: The design is stitched with a thick satin stitch border. You trim very close to the edge of this stitch. This gives a clean, finished edge.
- Merrowed Border: This is a classic patch edge. It’s a thick, rolled stitch that goes over the trimmed edge. Some digitizing software can create a guide for this. For a real merrowed edge, you need a special machine or service, but the satin stitch simulates it well for embroidery machine patch making.
Cutting accurately is important for a good-looking patch. Sharp scissors are a must.
Applying Patch Backing
Adding backing makes the patch sturdy and ready to attach.
Common backing types:
- Sew-On: No special backing needed. Just sew the finished patch onto the item.
- Iron-On (Heat Seal Patch Backing): A special adhesive film is applied to the back. You use heat (an iron or heat press) to stick the patch onto fabric. This is popular for iron on patch embroidery.
- Hook and Loop (Velcro): One part of the material is sewn onto the back of the patch. The other part is sewn onto the item you want to put the patch on.
To apply heat seal patch backing:
- Cut a piece of heat seal film slightly smaller than your patch.
- Place the adhesive side of the film onto the back of the patch.
- Use a heat press or iron according to the backing material instructions. Heat melts the glue onto the patch fabric.
This makes your embroidery patches ready to be ironed onto jackets, bags, etc.
Tips for Making Patches Faster
If you plan to make many patches, speed matters. Here are ways to make patches embroidery machine fast.
- Batching Designs: If you need multiple copies of the same design, arrange them together in one large hoop. Your machine stitches them one after another without stopping between patches.
- Optimized Digitizing: A well-digitized file runs more smoothly and uses stitches efficiently. Fewer stops for trims mean faster stitching. Ask your digitizer for this, or learn to do it yourself in your patch design software.
- Proper Material Handling: Have your patch making materials organized. Cut fabric and stabilizer pieces ahead of time. Have threads ready for changes.
- Use Multi-Needle Machines: If you are serious about speed and volume, a multi-needle machine changes thread colors automatically. This saves a lot of time compared to single-needle machines.
- Maintain Your Machine: A clean, well-oiled machine runs faster and has fewer problems like thread breaks. Follow your machine’s care instructions.
- Use Pre-Made Patch Blanks: Some companies sell pre-cut fabric shapes with stabilizer already attached. This saves hooping time. You just hoop the blank and stitch.
Making iron on patch embroidery in batches with heat seal patch backing can speed up the whole process significantly.
Interpreting Common Issues
Sometimes things don’t go perfectly. Here are issues you might see during embroidery machine patch making and what they mean.
| Issue | What It Looks Like | Possible Cause | How to Fix |
|---|---|---|---|
| Puckering | Fabric wrinkles around the design. | Hooping too loose; Stabilizer too light; Design too dense. | Re-hoop tighter; Use stronger stabilizer; Adjust design or density in software. |
| Thread Breaks | Top thread snaps during stitching. | Needle is old or wrong type; Tension is too high; Machine needs cleaning; Poor thread quality. | Change needle; Check tension; Clean machine; Use better thread. |
| Skipped Stitches | Gaps in the stitching path. | Needle is bent or blunt; Machine timing is off; Threading issue. | Change needle; Get machine serviced; Re-thread carefully. |
| Bad Bobbin | Loops or knots on the back or front. | Bobbin tension is off; Bobbin wound poorly; Wrong bobbin type. | Check bobbin tension; Rewind bobbin; Use correct bobbin type for machine. |
| Registration Off | Different colors or parts of design don’t line up. | Fabric/stabilizer shifted in hoop; Hooping was loose; Digitizing issue. | Re-hoop carefully; Check stabilizer choice; Check design file in software. |
| Fraying Fabric | Edges of patch fabric unraveling. | Fabric choice; Not using cut-away stabilizer for edges. | Use less-fraying fabric (like twill); Ensure border stitches cover raw edges. |
Troubleshooting helps you learn. With practice, you can quickly figure out what is wrong and fix it. This is part of becoming good at embroidery machine patch making.
FAQ Section
Here are answers to some common questions about making embroidery patches.
Q: What is the best embroidery stabilizer for patches?
A: Cut-away stabilizer is often best for patches. It gives stable support during stitching and keeps the patch shape after you cut it out. For dense designs, you might need a heavier cut-away.
Q: Can I use regular fabric for embroidery patch fabric?
A: Yes, but choose stable fabrics that don’t stretch much and don’t fray easily. Twill and felt are popular because they work well. Thin or stretchy fabrics need more support from stabilizer.
Q: How do I apply heat seal patch backing?
A: Cut the heat seal film to fit the back of your patch (a bit smaller than the patch outline). Place the adhesive side on the back of the patch. Use a heat press or iron set to the recommended temperature (check the backing material’s instructions). Press firmly for the time suggested. This melts the glue onto the patch.
Q: Is digitizing embroidery patches hard?
A: Digitizing takes practice and skill. It’s more than just converting an image. You need to tell the machine how to stitch for the best result. Many people start by buying designs or using a digitizing service before learning to do it themselves.
Q: What embroidery machine settings for patches are most important?
A: Thread tension and needle choice are very important. Correct tension makes stitches look good and prevents problems. Using the right needle for your fabric and thread helps avoid thread breaks and skipped stitches. Speed can also affect quality; sometimes slower is better for patches.
Q: How do I make iron on patch embroidery stick well?
A: Use a good quality heat seal patch backing. Make sure your iron or heat press is at the correct temperature. Apply firm, even pressure for the recommended time. Also, make sure the item you are ironing onto can handle the heat.
Q: What patch making materials do I absolutely need?
A: You need an embroidery machine, design file, patch fabric, stabilizer, embroidery thread, needles, scissors, and some kind of backing material. These are the basics for embroidery machine patch making.
Q: How can I improve my custom patch embroidery?
A: Good digitizing is key. Also, use quality materials – good fabric, stabilizer, and thread. Practice your hooping technique. Test your machine settings on scrap fabric before making the real patch.
Final Thoughts
Making patches with an embroidery machine is a rewarding skill. It lets you make cool, personalized items. By picking the right patch making materials, learning about digitizing embroidery patches, setting up your machine correctly with the right embroidery machine settings for patches, and using heat seal patch backing for iron on patch embroidery, you can make great looking custom patch embroidery. With practice, you can even make them fast! Enjoy the process and the awesome patches you create.