
Image Source: images.squarespace-cdn.com
Expert Tips: How To Organise Sewing Room Efficiently
A tidy sewing room makes creating fun. When things are messy, finding what you need is hard. This can stop your creative flow. An organized space helps you work better. It saves time and reduces stress. Let’s look at simple ways to get your sewing room in shape. We will share expert tips. These tips will help you create a perfect space for sewing.
First Step: Clear Out Your Sewing Space
Before you organize, you need to clear out. This is called declutter sewing space. Take everything out. Look at what you have. Decide what to keep, toss, or give away.
Get Rid of Things You Don’t Need
Walk through your sewing room. Look at every item. Ask yourself:
* Do I use this?
* Did I use it in the last year?
* Will I use it soon?
* Is it broken?
* Do I have too many?
If you don’t need it, let it go. This makes room for what you use.
Sort Items into Groups
As you clear out, sort things. Put similar items together. Make piles for:
* Fabrics
* Threads
* Patterns
* Tools (scissors, rulers, pins)
* Notions (buttons, zippers, elastic)
* Works in progress
This step shows you how much of each thing you have. It helps you plan for storage.
Clean Your Empty Space
Once things are out, clean the room. Dust shelves. Sweep or vacuum the floor. A clean space is a fresh start. It feels good to work in a clean room.
Second Step: Plan Your Room Setup
Now you know what you have. Think about your small sewing room layout. Even a small space can work well. You need to think about how you sew.
Where You Work
Your workspace is important. Where is your sewing machine? Is there space to cut fabric? Think about how you move in the room. Place items where you need them most.
Setting Up Work Zones
Divide your room into zones.
* Cutting Zone: Needs a large flat surface.
* Sewing Zone: Needs space for your machine and tools.
* Storage Zone: Needs shelves, drawers, or boxes.
* Pressing Zone: Needs space for an iron and ironing board.
Place zones near each other if you can. For example, keep thread near your sewing machine. Keep cutting tools near your cutting table.
Map Out Your Layout
Draw a simple map of your room. Add furniture you have. Think about where things should go. Where should storage be? Where should your machine sit? Plan for flow. You want to move easily from one zone to the next. This is key for workspace organization sewing.
Third Step: Find Places for Your Things
Now for sewing room storage ideas. You need ways to store all your sorted items. Storage should be easy to use. You should see what you have.
Using Vertical Space
Think up, not just out. Walls are great for storage.
* Add shelves high up.
* Hang things on walls.
* Use tall storage units.
This saves floor space. It is good for a small sewing room layout.
Clear Containers Are Your Friend
Use clear bins and boxes. You can see what is inside. No need to open every box. Label bins too. This makes finding things super fast.
Use Drawer Dividers
Drawers can get messy quickly. Use dividers. Small boxes or trays work well. They keep small items separate.
Think About Mobility
Can you move your storage? Carts with wheels are great. You can roll supplies to your workspace. This helps with workspace organization sewing.
Organizing Your Fabric Collection
Fabric is a big part of sewing. Keeping it neat is important. This is how to organize fabric stash.
Sorting Your Fabrics
Sort fabrics by:
* Type (cotton, knit, linen)
* Color
* Size (scraps, yardage)
* Project
Sorting makes it easy to find the right fabric.
Storing Large Cuts
Fold large pieces neatly. Store them on shelves.
* Use fabric boards: Wrap fabric around thin cardboard. This makes neat bolts. Store these like books on shelves.
* Fold into rectangles: Fold fabric to fit your shelves or bins. Keep folds consistent.
Handling Scraps
Scraps can take over!
* Sort by size: Keep small scraps separate from larger ones.
* Store in bins: Use clear bins for different sizes or colors of scraps.
* Use plastic bags: For tiny scraps, small zip-top bags keep them contained. Group bags in a larger bin.
Seeing Your Fabric
You want to see what you have.
* Open shelves work well for fabric on boards.
* Clear bins let you peek inside.
* Keep colors together so you can find them fast.
Table: Fabric Storage Options
| Fabric Size | Best Storage Type | How It Works | Pros | Cons |
|---|---|---|---|---|
| Large Cuts | Shelves with Fabric Boards | Fabric wrapped around cardboard, stored upright | Neat, easy to browse | Takes time to wrap |
| Large Cuts | Folded on Shelves or in Bins | Fabric folded into same-sized rectangles | Simple, quick | Can look messy if not folded well |
| Scraps | Clear Bins | Sorted by size or color in see-through bins | Easy to see contents, contained | Can get jumbled |
| Tiny Scraps | Small Bags in Larger Bins | Small pieces in small bags inside a bigger bin | Keeps tiny pieces together | Might forget what is in the bags |
| Any Size | Drawers (less common for large) | Folded fabric in drawers | Keeps dust off | Harder to see everything at once |
Putting Sewing Notions in Order
Sewing notions are the small bits. Buttons, zippers, elastic, ribbon, interfacing, etc. Sewing notions organization keeps these little things from getting lost.
Sort Your Notions
Group notions by type:
* Buttons
* Zippers
* Elastic and trim
* Interfacing and batting
* Ribbon and lace
* Snaps, hooks, eyes
Small Containers for Small Things
Little items need little homes.
* Divided boxes: Tackle boxes, craft organizers, or jewelry organizers work well for buttons, snaps, and hooks.
* Small jars or tins: Good for pins, needles, safety pins.
* Zip-top bags: Put related items together in small bags. Store bags in a bin.
Storing Trims and Ribbons
Ribbon and trim can tangle.
* Ribbon spools: Keep ribbon on its spool. Store spools on rods, in drawers, or in bins.
* Plastic bags: Wrap small cuts around card. Put card and trim in a small bag.
* Clear bins: Group similar trims in clear containers.
Interfacing and Batting
These are often large or bulky.
* Roll batting and secure with a tie. Stand rolls in a tall bin or basket.
* Fold interfacing neatly. Store on a shelf or in a drawer.
* Use garment bags to hang fusible interfacing on a rod.
Keep Notions Handy
Store notions near where you use them. Buttons and zippers near your sewing machine area. Interfacing near your cutting table.
Table: Sewing Notions Storage Ideas
| Notion Type | Best Storage Type | How It Works | Pros | Cons |
|---|---|---|---|---|
| Buttons, Snaps, Hooks | Divided Boxes | Small compartments keep types separate | Very organized, easy to see | Limited space per compartment |
| Pins, Needles | Magnetic Pin Cushions, Small Jars | Keeps sharps safe and together | Safe, easy to grab | Small capacity |
| Elastic, Trim, Ribbon | Spools on Rods, Clear Bins, Card Wraps | Spools held on a rod, or trims grouped in bins | Keeps from tangling, easy to see options | Can require specific storage rods |
| Interfacing, Batting | Rolled/Folded in Bins, Hanging Bags | Bulky items contained vertically or folded neat | Saves space, keeps clean | Can be hard to find specific type if stacked |
| Zippers | Small Bins, Hang on Hooks | Grouped by size or color, or hung up | Easy to see sizes, prevents kinking | Can take up hook space |
Simple Ways to Store Thread
Thread is needed for every project. Good thread storage solutions keep thread neat and easy to find.
Sort Your Threads
Sort threads by:
* Color
* Type (all-purpose, serger, embroidery)
* Brand
Keep Spools Tidy
Thread spools roll away easily.
* Thread racks: Wooden or plastic racks hold spools upright. Can sit on a table or hang on a wall. Shows colors clearly.
* Thread boxes: Plastic boxes with dividers. Spools sit in their own spot. Keeps dust off. Good for drawers or shelves.
* Foam inserts: Foam with holes fits in drawers. Spools push into holes. Keeps them from rolling.
Bobbin Storage
Bobbins are smaller. They need separate storage.
* Bobbin boxes: Small plastic cases with dividers. Keep bobbins sorted by color or type.
* Bobbin rings/holders: Rings or clips that hold multiple bobbins. Keep matching bobbin with spool.
* Drawer inserts: Small compartments in drawers.
See Your Thread Colors
Storage should let you see colors fast.
* Wall racks make colors visible at a glance.
* Clear boxes show colors without opening.
* Arranging by color helps you find the right shade quickly.
Table: Thread Storage Solutions
| Thread Type | Best Storage Type | How It Works | Pros | Cons |
|---|---|---|---|---|
| Spools (all sizes) | Wall-mounted Racks | Spools sit on pegs on the wall | Easy to see all colors, saves table space | Needs wall space |
| Spools (all sizes) | Thread Storage Boxes (Plastic with Dividers) | Spools placed in individual slots in a box | Keeps dust off, portable | Must open box to see all colors |
| Spools (all sizes) | Drawer Inserts (Foam, Plastic) | Inserts fit in drawers, spools fit in holes | Keeps drawers neat | Less visible than wall rack |
| Bobbins | Bobbin Boxes (Small Plastic with Dividers) | Small cases with slots for bobbins | Keeps bobbins together, portable | Easy to misplace the small box |
| Bobbins | Bobbin Rings/Holders | Rings or clips hold multiple bobbins | Keeps bobbins with spools | Can make spools bulkier |
Organizing Your Patterns
Sewing patterns can pile up. Good sewing pattern storage keeps them neat and easy to find.
Sort Your Patterns
Sort patterns by:
* Type (dresses, tops, pants, crafts)
* Designer/Brand
* Number (if you like)
* Size range
Storing Pattern Envelopes
Most patterns come in envelopes.
* Filing cabinet: A standard filing cabinet is great. Use hanging files. Label files by type or category.
* Magazine holders: Cardboard or plastic holders. Stand patterns upright like magazines. Store on shelves.
* Binders: Put pattern envelopes in plastic sleeves. Store sleeves in binders. Good for smaller pattern collections.
* Plastic bins: Stand patterns upright in bins on shelves. Use dividers if needed.
Handling Traced or Cut Patterns
If you trace or cut patterns, they might not fit back in the envelope easily.
* Fold pattern pieces neatly.
* Put pieces and envelope in a large plastic zip bag or a larger envelope.
* Store these with your other patterns. Note on the outside that pieces are inside.
Keep Patterns Organized
Label everything clearly.
* Label file folders.
* Label magazine holders or bins.
* Write notes on pattern envelopes (e.g., “used for blue dress”).
Table: Sewing Pattern Storage Ideas
| Pattern Type | Best Storage Type | How It Works | Pros | Cons |
|---|---|---|---|---|
| Envelope Patterns | Filing Cabinet (Hanging Files) | Patterns sorted in labeled hanging folders | Very organized, easy to add/remove files | Takes up floor space |
| Envelope Patterns | Magazine Holders on Shelves | Patterns stand upright like magazines | Visually accessible, uses shelf space | Can get crowded if too many patterns |
| Envelope Patterns | Binders with Plastic Sleeves | Patterns in clear sleeves in 3-ring binders | Protects patterns, good for smaller sets | Sleeves can be bulky |
| Envelope Patterns | Plastic Bins (Upright) | Patterns stood on edge in bins on shelves | Flexible, uses existing shelves | Patterns can lean or fall over without support |
| Traced/Cut Patterns | Large Zip Bags or Envelopes (in files) | Pieces stored with envelope in a larger container | Keeps all parts together | Can be bulky in files |
Organizing Sewing Tools
Sewing tools are scissors, rulers, marking pens, etc. Workspace organization sewing includes keeping tools handy.
Sort Your Tools
Group tools by type and use:
* Cutting (scissors, rotary cutters, mats)
* Marking (chalk, pens)
* Measuring (rulers, tape measures)
* Hand Sewing (needles, thimbles)
* Pressing (iron, press cloth – though these stay near iron)
Store Tools Where You Use Them
Keep tools near the related zone.
* Cutting tools near the cutting table.
* Small tools (snips, seam ripper) near the sewing machine.
* Hand sewing items near where you sit to hand sew.
Use Containers for Tools
Containers keep tools from rolling away.
* Tool caddies/jars: Hold pens, rulers, small scissors upright. Keep on your workspace.
* Drawer inserts: Dividers keep tools neat in drawers.
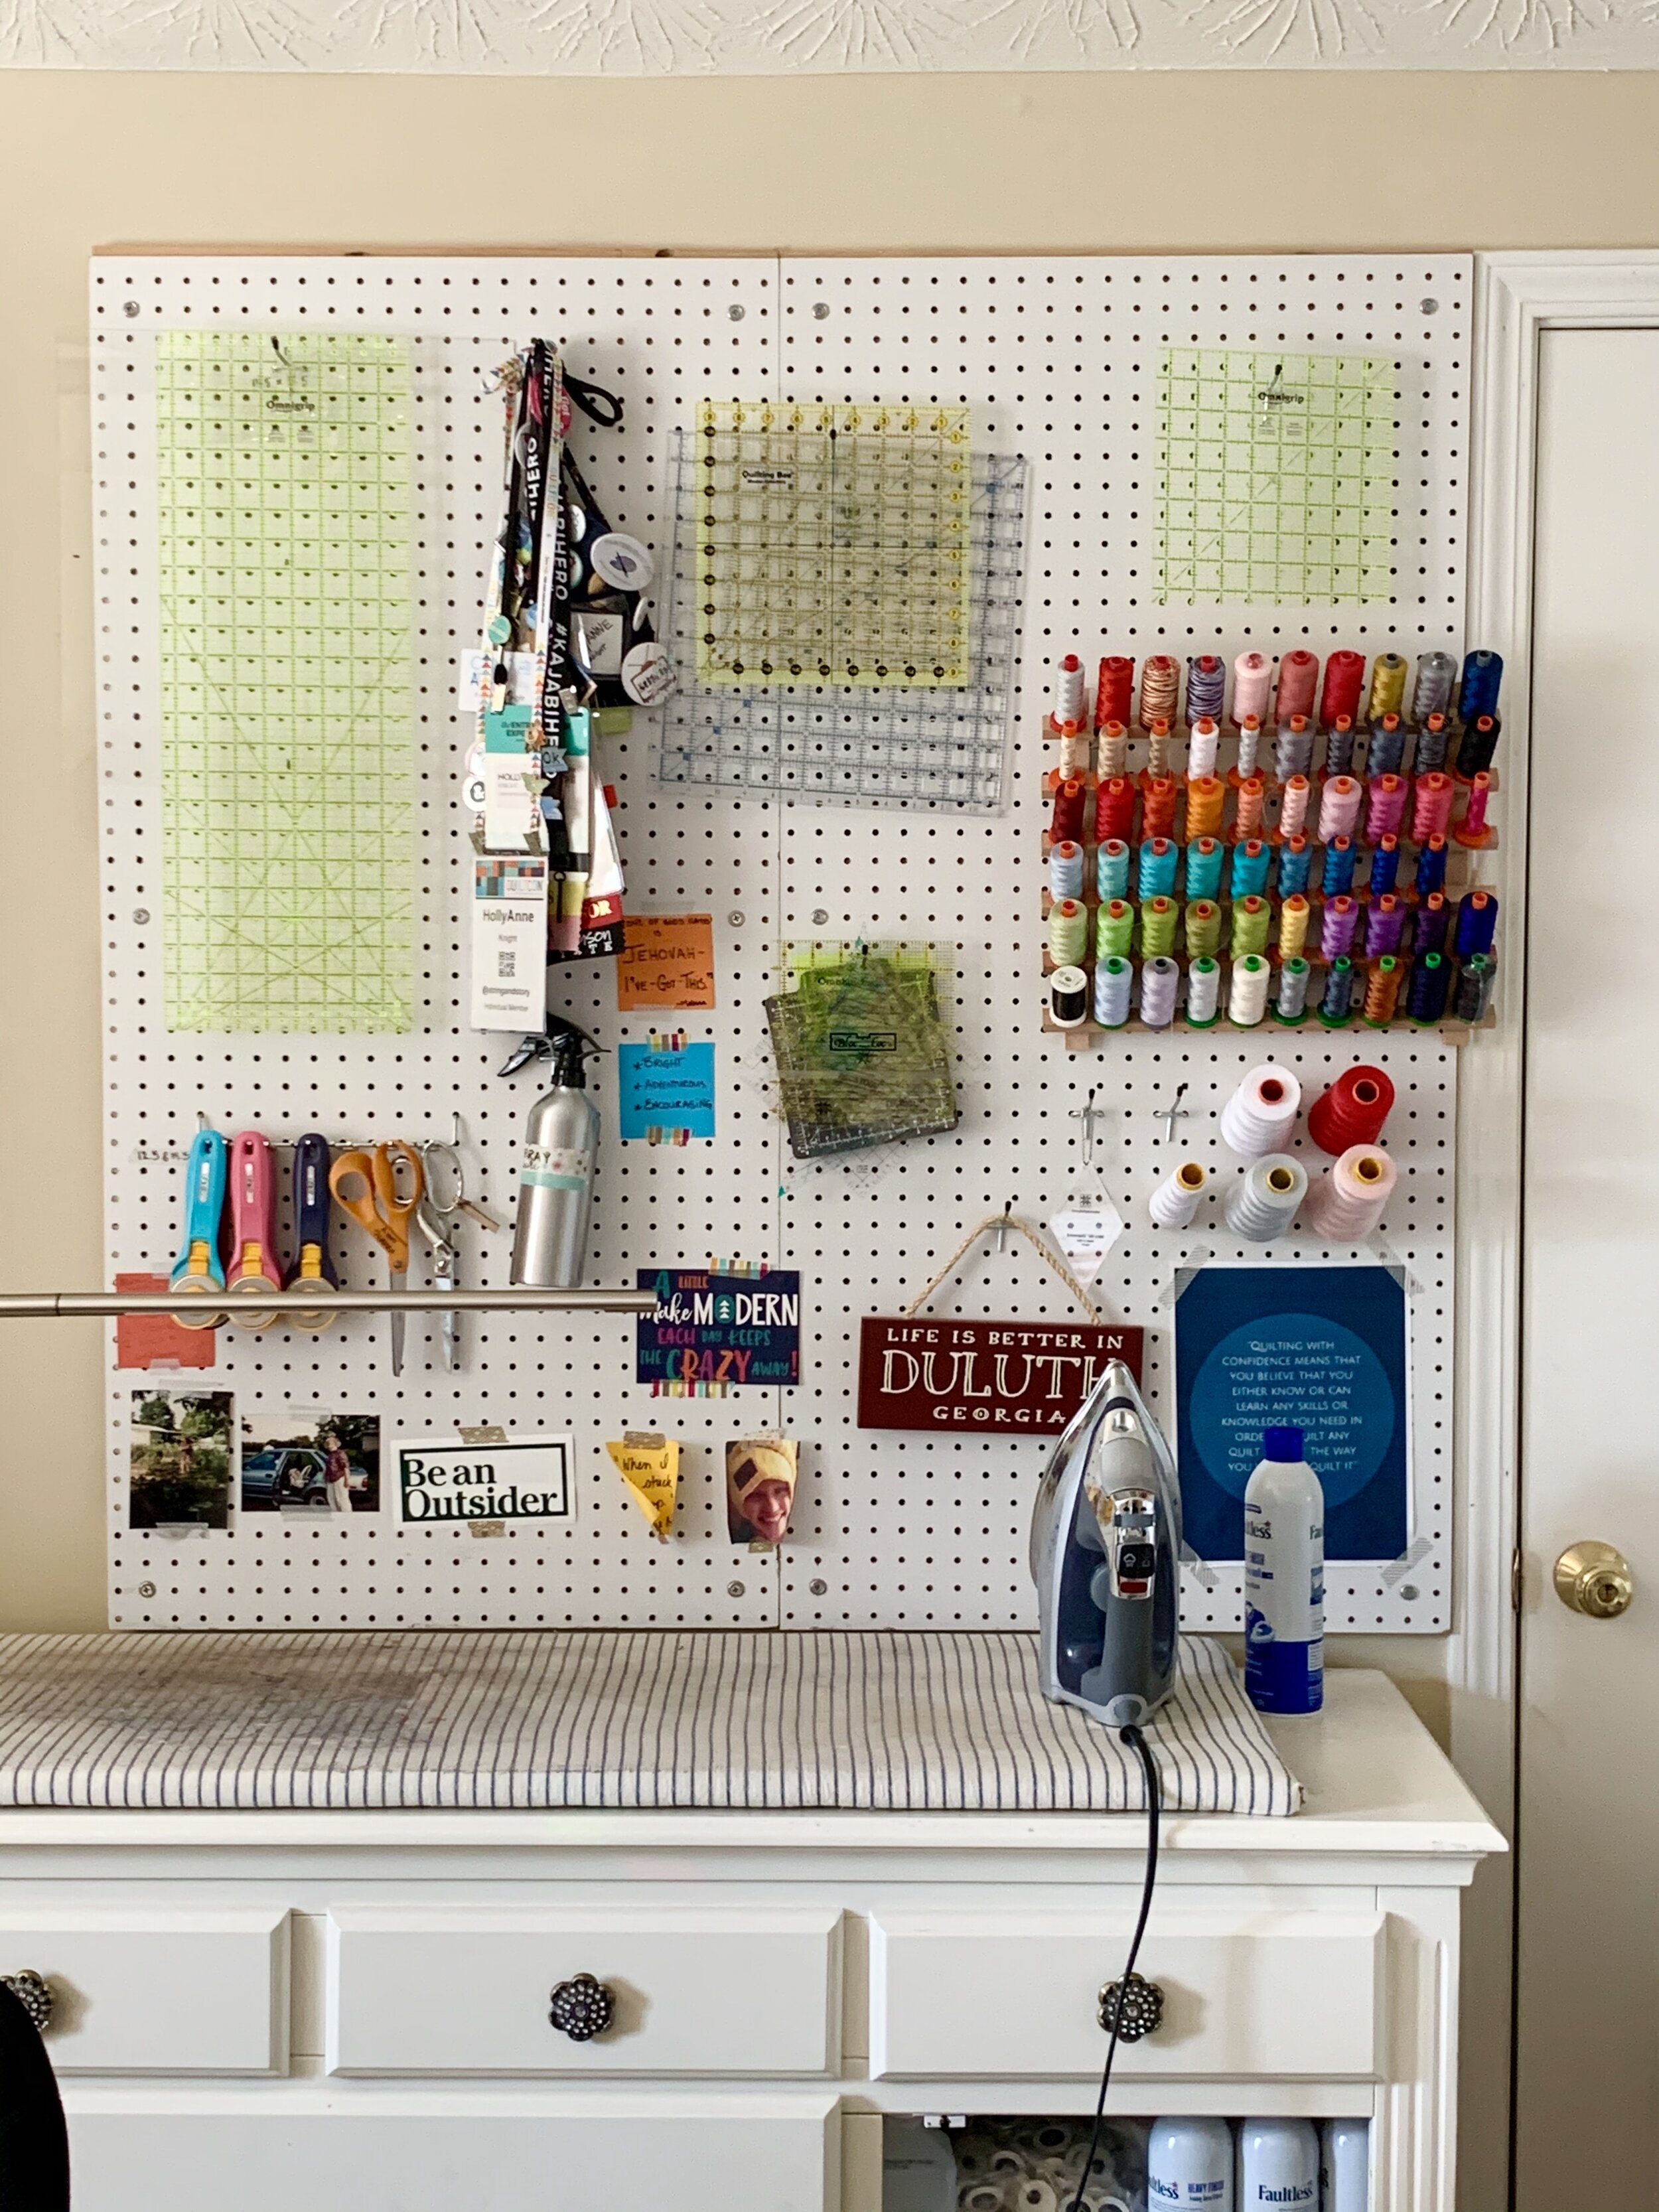
* Pegboards: Hang tools on a wall using hooks. Easy to see and grab.
* Magnetic strips: Good for metal items like scissors, pins, seam rippers. Mount on wall or cabinet.
Protect Your Tools
Scissors and rotary cutters need care. Store them safely.
* Keep sharp blades covered.
* Store scissors upright in a jar or holder.
* Hang rotary cutters on a pegboard or magnetic strip.
Table: Sewing Tool Storage
| Tool Type | Best Storage Type | How It Works | Pros | Cons |
|---|---|---|---|---|
| Scissors, Rulers | Jars, Tool Caddies, Pegboard | Stand upright in containers, or hang on hooks | Handy, easy to grab | Can take up desk space (jars/caddies) |
| Small Tools | Drawer Inserts, Magnetic Strips, Small Cups | Kept separate in drawers, or stick to magnetic bar | Neat drawers, tools stay put | Limited space in inserts |
| Marking Tools | Jars, Cups, Drawer Inserts | Stand upright or lie flat in compartments | Easy to see colors/types | Caps can come off in messy drawers |
| Rotary Cutters | Pegboard, Magnetic Strip, Dedicated Holders | Hang or stick to metal, or sit in safe holder | Blades protected, easy access | Requires pegboard or magnetic space |
| Hand Sewing Needles | Needle Books, Small Cases, Pin Cushions with Lid | Kept in protective cases or safe pin cushions | Prevents loss, protects points | Easy to misplace small cases |
Setting Up Your Sewing Machine Area
Your sewing machine is the heart of your room. Sewing machine setup should be comfortable and efficient.
Choose the Right Table
Your machine needs a stable table.
* The table should be at a good height. Your elbows should be at a comfy angle.
* There should be enough space around the machine. Space for fabric to move.
* Look for tables with built-in storage or nearby drawers.
Lighting is Key
Good light helps you see your stitches.
* Place your table near a window if possible. Use natural light.
* Add a task lamp. A lamp that points light right at your needle.
* Overhead room light is also needed.
Keep Essentials Close By
What do you need while sewing?
* Thread snips
* Seam ripper
* Extra bobbins
* Pins and pin cushion
* Small ruler or gauge
* A small trash bin for thread bits
Store these right next to your machine. On the table, in a nearby drawer, or in a tool caddy. This is key for workspace organization sewing.
Power Access
Make sure you have outlets nearby. Use a power strip if needed. Keep cords tidy and safe.
Machine Manual
Keep your sewing machine manual handy. Store it in a drawer near the machine. Or in a binder on a shelf.
Keeping Your Craft Room Tidy
Organization is not a one-time job. It needs to be kept up. These are craft room organization tips for staying tidy.
Clean Up As You Go
The best tip: Clean up after each step.
* Finish cutting? Put scissors away. Put fabric scraps in the scrap bin.
* Finish sewing? Put thread away. Put snips back in the caddy.
* Finish pressing? Put iron away safely.
This takes a few seconds. It stops mess from building up.
Have a “Putting Away” Routine
At the end of a sewing session, take 5-10 minutes.
* Put all tools back in their spots.
* Fold any fabric left out.
* Clear your cutting table.
* Sweep or vacuum any threads or fabric dust.
Doing this regularly keeps the room usable.
A “Work in Progress” Spot
Have one spot for current projects. A bin, a shelf, or a project bag. Put everything for that project there. Fabric, pattern, notions, instructions. This keeps projects from spreading out everywhere.
Label Everything
If you use containers, label them. Even if you think you will remember what’s inside. Labels save time later. Use simple labels: “Cotton Prints”, “Buttons – White”, “Project: Blue Skirt”.
Review Your Space Often
Every few months, look at your space. Does the current layout work? Are your storage systems still good? Do you need to declutter again? Adjust your system as needed. Your sewing habits might change.
More Sewing Room Storage Ideas
Let’s look at more ideas for sewing room storage ideas.
Using Walls Effectively
Walls offer lots of storage chances.
* Pegboards: Put hooks, shelves, and cups on a pegboard. Store tools, rulers, small notions, or thread racks.
* Floating shelves: Simple shelves hold fabric, patterns, or bins.
* Wall-mounted cabinets: Keep supplies dust-free and out of sight.
Smart Furniture Choices
Choose furniture that works hard.
* Cutting table with storage: Many cutting tables have drawers or shelves underneath.
* Storage ottomans: An ottoman can be seating and storage. Store batting or large scraps inside.
* Rolling carts: As mentioned, carts bring supplies to you. Look for carts with different sized drawers or shelves.
* Repurposed furniture: Old dressers, bookshelves, or kitchen cabinets can be great for sewing storage. Paint them to match your room.
Using Doors
The back of a door is often wasted space.
* Hang an over-the-door shoe organizer. Use pockets for notions, thread, or small tools.
* Add hooks for hanging rulers or cutting mats.
* Attach wire baskets for fabric scraps or current projects.
Specialty Storage Items
Companies make storage just for crafters.
* Thread storage units.
* Pattern filing boxes.
* Drawer units for specific items.
* Bolt organizers for fabric.
These can be helpful but check if they fit your needs and space.
Table: Additional Storage Ideas
| Area Used | Storage Type | What it Stores | Pros | Cons |
|---|---|---|---|---|
| Walls | Pegboard | Tools, Rulers, Thread Racks, Small Notions | Very flexible, uses vertical space | Can look cluttered if not well-organized |
| Walls | Floating Shelves | Fabric, Patterns, Bins | Looks clean, uses vertical space | Need to install, weight limits |
| Walls | Wall-mounted Cabinets | Any supplies | Keeps dust off, hides clutter | Need to install, less visible contents |
| Furniture | Cutting Table w/ Storage | Fabric, Patterns, Tools, Notions | Combines workspace and storage | Can be expensive, takes up floor space |
| Furniture | Rolling Carts | Supplies for current project, notions, thread | Mobile, brings items to your spot | Can become messy quickly if not maintained |
| Furniture | Repurposed Dresser/Bookshelf | Fabric, Notions, Tools, Patterns | Can be affordable, fits existing decor | May need modification or cleaning |
| Doors | Over-the-Door Organizer (Pockets) | Small Notions, Thread, Small Tools | Uses often wasted space | Can make door heavier, items can fall out |
| Doors | Hooks, Baskets | Rulers, Cutting Mats, Fabric Scraps, Projects | Uses often wasted space | Items visible from outside the room |
| Specialty Items | Dedicated Organizers | Specific items like thread, patterns, bobbins | Designed for purpose, fits item perfectly | Can be expensive, only stores one type |
Final Thoughts on Organizing Your Sewing Room
Organizing your sewing room is a process. It might take time. Start with one area. Maybe your fabric stash or your notions. Don’t try to do it all at once.
A well-organized space helps you sew more. It reduces stress. It helps you find things easily. You will know what you have. This saves money too! You won’t buy thread or fabric you already own because you couldn’t find it.
Use these tips. Make your sewing space work for you. Enjoy your crafting more in a tidy, happy room.
Frequently Asked Questions
What is the first step to organizing my sewing room?
The very first step is to declutter. Go through everything you own. Decide what you truly need, use, and want to keep. Get rid of the rest. This gives you a clear picture of what you need to organize.
How do I organize a lot of fabric in a small space?
For a small space, use vertical storage. Shelves on walls work well. Fold fabric neatly and stand it upright on shelves. Using fabric boards (cardboard inserts) helps keep bolts neat and saves space. Clear bins also help you see what you have.
What is the best way to store small sewing notions like buttons and pins?
Small notions are best stored in small containers with dividers. Craft organizers with many compartments are perfect. Small jars or tins work for pins and needles. Magnetic pin cushions keep pins safe and handy near your machine.
How can I keep my thread from getting tangled?
Store thread spools on a thread rack (wall-mounted or tabletop) or in plastic storage boxes with pegs or foam inserts. These methods keep each spool separate. For bobbins, use bobbin boxes or bobbin rings to keep the thread neat.
I have too many sewing patterns. How can I store them?
Sort patterns by type. Use a filing cabinet with hanging files to store patterns in their envelopes. You can also use magazine holders on shelves, or put patterns in plastic sleeves in binders. For traced patterns, store them in larger envelopes or zip bags.
What is a good way to organize my sewing tools like scissors and rulers?
Keep tools near where you use them. Store scissors and rulers in jars or tool caddies on your workspace. Use drawer dividers for smaller tools. Pegboards or magnetic strips on the wall are also great for keeping tools visible and within reach.
How can I make my sewing machine area more efficient?
Ensure your sewing machine table is stable and at a comfortable height. Have good lighting. Keep essential tools like snips, a seam ripper, and pins right next to the machine. Make sure you have easy access to power outlets.
What are some tips for keeping my sewing room organized after I clean it?
Clean up as you go while you sew. Have a routine at the end of each sewing session to put things away (5-10 minutes). Designate a single spot for your current projects. Label all your storage containers so you know what is inside without searching. Review your system regularly.