
What is the correct way to put a sewing machine needle in? The correct way to put a sewing machine needle in is to insert the flat side of the needle towards the back of the machine, with the groove facing forward.
Welcome, budding seamstresses and tailors! Today, we’re tackling a fundamental skill that’s essential for any sewing adventure: how to put a needle in a sewing machine. It might seem simple, but getting it right ensures smooth stitching, prevents skipped stitches, and protects your machine. This guide will walk you through the entire process, from choosing the right needle to the final tightening.
Sewing is a wonderful craft, and the sewing machine is your trusty companion. However, like any tool, it needs the right parts to function optimally. A dull, bent, or incorrectly inserted needle can lead to frustration and poor results. So, let’s demystify the process of sewing machine needle replacement and make sure you’re always set up for success.
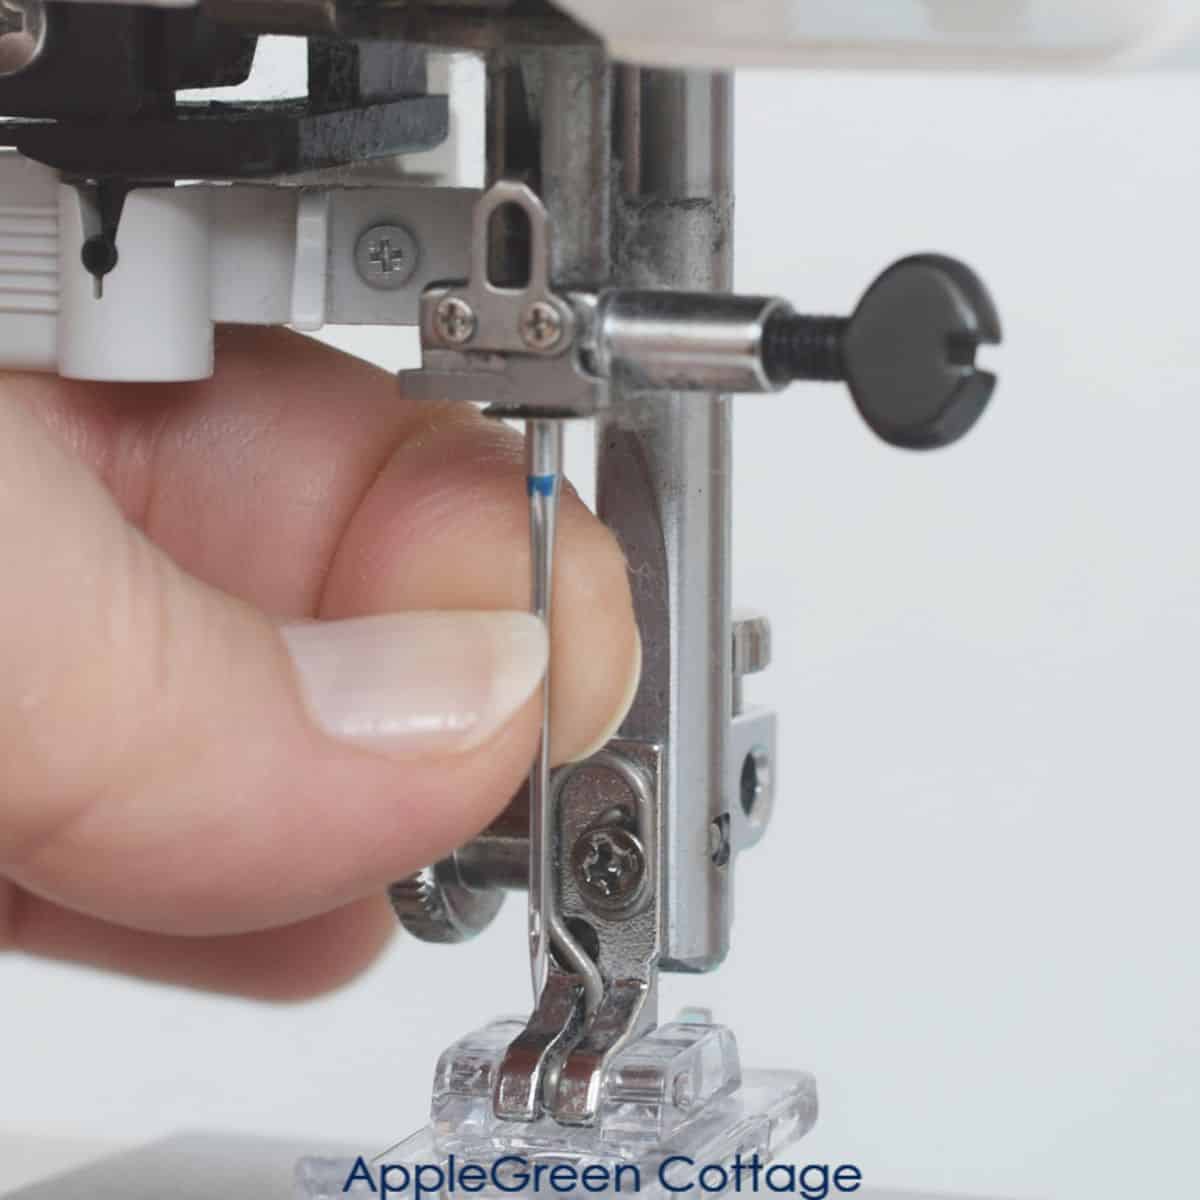
Image Source: www.applegreencottage.com
Why Proper Needle Insertion Matters
Before we dive into the “how,” let’s touch on the “why.” Placing the needle correctly is crucial for several reasons:
- Stitch Formation: The needle works in conjunction with the bobbin and thread to create stitches. The groove on the needle helps guide the upper thread, allowing the bobbin thread to loop around it and form a secure stitch. If the needle is backward, this process is disrupted, leading to messy or incomplete stitches.
- Preventing Machine Damage: An improperly inserted needle can cause damage to your machine’s internal mechanisms, including the bobbin case, hook assembly, and even the needle plate. A bent needle or one inserted backward can hit these parts, causing bending or breakage.
- Thread Quality: The needle’s eye and groove are designed to accommodate the thread’s passage. When the needle is correctly positioned, the thread flows smoothly, reducing the chance of fraying or breaking.
- Fabric Integrity: The needle pierces the fabric. The correct needle type and insertion ensure it pierces cleanly without snagging or tearing the material.
When to Replace Your Sewing Machine Needle
You might be wondering, “When is it time for changing a sewing machine needle?” Needles are consumables, meaning they wear out with use. Here are signs it’s time for a fresh needle:
- You’re getting skipped stitches: If your stitches are inconsistent, with gaps where thread should be, your needle is likely dull.
- The thread is fraying or breaking: A damaged or dull needle can snag and break your thread.
- Your machine is making unusual noises: A bent or dull needle can cause your machine to sound rough or strained.
- The stitches look messy or uneven: This could indicate a dull or bent needle, or one that’s not the right type for your fabric.
- You’ve hit a pin: Even if you don’t hear or feel it, hitting a sewing pin with your needle can bend or damage it. Always remove pins before sewing over them.
- After a set number of hours or projects: Most manufacturers recommend changing your needle after every 6-10 hours of sewing, or after completing a large project. Think of it like changing the blade on a razor – a fresh one works best!
Choosing the Right Sewing Machine Needle
Before we talk about inserting sewing needle into your machine, it’s important to note that not all needles are created equal. There are various sewing machine needle types, each designed for specific fabrics and threads. Using the wrong needle is as problematic as inserting it incorrectly.
Here’s a quick rundown of common needle types:
| Needle Type | Best For | Key Characteristics |
|---|---|---|
| Universal | Cotton, linen, polyester, blends, knits, and woven fabrics. A good all-rounder for general sewing. | A medium-sharp point and a slightly larger eye. |
| Ballpoint/Jersey | Knits, stretchy fabrics, jersey, lycra, spandex, activewear. | Rounded tip that pushes the fabric fibers aside instead of piercing them, preventing runs and holes in stretchy materials. |
| Sharps/Microtex | Tightly woven fabrics, microfiber, silk, synthetic leather, faux leather, and delicate fabrics where a clean piercing is essential. | Very sharp, fine point for precise piercing. |
| Denim/Jeans | Denim, canvas, twill, other heavy or tough fabrics. | Stronger shaft and a sharper point to penetrate dense weaves without breaking. |
| Leather | Leather, vinyl, suede, faux leather. | A chisel-shaped point that cuts through the leather fibers, creating a clean hole. Caution: Can leave visible marks on some leathers. |
| Embroidery | Embroidery, decorative stitching, and with metallic or textured threads. | Larger eye to prevent fraying of thicker or textured threads, and a larger groove to protect the thread. Sometimes has a scarf to help prevent skipped stitches. |
| Quilting | Quilting cottons, piecing, appliqué, and navigating multiple fabric layers. | Slightly sharper point than universal needles, with a longer “collar” to prevent skipped stitches when sewing through multiple layers. |
| Topstitch | Decorative topstitching, thicker threads, machine embroidery. | A very large eye and a long scarf to accommodate thicker threads and reduce friction, preventing thread shredding. |
Needle Size for Fabric
The needle size for fabric is indicated by a number. Generally, lower numbers mean a finer (thinner) needle, and higher numbers mean a thicker needle.
- Fine fabrics (silk, chiffon, organza): Use finer needles, like 60/8, 65/9, or 70/10.
- Medium-weight fabrics (cotton, linen, quilting cotton): Use universal needles in sizes 70/10, 80/12, or 90/14.
- Heavy fabrics (denim, canvas, upholstery): Use thicker needles like 90/14, 100/16, or even 110/18, often specific denim or leather needles.
When in doubt, check your sewing machine manual or fabric manufacturer’s recommendations.
How to Put a Needle in a Sewing Machine: A Step-by-Step Guide
Now, let’s get to the core of our topic: how to put a needle in sewing machine. This process is generally the same across most modern sewing machines, but always refer to your machine’s manual for specific instructions.
Step 1: Prepare Your Machine and Workspace
- Turn Off Your Machine: Safety first! Make sure your sewing machine is unplugged or switched off at the power button. This prevents accidental starts while you’re working.
- Lower the Presser Foot: Lower the presser foot by bringing down the presser foot lever. This will hold the needle bar steady, making it easier to work with.
- Remove the Old Needle (If Applicable): If you are changing a sewing machine needle, you’ll need to remove the old one first.
Step 2: Loosen the Needle Clamp Screw
- Locate the Needle Clamp: The needle clamp is a small metal piece that holds the needle in place. It’s usually located at the bottom of the needle bar, the part that moves up and down.
- Identify the Screw: You’ll see a screw on the side or front of the needle clamp. This is what secures the needle.
- Loosen the Screw: Use a small Phillips head screwdriver or the tool that came with your sewing machine to loosen this screw. You don’t need to remove it completely, just loosen it enough so that the needle can slide out.
Step 3: Remove the Old Needle
- Hold the Needle: Gently grasp the old needle between your fingers.
- Slide it Down: Pull the needle straight down out of the needle clamp. If it feels stuck, ensure the screw is loosened sufficiently. Sometimes, if the needle is bent, you might need to jiggle it gently. Be careful not to force it.
Step 4: Prepare the New Needle
- Unpack the New Needle: Carefully take your new, chosen sewing machine needle out of its packaging. Be mindful of the sharp point.
- Check the Needle: Before inserting, give the needle a quick look. Ensure it’s not bent or damaged. If it looks off, use a different needle.
Step 5: Insert the New Needle
This is the most critical step for correct needle insertion.
- Identify the Flat Side: Look at the top of your new sewing machine needle. You’ll notice that one side is rounded, and the other is flat. The flat side should always face the back of the sewing machine.
- Orient the Needle: With the flat side facing the back, hold the needle with your fingers.
- Insert into the Needle Clamp: Gently push the needle upwards into the needle clamp. You should feel it seat firmly into the opening. The rounded side will be facing forward, and the flat side will be against the back of the clamp. The groove on the needle should be facing forward, usually to the left side of the machine (this can vary slightly, but the flat side to the back is universal).
- Seat it Fully: Push the needle up as far as it will go. Most machines have a stop point that indicates it’s fully inserted.
Step 6: Tighten the Needle Clamp Screw
- Secure the Needle: Once the needle is pushed all the way up, use your screwdriver to tighten the needle clamp screw.
- Tighten Firmly: Tighten it firmly, but do not overtighten, as this could strip the screw threads or damage the clamp. The needle should feel secure and not wobble.
Step 7: Final Checks
- Lower the Presser Foot: Lower the presser foot lever again.
- Manually Turn the Handwheel: Slowly turn the handwheel towards you (usually counter-clockwise) a few times to bring the needle down and then back up. Watch as the needle passes through the needle plate opening. It should move smoothly without hitting anything.
- Check for Wobble: Gently try to wiggle the needle. It should be perfectly still. If it wobbles, it’s not inserted correctly or the screw isn’t tight enough.
Common Mistakes to Avoid When Changing Needles
Even with clear instructions, mistakes can happen. Here are some common pitfalls to steer clear of during the sewing machine needle replacement process:
- Forcing the Needle: If the needle doesn’t slide in easily, don’t force it. Check that the screw is loose enough and that you have the correct orientation.
- Incorrect Needle Orientation: This is the most frequent error. Always remember: flat side to the back.
- Using the Wrong Needle Type or Size: As discussed earlier, using a denim needle on silk or a tiny needle on canvas will cause problems.
- Not Tightening the Screw Enough: A loose needle will wobble and can cause skipped stitches or damage.
- Overtightening the Screw: This can strip the threads in the needle clamp or the screw itself, making future changes difficult.
- Forgetting to Lower the Presser Foot: While not a direct error in needle insertion, it makes the process more awkward and increases the risk of the needle not seating properly.
- Not Checking the Needle: Inserting a needle that is already bent or damaged is pointless. Always inspect your new needle.
Understanding the Needle Bar and Needle Clamp
To further assist you in changing a sewing machine needle, it’s helpful to grasp the components involved.
- Needle Bar: This is the rod that holds the needle at its lower end. It moves up and down when you operate the machine.
- Needle Clamp: This is the mechanism at the bottom of the needle bar that grips and secures the needle. It typically has a screw to tighten and loosen its grip.
The sewing machine needle guide often refers to the parts of the machine that help steer the thread and needle during the stitching process, but in the context of insertion, the needle bar and clamp are your primary focus.
Special Considerations for Different Machines
While the general principle remains the same, some machines might have slightly different mechanisms for their needle clamp.
- Older Machines: Some vintage machines might use a thumbscrew instead of a standard screw.
- Newer Machines: High-end machines may have tool-less systems where you can release and secure the needle with a lever or a special knob.
- Long Arm Quilting Machines: These often have very robust needle clamping systems designed for heavy use and thicker needles.
Always consult your machine’s manual for any specific nuances. It’s the ultimate authority on your particular model and helps with how to thread a sewing machine as well.
Troubleshooting Common Needle Issues
If you’ve followed the steps and are still experiencing problems, consider these troubleshooting tips:
- Skipped Stitches After Needle Change:
- Check Needle Orientation: Double-check the flat side is to the back.
- Verify Needle Type/Size: Ensure it’s appropriate for your fabric.
- Check for Needle Damage: Even a new needle can be flawed. Try another one.
- Check Machine Threading: Incorrect sewing machine threading is a very common cause of skipped stitches. Reread the threading instructions for both the top thread and the bobbin.
- Clean Your Machine: Lint buildup can interfere with stitch formation.
- Thread Breaking:
- Wrong Needle: A needle too fine for the fabric or thread can cause breakage.
- Rough Needle Eye: If the needle’s eye is burred or damaged, it can shred thread. Try a new needle.
- Tension Issues: Incorrect top or bobbin tension can cause thread to snap.
- Thread Quality: Cheap or old thread can be prone to breaking.
- Needle Breaking:
- Bent Needle: The needle hit something or wasn’t inserted straight.
- Wrong Needle Type: Using a thin needle on heavy fabric.
- Improper Insertion: If the needle isn’t seated fully or is at an angle.
- Machine Tension: Extreme tension issues can sometimes cause needle breakage.
Frequently Asked Questions (FAQ)
Q1: Can I reuse an old needle if it still seems okay?
A1: While tempting, it’s best to replace needles regularly. Even if they don’t appear obviously dull or bent, their microscopic sharpness and structural integrity degrade with use. This can lead to skipped stitches, fabric damage, and undue stress on your machine over time.
Q2: How often should I change my sewing machine needle?
A2: Most experts recommend changing your needle after approximately 6-10 hours of sewing time. For less frequent sewers, changing it after completing a large project or at least every 6 months is a good practice.
Q3: What happens if I put the needle in backward?
A3: If you insert the needle with the flat side facing forward, the groove will not be in the correct position to guide the thread. This will almost certainly result in skipped stitches, thread breakage, or your machine not sewing at all.
Q4: Do I need to remove the presser foot when changing the needle?
A4: No, you typically do not need to remove the presser foot. In fact, it’s usually recommended to keep the presser foot lowered, as it helps stabilize the needle bar.
Q5: My machine manual shows a different screw. What should I do?
A5: Always prioritize your machine’s manual. If it describes a different type of screw or clamp mechanism, follow those specific instructions. The general principle of securing the needle remains, but the exact hardware might vary.
Q6: Can I use a hand-sewing needle in my machine?
A6: No, absolutely not. Machine needles are specifically designed with a shank and a groove that fit your sewing machine’s mechanism and thread path. Hand-sewing needles are not compatible and will damage your machine.
Q7: How do I know if my needle is bent?
A7: A bent needle might cause skipped stitches or catch on the needle plate. The easiest way to check is to hold the needle by the shank and try to gently wiggle it. If it moves or feels loose, or if it appears visibly curved, it’s likely bent.
Conclusion
Mastering the art of how to put a needle in a sewing machine is a simple yet powerful step in your sewing journey. It’s a foundational skill that directly impacts the quality of your stitches and the longevity of your machine. By choosing the correct sewing machine needle types for your fabric, always ensuring proper orientation – flat side to the back, groove forward – and performing regular sewing machine needle replacement, you’ll set yourself up for a smoother, more enjoyable sewing experience.
Remember, practice makes perfect. The more you change your needles, the more intuitive it will become. So, go forth and stitch with confidence, knowing your machine is properly equipped for every project! Happy sewing!