
Learning to sew is fun. Your sewing machine is a helpful tool. It needs two threads to make a stitch. One thread comes from the top. The other thread comes from the bottom. The bottom thread is on the bobbin. Putting the bobbin in right is very important. This guide will show you how to do it simply on your Brother sewing machine. Many Brother machines use a drop-in bobbin system. This is simple to use. We will walk through winding the thread bobbin Brother machine needs and putting it in place.
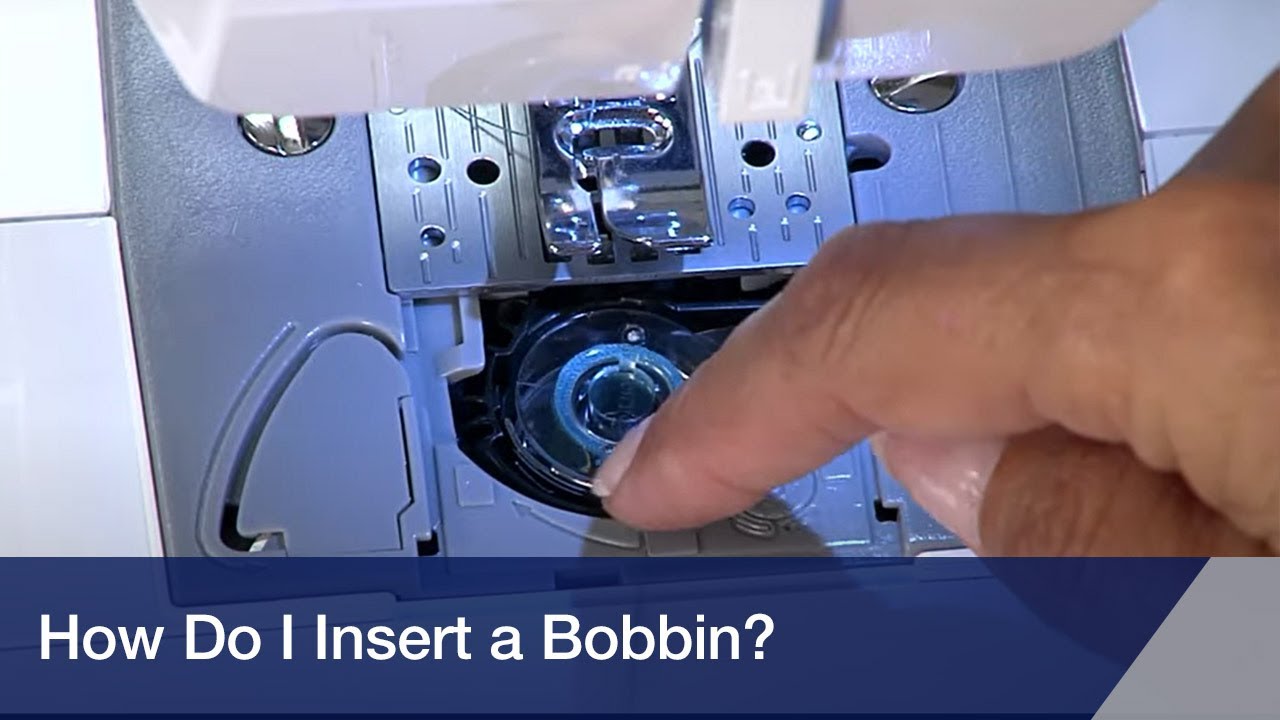
Image Source: i.ytimg.com
Why the Bobbin Matters
Sewing machines make stitches by linking two threads together. The top thread comes from the spool on top of the machine. It goes through the needle. The bottom thread comes from the bobbin. The bobbin sits under the sewing area. When the needle goes down, it grabs the top thread. As the needle comes back up, the hook under the sewing plate catches the top thread loop. It wraps the top thread loop around the bobbin thread. This makes a stitch. If the bobbin is not in right, the stitches will not look good. Or the machine will not sew at all. Knowing how to work with the thread bobbin Brother machine uses is a key step in sewing.
Getting to Know Your Brother Bobbin System
Most modern Brother sewing machines have a simple bobbin system. It is called a horizontal drop-in bobbin system. This means the bobbin lays flat. You drop it into a special spot under a clear cover. This is different from older machines. Older machines often have a bobbin case. You take the bobbin case out. You put the bobbin in the case. Then you put the case back in the machine.
The Brother sewing machine drop-in bobbin system is easy. You can see how much thread is left through the clear cover. This is very helpful. The Brother sewing machine horizontal bobbin sits in a holder. This holder is under the needle plate. You just open the cover, drop the bobbin in, and follow a simple thread path. Learning how to thread Brother bobbin case area correctly is vital for good stitches.
Getting Ready to Put the Bobbin In
Before you put the bobbin in, you need to wind thread onto it. This is usually the first step. You will need a bobbin and thread. Use the bobbins that came with your machine. Or buy bobbins made for your specific Brother model. Using the wrong bobbin can cause problems. It can mess up your bobbin tension Brother machine needs.
Picking the Right Bobbin
Brother machines usually use plastic bobbins. Look in your machine’s manual. It will tell you the right size and type of bobbin. Often, they use a “Class 15” or “SA156” bobbin. Make sure the bobbin is not bent or damaged. A bad bobbin can cause Brother sewing machine bobbin problems.
Finding the Bobbin Winder
Every Brother machine has a built-in bobbin winder. This is called the Brother sewing machine bobbin winder. It is usually on the top right side of the machine. It has a pin or spindle you put the empty bobbin on. It also has guides for the thread. And a small lever that holds the bobbin in place while it spins.
Winding the Bobbin: Step by Step
Winding the bobbin is a simple job. Doing it right sets you up for sewing success. Here are the steps:
Step 1: Put Thread on the Spool Pin
First, take the thread you want to use for the lower thread. Put the spool of thread on the spool pin on top of your machine. Make sure the thread comes off the spool correctly. For most machines, if the spool pin is vertical, the thread should come off the front or back, depending on how it spins freely. If the spool pin is horizontal, use a spool cap to keep the thread on.
Step 2: Follow the Thread Path for Winding
Look at the top of your machine. You will see pictures or numbers showing how to guide the thread. Find the path for winding the bobbin.
* Usually, the thread goes from the spool pin to a guide.
* Then it wraps around a small disk or tensioner. This puts a little pull on the thread. This makes the bobbin wind neatly.
* The thread then goes to the Brother sewing machine bobbin winder spindle.
Step 3: Put the Bobbin on the Winder
Put an empty bobbin onto the bobbin winder spindle. Push it down so it fits snug. Take the end of your thread. Push it through one of the small holes in the top of the bobbin. Push it from the inside to the outside. Pull a few inches of thread through the hole. Hold onto this thread tail lightly.
Step 4: Start Winding
Push the bobbin winder spindle to the right. It will click into place. This tells the machine you are ready to wind the bobbin. Some machines have a switch or button to select winding mode.
Now, gently press the foot controller. The bobbin will start to spin. The thread will wrap around the bobbin. Hold the thread tail you pulled through the hole for a few seconds. Let the thread wrap over it. Then you can stop and trim that short tail close to the bobbin.
Step 5: Watch it Wind
Keep pressing the foot controller. The machine will wind the thread onto the bobbin. The Brother sewing machine bobbin winder has a part that moves back and forth. This helps the thread wind evenly. Watch the bobbin. Let it fill up. Do not overfill the bobbin. Stop when it is full but not packed too tight. It should stop automatically when it is full. If not, stop it yourself.
Step 6: Finish Winding
Push the bobbin winder spindle back to the left. This takes it out of winding mode. Cut the thread connecting the bobbin to the spool. Your bobbin is now ready. This completes the winding part of this Brother sewing machine tutorial bobbin guide. Note the bobbin winding direction Brother machines use. The thread should be wound neatly and evenly.
Putting the Bobbin In: The Drop-In Method
Now that your bobbin is full, it’s time to put it into the machine. This is where the Brother sewing machine drop-in bobbin system is very easy.
Step 1: Turn Off the Machine
Safety first! Turn off your Brother sewing machine. Unplug it if you want to be extra safe. This stops the machine from starting by accident.
Step 2: Open the Bobbin Cover
Look at the needle plate. This is the flat metal part under the needle. There is a clear plastic cover on it. This is the bobbin cover. Slide a latch or press a button to open this cover. It usually slides off or flips up.
Step 3: Get the Bobbin Ready
Pick up your newly wound bobbin. Look at the thread on it. You need to know which way the thread should come off the bobbin. For most Brother drop-in systems, the thread needs to come off the bobbin counter-clockwise. Imagine the bobbin is a clock face. The thread should come off the top towards the left, like the hands moving backwards. This bobbin winding direction Brother requires is key. If the thread comes off the wrong way, your machine will not sew right.
Step 4: Drop the Bobbin In
Hold the bobbin correctly (thread coming off counter-clockwise). Drop it into the bobbin holder. It should lay flat inside the round area. It should fit easily. Do not force it.
Step 5: Follow the Thread Path
Now, look closely at the bobbin holder. There is a small path or channel the thread needs to follow. This is how to thread Brother bobbin case area.
* Find the start of the path. It is usually a small slit or groove on the edge of the bobbin holder.
* Take the thread tail from the bobbin.
* Guide the thread into this path. There might be numbers or pictures to help you.
* Pull the thread gently along the path. It will go through a tension spring area. This area puts the right amount of pull on the lower thread. This is important for getting the bobbin tension Brother machine needs just right.
* Keep pulling the thread until it comes out from the end of the path. The path usually ends near where the needle goes down. There might be a small cutter here.
Step 6: Pull the Thread
Pull about 4 to 6 inches of thread out. Let it lay over the needle plate towards the back of the machine. There is often a little gap or guide near the back of the plate to rest the thread in.
Step 7: Close the Cover
Put the clear bobbin cover back on. Slide it into place until it clicks or snaps shut. Make sure it is closed properly.
Step 8: Get the Lower Thread Up
You need to bring the bobbin thread (the lower thread Brother sewing machine uses) up through the needle plate hole.
* Hold the top thread gently with one hand. Do not hold it tight.
* Turn the handwheel on the side of your machine towards you. Turn it one full turn.
* As you turn the handwheel, the needle will go down and then come back up.
* As the needle comes back up, the top thread will make a loop around the bobbin thread under the plate.
* Keep turning the handwheel until the needle is at its highest point.
* Pull gently on the top thread you are holding. You should see a loop of the bobbin thread pulled up through the needle plate hole.
* Use tweezers or your fingers to grab this loop. Pull the bobbin thread tail completely up.
Step 9: Position the Threads
You now have both the top thread and the bobbin thread coming up through the needle plate. Pull both threads under the presser foot and towards the back of the machine. Lay them flat there. This keeps them out of the way when you start sewing. Your machine is now threaded and ready to sew.
This step-by-step guide acts as a useful Brother sewing machine tutorial bobbin process, showing you exactly what to do from winding to getting the thread ready to sew.
Checking the Bobbin Tension
The bobbin tension Brother machine uses is set at the factory. With a drop-in system, you usually cannot adjust the bobbin tension directly like you can with an old-style bobbin case. The tension comes from the path the thread follows under the clear cover. If your stitches look bad (loops on the top or bottom), the tension might be off.
- If loops are on the bottom of the fabric, the top tension is too loose. Tighten the top tension.
- If loops are on the top of the fabric, the bobbin tension might be too loose, or the top tension is too tight. Check that the bobbin thread is in the tension path correctly. If it is, try loosening the top tension.
Most Brother sewing machine bobbin problems related to tension are fixed by making sure the bobbin is threaded right and adjusting the top tension. If problems continue, the bobbin area might need cleaning, or there could be a problem with the tension spring in the bobbin holder. Check your manual or contact Brother support for more help with bobbin tension Brother machine issues.
Fixing Common Bobbin Problems
Sometimes things go wrong with the bobbin. Here are some common Brother sewing machine bobbin problems and how to fix them.
- Thread Nesting (Bird’s Nest): This looks like a tangled mess of thread on the bottom of your fabric.
- Cause: Usually, the top thread is not threaded correctly, or the presser foot is up while sewing.
- Fix: Re-thread the entire top of your machine, making sure the presser foot is up when threading through the tension disks. Also, check that the bobbin is in correctly and the thread is following the path. Make sure you lower the presser foot before you start sewing.
- Skipped Stitches: The machine makes stitches, but some are missing.
- Cause: Often caused by using the wrong needle, a bent needle, or the bobbin not sitting right.
- Fix: Change the needle. Make sure the needle is put in correctly. Check the bobbin and re-insert it, following the thread path carefully.
- Thread Breaks: The thread keeps snapping while you sew.
- Cause: Can be from many things: bad thread, wrong needle size, needle put in wrong, top tension too tight, or bobbin tension issues. Sometimes it is a nick in the needle plate or bobbin holder.
- Fix: Try new thread. Change the needle. Check needle position. Check top tension. Make sure the bobbin thread is not catching on anything. Check the bobbin area for damage.
- Machine Jams: The machine stops sewing suddenly, and thread is stuck.
- Cause: Often happens when the bobbin area is jammed with thread.
- Fix: Turn off the machine immediately. Carefully remove the fabric. Open the bobbin cover. Take out the bobbin. Gently pull out any tangled thread you can see. You might need small tweezers. Sometimes you need to unscrew the needle plate to get to the mess underneath. Clean out all the fuzz and thread bits. Re-insert the bobbin correctly and re-thread the machine.
Dealing with Brother sewing machine bobbin problems can be annoying, but many are easy to fix by checking the threading and cleaning.
More Details on Bobbin Winding
Let’s look closer at the Brother sewing machine bobbin winder. This small part is very important. Proper winding makes a world of difference.
- Speed: Do not wind the bobbin too fast, especially with thin threads. Winding too fast can cause the thread to stretch or wind unevenly. This leads to bad tension later.
- Evenness: The goal is to have the thread wind evenly from one end of the bobbin to the other. The little guide on the winder helps with this. If the thread is only winding on one part of the bobbin, check that the thread is in all the guides correctly before it gets to the winder.
- Tightness: The thread should be wound firmly, but not so tight that it squishes the bobbin sides. If it is too loose, the thread can spill off the bobbin while sewing. If it is too tight, it can cause tension issues or break the thread. The tension disk on the winding path helps get the right tightness.
- Fullness: Let the bobbin fill up almost completely. Most winders stop when the bobbin is full enough. If your winder does not stop automatically, watch it and stop when it looks full. Do not pile the thread up higher than the bobbin edges.
Remember the bobbin winding direction Brother needs for placement (counter-clockwise for drop-in). This is separate from how the thread goes onto the bobbin during winding. The machine handles the winding motion. You just need to guide the thread and make sure it winds evenly.
How to Thread Brother Bobbin Case Area Revisited
Let’s break down the threading path for the drop-in bobbin again, step by step, focusing on that “how to thread Brother bobbin case” section under the plate. This is a common place for mistakes.
- Open the cover: Slide or lift the clear plastic cover over the bobbin area.
- Hold the bobbin right: Hold the bobbin so the thread comes off the top towards the left (counter-clockwise).
- Place the bobbin: Drop the bobbin into the holder. It should spin freely if you pull the thread.
- Find the first slot: Look for a small notch or slit on the front edge of the bobbin holder. This is where the thread path starts.
- Pull thread into the slot: Take the thread tail and pull it into this first slot.
- Follow the path: Gently pull the thread along the marked path. The path is usually shaped like the edge of the bobbin holder, going around to the left or back. There might be arrows or numbers guiding you.
- Engage the tension: As you pull the thread along the path, it will go under a thin piece of metal or through a narrow channel. This is the bobbin tension spring. You should feel a slight resistance as the thread goes through. This is good! It means the tension is working.
- Reach the end of the path: The path will end near the back of the bobbin area, close to where the needle goes down. There might be a little thread cutter blade here.
- Leave the thread: Pull about 4-6 inches of thread out past the end of the path. Leave this tail resting on the needle plate.
This detailed look at how to thread Brother bobbin case (area) highlights that it is less about threading a removable case and more about guiding the thread correctly within the machine’s bobbin holder. Getting the thread properly seated in that tension path is super important for correct bobbin tension Brother machine performance.
The Lower Thread Brother Sewing Machine Uses
The thread that comes up from the bobbin is the lower thread. Its job is to link with the upper thread to form stitches.
- Matching Threads: For best results, use the same type and weight of thread for both the top and the bobbin. This helps create balanced stitches. You can use different colors, of course!
- Thread Quality: Use good quality thread. Cheap thread can cause lint buildup, break easily, and lead to Brother sewing machine bobbin problems.
- Checking the Lower Thread: Before you start sewing a seam, always make sure you have pulled up the lower thread Brother sewing machine just created after threading the bobbin. If you start sewing without doing this, you will get a thread jam.
Maintaining Your Bobbin Area
Keeping the bobbin area clean is very important for smooth sewing and preventing Brother sewing machine bobbin problems.
- Lint: Fabric creates lint. Lint loves to gather in the bobbin area. This can mess up the bobbin tension Brother machine relies on. It can also cause thread breaks or jams.
- Cleaning: Regularly open the bobbin cover. Use a small brush (often comes with the machine) to brush out lint and dust. Do not use compressed air. It can push lint further into the machine.
- Check for Nicks: While cleaning, look closely at the bobbin holder and the needle plate. Feel for any rough spots or nicks. Sharp spots can catch and break the thread. If you find one, you might need a technician to smooth it, or the part might need replacing.
A clean machine, especially the bobbin area, works much better and lasts longer. This is part of the essential care mentioned in any good Brother sewing machine tutorial bobbin section.
Summary of Bobbin Steps
Here is a quick list of the main steps for putting the bobbin in a Brother machine with a drop-in system:
- Turn off the machine.
- Open the clear bobbin cover.
- Hold the wound bobbin so thread comes off counter-clockwise.
- Drop the bobbin into its holder.
- Guide the thread into the path/slot and along it until it engages the tension.
- Pull out a few inches of thread tail.
- Close the bobbin cover.
- Hold the top thread. Turn the handwheel towards you one full turn.
- Pull the top thread to bring the bobbin thread loop up.
- Pull the bobbin thread tail completely up.
- Pull both threads under the presser foot and to the back.
These simple steps, part of any Brother sewing machine tutorial bobbin lesson, help make sure your lower thread Brother machine uses is ready to go.
When to Seek Help
Most bobbin problems can be fixed with the steps above. But sometimes, you might need help.
- If you clean the machine, re-thread everything perfectly, and still have bad stitches or jams.
- If you see damage to the bobbin holder or needle plate.
- If the bobbin winder stops working.
- If you cannot figure out the threading path even with the manual.
In these cases, it is best to look at your machine’s manual again. Brother provides good manuals. You can also find videos online specific to your model (search for “Brother [Your Model Number] bobbin tutorial”). If problems still happen, contact Brother support or take your machine to a qualified sewing machine repair shop. They can help figure out the bobbin tension Brother machine has and fix other issues.
Frequently Asked Questions (FAQ)
Q: What if my bobbin thread is looping on the bottom of the fabric?
A: This usually means your top thread tension is too loose. Check that the top thread is correctly threaded through all the guides and the tension disks with the presser foot UP when you threaded it. Try increasing the top tension.
Q: My bobbin thread is looping on the top of the fabric. Why?
A: This can mean the top tension is too tight, or the bobbin thread is not sitting correctly in its tension path under the bobbin cover. Make sure the bobbin thread is pulled into the slot and pathway correctly. If it is, try loosening the top tension.
Q: Can I use metal bobbins in my Brother machine?
A: Check your machine’s manual! Most modern Brother machines designed for drop-in plastic bobbins should not use metal bobbins. Metal bobbins can interfere with the machine’s magnetic sensor (if it has one) and cause tension or timing problems. Stick to the type of bobbin your manual says to use.
Q: How much thread should I wind on a bobbin?
A: Fill it until it is neatly full, but not overflowing or packed tight. Most Brother bobbin winders stop automatically when the bobbin is full enough. Do not force more thread on after it stops.
Q: My thread keeps breaking near the bobbin area. What is wrong?
A: Several things can cause this. Check for lint buildup in the bobbin area. Make sure the bobbin thread is correctly in its tension path. Check the bobbin holder and needle plate for any nicks or rough spots that could be snagging the thread. Ensure you are using good quality thread.
Q: The bobbin winder is not working. What do I do?
A: Make sure the bobbin winder spindle is pushed all the way to the right. Check if your machine has a setting (like on a screen or a switch) that needs to be changed to engage bobbin winding. Ensure the thread is routed correctly to the winder. If it still does not work, the machine might need repair.
Q: How often should I clean the bobbin area?
A: Clean it often! It’s a good habit to brush out the bobbin area after finishing a project, or after several hours of sewing, especially if you are using fabric that creates a lot of lint (like cotton or flannel).
Putting the bobbin in your Brother sewing machine does not have to be hard. By following these simple steps for winding and insertion, you can avoid many common problems and get back to enjoying your sewing. Remember to check your manual for details specific to your model. Happy sewing!