
Can you sew with a new needle without putting it in correctly? No, you cannot sew effectively with a new needle if it’s not inserted properly. This guide will walk you through the simple steps for correct sewing machine needle insertion.
Switching out your sewing machine needle is a fundamental skill, as important as knowing how to thread your machine or wind a bobbin. A dull, bent, or incorrect needle can cause all sorts of sewing woes, from skipped stitches and fabric snags to broken threads and even damage to your machine. Learning how to change a sewing machine needle correctly ensures you can sew with a new needle smoothly and achieve professional-looking results.
This guide is designed to be your go-to resource for proper needle insertion sewing machine, covering everything from identifying the right needle to securing it in place. We’ll demystify the process, making it straightforward for beginners and a helpful refresher for seasoned sewists.
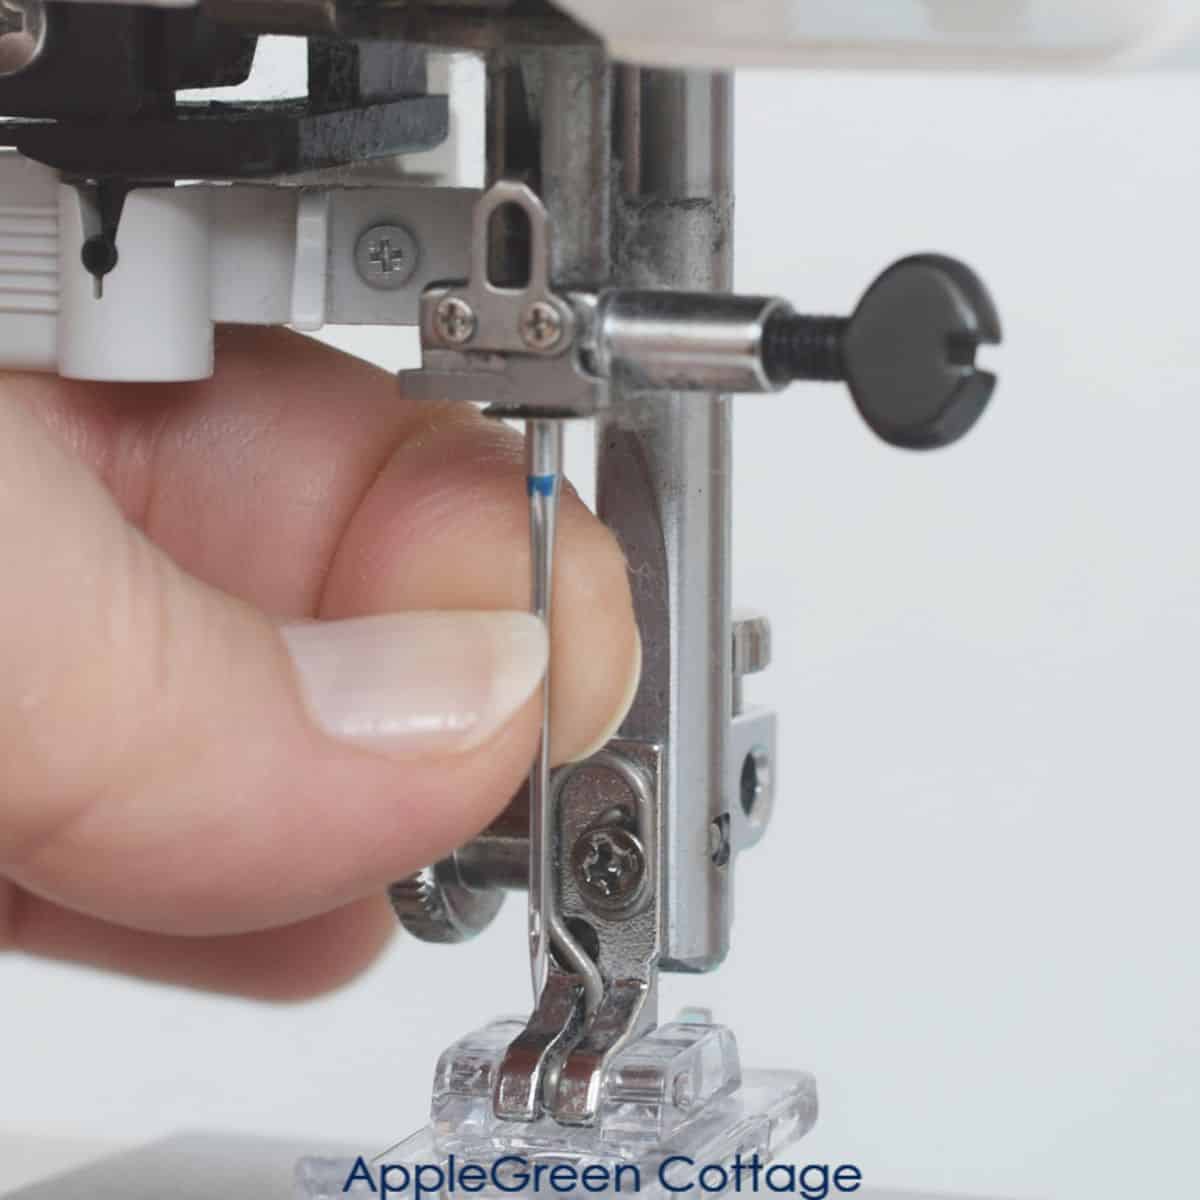
Image Source: www.applegreencottage.com
Why Changing Your Needle Matters
Think of your sewing machine needle as the workhorse of your machine. It’s the part that actually pierces the fabric and guides the thread. When it’s not in its best condition, the entire sewing process suffers.
- Skipped Stitches: A dull or damaged needle can’t properly create the stitch. The hook or bobbin case might miss catching the thread loop, resulting in skipped stitches.
- Fabric Damage: A bent or blunt needle can snag, tear, or leave unsightly holes in your fabric, especially delicate materials.
- Thread Breakage: A needle with a rough eye or burrs can fray or break your sewing thread.
- Uneven Stitches: A needle that isn’t inserted straight can lead to uneven stitch lengths and a messy seam.
- Machine Strain: Forcing a damaged needle through fabric can put undue stress on your machine’s internal mechanisms.
It’s recommended to change a sewing machine needle regularly. A good rule of thumb is to change it every 6-8 hours of sewing time, or whenever you switch to a new fabric type or thread weight.
Decoding Sewing Machine Needle Types
Before you can insert a needle, you need to know which one to use. The world of sewing needles can seem vast, but they generally fall into categories based on their point and shaft. Understanding sewing machine needle types is crucial for successful sewing.
The Anatomy of a Sewing Machine Needle
Every sewing machine needle has a few key parts:
- Point: The tip that pierces the fabric. This can be sharp, ballpoint, or specialized.
- Shank: The top, thicker part of the needle that inserts into the machine. Most modern home sewing machines use a flat shank needle, where one side of the shank is flattened. Older or industrial machines might use a round shank.
- Shaft: The long, slender body of the needle.
- Groove: A channel that runs down the front of the shaft to protect the thread as it passes through the fabric.
- Eye: The hole at the bottom of the shaft where you thread the needle. This is the sewing machine needle eye.
Common Needle Types for Home Sewing Machines
Here’s a breakdown of some common sewing machine needle types and their uses:
| Needle Type | Point Type | Best For |
|---|---|---|
| Universal Needle | Slightly rounded, sharp point | All-purpose; good for woven fabrics, light knits, and general sewing. |
| Ballpoint Needle | Rounded, blunt point | Knit fabrics, stretch fabrics. The point pushes threads aside rather than piercing them, preventing runs. |
| Sharp/Microtex Needle | Very sharp, fine point | Woven fabrics, silks, synthetics, microfibers, quilting, and precise stitching. |
| Jeans/Denim Needle | Stronger shaft, sharp point | Denim, canvas, twill, and other heavy, dense fabrics. |
| Leather Needle | Chisel-shaped or cutting point | Leather, vinyl, suede. The point cuts a slit for the thread to pass through. |
| Embroidery Needle | Larger eye, smooth shaft, often a larger groove | Embroidery, free-motion quilting. Designed to handle thicker embroidery threads. |
| Topstitch Needle | Longer, sharper point, larger eye, deeper groove | Topstitching, decorative stitches, and thicker threads. |
| Stretch/Swimwear Needle | Medium ballpoint, flexible shaft | Stretchy knits, swimwear, athletic wear. Helps prevent skipped stitches on very elastic fabrics. |
Always check your sewing machine manual for the recommended needle system (e.g., 130/705 H, HAx1). This number usually indicates the type of shank and the needle’s general purpose.
Preparing for Needle Insertion
Before you begin sewing machine needle insertion, take a moment to prepare.
Gather Your Supplies
- The Correct Sewing Machine Needle: Ensure you have the right type and size for your fabric and project.
- Clean Workspace: A well-lit and clear area makes the process easier and reduces the chance of dropping small parts.
- Sewing Machine Manual: Keep it handy if you’re unsure about any steps specific to your machine model.
- A Soft Cloth or Brush: For cleaning any dust or lint from the needle clamp area.
Safety First!
- Turn Off Your Machine: Always unplug your sewing machine or turn off the power switch before changing the needle. This prevents accidental starts.
- Lower the Presser Foot: Lowering the presser foot can help stabilize the needle clamp and make it easier to work with.
The Step-by-Step Guide to Sewing Machine Needle Insertion
Now, let’s get to the core of it: how to correctly put the needle in your sewing machine. This process is often referred to as sewing needle placement.
Step 1: Access the Needle Clamp
Locate the needle clamp. This is usually a small metal or plastic piece at the end of the needle bar, the part that moves up and down.
Step 2: Loosen the Needle Clamp Screw
Most sewing machines have a small screw that holds the needle in place. This is the needle clamp screw.
- With a Screwdriver: Many machines come with a small flathead or Phillips head screwdriver. Use the appropriate one to turn the screw counter-clockwise to loosen it. You don’t need to remove the screw completely, just loosen it enough so the old needle can slide out.
- With a Thumb Screw: Some modern machines have a convenient thumb screw that can be loosened by hand.
Step 3: Remove the Old Needle
Once the screw is loose, the old needle should be free.
- Carefully slide the old needle downwards and out of the needle clamp. Be cautious; the needle might still be sharp.
- Inspect the old needle. Look for any signs of damage, dullness, or bending. This can give you clues about why you needed to change it.
- Dispose of the old needle safely. Drop it into a needle disposal container or wrap it securely in tape before throwing it away to prevent injury.
Step 4: Select and Prepare the New Needle
Choose the correct needle for your project from your collection of sewing machine needle types.
- Check the Shank: Ensure the new needle has the correct shank type for your machine (usually a flat shank).
- Examine the Needle Eye: Make sure the sewing machine needle eye is clean and free of any rough edges.
Step 5: Insert the New Needle
This is where sewing machine needle placement is critical for proper function.
- Position the Needle: Hold the new needle firmly.
- Identify the Flat Side of the Shank: Most home sewing machine needles have a flat side on the back of the shank.
- Orient the Needle Correctly:
- For most modern machines with flat shank needles: The flat side of the shank should face away from you (towards the back of the machine). The rounded side of the shank should face towards you.
- Consult your manual: While this is the most common orientation, always double-check your machine’s manual. Some older or specialized machines may have different requirements.
- Slide the Needle Up: Push the needle upwards into the needle clamp as far as it will go.
Step 6: Tighten the Needle Clamp Screw
Once the needle is fully inserted into the clamp:
- Use the screwdriver or thumb screw to tighten the needle clamp screw securely. Turn it clockwise.
- Do not overtighten. You want it snug, but not so tight that you risk damaging the needle or the clamp. A firm grip is usually sufficient.
Step 7: Check for Proper Seating
Give the needle a gentle wiggle. It should feel secure and not move loosely within the clamp.
Step 8: Re-thread Your Machine
Now that the new needle is in place, you’ll need to re-thread your sewing machine, ensuring the thread goes through the correct guides and into the sewing machine needle eye.
- Thread the machine as you normally would. Pay close attention to the thread path.
- Ensure the thread passes through the grooves correctly.
- The thread should enter the eye of the needle from front to back (for most machines).
Step 9: Test Stitch
Before diving into your project, always do a test stitch on a scrap piece of the fabric you’ll be using.
- Check for smooth stitching, no skipped stitches, and no fabric damage.
- If you encounter problems, re-check that the needle is inserted correctly and that you are using the right needle type and size.
This entire process is crucial for successful sewing machine needle insertion.
Common Pitfalls and Troubleshooting
Even with a clear guide, issues can arise. Here’s how to handle them.
Pitfall 1: Needle Hits the Throat Plate or Presser Foot
- Why it happens: The needle is not inserted high enough, or it’s not straight.
- How to fix:
- Loosen the needle clamp screw.
- Ensure the needle is pushed up as far as it can go.
- Double-check that the flat of the shank is facing the correct direction (usually to the back).
- Retighten the screw firmly.
Pitfall 2: Skipped Stitches or Thread Breaking
- Why it happens:
- Dull, bent, or the wrong type of needle.
- Incorrect needle insertion (not fully seated or crooked).
- Incorrect threading of the machine.
- Thread issues (old, knotty, or wrong type for the needle).
- How to fix:
- Change the needle to a brand new, correct type.
- Re-seat the needle, ensuring it’s fully inserted and straight.
- Re-thread the entire machine, paying close attention to every step.
- Try a different spool of thread.
Pitfall 3: Needle Won’t Go In or Seems Loose
- Why it happens:
- The needle shank is bent or damaged, preventing it from seating properly.
- The needle clamp screw is stripped.
- You are trying to force the wrong type of needle.
- How to fix:
- Try a different needle of the same type.
- If the screw is stripped, you may need to contact a sewing machine repair technician.
- Always confirm you have the correct needle system for your machine.
Pitfall 4: Fabric is Snagging or Tearing
- Why it happens:
- The needle is dull or damaged.
- You are using the wrong needle type for your fabric (e.g., a sharp needle on knit fabric).
- How to fix:
- Change the sewing machine needle to a new one, ensuring it’s the appropriate type for your fabric (e.g., a ballpoint for knits, a Microtex for fine wovens).
Maintaining Your Sewing Machine Needles
Even the best needles can wear out. Understanding how to maintain them and when to replace them is key.
When to Replace Your Needle
- After 6-8 Hours of Sewing: This is a general guideline. If you sew frequently, you’ll get a feel for when a needle starts to perform less optimally.
- When Sewing a New Fabric Type: Especially if it’s a different weight or weave than what you’ve been working with.
- If You Drop a Needle: Even if it looks fine, dropping a needle can cause microscopic damage to the point or eye.
- When Stitch Quality Declines: This is the most obvious sign – skipped stitches, thread breaks, fabric snags.
Proper Storage of Needles
- Keep Needles in Their Original Packaging: This protects them from damage and keeps them organized by type and size.
- Use a Needle Case or Magnetic Pad: For needles that are in use or temporarily removed, these offer protection.
- Store in a Dry Place: Moisture can lead to rust.
Frequently Asked Questions (FAQ)
Q1: What is the correct way to insert a sewing machine needle?
A1: For most home sewing machines, the needle should be inserted into the needle clamp with the flat side of the shank facing away from you (towards the back of the machine). Push it up as far as it will go and tighten the clamp screw securely. Always refer to your machine’s manual for specific instructions.
Q2: Can I sew with a dull needle?
A2: While you might technically be able to sew, it’s highly discouraged. A dull needle can cause skipped stitches, thread breakage, fabric damage, and even put stress on your sewing machine. It’s best to change a sewing machine needle regularly.
Q3: What does the flat side of the needle shank mean?
A3: The flat side of the sewing machine needle shank is a guide for proper insertion into the needle clamp. For most home machines, this flat side indicates the correct orientation.
Q4: How do I know if I have the right sewing machine needle for my fabric?
A4: This depends on the fabric type. For knits and stretchy materials, use a ballpoint or stretch needle. For wovens, especially fine or dense ones, a sharp or Microtex needle is often best. Heavy fabrics like denim require a jeans needle. Always check the needle’s intended use against your fabric.
Q5: Do I need to re-thread my machine after changing the needle?
A5: Yes, it’s always best practice to re-thread your machine after inserting a new sewing needle. This ensures the thread is correctly guided through the new needle’s eye and any associated tension discs or guides.
Q6: What happens if the sewing machine needle eye is too small for my thread?
A6: If the sewing machine needle eye is too small, the thread will fray, break, or not pass through smoothly, leading to poor stitch quality. You’ll need to select a needle with a larger eye, often labeled for embroidery, topstitching, or heavy-duty thread.
Q7: My sewing machine makes a loud noise when sewing after changing the needle. What’s wrong?
A7: This usually indicates the needle is not inserted correctly. It might be too low, crooked, or the wrong type for your machine, causing it to hit the throat plate or bobbin casing. Re-check your sewing needle placement and ensure the needle is fully seated and straight with the correct shank orientation.
Q8: How often should I change my sewing machine needle?
A8: A good rule of thumb is to change a sewing machine needle every 6-8 hours of sewing time, or when you notice a decline in stitch quality. It’s also wise to change it when switching fabric types or thread weights to ensure optimal performance.
By following these detailed steps and tips, you’ll master the essential skill of sewing machine needle insertion, ensuring your projects are sewn beautifully and your machine runs smoothly. Happy sewing!