
Are sewing patterns hard to read? No, not once you know the simple steps. Can a beginner read a pattern? Absolutely! This guide will break down everything you need to know to use a sewing pattern with confidence. We will walk you through each part, from the envelope to the symbols on the paper pieces. Soon, you will feel ready to pick out your first pattern and start making clothes or other items.
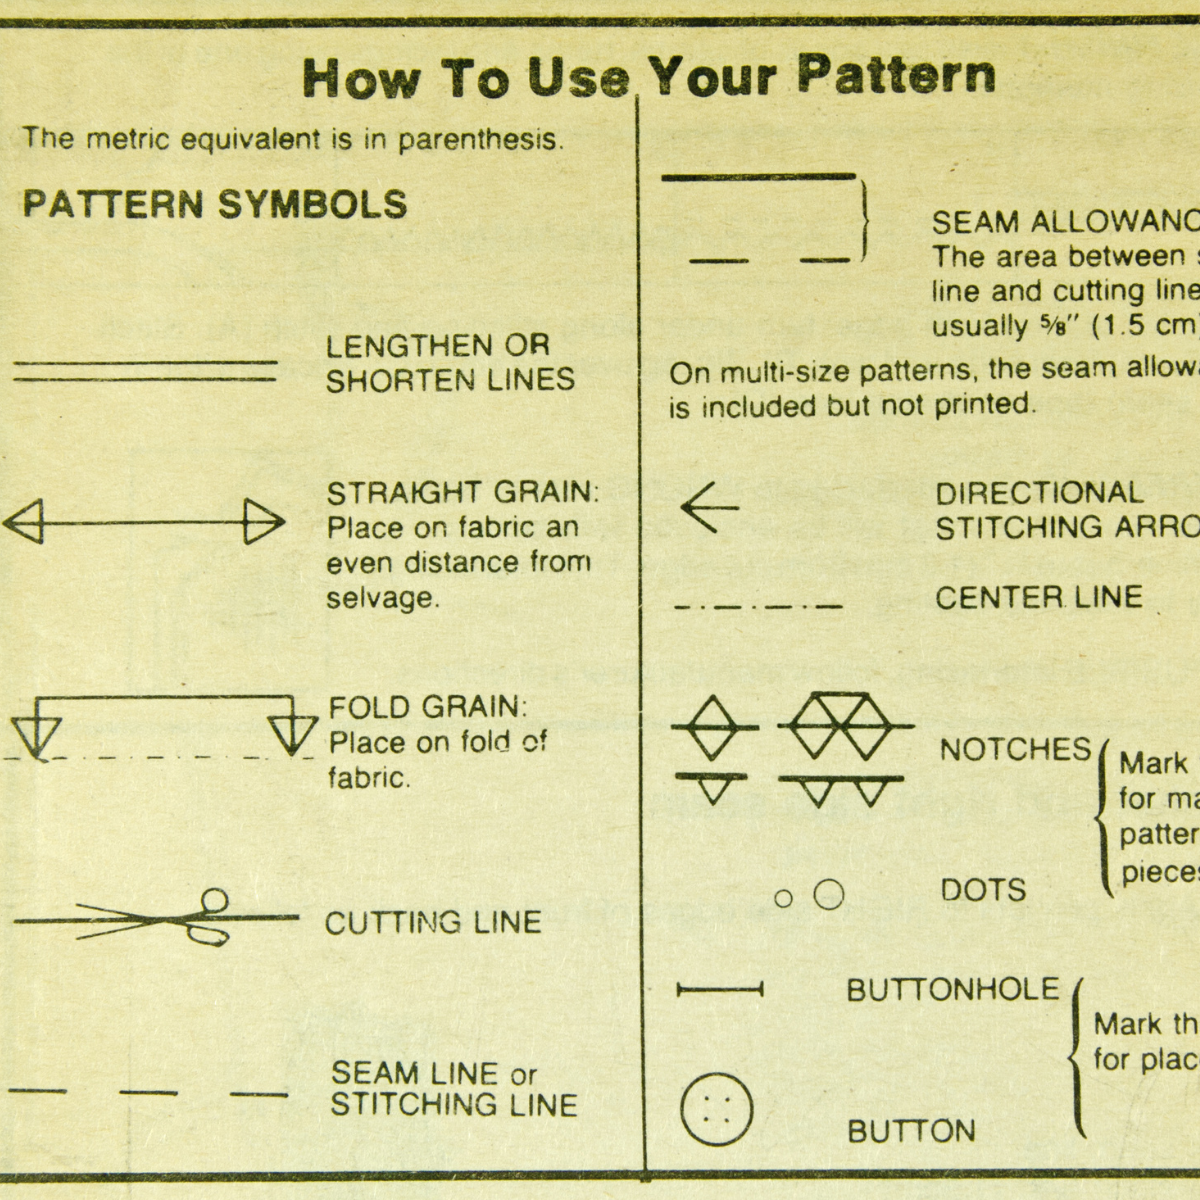
Image Source: letslearntosew.com
Looking at the Pattern Envelope Information
The sewing pattern envelope holds a lot of important details. Think of it like the cover of a book. It tells you what the pattern is, who it’s for, and what you need to make it.
What’s on the Front?
- Picture: This shows you what the finished item will look like. There are often different versions or “views” shown. Each view will have a letter (like A, B, C).
- Pattern Number: This is a special code for this specific pattern. You use this number when you look for the pattern in a store or online.
- Sizes Included: The front tells you the size range you get with this pattern. Some patterns have just one size, but most have many sizes in one package.
What’s on the Back?
The back of the envelope has even more helpful facts.
- Description: It gives a short write-up about the design. It might say if it’s fitted, loose, or has special features.
- Fabric Suggestions: This tells you what kind of fabric works best for this pattern. It might list cotton, linen, knit, etc. Picking the right fabric is important for the item to look and hang correctly.
- Notions List: “Notions” are the small items you need besides fabric. This list tells you if you need buttons, zippers, elastic, thread, trim, interfacing, or other supplies. It will also tell you the size and amount needed.
- Body Measurement Chart: This chart helps you pick your size. It lists standard body sizes with measurements for bust, waist, and hips. Sometimes it includes back waist length or height.
- Finished Garment Measurements: This is a key part. It shows you the size of the finished piece of clothing. This helps you see how much room (ease) the pattern has. We will talk more about ease later.
- Fabric Yardage Chart: This chart tells you how much fabric you need. It lists the different pattern views, sizes, and fabric widths. Fabric comes in different widths (like 45 inches or 60 inches). You need less fabric if the width is wider. It also tells you if you need extra fabric for fabric with a nap (like velvet) or a one-way design.
How to Measure for Sewing Patterns
Choosing the right size starts with knowing your own body size. Do not guess your size based on ready-to-wear clothes you buy in stores. Sewing pattern sizes are different.
Taking Your Body Measurements
You need a flexible tape measure. It is best to have someone help you for more accurate results, especially for the back measurements. Wear clothes that fit close to your body, like a slip or leggings.
- Bust: Measure around the fullest part of your chest. Keep the tape measure straight across your back.
- Waist: Measure around the narrowest part of your torso. This is usually just above your belly button.
- Hips: Measure around the fullest part of your hips and rear. Keep your feet together.
- Back Waist Length: Measure from the bone at the back of your neck down to your natural waistline. This helps check the length of the top part of patterns like dresses or shirts.
- Height: Stand against a wall without shoes. Mark the top of your head and measure from the floor to the mark. Pattern companies draft for a specific height (often 5’6″). Knowing your height helps you know if you need to adjust the length.
Write down all your measurements.
Choosing the Right Sewing Pattern Size
Now, compare your body measurements to the chart on the pattern envelope. Find the size range that best matches your numbers.
Matching Your Numbers
- Look at your bust, waist, and hip measurements.
- Find the size row on the chart that is closest to your measurements.
- If your measurements fall between sizes, it is usually better to pick the larger size. You can always make clothes smaller, but it is harder to make them bigger.
- If your bust, waist, and hip measurements fall into different sizes, choose the size based on the most important measurement for that type of clothing.
- For tops and dresses, the bust measurement is often the most important.
- For skirts and pants, the hip measurement is usually the most important.
- Many patterns are multi-size. This means the pattern paper has lines for several sizes printed on it. You will trace or cut the size line that fits you best.
Why Finished Garment Measurements Matter Too
After you pick a size based on your body measurements, look at the finished garment measurements chart. This tells you the actual size of the shirt, dress, or pants when done. Compare these numbers to your body size. This shows you how much room the pattern gives you. This “extra room” is called ease. If the finished garment measurement is only slightly bigger than your body measurement, the item will fit closely. If it is much bigger, it will be loose. This helps you decide if you like the intended fit or if you might want a different size for a different look.
Inside the Envelope: The Pattern Pieces and Instructions
Open the envelope carefully. Inside, you will find folded tissue paper (the pattern pieces) and a folded paper with words and pictures (the instruction sheet).
The Instruction Sheet
This sheet is your map for making the project. Do not skip reading it!
- Layout Diagrams: These pictures show you how to place the pattern pieces on your fabric. This is very important for cutting correctly.
- Sewing Steps: This is a step-by-step guide on how to sew the pieces together. It often includes simple drawings.
- Glossary: Sometimes, there is a list of terms explained. This is like a mini sewing dictionary. (We will cover common terms later too).
The Pattern Pieces
These are the tissue paper shapes. Each shape is one part of the item you are making (like a sleeve, a front piece, a back piece). They have marks and words printed on them. These marks are called symbols.
Deciphering Sewing Pattern Symbols Meaning
Pattern symbols are like a secret code. They tell you how to cut the fabric and how to put the pieces together. Learning these symbols is key to using a pattern.
Key Symbols to Know
Let’s look at the most common symbols you will see on pattern pieces.
- Grainline: This is a long line with an arrow or arrows at one or both ends. This is one of the most important marks! You must line up this arrow with the straight edge of your fabric (the selvage). Doing this keeps the fabric from stretching in odd ways. It helps the finished item hang correctly.
- Place on Fold Line: This is a symbol that looks like a bracket or a line with arrows pointing back to it. It is often printed along one edge of a pattern piece. This edge must be placed exactly on the fold of your fabric when cutting. This creates a mirrored piece, like half a shirt front cut on the fold to make one full front.
- Cutting Line: This is the outside line of the pattern piece. You cut along this line. It might be a solid line for one size and different dotted or dashed lines for other sizes on multi-size patterns. Make sure you cut the line for the size you chose!
- Stitching Line: This line is inside the cutting line. It is often a dashed or solid line. It shows where you will sew. The space between the cutting line and the stitching line is the seam allowance. Standard seam allowance is often 5/8 inch (1.5 cm), but patterns will tell you the exact amount.
- Notches: These are short lines or diamond shapes on the cutting line. They are matching points. You cut small snips or points into the fabric where the notches are. When you sew two pieces together, you match the notches. This helps make sure the pieces fit together correctly. Sometimes there are double or triple notches. Match single to single, double to double, and triple to triple.
- Dots or Circles: These are small filled-in circles or dots. Like notches, they are matching points. They are often used for placing pockets, darts, or other details. You can mark these on your fabric with chalk or a fabric pen.
- Triangles: Similar to dots, these are also matching points, often used with notches.
- Darts: These are shaped lines (often like a diamond or triangle shape) on the pattern piece. Darts are sewn to take in fabric and give shape to the garment, like fitting a shirt at the waist or bust.
- Pleats: These are lines showing where to fold the fabric to create a pleat. There will be lines for folding and lines for matching.
- Buttonhole Placement: These are marks showing where to make buttonholes. They look like a long ‘I’ shape or a rectangle.
- Button Placement: These are marks showing where to sew the buttons. They are usually small ‘X’ shapes.
- Lengthen or Shorten Line: These are two parallel lines across the pattern piece. If you need to make a piece longer or shorter (like a sleeve or pant leg), you cut the pattern piece between these lines and spread or overlap the pieces before taping them.
- Fold Line (within the pattern piece): Sometimes there are lines within the pattern piece indicating where a piece needs to be folded after cutting, for things like hems or facings.
Here is a simple table of some common symbols:
| Symbol | Looks Like | Meaning |
|---|---|---|
| Grainline | Line with arrows | Line up with fabric selvage/straight grain |
| Place on Fold | Bracket or arrow to fold | Place this edge on folded fabric edge |
| Cutting Line | Solid or dashed outer line | Cut along this line |
| Stitching Line | Dashed or solid inner line | Sew along this line (seam line) |
| Single Notch | Short line or triangle | Matching point (cut a snip) |
| Double Notch | Two short lines/triangles | Matching point (cut two snips) |
| Dots/Circles | Small filled circle | Matching point or placement marker (mark fabric) |
| Dart | Diamond or triangle outline | Fold and sew to add shape |
| Lengthen/Shorten | Two parallel lines | Cut here to change length |
| Buttonhole Mark | ‘I’ shape or rectangle | Place buttonhole here |
| Button Placement | ‘X’ mark | Sew button here |
Grasping Sewing Pattern Ease
We talked about finished garment measurements showing “ease.” What is ease, really?
Ease is the amount of extra room a garment has beyond your body measurements. It is built into the pattern by the designer. There are two main types of ease:
- Wearing Ease: This is the minimum amount of extra room needed to move, sit, and breathe in a garment. Even a very fitted shirt needs wearing ease to lift your arms.
- Design Ease: This is extra room added by the designer to create a specific look or style. A loose, flowy dress has a lot of design ease. A tailored jacket has less design ease than a loose jacket.
Look at the finished garment measurements to understand the ease. If you choose a pattern size where the finished measurements are very close to your body size, expect a tight fit. If they are much larger, the fit will be loose. Knowing about ease helps you decide if the pattern’s intended fit is what you want or if you might need to pick a different size or make changes.
Pattern Layout on Fabric Instructions
Once you have picked your size, identified the right pattern pieces for your view, and prepared your fabric (like washing it!), you need to place the pieces on the fabric for cutting. This is where the layout diagrams on the instruction sheet come in.
Using the Layout Diagrams
The pattern company provides diagrams to show you the most fabric-efficient way to lay out the pieces for your chosen size and fabric width.
- Find the diagram for your specific pattern view, size, and fabric width (e.g., 45″ or 60″).
- The diagram shows how the fabric should be folded (if at all). Fabric can be folded in half lengthwise, crosswise, or not folded at all.
- It shows the shape of each pattern piece and where to put it on the fabric.
- Pay close attention to the grainline arrow on the pattern piece and how it lines up with the edge of the fabric fold or the selvage (the finished edge of the fabric). This is critical!
- If your fabric has a nap (like velvet or corduroy, where the fibers lie in one direction) or a one-way print, all the pattern pieces must be laid out with the top pointing in the same direction. The layout diagram will show this, and the fabric yardage chart will tell you if you need extra fabric for “with nap” layouts.
Pinning and Cutting
- Smooth your fabric on a large, flat surface.
- Fold the fabric as shown in the layout diagram.
- Place the pattern pieces on the fabric as shown in the diagram, paying very close attention to the grainline on each piece. Measure from the grainline arrow to the selvage or fabric fold at both ends of the arrow to make sure it is perfectly straight.
- Pin the pattern pieces securely to the fabric. Use enough pins to keep the edges flat.
- Carefully cut along the cutting line for your size.
- Snip the notches and mark the dots or other symbols onto your fabric pieces using tailor’s chalk, a fabric pen, or by cutting tiny snips inward (be careful not to snip past the seam allowance).
Sewing Pattern Adjustment Techniques
Pattern companies make patterns for a standard body shape and height. Most people do not fit this standard exactly. This is where learning basic pattern adjustments helps you get a better fit.
Why Adjust?
You might need to adjust if you are:
- Taller or shorter than the height the pattern was made for.
- Wider or narrower in certain areas compared to the pattern size.
- Have different proportions (e.g., a small bust with wide hips).
Simple Adjustments
Pattern instructions often show you how to do simple adjustments.
- Lengthening or Shortening: If a sleeve, pant leg, or top is too short or too long, you can adjust using the “lengthen or shorten” lines on the pattern piece. Cut the pattern on the lower line, spread the pieces apart by the needed amount (adding paper in the gap), and tape. Or, overlap the pieces by the needed amount and tape. Then, redraw the cutting and stitching lines smoothly.
- Width Adjustments: For minor width changes (like making a sleeve slightly wider or a pant leg narrower), you might adjust the cutting line slightly. For larger width changes, you might need to use techniques like the “slash and spread” method to add width evenly across a piece, or the “slash and overlap” method to remove width. These techniques involve cutting the pattern piece and spreading or overlapping it.
More complex adjustments exist for fitting different body shapes (like full bust adjustments or narrow shoulder adjustments). These are learned over time or from specific fitting guides. Start with the basics shown on the pattern sheet.
Sewing Pattern Terminology Guide
Sewing patterns use specific words. Knowing what they mean will help you understand the instructions better. Here is a guide to some common terms:
| Term | Simple Meaning |
|---|---|
| Selvage | The finished, non-fraying edge that runs along the length of the fabric. |
| Grain | The direction of the threads in the fabric. Straight grain runs parallel to the selvage. |
| Bias | The diagonal direction of the fabric (45 degrees to the selvage). Fabric cut on the bias is stretchy. |
| Right Side | The side of the fabric you want to show on the outside of your finished item. |
| Wrong Side | The side of the fabric that will be on the inside of your finished item. |
| Seam | The line where two pieces of fabric are joined by stitching. |
| Seam Allowance | The width of fabric between the stitching line and the cut edge. (Often 5/8 inch) |
| Notions | Small supplies needed for a project besides fabric (buttons, zippers, thread). |
| Interfacing | A material (often ironed on) used to give shape and stiffness to areas like collars or waistbands. |
| Facing | A piece of fabric used to finish a raw edge, like a neckline or armhole. |
| Hem | The finished edge at the bottom of a garment or sleeve. |
| Dart | A fold sewn into fabric to give it shape. |
| Pleat | A fold of fabric, usually pressed flat, used for fullness or decoration. |
| Gather | To pull a thread to make fabric fuller along a seam. |
| Staystitch | A line of machine stitching just inside the seam line to keep fabric from stretching out of shape. |
| Understitch | Stitching that holds a facing or lining to the seam allowance to keep it from showing on the outside. |
| Topstitch | Stitching done on the outside of a garment, often for decoration or strength. |
| Press | Using an iron to flatten seams or folds. Lift and lower the iron instead of sliding. |
| Baste | To sew with long, temporary stitches that you will remove later. |
| Finish Seams | Steps taken to keep the raw edges of seams from fraying (like using a serger or zigzag stitch). |
| View | A specific style version included in a pattern package (e.g., View A is a dress, View B is a top). |
Putting It All Together: The Sewing Process
Once you have read the envelope, measured yourself, chosen your size, interpreted the symbols, understood the ease, followed the layout, cut your fabric, and know the basic terms, you are ready to sew!
Follow the steps on the instruction sheet one by one. Take your time. The instructions will tell you which pieces to join, when to add notions, and how to finish edges.
Tips for Success
- Read Everything First: Before you even touch scissors, read the entire instruction sheet from start to finish. Look at the pictures. This helps you understand the whole process.
- Mark Your Pattern Size: If your pattern has many sizes, use a highlighter to mark the cutting line and any other lines (like stitching lines or dots) for your size. This helps prevent cutting the wrong line by mistake.
- Make a Copy: For multi-size patterns or if you plan to make adjustments, consider tracing your size onto different paper (like Swedish tracing paper or baking parchment). This keeps the original pattern whole if you want to make a different size or view later.
- Pre-wash Your Fabric: Most fabrics will shrink the first time they are washed. Wash and dry your fabric the same way you plan to wash the finished item before you cut the pattern pieces. This stops your finished project from shrinking after you make it.
- Practice on Scrap Fabric: If a step seems tricky (like a zipper or buttonhole), practice it on a small piece of your fabric before you sew it on your actual project.
- Press as You Sew: Do not wait until the end to press seams and folds. Pressing as you go makes your sewing look much more professional and makes later steps easier.
- Be Patient: Learning to sew and read patterns takes time and practice. Do not get discouraged if your first project is not perfect. Every stitch is a step in learning!
FAQ: Common Questions About Sewing Patterns
What if my measurements fall into different sizes?
This is very common! Choose the size based on your largest measurement for tops and dresses (usually bust) or bottoms (usually hips). Be prepared to make adjustments in the other areas. Looking at finished garment measurements helps you see how much ease is in those other areas.
Can I use a pattern made for woven fabric with knit fabric?
Generally, no. Patterns made for woven fabric do not have enough negative ease (stretch taken out) for knits. Patterns for knits are made to stretch and fit differently. Always use a pattern designed for the type of fabric you have.
What does “with nap” mean?
“Nap” refers to fabrics like velvet, corduroy, or even some prints where the surface texture or design goes in one direction. If you run your hand over velvet, it feels different one way than the other. For these fabrics, all pattern pieces must be laid out facing the same direction (usually top edge up) to ensure the color and texture look consistent on the finished item. This often requires more fabric, which is why the “with nap” yardage is higher.
How do I know if a pattern is right for a beginner?
Look on the pattern envelope. Many pattern companies label patterns as “Easy,” “Very Easy,” or similar terms. Simple designs with few pieces, no zippers, or simple elastic waists are usually good choices for beginners.
Do I need to buy special paper to trace patterns?
No, you do not need special paper. Many people use baking parchment paper, medical exam table paper (sold in rolls), or even large sheets of newsprint or wrapping paper. Swedish tracing paper is nice because you can sew through it, but it is not required.
What if the pattern pieces are wrinkled?
You can gently press the tissue pattern pieces with a dry iron on a low heat setting. Test on a small edge first to make sure it doesn’t melt or stick.
Reading a sewing pattern might seem like a lot at first. But each part gives you the details you need to create something wonderful. Take it one step at a time. Look closely at the envelope, measure carefully, study the symbols, and follow the instructions. With a little practice, you will be reading patterns like a pro and making a wardrobe that fits you perfectly!