
Image Source: letslearntosew.com
Your Essential Guide: How To Read Patterns For Sewing
What is a sewing pattern, and why do you need one? Can a beginner really learn to read them? Yes, you absolutely can! A sewing pattern is like a map and a set of instructions for making clothes or other fabric items. It shows you the shapes you need to cut from your fabric and tells you how to put them together. Using a pattern helps you make things that fit and look great. This guide will show you how to read them step by step.
Starting With the Pattern Envelope
The first thing you see is the pattern envelope. It gives you a lot of important details even before you open it. Think of it as the cover of a book. It tells you what the project is and who it’s for.
The Front of the Envelope
- Pictures: There are pictures of the finished project. Sometimes you see different versions, like a dress with sleeves and one without. This shows you the style options the pattern offers.
- Description: A short write-up explains what the item is. It might say “Misses’ Dress” or “Children’s Pajamas.” It also lists the different styles or “views” included in the pattern. These views are usually labeled A, B, C, etc.
The Back of the Envelope
This is where you find the really useful stuff.
- Body Measurements and Pattern Sizing: This chart is super important. It lists body measurements (like bust, waist, hips for clothes) and tells you which pattern size matches those numbers. Pattern sizes are NOT the same as store clothing sizes. Always use your body measurements, not the size you buy in shops.
- Suggested Fabrics: The pattern designer suggests types of fabric that work well for the design. For example, a flowy dress might suggest rayon or chiffon. A structured jacket might suggest denim or tweed. Using the suggested fabrics helps ensure the finished item looks like the picture.
- Fabric Yardage Chart: This chart tells you how much fabric you need. It lists the different sizes and the different fabric widths (like 45 inches or 60 inches). You find your size and the width of the fabric you plan to buy, and it tells you the fabric yardage required. It also lists extra fabric needed for linings, interfacing, or notions (buttons, zippers, elastic).
- Notions List: This is a list of everything else you need besides fabric. This includes things like zippers, buttons, elastic, thread, hooks and eyes, or interfacing.
- Skill Level: The pattern usually tells you if it’s easy, average, or advanced. Beginners should look for “easy” or “learn to sew” patterns.
Opening the Pattern Envelope
Inside the envelope, you will find two main things:
1. Large sheets of tissue paper with the pattern pieces printed on them.
2. An instruction sheet or booklet detailing how to sew the project. This is your set of sewing pattern instructions.
Keep these together! It’s a good idea to store the tissue pieces back in the envelope after use.
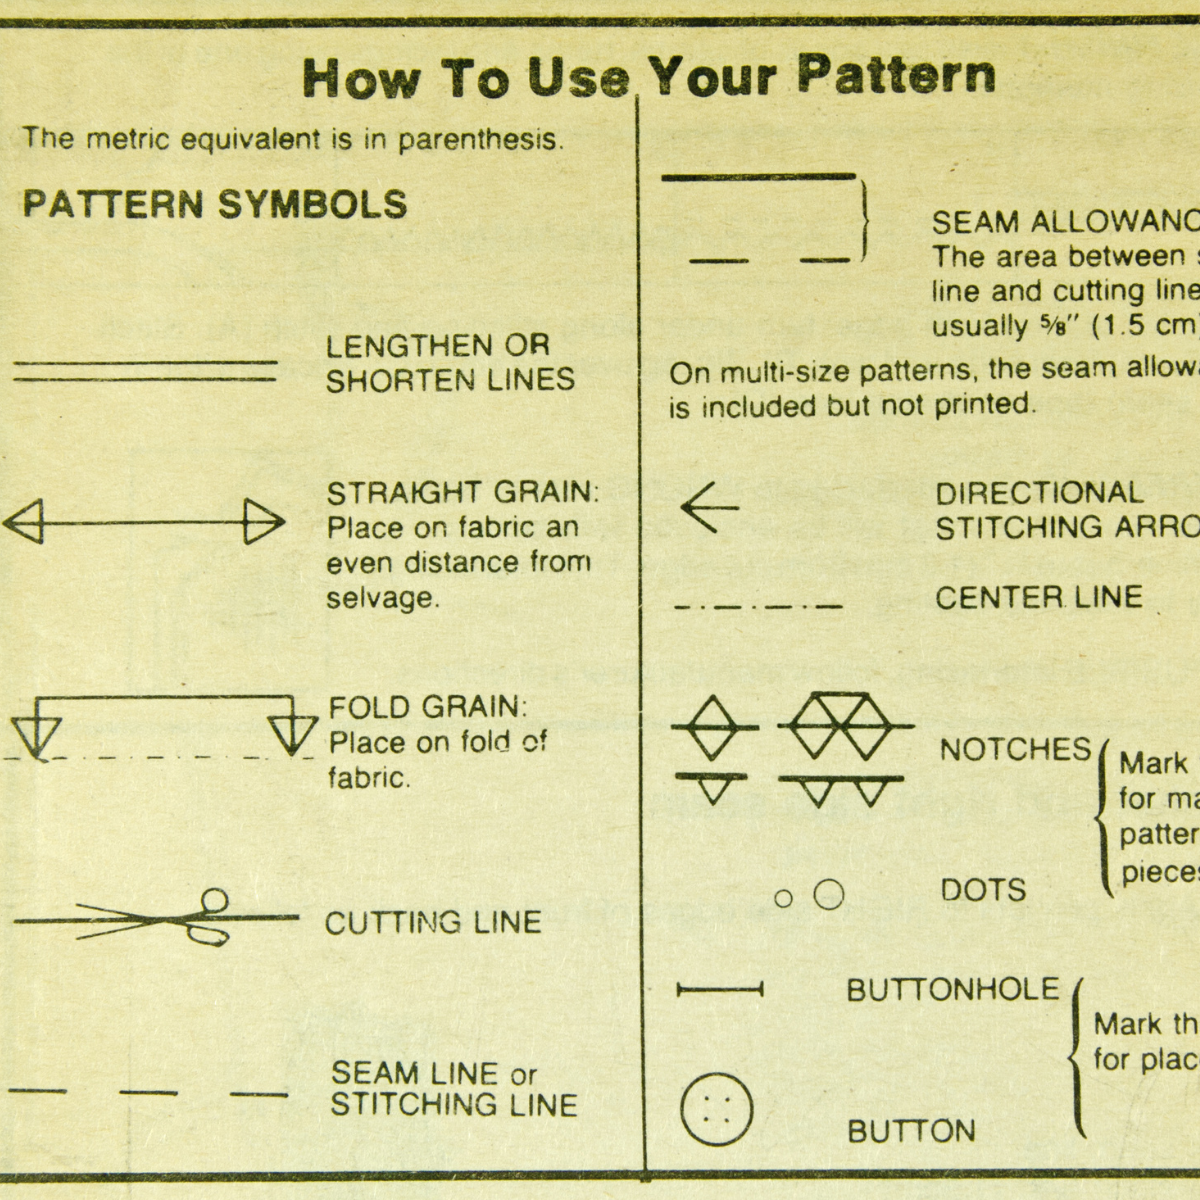
Interpreting Pattern Symbols and Pattern Markings
The pattern pieces have lines and shapes printed on them. These are not just random drawings. They are pattern symbols and pattern markings. They tell you how to place the pattern pieces on the fabric, where to cut, and how to put the pieces together. Learning these symbols is key to using a pattern successfully.
Let’s look at the most common ones.
The Grainline
- What it is: The grainline is a long, straight line with arrows on both ends.
- What it means: This line must be placed parallel to the selvage edge of your fabric. The selvage is the tightly woven edge that runs along the length of the fabric.
- Why it matters: Placing the grainline correctly ensures your garment hangs properly and doesn’t twist or stretch out of shape. It uses the natural direction of the fabric threads.
- How to use it: You will measure from the grainline marking on the pattern piece to the selvage edge of the fabric. Make sure the distance is the same all along the line.
Notches
- What they are: Notches are short lines or diamond shapes sticking out from the edge of a pattern piece.
- What they mean: Notches are used for matching up pattern pieces. When you sew two pieces together, the notches on one piece should match the notches on the other piece.
- Types of Notches:
- Single notches: Used for matching front pieces or simple seams.
- Double notches: Often mark the back sections or points that need special attention.
- Triple notches: Often mark the back sections on more complex patterns.
- How to use them: When you cut your fabric, make small snips or marks on the edge of the fabric where the notches are. Don’t cut the notches themselves off! You’ll use these marks when you sew to align the fabric edges correctly.
Dots, Squares, and Triangles
- What they are: Small circles (dots), squares, or triangles printed on the pattern pieces, usually inside the cutting line.
- What they mean: These pattern symbols mark important points. They could mean:
- Placement for pockets, pleats, or darts.
- Points where seams meet.
- Where to stop stitching.
- Button or buttonhole placement.
- How to use them: You transfer these markings from the tissue pattern piece to your fabric using tailor’s chalk, fabric pens, or pins.
Cutting Lines
- What they are: These are the lines you cut along. They are usually solid lines, sometimes thick ones.
- What they mean: This is the outline of the fabric piece you need. They include seam allowances.
- How to use them: Place the pattern piece on your fabric, pin it, and cut carefully along these lines with sharp fabric scissors.
Stitching Lines
- What they are: These are often dashed or dotted lines, usually located inside the cutting line.
- What they mean: This is the line where you will sew. The space between the cutting line and the stitching line is the seam allowance. The pattern instructions will tell you the width of the seam allowance (e.g., 5/8 inch or 1.5 cm).
- How to use them: You don’t usually mark the stitching line on your fabric, but it’s important to know where it is. Your sewing machine foot often has guides to help you sew the correct distance from the edge (which is the seam allowance).
Fold Lines
- What they are: A line with a bent arrow or an arrow pointing towards an edge that says “Place on Fold.”
- What they mean: This edge of the pattern piece must be placed exactly on a folded edge of your fabric.
- Why it matters: This creates a symmetrical piece without a seam, like the center front of a dress or the back of a skirt.
- How to use it: Fold your fabric so the folded edge is smooth. Place the pattern piece so the “Place on Fold” line sits right on the fabric fold. Pin it there before cutting.
Other Pattern Markings
Patterns include many other specific markings:
- Darts: These are triangular or diamond shapes marked by dots and lines. They are stitched to shape flat fabric to fit curves (like the bust or waist). You fold the fabric and sew along the lines connecting the dots.
- Pleats: These markings show where to fold fabric to create pleats. Arrows indicate the direction of the fold.
- Gathering Lines: Often two parallel lines of dots within a section. You sew along these lines with long stitches to gather the fabric.
- Button and Buttonhole Placement: Small symbols (often a square or circle for a button, and a line with crossbars for a buttonhole) show you where to put closures.
- Lengthen/Shorten Lines: Double lines across a pattern piece. You use these if you need to make the garment longer or shorter. You cut the pattern piece along the line, spread it apart or overlap it the needed amount, and tape it back together.
Table of Common Pattern Symbols
Here is a quick reference for common pattern symbols you will see:
| Symbol | Description | Meaning and Use |
|---|---|---|
 |
Long line with arrows on both ends. | Place this line parallel to the fabric selvage. Controls how the fabric hangs. |
 |
Short line or diamond on the edge. | Use to match pattern pieces together accurately. Single notch matches single. |
 |
Two short lines or diamonds on the edge. | Use to match pattern pieces, often on back sections. Double matches double. |
 |
Three short lines or diamonds on the edge. | Use to match pattern pieces, often on back sections. Triple matches triple. |
 |
Small circle inside the cutting line. | Marks a specific point: placement for details, pivot points, stop points. |
 |
Small square inside the cutting line. | Marks a specific point, similar to a dot. |
 |
Small triangle inside the cutting line. | Marks a specific point, similar to a dot or square. |
 |
Solid line (often thicker) on the outer edge. | CUT along this line. It includes the seam allowance. |
 |
Dashed or dotted line inside the cutting line. | SEW along this line. This is the sewing line. |
 |
Line with bent arrow pointing to the edge. | Place this edge of the pattern piece exactly on a folded edge of the fabric. |
 |
Lines and dots forming a triangle or diamond. | Mark these points to sew darts and shape the fabric. |
 |
Line with crossbars. | Mark this for buttonhole placement and size. |
 |
Circle or square. | Mark this for button placement. |
 |
Parallel dotted or dashed lines. | Sew between these lines with long stitches to create gathers. |
 |
Double parallel lines across the pattern piece. | Cut here to adjust the length of the pattern piece. |
(Note: Symbols can look slightly different depending on the pattern company, but the basic shapes and meanings are usually the same. Always check the pattern instructions key!)
Figuring Out Pattern Sizing
One of the trickiest parts for new sewers is pattern sizing. As mentioned, pattern sizes are different from the sizes you wear in stores.
- Measure Yourself: Use a tape measure to find your current bust, waist, and hip measurements. For other patterns, you might need height or back waist length. Write these down.
- Compare to the Chart: Look at the pattern sizing chart on the back of the envelope. Find the size that best matches your measurements.
- Choose Based on Key Measurement: For dresses, tops, and jackets, pick the size based on your bust measurement. For skirts and pants, pick the size based on your hip measurement. Your other measurements might not match perfectly. This is normal!
- Blending Sizes: Sometimes your measurements fall between sizes, or you might be one size on top and a different size on the bottom. Experienced sewers can blend between sizes on the pattern pieces. As a beginner, choose the size that is closest to your most important measurement (bust for tops, hip for bottoms) or the largest size if between sizes, as it’s easier to take fabric away than add it.
Checking Fabric Yardage
Once you know your size and have chosen your fabric, you need to know how much to buy. The fabric yardage chart on the envelope back tells you this.
- Find Your Size: Look down the left side of the chart for the size you chose.
- Find Your Fabric Width: Fabric comes in different widths, most commonly 45 inches or 60 inches (or about 115 cm and 150 cm). Check the bolt of fabric at the store to see its width.
- Read the Yardage: Go across the row for your size to the column for your fabric width. The number there is the amount of fabric you need in yards or meters.
- Check Different Views: If the pattern has different views (A, B, C), the fabric yardage might be different for each view. Make sure you look at the yardage listed for the specific view you want to make.
- Consider Nap: If your fabric has a “nap” (like velvet or corduroy, where the fibers lay in one direction), or if it has a directional print (like flowers all facing up), you might need extra fabric. The pattern envelope will often list separate yardage for fabrics with nap.
Getting the Pattern Pieces Ready
Now you are ready to work with the tissue paper pattern pieces themselves.
- Identify Your Pieces: The instruction sheet will list the pattern pieces you need for the specific view you are making. They are usually numbered or lettered. Find these pieces on the tissue sheets. They might be overlapping with pieces for other views or sizes.
- Cut Out Your Size: The pattern pieces have lines for different sizes. These lines are usually different styles (like a solid line for one size, a dashed line for another, a dash-dot line for another). Find the line for the size you chose based on your measurements. Carefully cut along that line for all the pattern pieces you need.
- Smooth the Tissue: Pattern tissue can be very wrinkled. You can lightly press it with a cool, dry iron (NO steam!) to flatten it out. This makes it easier to place on the fabric.
Looking at the Cutting Layout
Before you cut your fabric, you must look at the cutting layout diagrams in the sewing pattern instructions. This is another critical map.
- What it is: The cutting layout shows you how to arrange the pattern pieces on your fabric efficiently. There are different diagrams depending on the fabric width you are using (45″ or 60″) and sometimes depending on your size.
- Why it matters: Following the cutting layout saves fabric and ensures you place pieces correctly in relation to the grainline or on the fold.
- How to use it:
- Look at the diagrams and find the one that matches your view, your size (sometimes), and your fabric width.
- Follow the diagram exactly to fold your fabric (if needed) and place the pattern pieces on top.
- Pay close attention to which pieces are placed on the fabric fold and which have the grainline parallel to the selvage.
- Use pins to secure the pattern pieces to the fabric. Place pins smoothly, not puckering the fabric.
Following the Sewing Pattern Instructions
The instruction sheet is your step-by-step guide to sewing the garment. Don’t skip reading it!
- Read First: Before you even touch your fabric or sewing machine, read through the sewing pattern instructions completely. Get a general idea of the steps involved.
- Glossary/Key: Most instruction sheets have a key to the pattern symbols and a glossary of sewing terms. Refer back to this if you forget what a symbol means or what a certain sewing term (like “baste,” “staystitch,” “finish seam”) means.
- Step-by-Step: The instructions are broken down into numbered or lettered steps. Follow them in order.
- Diagrams: The instructions include diagrams showing what your fabric pieces should look like at each step. These diagrams are very helpful. They show you where to sew, how to press seams, and how to assemble parts. Match your work to the diagrams.
- Specific Techniques: The instructions will tell you how to do specific things like inserting a zipper, sewing a dart, or making a buttonhole.
Putting It All Together: The Process
Let’s recap the steps you’ll take when using a pattern:
- Get Your Measurements: Measure your body accurately.
- Choose Your Size: Use the pattern sizing chart on the envelope to find your size. Remember pattern sizes are different from store sizes.
- Check Fabric Yardage and Notions: Look at the back of the envelope to see how much fabric and what other supplies you need for your chosen size and view.
- Buy Supplies: Purchase your fabric, thread, zipper, buttons, etc. Pre-wash your fabric if needed (most fabrics shrink!).
- Find Pattern Pieces: Locate all the required pattern pieces for your view and size on the tissue sheets.
- Cut Out Your Size: Carefully cut out the pattern pieces along the line for your chosen size.
- Decipher Pattern Symbols: Look over your cut-out pieces and identify the grainline, notches, dots, and other pattern markings. Understand what they mean.
- Study Cutting Layout: Find the correct cutting layout diagram for your fabric width and size.
- Lay Out Fabric and Pieces: Fold your fabric as shown in the cutting layout. Place the pattern pieces on the fabric following the diagram exactly, paying attention to the grainline and “Place on Fold” lines. Pin the pieces down.
- Cut Fabric: Carefully cut out your fabric pieces following the cutting lines on the pattern. Transfer any dots, squares, triangles, or other pattern markings from the tissue to your fabric. Clip notches onto the fabric edges.
- Read Sewing Pattern Instructions: Read the instructions through once completely.
- Start Sewing: Follow the sewing pattern instructions step by step, using the diagrams and matching up your notches and other markings as you go.
Fathoming Common Challenges
Sometimes things don’t seem right when you’re following a pattern. Here are a few common issues:
- My measurements don’t match any one size: Choose the size based on the most important measurement for that garment (bust for tops, hip for bottoms). You can learn to make adjustments later, or simply choose the closest size – it’s often easier to take in a garment that’s too big than to let out one that’s too small.
- The pattern pieces overlap on the tissue paper: This is normal. You only cut out the pieces and the lines needed for your chosen size and view. Ignore the other lines.
- I don’t understand a symbol: Check the key on the instruction sheet or refer back to the table above. If it’s still unclear, a quick online search for the symbol from that pattern company can often help.
- The cutting layout seems wasteful: Pattern companies try to be efficient, but sometimes you might find a slightly better way to lay out smaller pieces after cutting the main ones. However, always follow the initial layout for the main pieces, paying close attention to the grainline and fold placement. These are critical.
- The sewing pattern instructions use terms I don’t know: Look at the glossary on the instruction sheet. If there isn’t one, search online for the term (e.g., “what does ‘baste’ mean in sewing?”).
Taking the Next Step
Learning to read patterns opens up a world of possibilities for making your own clothes and home items. It might seem like a lot at first, but like any new skill, it gets easier with practice. Start with a simple pattern for a beginner project (like a pajama simple top, skirt, or tote bag). Focus on understanding the pattern envelope, pattern symbols, grainline, notches, cutting layout, and following the sewing pattern instructions. Each project you complete will build your confidence and knowledge. Soon, reading patterns will feel like reading any other guide!
Frequently Asked Questions (FAQ)
Q: Do I need to wash my fabric before using the pattern?
A: Yes, usually. Most fabrics shrink the first time they are washed and dried. Pre-washing prevents your finished garment from shrinking later. Check the fabric care instructions.
Q: What is “interfacing” mentioned in the notions list?
A: Interfacing is a fabric that gives stiffness or support to certain areas of a garment, like collars, cuffs, or waistbands. It can be ironed on (fusible) or sewn in.
Q: Can I use a fabric that is not on the suggested fabrics list?
A: You can, but be aware the final result might look or feel different. The suggested fabrics are chosen because they have the right weight, drape, or stretch for the design. A fabric that is too stiff, too heavy, or too light might not work well.
Q: What does “selvage” mean?
A: The selvage (or selvedge) is the tightly woven edge along the length of the fabric. It doesn’t fray. The grainline on the pattern piece is always placed parallel to this edge.
Q: How do I transfer pattern markings to my fabric?
A: There are several ways:
* Tailor’s chalk: Rub chalk over the symbol, or trace through the tissue.
* Fabric marking pens/pencils: Trace the symbol onto the fabric. Use washable or air-erasable ones.
* Tracing wheel and paper: Place special tracing paper between the pattern and fabric, and roll a tracing wheel over the lines/symbols.
* Tailor’s tacks: Use thread to make small loops through the pattern and fabric at key points like dots.
Choose a method that works for your fabric type and won’t be visible on the finished project.
Q: What if I mess up a step?
A: Don’t worry! Sewing is a skill that takes practice. Most mistakes can be fixed. Use a seam ripper carefully to undo stitches and try the step again. The more you sew, the fewer mistakes you’ll make.
Reading a sewing pattern is a fundamental skill for anyone wanting to sew garments or other projects. Take your time, read everything, pay attention to the pattern markings and pattern symbols, and follow the sewing pattern instructions step by step. Happy sewing!