
Hey there, new sewer! Wondering what all that text and those pictures on the back of a sewing pattern envelope mean? This guide is for you! The back of the envelope holds all the important sewing pattern envelope information you need. It tells you things like what fabric works best, how much fabric you need, what other bits and pieces (like zippers or buttons) you need, what size you should make, and how tricky the project is. Think of it as the instruction manual before you even open the packet. Reading it helps you pick the right supplies and gives you a clear idea of what you are getting into.
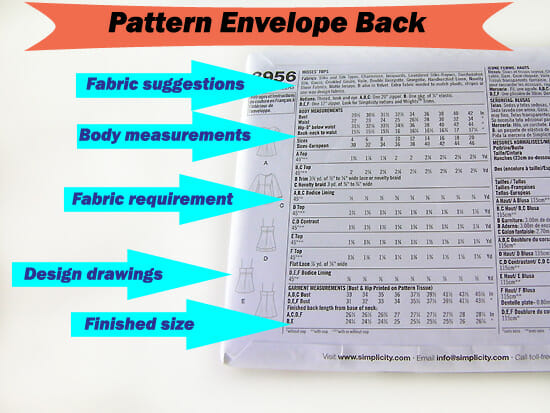
Image Source: so-sew-easy.com
Why the Back of the Envelope Matters
Okay, so why spend time looking at the back? It’s simple. The back of the pattern envelope is your first and most important tool. It stops you from guessing. It tells you what you need before you go shopping for fabric and supplies.
If you skip reading the back, you might buy the wrong fabric. A stiff fabric for a flowy dress won’t work. You might buy too much fabric, or not enough. You might get home and find you forgot the zipper you needed. Reading the back saves you time, saves you money, and helps your project turn out right. It’s the map for your sewing journey.
Decoding Key Information on the Back
The back of a sewing pattern envelope packs a lot of details into a small space. Let’s break it down piece by piece.
Deciphering Difficulty Levels
One of the first things you might look for is how hard the project is. Pattern companies use different ways to show this.
- Symbols: Many companies use symbols. Stars are very common.
- One star (*) often means “Easy.” These patterns are great for beginners. They usually have simple shapes, few pieces, and basic steps.
- Two stars (**) might mean “Easy to Medium” or “Average.” They might have a few more steps, maybe a simple zipper or collar.
- Three stars (***) or more usually mean “Advanced” or “Complex.” These are for sewers with more skill. They might include tailored collars, tricky pockets, or complex closures.
- Words: Sometimes the difficulty is written out. You might see words like “Beginner,” “Easy,” “Average,” “Intermediate,” or “Advanced.”
Knowing the sewing pattern difficulty levels helps you pick projects that match your current skills. Don’t feel bad starting with “Easy.” That’s how you build confidence!
Grasping Available Sizes
Patterns usually come in a range of sizes in one envelope. The back will list the sizes included.
- Size Numbers: You will see a list of size numbers, like 8, 10, 12, 14, 16, 18. Reading sewing pattern sizes is different from ready-to-wear clothing sizes you buy in shops. Pattern sizes are often based on older measurement systems or different blocks. Do not just pick the size you buy in a shop.
- Body Measurement Chart: This is super important! The back of the envelope will have a chart. It lists key body measurements like Bust, Waist, and Hip. It shows which size number goes with those measurements.
- You need to measure yourself with a tape measure. Wear light clothing. Have someone help you for best results.
- Compare your body measurements to the chart on the pattern back.
- Find the size that best matches your measurements. For dresses or tops, the bust measurement is usually the most important for picking a size. For skirts or pants, waist and hip are key.
This chart is crucial for choosing sewing pattern size. It’s okay if your measurements don’t fit perfectly into one size. Many people are a different size on top than on the bottom. The pattern pieces inside are usually marked for all sizes included, so you can blend between sizes if needed.
Suggested Fabrics and What They Mean
The back of the envelope lists suggested fabrics sewing pattern. This is not just a suggestion; it’s a guide based on how the finished garment should look and feel.
- Why They Suggest Fabrics: The designers pick fabrics that have the right “hand” (how it feels) and “drape” (how it hangs) for the style.
- A flowy dress might suggest rayon challis or silk. These fabrics drape softly.
- A structured jacket might suggest denim or twill. These fabrics are stiffer and hold shape.
- A t-shirt might suggest knit fabric. Knits stretch.
- Common Fabric Types: You’ll see names like:
- Cotton (Quilting cotton, broadcloth)
- Linen
- Rayon (Challis, Crepe)
- Silk (Charmeuse, Crepe de Chine)
- Wool (Crepe, Gabardine)
- Knit fabrics (Jersey, Interlock, French Terry)
- Denim
- Twill
- Satin
- Velvet
- What to Look For: The list might say something like “Lightweight cotton, rayon, crepe, challis.” This means any of those types should work well. It might also say “No obvious diagonals” or “Fabrics with nap.”
- “Nap” refers to fabrics with a pile or direction, like velvet or corduroy. These need extra fabric because all the pattern pieces must be laid out going the same way.
Choosing one of the suggested fabrics sewing pattern helps make sure your finished item looks like the picture on the envelope. Using a fabric that is too stiff or too drapey can change how the garment hangs and fits.
The Notions List Explained
Besides the main fabric, you almost always need other things to finish your project. These are called notions. The back of the envelope has a sewing pattern notions list.
- What are Notions? Notions are the smaller bits and pieces needed.
- Thread: You’ll need thread to match your fabric. The list will say “Thread.”
- Zippers: If the garment has a zipper, the list will say “Zipper” and tell you the length needed (e.g., “7 inch zipper”). Make sure to get the correct length.
- Buttons: If there are buttons, the list will say “Buttons” and tell you the number and size (e.g., “3 buttons, 1/2 inch”).
- Elastic: For waistbands or cuffs, the list will say “Elastic” and give you the width (e.g., “1 inch wide elastic”). You’ll cut the length needed based on your size inside the pattern instructions.
- Interfacing: This is a fabric used inside collars, cuffs, or waistbands to give them stiffness or shape. The list will tell you the type (like “Fusible interfacing”) and how much you need.
- Other Items: Sometimes you need things like hook and eye closures, snaps, ribbon, or trim.
Check this sewing pattern notions list carefully before you go shopping. It’s easy to forget one small item!
Interpreting the Numbers and Charts
Beyond sizes and lists, the back of the envelope has charts with numbers. These tell you how much fabric to buy and how big the finished garment will be.
The Fabric Yardage Chart – Your Fabric Map
This chart tells you exactly how much fabric to buy for your chosen size and view. This is your fabric yardage chart. It looks like a table.
Here’s a simple example of what a fabric yardage chart might look like:
| View | Size | 45″ Fabric Yardage | 60″ Fabric Yardage |
|---|---|---|---|
| A | 8 | 2 1/2 yards | 1 3/4 yards |
| 10 | 2 5/8 yards | 1 7/8 yards | |
| 12 | 2 3/4 yards | 2 yards | |
| B | 8 | 1 7/8 yards | 1 1/2 yards |
| 10 | 2 yards | 1 5/8 yards | |
| 12 | 2 1/8 yards | 1 3/4 yards |
Let’s break down the parts:
View
Most patterns offer different styles or “views” from the same basic design. View A might be a dress, View B a top, View C a top with different sleeves. The yardage chart lists the amounts for each view. Choose which view you want to make first.
Fabric Widths
Fabric comes in different standard widths. The most common are 45 inches (often used for quilting cottons or lighter dress fabrics) and 60 inches (common for knit fabrics, denims, and home décor fabrics). The chart gives yardage amounts for the different widths the suggested fabrics sewing pattern come in.
- Why Width Matters: You need less fabric in length if the fabric is wider, because you can fit more pattern pieces across its width when laying them out.
- Checking Fabric Width: When you buy fabric, the width is usually printed on the end of the bolt. Or ask the shop assistant. Make sure you look at the correct column in the chart for the width of the fabric you are buying.
Sizes and Yardage
Once you know your size (from the body measurement chart) and your chosen view, find that row in the table. Then look across to the column that matches your fabric’s width. The number there is the minimum amount of fabric you need in yards (or meters, depending on where the pattern is from).
- Buying Fabric: It’s always a good idea to buy a little extra fabric, maybe an extra 1/4 or 1/2 yard, especially if you are a beginner. This gives you room for mistakes or if your fabric shrinks when pre-washing.
So, using the example chart: If you are making View B, you are a size 10, and you found a lovely fabric that is 60 inches wide, you need 1 5/8 yards of fabric.
This fabric yardage chart is essential for smart fabric shopping!
Finished Garment Measurements – Know Your Fit
This chart is different from the body measurement chart. The finished garment measurements tell you the actual size of the item after you sew it.
- What It Shows: It usually gives measurements like the finished bust/chest, waist, or hip of the garment for each size. It might also list finished length.
- Why It’s Useful: Garments need “ease.” Ease is the extra room in the clothing beyond your body measurements.
- “Design ease” is built in by the designer to create the style (e.g., a loose, flowy top has more design ease than a fitted dress).
- “Wearing ease” is the minimum amount needed to move and breathe comfortably.
- Checking Fit: By looking at the finished garment measurements and comparing them to your body measurements, you can see how much ease is included.
- If your bust is 36 inches, and the finished garment bust for your size is 40 inches, that’s 4 inches of ease. Is that enough room? Too much?
- This helps you decide if you need to adjust the size based on how you like your clothes to fit (tight, loose, just right). It also helps if your measurements fall between sizes on the body measurement chart; you can look at the finished garment measurements to see which size might be closer to what you want.
This chart gives you a better idea of the final fit compared to just looking at your body size number.
What Else You Might See
The back of the envelope often includes images and sometimes brief notes about what’s inside.
Pattern Layout Diagrams
While the detailed instructions and pattern layout diagrams showing you how to place pattern pieces on fabric are inside the envelope, the back often gives you a preview.
- Views: The back will show pictures or drawings of the different views (styles) you can make from the pattern. This helps you pick which version you want before you even look at the fabric needed.
- Piece Count: Sometimes, the back tells you how many pattern pieces are included for each view. This gives you an idea of the complexity. More pieces usually mean more seams and steps.
- Diagrams or Photos: The back often has small technical drawings or photos of the finished garments from different angles. This helps you see details like waistbands, sleeves, or back closures.
So, while the full pattern layout diagrams are hidden inside, the back gives you visual hints about the project.
Symbols on the Back
Besides the difficulty symbols (stars), the back might use other small pictures or symbols as part of the sewing pattern envelope information.
- Body Measurement Symbols: Sometimes small icons represent Bust, Waist, and Hip next to the numbers.
- Metric/Imperial: Symbols might indicate if measurements are in inches (imperial) or centimeters (metric).
- Fabric Type Icons: Less common on the back, but sometimes symbols might suggest fabric stretch (for knits).
- General Symbols: Remember that sewing pattern symbols used for cutting, marking, and sewing (like dots, triangles, grainlines) are explained inside the pattern instructions. The back only uses a few key symbols for quick information.
If you see a symbol on the back you don’t recognize, don’t worry too much. The most important sewing pattern symbols for construction are explained in detail on the instruction sheet inside the envelope. For the back, focus on the difficulty symbols and any symbols used in the measurement charts.
Putting It All Together: Choosing Your Path
Now you know what each part of the back of the pattern means. Let’s talk about how to use all this sewing pattern envelope information to get ready to sew. This is where choosing sewing pattern size and picking your materials comes together.
- Look at the Pictures: Decide which view you want to make. Make sure you like the style.
- Check the Difficulty: Is it right for your skill level? If you’re new, stick to “Easy.”
- Measure Yourself: Get your current Bust, Waist, and Hip measurements. Write them down.
- Find Your Size on the Body Chart: Compare your measurements to the chart on the pattern back. Identify the size number that matches best. This is the size you will likely cut. Remember to focus on the key measurement for that garment type (bust for tops/dresses, waist/hip for bottoms). This is your starting point for choosing sewing pattern size.
- Look at Finished Garment Measurements: See how much ease the pattern has in your chosen size. Is that the fit you want? If you want it tighter or looser, you might pick a size down or up, but be careful if you are a beginner. Using the recommended size based on body measurements is usually safest first.
- Read Suggested Fabrics: Think about the type of fabric you need. Does the list match the kind of fabric you want to use or can easily find?
- Check the Yardage Chart: Find your chosen view, your size, and the width of the fabric you plan to buy. Note the yardage needed. Add a little extra just in case. This uses the fabric yardage chart.
- Check the Notions List: Make a list of everything else you need: thread, zipper length, number and size of buttons, elastic width, interfacing, etc. This is your sewing pattern notions list.
- Go Shopping: Now you have all the info! You know what size you are making, what fabric type to look for, how much fabric to buy based on the fabric yardage chart and width, and all the notions from the sewing pattern notions list.
Following these steps using the sewing pattern envelope information makes the start of your project much smoother. It takes away the guesswork and sets you up for success. Choosing sewing pattern size and buying supplies based on the back of the envelope is a key first step in sewing.
FAQ
Here are some common questions beginners have after looking at the back of a pattern:
Q: What if my body measurements are between sizes on the chart?
A: This happens often! If you are a beginner, it’s often easiest to pick the size that matches your largest important measurement (bust for tops/dresses, hip for bottoms). For example, if your bust is size 12 but your waist is size 14, pick size 12 for a top. As you get more practice, you can learn to blend between sizes on the actual pattern pieces.
Q: Can I use a fabric that is NOT on the suggested fabrics list?
A: Maybe, but be careful. The suggested fabrics sewing pattern are picked for a reason. Using a very different fabric (like a stiff cotton when a flowy rayon is suggested) will change how the garment hangs and fits. If you are new to sewing, it’s best to stick to the list. As you learn more, you can experiment with different fabrics and understand how they behave.
Q: What if I can’t find the exact notions on the list?
A: For some notions, there is wiggle room. You can usually use a similar color of thread. For buttons, you can often use a slightly different size if the needed size isn’t available. However, things like zipper length and elastic width are usually important and harder to substitute. Check sewing supply shops for specific items.
Q: Do I need to pre-wash my fabric?
A: Yes, always pre-wash your fabric the way you plan to wash the finished garment. Fabrics can shrink, and it’s better for the shrinking to happen before you cut and sew. This helps prevent your finished item from shrinking unevenly or changing shape after you wash it.
Q: Why are pattern sizes different from shop clothing sizes?
A: Ready-to-wear clothing sizes can vary a lot between brands. Pattern sizes are based on standard body measurement charts that have been used in the sewing industry for a long time. They are more consistent than shop sizes. That’s why using your body measurements with the pattern’s chart is essential, rather than just picking your usual shop size.
In Closing
See? The back of a sewing pattern envelope isn’t scary at all! It’s a source of really useful sewing pattern envelope information. Taking the time to read and understand the sewing pattern difficulty levels, reading sewing pattern sizes, checking the suggested fabrics sewing pattern, making note of the sewing pattern notions list, studying the fabric yardage chart and finished garment measurements, and looking at the small pictures or pattern layout diagrams helps you start your sewing project the right way. It makes choosing sewing pattern size and gathering your supplies simple and clear.
Happy sewing! You’ve got this.