
Yes, you can remove embroidery from fabric. The process depends on the type of fabric, the thread used, and the complexity of the embroidery design.
Many people want to know how to remove embroidery from a beloved garment or a piece of fabric that no longer fits their style. Whether you’ve inherited a beautifully embroidered item with an outdated design, made a mistake on a project, or simply want to repurpose fabric, embroidery removal is a common need. This guide will walk you through various stitch removal techniques, from simple methods to more involved processes, ensuring you can confidently tackle fabric unstitching and achieve a clean finish.
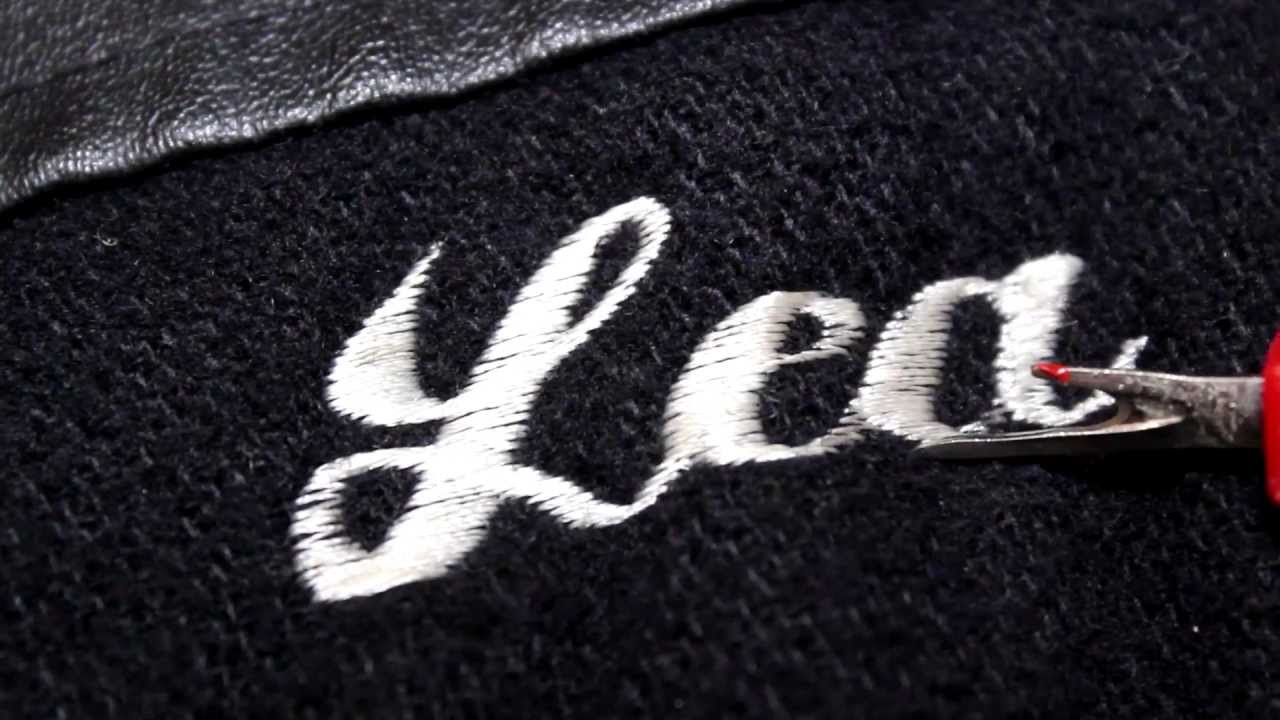
Image Source: i.ytimg.com
Why Remove Embroidery?
There are several compelling reasons to embark on the journey of embroidery removal:
- Repurposing Fabric: An embroidered piece might be stunning, but perhaps the design or color doesn’t match your current decor or wardrobe. Removing the embroidery allows you to use the fabric for a new project.
- Correcting Mistakes: Whether you’re a seasoned embroiderer or a beginner, mistakes happen. You might have a crooked line, a misplaced stitch, or used the wrong color. Removing the faulty stitching lets you correct the error.
- Restoring Garments: Sometimes, embroidery can become worn, faded, or damaged. Removing it can restore the original beauty of the fabric or prepare it for a new embellishment.
- Modernizing Styles: Fashion trends change. What was once a popular embroidered motif might now feel dated. Removing old embroidery can give a garment a fresh, modern look.
- Creating a Blank Canvas: You might have a plain piece of fabric that you want to embroider yourself, but it already has some existing stitching. Embroidery removal provides you with a clean slate.
Essential Tools for Embroidery Removal
Before you begin, gather the right tools. Having these on hand will make the process smoother and more effective.
The Mighty Seam Ripper
The seam ripper embroidery tool is your best friend in this endeavor. It’s specifically designed to cut threads without damaging the surrounding fabric. Most seam rippers have a sharp, curved metal tip with a small blade inside.
- Types of Seam Rippers:
- Standard: The most common type, usually with a red plastic handle.
- Ergonomic: Designed for comfort and better grip, often with rubberized handles.
- Lighted: Features a small LED light to illuminate your work area, perfect for intricate designs or low light conditions.
Other Helpful Tools
- Small, Sharp Scissors: For snipping stubborn threads that the seam ripper can’t quite reach. Embroidery scissors or craft scissors work well.
- Tweezers: For pulling out small, cut threads. Pointed tweezers are particularly useful for precision.
- Needle: Sometimes a needle can help you gently lift and separate threads to get the seam ripper underneath.
- Pin or Brooch Pin: Can be used to gently lift stitches.
- Magnifying Glass: For detailed work or if your eyesight isn’t what it used to be.
- Good Lighting: Crucial for seeing those tiny threads. A daylight lamp or working near a window is ideal.
- Iron and Ironing Board: For pressing the fabric after the embroidery is removed.
Getting Started: Preparing Your Fabric
Proper preparation is key to successful embroidery removal.
-
Examine the Embroidery:
- Look closely at the front and the back of the embroidered area.
- Identify the direction the stitches are running.
- Determine if there’s backing material used. If so, this will need to be removed too.
-
Test in an Inconspicuous Area:
- Before tackling the main design, test your chosen method on a small, hidden part of the fabric or a similar scrap. This ensures you won’t damage the material.
-
Ensure the Fabric is Clean:
- Wash and dry the fabric before you start. This removes any dirt or oils that might make the threads harder to grip or could stain the fabric during the process.
Thread Removal Techniques: A Step-by-Step Approach
The core of embroidery removal involves systematically cutting and pulling out the threads.
Method 1: The Seam Ripper Method (Most Common)
This is the go-to method for most DIY embroidery removal projects.
-
Locate the First Stitch:
- On the back of the embroidery, find the beginning of a stitch or a loose thread.
- Carefully slide the pointed end of the seam ripper under a stitch.
-
Cut the Stitch:
- Gently push the seam ripper forward, using the small blade to cut the thread.
- Work slowly and methodically, cutting one stitch at a time.
-
Pull Out the Thread:
- Once a stitch is cut, use tweezers or your fingers to pull the thread free from the fabric.
- Try to pull the thread in the direction it was sewn, if possible, to minimize fabric distortion.
-
Work in Sections:
- Don’t try to pull out a long thread all at once if it’s been cut in many places. Instead, cut and remove short sections.
- Focus on one color or one part of the design at a time.
-
Removing Stitches Layer by Layer:
- Embroidery is often done in layers. You might have to remove several layers of thread.
- After removing one layer of stitches, you might find another layer underneath. Repeat the cutting and pulling process.
-
Dealing with Knots:
- If you encounter knots, use the seam ripper to carefully cut them.
-
Removing Backing Material:
- If a stabilizer or backing was used, you’ll need to remove this as well. It may be iron-on or tear-away. Carefully cut and peel it away.
-
Final Thread Removal:
- Once the bulk of the embroidery is gone, you’ll likely have small bits of thread remaining. Use tweezers to pick these out.
- For very fine threads, you might need to use a sticky lint roller or a piece of tape to lift them off the fabric surface.
Method 2: Using a Needle and Tweezers
This method is suitable for very delicate fabrics or when the seam ripper feels too aggressive.
-
Gently Lift a Stitch:
- Use the tip of a needle to carefully lift a single stitch.
-
Slide the Needle Underneath:
- Once a loop is lifted, slide the needle underneath the thread.
-
Pull and Cut:
- Gently pull the thread taut and use small, sharp scissors to snip it close to the fabric.
-
Use Tweezers:
- Use tweezers to grasp the cut thread and pull it out.
-
Repeat:
- Continue this process, working stitch by stitch. This is a slower but more controlled approach.
Method 3: Dissolving Embroidery (For Specific Threads)
Some embroidery threads are designed to dissolve in water. This is often seen with water-soluble stabilizers but can sometimes apply to the threads themselves.
- Identify the Thread Type: This method only works if you have water-soluble embroidery thread. It’s uncommon for the threads themselves to be water-soluble, but it’s worth checking if you’re unsure. If the embroidery uses standard polyester or cotton threads, this method will not work.
- How it Works: If the threads are water-soluble, soaking the embroidered item in warm water will cause the threads to break down and disappear.
- Process:
- Submerge the embroidered section in warm water.
- Gently agitate the fabric.
- You may see the threads disintegrate.
- Rinse the fabric thoroughly.
- Carefully remove any remaining dissolved thread residue with tweezers.
- Caution: Only use this if you are certain the threads are water-soluble, as it will ruin regular threads and can damage some fabrics.
Method 4: Chemical Embroidery Removal (Use with Extreme Caution)
While chemical embroidery removal is an option, it’s generally not recommended for most home users.
- What it Entails: This involves using specific chemicals to break down the embroidery threads.
- Risks:
- Fabric Damage: Chemicals can easily damage, weaken, or discolor fabrics.
- Skin Irritation: These chemicals can be harmful to skin and eyes.
- Environmental Concerns: Disposal of chemicals can be problematic.
- When it Might Be Considered: This is usually a technique used by professional textile conservators for specific situations where other methods are not viable and the risk is carefully managed.
- Recommendation: For most DIY embroidery removal, stick to mechanical methods like the seam ripper.
Dealing with Different Fabric Types
The fabric the embroidery is on will influence your approach.
Delicate Fabrics (Silk, Chiffon, Fine Cotton)
- Be Extra Gentle: Use your seam ripper with the utmost care.
- Needle and Tweezers: These might be safer than a seam ripper on very fine fabrics.
- Support the Fabric: Place a piece of thin cardboard or cardstock behind the embroidery to prevent accidental tears.
- Work Slowly: Patience is paramount.
Sturdy Fabrics (Denim, Canvas, Thick Cotton)
- More Forgiving: These fabrics can handle the seam ripper more easily.
- Multiple Layers: Be prepared for potentially thicker embroidery, which might require more effort and multiple layers of thread removal.
Knits (Sweaters, T-shirts)
- Risk of Runs or Snags: Be very careful, as pulling threads can cause runs or distortion in knit fabrics.
- Cut Threads Carefully: Cut threads close to the fabric surface.
- Avoid Pulling: Try to lift and remove pieces of thread rather than pulling long lengths.
Handling Embroidery on Specific Items
-
Carpet Embroidery Removal: If you’re dealing with carpet embroidery removal, the principles are similar, but the scale is different. You’ll be working with a thicker pile.
- Use a sharp seam ripper or a craft knife very carefully to avoid cutting carpet fibers.
- Work in small sections.
- Expect to find significant backing material and dense stitching.
- Vacuum thoroughly to remove all cut threads and debris.
-
Tablecloths and Linens: These can range from delicate to robust. Follow the fabric guidelines above. Removing embroidery from a tablecloth can give it a whole new life for different occasions.
-
Clothing: Be mindful of the garment’s construction. You might need to unpick seams if the embroidery is too close to an edge.
Post-Removal Care: Cleaning Up
After you’ve meticulously removed all the threads, the fabric might show signs of the embroidery.
Removing Thread Residue
- Tweezers: Go over the area again with tweezers to pick up any stray threads.
- Lint Roller: A sticky lint roller is excellent for grabbing tiny fibers.
- Fabric Brush: A soft fabric brush can help sweep away loose threads.
Dealing with Thread Marks or Holes
- Pressing: Gently iron the area. This can help the fabric fibers relax and close up small holes. Use the appropriate heat setting for your fabric.
- Steam: Applying steam while ironing can also help.
- Washing: Wash the item again after removal. This will help remove any residual thread dust and further relax the fibers.
Repairing Minor Damage
If there are small snags or holes, you might consider:
- Darning: For small holes in woven fabrics.
- Patching: If the damage is more significant.
- Covering: You could add a small, new embellishment (like a button or a different patch) over the area if slight imperfections remain.
Troubleshooting Common Problems
| Problem | Solution |
|---|---|
| Cutting the Fabric | Slow down! Use the curved tip of the seam ripper to get under the thread without touching the fabric. If the fabric is very delicate, switch to a needle and small scissors. |
| Stubborn Threads | Ensure you’re cutting every stitch. Sometimes threads are woven tightly. Try using the tip of the seam ripper to lift and cut. Tweezers can help grip and pull out shorter pieces. |
| Ink Marks from Embroidery Pattern | If the embroidery pattern was transferred with ink, these marks might remain. Try a fabric marker remover or wash the item with a good quality laundry detergent. Test removers in an inconspicuous area first. |
| Fabric Distortion | This can happen, especially with knits or if threads were pulled too hard. Gentle pressing with steam after removal can help the fabric relax. Washing and air-drying might also improve it. |
| Backing Material is Difficult to Remove | Some tear-away stabilizers are designed to be removed by tearing. Others are more embedded. Use your seam ripper or scissors to cut it away bit by bit. If it’s a water-soluble stabilizer, it would have dissolved during washing. If it’s a heat-activated stabilizer, it might be fused and require careful cutting. |
| Tiny Thread Ends Left Behind | These are best dealt with using fine-tipped tweezers or a sticky lint roller. A gentle flick with a fingernail can sometimes dislodge them. |
| Thread Snaps and Leaves a Long Tail | This means you haven’t cut the stitch. You need to find the point where the thread is anchored to the fabric and cut it there. Sometimes you can trace the thread path on the back to find the best place to cut. |
Can I Remove All Types of Embroidery?
In most cases, yes, you can remove embroidery. However, some situations are more challenging:
- Extremely Dense Embroidery: Very tightly packed stitches can be time-consuming and may leave small perforations.
- Thread Blending with Fabric: If the thread color is very close to the fabric color, it can be harder to see and remove.
- Damaged Fabric: If the fabric itself is already fragile or damaged, the removal process could worsen it.
- Machine Embroidery with Heavy Backing: Some machine embroidery uses very dense stitching and heavy-duty backing, making stitch removal more labor-intensive.
Frequently Asked Questions (FAQ)
Q: Will removing embroidery damage my fabric?
A: There’s always a slight risk, but if you are careful and use the right tools (especially a seam ripper), you can minimize damage. Working slowly and deliberately is key. For delicate fabrics, use extra caution or opt for the needle and tweezers method.
Q: How long does embroidery removal take?
A: The time required varies greatly depending on the size and complexity of the embroidery. A small motif might take 15-30 minutes, while a large, intricate design on a garment could take several hours.
Q: What’s the best way to remove embroidery from a t-shirt?
A: Use a seam ripper on the back of the design. Be gentle, as t-shirt fabric can stretch. Cut each stitch, then use tweezers to pull out the thread. Afterward, wash the t-shirt to help the fabric relax.
Q: Can I remove embroidery from a machine embroidered item?
A: Yes, the process is the same. Machine embroidery can sometimes be denser and use more backing material than hand embroidery, so be prepared for a potentially more involved process.
Q: Is there a way to dissolve embroidery threads?
A: Only if the threads themselves are made of water-soluble material. This is rare. Most embroidery threads are cotton, polyester, or rayon, which do not dissolve in water. Water-soluble stabilizers are common, but not usually the threads themselves.
Q: What if the embroidery is on both sides of the fabric?
A: This is unusual for most embroidery, but if it occurs, you’ll need to address the stitching on both the front and the back. It may be a reversible item or have a decorative back.
Q: My fabric is old and fragile. What should I do?
A: For very old or fragile fabrics, proceed with extreme caution. Consider working under magnification and using a needle and small, sharp scissors rather than a seam ripper. Support the fabric from behind with a piece of stiff paper. If the fabric is very precious, you might want to consult a textile conservator.
Q: What is the best tool for stitch removal?
A: The most recommended tool for stitch removal is a seam ripper embroidery tool, often referred to as an “embroidery ripper.” Its design allows for precise cutting of threads close to the fabric.
By following these detailed steps and using the right tools, you can successfully remove embroidery from your fabrics, breathing new life into your textiles and opening up possibilities for creative reuse. Remember to be patient, work with good lighting, and always prioritize the integrity of your fabric.