
You can rethread a sewing machine by following a specific set of steps for both the upper thread and the bobbin thread. Getting the thread path right is key. This guide will show you each step clearly so your machine sews well.
Sewing is a fun and useful skill. But sometimes, sewing machines stop working right. Often, the problem is simple: the machine is not threaded correctly. Threading a sewing machine can seem tricky at first. Many parts are involved. You need to put the thread in the right places. This guide breaks it down. You will learn each part and what it does. You will see the simple steps to thread your machine the right way. This helps you avoid problems like skipped stitches or tangled thread nests.
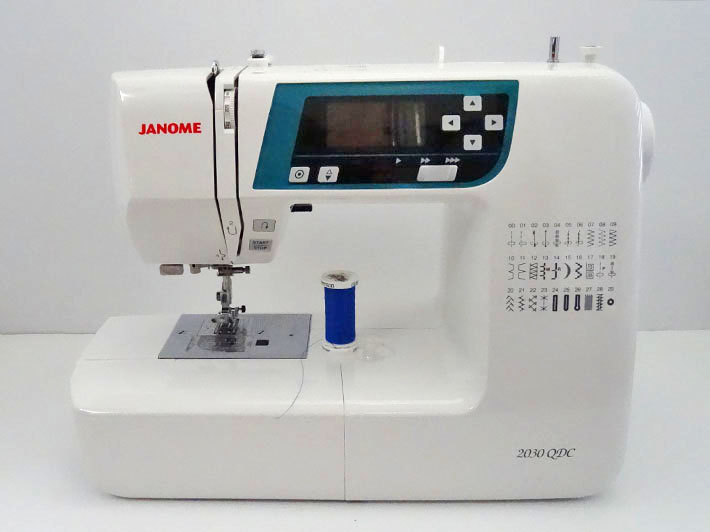
Image Source: d2culxnxbccemt.cloudfront.net
Getting Ready to Thread Your Machine
Before you start threading, do a few simple things. These steps make threading easier and help prevent issues. Think of it as getting your workspace ready.
- Turn off the power. This is very important. Always turn off your sewing machine before threading or changing the needle. This stops the machine from starting by accident. This keeps your fingers safe.
- Raise the presser foot. Find the lever that lifts the presser foot. It is usually on the back or side of the machine head. Lift it up. Lifting the presser foot opens the tension discs. This is a vital step. If the presser foot is down, the thread will not sit right in the tension discs. This causes loose stitches on the top of your fabric.
- Raise the needle to its highest point. Turn the handwheel on the side of your machine. Turn it towards you. Keep turning it until the needle is all the way up. The take-up lever should also be at its highest point. The take-up lever is the arm that moves up and down as you sew. The thread goes through a hole in it. Having the needle and take-up lever up helps the thread move through the path easily.
Once you have done these three things, your machine is ready for the new thread.
How to Wind a Bobbin
Every sewing machine uses two threads. One is the upper thread. It comes from the spool on top. The other is the bobbin thread. It comes from the bobbin underneath. The bobbin holds the lower thread. You must fill the bobbin with thread before you can sew. This is called winding a bobbin.
Winding a bobbin is a simple process. Most machines have a special spot just for this. Look for a small spindle that sticks up or out, usually near the top or side of the machine. This is the bobbin winder spindle. There is also often a bobbin winder tension disc or guide. The thread wraps around this before going to the bobbin.
Here are the steps to wind a bobbin:
- Put thread on the spool pin. Place your spool of thread on the spool pin. This is the metal or plastic pin that holds the spool of thread. It is usually on the top or back of the machine. Some machines have horizontal spool pins. Others have vertical ones. Make sure the thread comes off the spool smoothly. It should unroll correctly for your machine. Look at how the thread wraps around the spool. It should come off in a way that does not tangle.
- Guide the thread. Take the end of the thread from the spool. Follow the path for bobbin winding shown on your machine. Machines have little pictures or numbers to show the way. The thread usually goes through a guide or two. Then, it goes around the bobbin winder tension disc. This disc gives a little pull to the thread as it winds. This makes the bobbin fill evenly and firmly.
- Put the thread on the bobbin. Take the empty bobbin. Find the small hole or slit on the side of the bobbin. Push the end of the thread through this hole from the inside out. This holds the thread in place at the start.
- Place the bobbin on the spindle. Put the bobbin onto the bobbin winder spindle. Push it down firmly. On many machines, you need to slide the spindle towards the right (or left, depending on your machine). This engages the bobbin winding function. When the spindle is engaged, the machine’s motor will turn the spindle and wind the bobbin. The needle may stop moving while you wind.
- Start winding. Hold the thread tail sticking out of the bobbin hole. Use the foot pedal or the start button on your machine to start winding. The machine will spin the bobbin. The thread will wrap around it. Let it wind for a few turns. Then, stop the machine. Carefully cut off the short thread tail sticking out of the bobbin hole. Cutting this tail makes the bobbin thread neat.
- Fill the bobbin. Start winding again. The machine will fill the bobbin. Most machines have a little stopper arm. When the bobbin is full, the thread will push this arm. This tells the machine to stop winding. Do not overfill the bobbin. An overfilled bobbin can cause problems in the bobbin case. It can make the thread jam.
- Finish. Once the bobbin stops or is full, stop the machine. Slide the bobbin winder spindle back to its resting place. Remove the full bobbin from the spindle. Cut the thread connecting the bobbin to the spool. Your bobbin is now ready to use.
Winding a bobbin correctly is the first part of successful threading. A poorly wound bobbin (too loose, too tight, or uneven) can cause stitching problems.
The Upper Thread Path: Step-by-Step Threading
Now that the bobbin is ready, it is time to thread the top part of the machine. This is sometimes called threading the needle area. The thread must follow a specific path from the spool to the needle. This path goes through several guides and the tension system. This is the upper thread path.
Sewing machine threading steps usually follow a numbered path printed on the machine itself. Always check these numbers or pictures on your machine. They are your best guide.
Let’s follow the common steps:
- Place the spool on the spool pin. Put your spool of thread on the spool pin. Make sure the spool turns freely. The thread should come off the spool in the right direction. For vertical spool pins, the thread usually comes off the front. For horizontal spool pins, it often comes off the back, under a cap. Using the right size spool cap helps the thread come off smoothly.
- Guide the thread through the first thread guide. The first guide is usually near the spool pin. It might be a hook or a slot. Pull the thread through this guide. This keeps the thread in line as it starts its journey. These thread guides sewing machine parts are simple but important. They control the thread’s path.
- Bring the thread down. The thread now usually goes down the front or side of the machine. There are often more guides along this path. Follow the numbers or lines on your machine. The thread might go behind a cover or into a channel.
- Guide the thread through the tension discs. This is a crucial step for sewing machine tension. The thread goes down into a channel that contains the tension discs. These are two metal plates that press together. The thread passes between them. The pressure on the discs controls how much pull is on the thread. This pull affects the stitch quality. Make sure the thread is seated firmly between these discs. You might need to gently pull the thread upwards to make sure it slips fully into the tension area. Remember, the presser foot must be up for the tension discs to be open enough to accept the thread correctly. If the foot is down, the discs are closed, and the thread just sits on top, leading to loose upper stitches.
- Go up to the take-up lever. After going down through the tension area, the thread goes back up. It goes towards the take-up lever. The take-up lever is the arm that moves up and down as the needle moves. It has a hole or hook at the end. The thread must go through this hole or hook. If the take-up lever is not threaded, the machine will not form stitches correctly. The thread will loop and tangle. Ensure the take-up lever is at its highest point when you thread it. This makes it easy to find the hole.
- Bring the thread back down again. From the take-up lever, the thread goes back down towards the needle. There will be more thread guides sewing machine parts on the way down. These might be small hooks, clips, or channels along the machine arm. These guides keep the thread from tangling and direct it straight to the needle. Make sure you pass the thread through all the guides shown on your machine. Skipping a guide can cause problems.
- Thread the needle. This is the last step for the upper thread. The thread goes through the eye of the needle. The direction you thread the needle depends on your machine. Most modern machines thread from front to back. Some older or special machines thread from side to side. Check your machine manual if you are unsure. Some machines have a needle threader tool. This little tool helps push the thread through the small needle eye. It is a great help for many people.
Once the needle is threaded, pull about 6 inches of thread through the eye. Slide this thread under the presser foot and towards the back of the machine. This keeps the thread out of the way and ready to start sewing.
Inserting the Bobbin
The upper thread is ready. Now you need to put the bobbin in place. This is Inserting the bobbin. How you do this depends on the type of bobbin system your machine has. There are two main types: a front-loading bobbin with a separate bobbin case, and a top-loading (drop-in) bobbin.
Front-Loading Bobbin System
This system is common on many older or mechanical machines. The bobbin goes into a metal case first. The bobbin case then goes into a compartment under the needle plate, usually in the front of the machine.
Here are the steps for a front-loading system:
- Get the bobbin case. Take the bobbin case out of the machine if it is in there.
- Put the bobbin in the case. Hold the bobbin case in one hand. Pick up your filled bobbin. Look at the bobbin case. It has a slot or opening. Put the bobbin into the bobbin case. Make sure the thread comes off the bobbin in the right direction. There is usually a picture or note in your manual showing this. For most front-loading cases, the thread should unspool clockwise when you hold the bobbin in the case and look at it from the side that goes into the machine.
- Pull the thread through the tension spring. Find the small slot on the side of the bobbin case. This slot has a flat spring over it. This is the bobbin case tension spring. Pull the bobbin thread through this slot and under the spring. The thread should slide smoothly under the spring. This spring provides the bobbin thread tension. You will feel a slight resistance when you pull the thread. This resistance sets the bobbin thread tension.
- Insert the bobbin case. Find the bobbin compartment on your machine. It might be under a flip-up cover or in a slide-out section. Hold the bobbin case by its latch (a small handle or lever). The latch keeps the bobbin from falling out. Push the bobbin case into the compartment. It should click or snap into place. The latch might release automatically when it is seated correctly. Make sure it is seated firmly. If it is not, the machine will not sew.
- Close the cover. Close the bobbin compartment cover.
Top-Loading (Drop-in) Bobbin System
This system is common on many newer and electronic machines. The bobbin drops directly into a compartment on top of the machine arm, under a clear cover on the needle plate. There is no separate bobbin case to handle.
Here are the steps for a top-loading system:
- Open the cover. Open the clear plastic cover over the bobbin area on the needle plate.
- Insert the bobbin. Take your filled bobbin. Drop the bobbin into the bobbin compartment. Make sure the thread comes off the bobbin in the right direction. For most top-loading systems, the thread should unspool counter-clockwise when you look down at the bobbin in the machine. There are usually pictures on the machine to show this direction. This direction is key for the machine to pick up the bobbin thread correctly.
- Guide the thread through the channel. Do not just leave the thread loose. Look for a channel or slot running along the edge of the bobbin compartment. Guide the bobbin thread through this channel. This channel has tension built into it. This sets the bobbin thread tension. The thread usually follows the channel and is then pulled towards the back or side.
- Close the cover. Close the clear plastic cover firmly.
Whether you have a front-loading or top-loading system, inserting the bobbin correctly is just as important as threading the upper part. Both threads must be in place and under the right tension for a balanced stitch.
Bringing Up the Bobbin Thread
Before you start sewing, you need to bring the bobbin thread up through the needle plate hole. This joins the two threads so the machine can make the first stitch.
Here is how to do it:
- Make sure the presser foot is down.
- Hold the end of the upper thread loosely in your hand, near the needle.
- Slowly turn the handwheel on the side of your machine towards you. Turn it one full turn.
- As the handwheel turns, the needle goes down into the bobbin area. It picks up the bobbin thread.
- Watch the upper thread you are holding. It will form a loop. This loop is the bobbin thread being pulled up by the upper thread.
- Stop turning the handwheel when the take-up lever is at its highest point again. The needle is also high up.
- Use a seam ripper, a pin, or your finger to gently pull the loop of bobbin thread up through the needle plate hole.
- Pull the bobbin thread loop until the end of the bobbin thread comes out.
- Now you have two threads: the upper thread coming through the needle, and the bobbin thread pulled up from below.
- Pull both threads under the presser foot. Pull them towards the back of the machine. Place them side-by-side under the foot. This gives you a clean start when you begin sewing.
Checking Sewing Machine Tension
Once the machine is threaded correctly, upper and lower, it is ready to sew. However, sometimes the stitches still do not look right. They might be too loose or too tight. This is usually a problem with sewing machine tension.
Tension is the amount of pull on the thread as it flows through the machine. Both the upper thread and the bobbin thread have their own tension. The tension system makes sure both threads meet in the middle of the fabric layers. This creates a strong, balanced stitch that looks the same on the top and bottom of the fabric.
- Upper Thread Tension: This is controlled by the tension discs you threaded earlier. Your machine has a dial or buttons to adjust this. A higher number means more tension (more pull). A lower number means less tension (less pull).
- Bobbin Thread Tension: On front-loading machines, this is controlled by the small screw on the bobbin case tension spring. On top-loading machines, the tension is built into the bobbin channel. Bobbin tension is adjusted less often than upper tension. It is usually set at the factory. Only adjust it if you are sure it is wrong or if your manual tells you to.
How to tell if tension is wrong:
- Top thread lies flat on the fabric top, bottom thread is straight with loops on top: The upper tension is too loose or bobbin tension is too tight.
- Bottom thread lies flat on the fabric bottom, top thread is straight with loops on bottom: The bobbin tension is too loose or upper tension is too tight.
- Stitches look the same on top and bottom, with threads interlocking neatly in the fabric: Tension is balanced and correct.
Troubleshooting tension problems (after correctly threading):
- Always check threading first. The most common cause of tension problems is incorrect threading. Go back and rethread the machine, upper and lower. Make sure the presser foot was up when you threaded the upper thread and that the thread is seated between the tension discs.
- Check the bobbin. Is the bobbin wound evenly? Is it in the bobbin case or compartment correctly? Is the thread pulled through the bobbin tension spring or channel?
- Check the thread path. Did you miss any thread guides sewing machine parts? Is the thread properly in the take-up lever?
- Check the needle. Is the needle the right size and type for your thread and fabric? Is it inserted correctly? A bent or dull needle can cause bad stitches.
- Adjust upper tension. If threading is perfect and the stitch is still off, adjust the upper tension dial slightly. Sew a test piece of fabric. Adjust again if needed. Make small changes.
Getting the tension right is key to beautiful stitches. It takes practice and testing on scraps of fabric.
Essential Sewing Machine Threading Steps Reviewed
Let’s quickly look back at the main steps. Having these steps clear helps you thread your machine fast and right every time.
- Prepare: Turn off machine, raise presser foot, raise needle/take-up lever.
- Wind Bobbin: Put spool on spool pin, guide thread, wind bobbin on spindle, cut tail, fill bobbin, cut from spool.
- Thread Upper: Put spool on spool pin, go through first guide, go down through tension discs (foot UP!), go up to take-up lever, go down through guides, thread needle.
- Insert Bobbin: Put bobbin in case (front-load) or drop in (top-load), guide thread through bobbin tension.
- Bring Up Bobbin Thread: Lower presser foot, hold upper thread, turn handwheel towards you one turn, pull up bobbin loop through needle plate, pull both threads under foot and back.
- Test: Sew on a scrap of fabric. Check stitches on top and bottom. Adjust upper tension if needed.
Following these sewing machine threading steps in order is very important. Skipping a step or doing it out of order will likely cause problems.
Common Issues When Threading and How to Fix Them
Even when you follow the steps, sometimes things go wrong. Here are a few common problems people have when threading and how to fix them easily.
- Thread keeps breaking.
- Check if the thread is catching on the spool pin or spool cap.
- Is the thread old or poor quality? Try new thread.
- Is the upper tension too tight? Lower the number on the tension dial.
- Is the needle bent, dull, or the wrong size? Change the needle.
- Is the machine threaded correctly, especially through the take-up lever and tension discs? Rethread carefully.
- Thread nests or loops on the bottom of the fabric.
- This is almost always an upper threading problem.
- The most common cause is threading the upper thread with the presser foot down. This means the thread is not properly in the tension discs. Rethread with the presser foot up.
- Did you miss a thread guide sewing machine part? Rethread, following the path exactly.
- Is the thread in the take-up lever? Rethread, making sure it goes through the hole or hook.
- Thread nests or loops on the top of the fabric.
- This is usually a bobbin threading problem or bobbin tension problem.
- Is the bobbin inserted correctly in the bobbin case or drop-in area? Did you pull the thread through the bobbin tension spring or channel? Re-insert the bobbin.
- Is the bobbin wound evenly? If it is lumpy, rewind it.
- For front-load machines, is the bobbin case tension too loose? This is less common. You might need a service if this is the issue.
- Skipped stitches.
- Is the machine threaded correctly? Rethread both upper and bobbin threads.
- Is the needle bent or the wrong type for the fabric? Change the needle. Use a ballpoint needle for knits, a sharp needle for woven fabric.
- Is the needle inserted correctly? It must be pushed all the way up into the needle clamp, with the flat side facing the back (on most machines).
- Is the presser foot pressure correct for the fabric? (This is a different setting, but can affect skipping).
Most problems after changing thread are due to simple threading mistakes. Taking your time and following the specific path for your machine is the best way to avoid these issues. Always check your machine’s manual. It has pictures and details just for your model.
Knowing Your Sewing Machine Parts
Understanding the names of the parts helps you follow threading instructions better. Here are some key parts we talked about:
| Part Name | What it Looks Like | What it Does | Importance for Threading |
|---|---|---|---|
| Spool Pin | Vertical or horizontal pin at the top/back. | Holds the spool of thread. | First step for upper thread and bobbin winding. |
| Thread Guides | Small hooks, clips, or slots along the thread path. | Direct the thread from the spool to the needle. | Keeps thread smooth and prevents tangles; part of the upper thread path. |
| Tension Discs | Two metal plates inside a channel. | Pinch the upper thread to control tension. | Crucial for balanced stitches. Must be threaded with foot up. |
| Take-Up Lever | An arm that moves up and down. | Pulls thread to form the stitch loop. | Thread must go through its hole/hook. Must be at highest point to thread. |
| Needle | The sharp part that goes through the fabric. | Carries the upper thread through the fabric layers. | Must be threaded correctly through the eye. |
| Needle Plate | The metal plate under the needle. | Covers the bobbin area. | Has the hole the needle goes through and the bobbin thread comes up. |
| Presser Foot | Holds the fabric down against the feed dogs. | Helps feed fabric evenly. | Must be raised to properly thread tension discs. |
| Bobbin | Small spool that holds the lower thread. | Provides the bottom thread for the stitch. | Must be wound and inserted correctly. |
| Bobbin Case (Front-Load) | Small metal case the bobbin sits in. | Holds the bobbin and provides bobbin thread tension. | Bobbin goes in here before going in the machine. |
| Bobbin Compartment | Area where the bobbin/bobbin case sits (under needle plate). | Houses the lower thread supply. | Where you insert the bobbin/case. |
| Bobbin Tension | Spring on bobbin case (front) or channel (top). | Controls the tension of the bobbin thread. | Works with upper tension for balanced stitches. |
| Bobbin Winder Spindle | Pin on top/side that turns to wind bobbin. | Used to fill the bobbin with thread. | Where the bobbin sits to be wound. |
| Bobbin Winder Tension Disc | Small guide/disc used during winding. | Puts slight tension on thread while winding bobbin. | Helps wind a smooth, even bobbin. |
Knowing these parts makes it easier to follow any sewing machine threading steps. It helps you know where the thread is supposed to go.
More Tips for Threading Success
- Use good quality thread. Cheap thread can break easily, shred, or cause lint build-up. Use thread made for sewing machines.
- Match thread size to needle size. Thicker threads need larger needles. Using a thread that is too thick for the needle eye can cause problems.
- Always thread with the presser foot up. This cannot be said enough. It is the number one reason for loose upper stitches.
- Pull both threads to the back before starting. Having the upper and bobbin threads under the presser foot and pulled behind the needle gives a clean start.
- Clean your machine often. Lint and thread bits can build up in the thread path, tension discs, and bobbin area. This can mess up tension and threading. Use a small brush (often comes with the machine) to clean these areas regularly.
- Check your manual. Every sewing machine is a little different. Your manual has the exact sewing machine threading steps for your model. It often has helpful pictures. Keep it handy!
- Practice! The more you thread your machine, the faster and easier it will become.
Threading a sewing machine is a basic skill for sewing. It might seem hard at first. But by following the steps one by one, you will get good at it. Paying attention to the thread guides sewing machine parts, the take-up lever, and the tension discs is important. Learning how to wind a bobbin and inserting the bobbin correctly is also key. With practice, these sewing machine threading steps will become second nature. You will spend less time fixing problems and more time sewing!
Frequently Asked Questions About Threading
Q: My machine keeps making loops on the bottom of the fabric. Why?
A: This is almost always because the upper thread is not properly seated in the tension discs. Make sure you thread your machine with the presser foot up. This opens the discs so the thread can slip inside. Then lower the foot before sewing. Rethread the entire upper path carefully.
Q: How do I know if my bobbin is in correctly?
A: For front-loading machines, the bobbin case should click or snap firmly into place. The thread should come off the bobbin in the correct direction (check your manual, often clockwise in the case). For top-loading machines, the bobbin should drop in flat, and the thread must be pulled through the tension channel, following the arrows or diagram on the machine. The thread should pull smoothly with some resistance.
Q: What is the take-up lever for?
A: The take-up lever is a moving arm on the upper thread path. It pulls thread up to form the stitch and then lets it go as the needle goes down. The thread must go through the hole or hook on this lever. If you miss it, the machine will not sew correctly and will make messy stitches.
Q: How do I adjust sewing machine tension?
A: Upper tension is usually adjusted with a dial or buttons on the machine, marked with numbers. Higher numbers mean more tension. Adjust in small steps (like half a number). Sew a test piece to check. Bobbin tension (especially on front-load machines) is adjusted with a tiny screw on the bobbin case spring. This is rarely needed and should only be done if you are sure the upper tension is correct and the stitch is still unbalanced.
Q: Does the type of thread matter for threading?
A: Yes. Using good quality thread designed for sewing machines is best. Very cheap thread can cause lint, break easily, or stretch. Using thread that is too thick or too thin for your needle and fabric can also cause problems.
Q: Why won’t my needle threader work?
A: First, make sure the needle is at its highest point. The threader often needs the needle eye to be in a very specific position. Check your manual for the exact steps for your machine’s threader. Make sure the needle is inserted correctly and is not bent. Sometimes, the needle threader itself can become bent and need adjustment or repair.
Q: What are thread guides sewing machine parts used for?
A: Thread guides are small hooks, clips, or channels along the upper thread path. Their job is to keep the thread in the correct place as it travels from the spool to the needle. They help control the thread’s movement and prevent tangles, ensuring it goes into the tension discs and take-up lever correctly. Always make sure the thread passes through every guide shown on your machine’s diagram.
Threading your sewing machine right is the first step to happy sewing. Take it slow, follow the path, and use this guide to help you every time. You’ll be sewing smoothly in no time!