
Image Source: www.needlenthread.com
Learn How To Separate Embroidery Floss Without Knots
Have you ever wondered how to separate embroidery floss strands neatly without ending up with a tangled mess? It’s a common question for anyone starting embroidery or cross-stitch! Luckily, there’s a simple and effective embroidery thread separation technique that helps you avoid knots and makes working with stranded embroidery cotton much easier. This guide will show you exactly how to prepare embroidery floss and separate its individual strands perfectly every time.
Why Separate Your Floss?
Embroidery floss, like the popular splitting DMC embroidery thread, usually comes with six individual strands twisted together. When you work stitches, you almost never use all six strands at once. Different projects and different looks need different numbers of strands.
- Using fewer strands makes your stitches finer.
- Using more strands makes your stitches bolder and thicker.
- Separating the strands lets you choose just the right thickness for your project.
- Using separated strands, even if you put some back together, helps your stitches lie flatter and look smoother on the fabric.
- Trying to pull multiple strands together from the skein often leads to frustrating knots.
So, learning to separate the strands is a basic and very important skill. It helps you prevent tangling embroidery thread right from the start.
Getting to Grips with Floss Structure
Before you start pulling embroidery floss strands apart, it helps to know what you’re working with. A standard skein of embroidery floss is made of one long length of thread folded and wrapped. This long thread is actually six thinner threads twisted together.
Imagine six thin ropes twisted into one thicker rope. When you divide this thicker rope (the floss), you are taking out some of the thin ropes (the strands) to use on their own or combined differently.
The Simple Way to Separate Floss Strands
This is the best embroidery thread separation technique to keep knots away. It might seem a little strange at first, but it works like magic.
Here’s how to do it:
h4 Preparing Your Thread
- Cut a Piece: First, cut a length of floss from your skein. About 18 inches (45 cm) is a good length to start with. Longer pieces can tangle more easily when you’re learning.
- Hold One End: Take the piece you cut. Hold one end firmly between your thumb and finger. Keep a good grip on this one end. The rest of the length should hang down.
h4 The Pulling Action
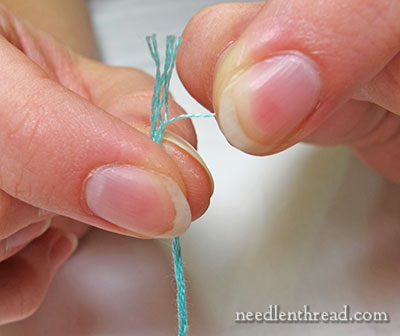
- Grab One Strand: Look at the end you are holding. Find just one of the six strands. Pinch or grab only that single strand near the end you are holding.
- Pull That Single Strand Up: Now, slowly and smoothly pull that single strand upwards and away from the other five strands that are hanging down.
- Let the Others Hang: This is the key! As you pull the one strand up, let the other five strands just dangle freely below your hand. Do not hold onto them or try to control them. Just let them hang loose.
- Keep Pulling: Continue pulling the single strand all the way out from the length of floss you cut. As you pull, the other strands might twist around each other a bit where you are holding the end. This is okay! Let them twist.
- Release and Smooth: Once the single strand is pulled free, the other five strands will likely untwist themselves. They should be much less tangled than if you had tried to separate them another way. Smooth the single strand you pulled out.
You now have one single strand ready to use, and the remaining five strands are still together, ready for you to pull more single strands from them if needed.
h4 Repeating the Process for More Strands
Let’s say your project needs two strands. You have already pulled one single strand out using the method above. Now you have the original piece (minus the one strand you removed) still in your hand, hanging down.
- Regather the Remaining Strands: Take the end of the remaining piece (the one you were holding initially) and smooth the five strands back together.
- Grab Another Single Strand: Find just one more single strand from this group of five near your held end.
- Pull it Out: Slowly pull this second single strand upwards and away, again letting the other four strands dangle freely.
- Repeat as Needed: Keep doing this until you have the number of single strands you need for your stitch. If you need three strands, pull out a third single strand from the remaining four.
Once you have the number of single strands you want (say, two for cross-stitch), hold them together at the end and thread your needle with them. You are now ready for dividing embroidery floss for your work!
Preventing Knots While Working
The right separation technique is the first step to prevent tangling embroidery thread. But tangles can still happen while you stitch. Here are tips to keep your thread smooth:
- Use Shorter Lengths: As mentioned, about 18 inches is good. Very long pieces (over 24 inches or 60 cm) are more likely to knot as you pull them through the fabric many times.
- Let Your Needle Hang: Every few stitches, let your needle and thread dangle freely from your fabric. This lets the thread untwist itself. Floss naturally twists as you stitch, and this twisting leads to knots. Letting it hang undoes the twist.
- Use a Thread Conditioner: Products like beeswax or special thread conditioners can help the floss glide through the fabric more smoothly and reduce tangling. Run the separated strands through the conditioner before you thread your needle.
- Don’t Pull Too Hard: Pulling your stitch too tight can cause the thread to twist and knot at the back of your work. Pull firmly enough to seat the stitch, but not so hard it causes puckering or excessive twisting.
Following these steps makes working with stranded embroidery cotton a much more pleasant experience.
Grasping the Standard Technique: Step-by-Step Summary
Here’s a quick review of the standard embroidery thread separation technique:
- Cut a manageable length of floss (around 18 inches).
- Hold one end firmly.
- Identify and grab one single strand at the held end.
- Slowly pull only that one strand upwards and away.
- Let the other strands hang loosely as you pull.
- Pull the single strand all the way out.
- Regather the remaining strands if you need more.
- Repeat the process to pull out more single strands one by one.
- Combine the desired number of single strands.
This method ensures you are separating embroidery thread strands in the best way possible to avoid those frustrating knots.
Interpreting Floss Needs for Different Projects
The number of strands you need depends on:
- Your Fabric Count: This is the number of threads per inch in your fabric. Higher counts (like 18 or 28 count aida/linen) use fewer strands. Lower counts (like 11 or 14 count aida) use more strands.
- Your Stitch Type: Cross-stitch, backstitch, satin stitch, French knots, etc., might each look best with a different number of strands.
- The Desired Look: Do you want full, bold stitches or fine, delicate ones?
Here’s a general guide, especially for cross-stitch on Aida fabric (this is just a starting point, feel free to experiment!):
| Fabric Count | Typical Strands Used (Cross-Stitch) | Effect |
|---|---|---|
| 11 count | 3-4 strands | Full coverage, bolder stitches |
| 14 count | 2-3 strands | Standard coverage, most common |
| 16 count | 2 strands | Good coverage, slightly finer |
| 18 count | 2 strands (sometimes 1) | Fine coverage, more detail visible |
| 28 count | 1 strand (usually over 2 threads) | Very fine stitches, high detail |
| 32 count | 1 strand (usually over 2 threads) | Extremely fine stitches, delicate |
Remember, this table is just a guide for dividing embroidery floss. Always check your pattern instructions, which will usually tell you how many strands to use. Even within one project, you might use different numbers of strands for different elements (e.g., more for main areas, fewer for details or backstitch).
The Specifics of Splitting DMC Embroidery Thread
DMC is one of the most common brands of embroidery floss, and it is the standard stranded cotton we’ve been talking about. Splitting DMC embroidery thread works exactly as described in the main separation technique. DMC floss is specifically designed with those six easily separable strands. Other brands of stranded cotton will also work the same way. The key is that it’s stranded cotton, meaning it’s made of multiple smaller threads twisted together.
Using a Needle to Separate Floss
While the primary method involves pulling one strand free while letting others dangle, sometimes using a needle can help, especially if you encounter a tricky spot or a slight tangle mid-length.
How to use a needle:
- If you have a spot where the strands seem stuck or knotted before you even start separating at the end, you can use your needle tip.
- Gently insert the needle tip into the very center of the floss bundle at the problem spot.
- Wiggle the needle tip gently to help loosen the twist and separate the strands slightly. Do not force it.
- Once slightly loosened, you can usually go back to the standard pulling method from the end to finish separating embroidery thread strands smoothly.
Using a needle to separate floss is more of a helper tool for minor issues, not the main method itself. The core technique of pulling one strand while letting the others hang is the most effective way to prevent tangling embroidery thread during the main separation process.
Troubleshooting: Untangling Embroidery Floss
Even with the best technique, sometimes a knot happens, or you might need to untangle floss that was separated incorrectly before. Don’t panic! Most knots can be undone with patience.
- Don’t Pull Tight: The worst thing you can do is pull the knot tighter. Stop pulling immediately.
- Assess the Knot: Lay the knotted piece of floss flat on a surface. Look closely at the knot. Where do the strands cross over each other?
- Use a Needle or Pin: Use the tip of a sewing needle, a pin, or even a toothpick. Gently try to loosen the loops of the knot. Work from the outside of the knot inwards.
- Wiggle Gently: Use the needle tip to gently wiggle into the knot and lift one strand at a time to loosen it. Think of it like picking a lock, but very gently.
- Be Patient: This takes time. Do not yank. Small, gentle movements are key to untangling embroidery floss.
- If All Else Fails: Sometimes a knot is just too tight or complex. It’s okay to cut it out and start that section with a new piece of thread. Losing a little thread is better than hours of frustration!
Properly separating embroidery thread strands using the pulling technique drastically reduces the need for untangling embroidery floss later on.
Preparing Floss for Stitching: Beyond Separation
Once you have separated the correct number of strands (dividing embroidery floss for your project), you need to get it ready for stitching.
- Combine Strands: Hold the individual strands you pulled out together at one end.
- Thread Your Needle: There are several ways to thread a needle with multiple strands:
- Folding Method: Hold the combined strands together. Fold the end you will thread through the needle. Pinch the folded end tightly between your finger and thumb. Push the pinched loop through the eye of the needle. Pull the loop through and then pull the tails of the thread through the loop. This secures the thread (creating a “loop start”).
- Traditional Method: Hold the ends of the combined strands together. Push the ends through the eye of the needle. You might need a needle threader if the eye is small or you have many strands.
- Smooth the Thread: Once threaded, run your fingers down the length of the thread gently to smooth out any remaining twists before you start stitching. This is part of working with stranded embroidery cotton effectively.
This entire process, from cutting the length to threading the needle, is all part of how to prepare embroidery floss for your needlework.
Common Errors and How to Steer Clear
Let’s look at mistakes people make when separating floss and how you can easily avoid them.
- Trying to Separate From Both Ends: You cut a piece, hold both ends, and try to pull strands from the middle. This is almost guaranteed to create a giant knot! Always hold only one end and pull from that end.
- Holding All the Strands Tightly: When pulling out one strand, if you squeeze the other five strands tightly in your hand, they can’t untwist and slide past each other easily. This causes bunching and knots. Remember to let the others hang loosely.
- Pulling Too Fast or Hard: Yanking the single strand quickly can cause the others to snag or knot. A slow, smooth, steady pull is best for separating embroidery thread strands.
- Cutting Too Long a Piece: Starting with very long pieces (30 inches or more) makes the pulling action harder and increases the chance of the dangling strands catching on something or tangling themselves. Start shorter, especially when you are new to this.
- Not Letting the Thread Untwist While Stitching: Ignoring the natural twist that happens as you stitch will lead to knots on the back of your fabric. Get in the habit of letting your needle hang and the thread untwist every so often.
Avoiding these simple errors makes the process of dividing embroidery floss and working with it much smoother.
Organizing Your Floss
Once you get good at separating floss, you might have partial skeins or lengths with fewer than six strands. Keeping them neat helps for future use and prevents more tangles.
- Floss Bobbins: Winding floss onto small plastic or cardboard bobbins is a popular method. You can buy or make them. Write the color number on the bobbin.
- Storage Containers: Keep your bobbins or skeins in a box or container to keep them clean and tidy.
- Leftover Lengths: For short lengths of separated or leftover floss, consider tying them onto a bobbin with the main color or storing them in small bags labeled with the color number.
Good organization is part of how to prepare embroidery floss not just for your current project, but for future ones too.
Thinking About Different Thread Types
While this guide focuses on stranded cotton (like splitting DMC embroidery thread), it’s worth noting that other thread types exist.
- Pearl Cotton: This thread is not stranded. It is a single, non-divisible thread. It comes in different sizes (like sizes 5, 8, 12). You use it as is, no separation needed.
- Silk Floss: Often comes stranded like cotton and can be separated using the same method, but it can be more delicate.
- Specialty Threads: Metallic threads, rayon, etc., may or may not be stranded. Always check the thread type and handle according to its nature.
For stranded cotton, the method of pulling one strand at a time while letting the rest dangle is the go-to embroidery thread separation technique.
Why This Method Works So Well
The reason pulling one strand at a time while letting the others dangle is so effective for separating embroidery thread strands is simple physics. The strands are twisted together. When you pull one strand straight up and away, the twist can easily unravel and allow that one strand to slide out, provided the other strands are free to untwist and move. If you hold the other strands tightly, you lock the twist in place, and pulling creates friction and knots. Letting them hang gives them the freedom to move and stay smooth. This technique is fundamental to preventing tangling embroidery thread.
Preparing for Different Stitches
The number of strands you use impacts the look of various stitches:
- Cross-Stitch: As shown in the table, 2-3 strands on 14 count is common, but adjust for fabric count and desired coverage.
- Backstitch: Often uses 1 or 2 strands for outlines and details. Fewer strands make a finer line.
- Satin Stitch: The number of strands depends on the area you are filling and the desired puffiness and coverage. Can range from 1 to all 6 strands, or even more layered stitches. Separating allows you to get smooth, flat stitches.
- French Knots: Can use varying numbers of strands depending on how large you want the knot to be.
By dividing embroidery floss into individual strands first, you have complete control over the thickness of your thread for every stitch in your project. This flexibility is a key part of working with stranded embroidery cotton.
Final Thoughts on Smooth Separation
Mastering the technique of separating embroidery thread strands is a game-changer for anyone who enjoys needlework. It turns a potentially frustrating task into a simple step in your process. By holding one end, grabbing a single strand, and pulling it gently while letting the others hang, you effectively use the natural structure of the floss to your advantage.
This skill, combined with using appropriate thread lengths and letting your thread untwist as you work, is the best way to prevent tangling embroidery thread. Whether you are splitting DMC embroidery thread or another brand, the method is the same. Taking a few moments to properly prepare your floss using this embroidery thread separation technique sets you up for smooth, enjoyable stitching and beautiful results.
So, next time you pick up your needle and floss, remember the pull-and-dangle method. Your needle and your patience will thank you!
Frequently Asked Questions (FAQ)
Q: Can I separate floss that is already threaded onto a needle?
A: It is much harder to separate floss once it’s threaded and potentially tangled. It’s best to separate the correct number of strands before threading your needle. If you need fewer strands mid-project from a piece already threaded, it’s often easier to cut a new piece and separate that.
Q: What if the strands won’t pull apart easily?
A: Make sure you are only trying to pull one strand. Check that you are letting the other strands hang completely loose. Sometimes floss from an older skein can be a little sticky. A gentle wiggle near the held end might help, or try using a needle tip very gently to loosen the start of the separation. If it’s really stuck, you might need to cut off a small piece and try again.
Q: How long should I make my cuts of floss?
A: For beginners, 18 inches (about 45 cm) is a good length. It’s easy to manage. Experienced stitchers might use up to 24-30 inches, but longer lengths increase the risk of tangling as you stitch, even if separated properly. Shorter lengths mean threading your needle more often, but often save time by avoiding knots.
Q: Do all brands of embroidery floss separate like DMC?
A: Most major brands of stranded cotton floss are made with 6 strands that can be separated using this method. Always check the label or the thread itself. If it looks like multiple fine threads twisted together, this method should work. Pearl cotton, however, is a single thread and does not separate.
Q: My floss is still twisting a lot as I stitch. What can I do?
A: This is normal! Floss twists as it goes through the fabric. Regularly (every few stitches), stop and let your needle and thread hang towards the floor. This allows the thread to untwist naturally. You can also use a thread conditioner.
Q: Is it okay to reuse leftover separated strands?
A: Absolutely! That’s why good organization is helpful. If you have a piece of floss with, say, 4 strands left after pulling out 2, you can save it. Later, if you need 2 strands, you can pull them from this piece using the same method, or just use the remaining 4 strands if that’s the number you need. Just be aware that shorter lengths might be harder to separate.
Q: Does the direction I pull matter? Up or down?
A: Pulling the strand upwards away from the dangling length is usually easiest, but the key is pulling one strand away from the others while they are free to move. As long as the others can hang and untwist, the direction relative to gravity doesn’t strictly matter, but pulling up is the most common way.