
Can you service a sewing machine yourself? Yes, you absolutely can! With a little guidance and the right tools, most home sewers can perform basic sewing machine maintenance to keep their machines running smoothly. This guide will walk you through the essential steps for cleaning a sewing machine, oiling a sewing machine, and other vital sewing machine repair tips to tackle common issues.
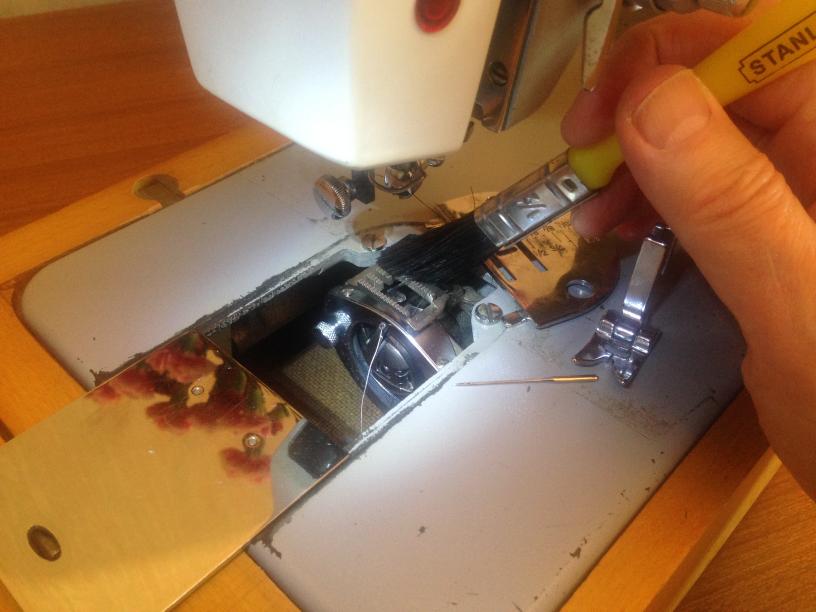
Image Source: content.instructables.com
Keeping Your Sewing Machine in Top Shape
Your sewing machine is a complex piece of equipment, but regular care doesn’t have to be intimidating. Think of it like taking care of your car; a little regular attention prevents big problems down the road. Proper sewing machine maintenance is key to ensuring it performs reliably for years to come. Neglecting this can lead to skipped stitches, thread breaks, and a general frustration that can dampen your creative spirit. This guide aims to demystify the process, offering clear, actionable steps.
Why Regular Servicing Matters
- Longevity: Just like any mechanical device, your sewing machine needs care to last. Regular cleaning and lubrication prevent wear and tear on moving parts.
- Performance: A well-maintained machine sews better. You’ll experience fewer skipped stitches, consistent tension, and smoother operation.
- Cost Savings: Catching small issues early can prevent them from becoming expensive repairs. Many common problems are easily fixed with a good clean and oil.
- Enjoyment: A smoothly running machine makes sewing a pleasure, not a chore.
Essential Tools for Servicing
Before you begin, gather these items. Having them ready makes the process much smoother.
- Soft Brushes: A small, soft paintbrush or a dedicated sewing machine cleaning brush is perfect for dusting away lint.
- Lint-Free Cloths: Microfiber cloths are ideal for wiping down surfaces without leaving fibers behind.
- Sewing Machine Oil: Use only oil specifically designed for sewing machines. Household oils can gum up the works.
- Screwdrivers: You might need a few small Phillips head and flathead screwdrivers, depending on your machine model. Check your manual.
- Tweezers: For grabbing stubborn bits of lint or thread.
- Needle-Nose Pliers: Helpful for tasks like sewing machine belt replacement if needed.
- Compressed Air (Optional): Can be useful for blowing out hard-to-reach dust.
- Your Sewing Machine Manual: This is your best friend! It will have specific diagrams and instructions for your model.
Step-by-Step Guide to Cleaning Your Sewing Machine
Cleaning a sewing machine is the most crucial step in basic maintenance. Lint, thread scraps, and dust are the primary enemies of a smooth-operating sewing machine.
H3: Cleaning the Exterior
Start with the outside. It’s the easiest part and gives you a chance to get familiar with your machine.
- Unplug the Machine: Safety first! Always disconnect the power before doing any cleaning or maintenance.
- Wipe Down Surfaces: Use a damp, lint-free cloth to wipe down the entire exterior of the machine. For stubborn grime, you can use a little mild soap, but ensure the cloth is only slightly damp and dry thoroughly afterward.
- Clean the Control Panel: Be gentle with buttons and dials. A dry or slightly damp cloth is usually sufficient. Avoid spraying cleaners directly onto the machine.
H3: Cleaning the Needle Area and Presser Foot
This is where a lot of lint accumulates.
- Remove the Needle: Loosen the needle clamp screw and carefully remove the needle. Keep it in a safe place.
- Remove the Presser Foot: Most presser feet are attached with a screw or a lever. Consult your manual if you’re unsure.
- Clean Under the Presser Foot and Needle Plate: Use your soft brush to gently sweep away any lint or thread fragments from the needle bar area and around the feed dogs (the little metal teeth that move the fabric). You can lift the presser foot to get better access.
- Clean the Bobbin Case Area: This is a prime spot for lint. Remove the needle plate (usually held by one or two small screws) and the bobbin case. Use your brush to meticulously clean out all the lint. Tweezers can help pull out larger tangled bits. If your machine has a removable bobbin area, take it out to clean thoroughly.
H3: Cleaning the Bobbin Area
This area is critical for proper stitch formation.
- Remove Bobbin and Bobbin Case: As mentioned above, take these out.
- Brush Away Lint: Use your brush to clean the bobbin race and any surrounding areas where lint can gather. Pay attention to the bobbin driver mechanism.
- Wipe with a Lint-Free Cloth: Ensure all surfaces are clean and dry.
H3: Cleaning the Feed Dogs
The feed dogs are essential for moving fabric.
- Brush Gently: Use your soft brush to remove lint and thread from between the teeth of the feed dogs.
- Check for Obstructions: Make sure nothing is lodged between them.
H3: Cleaning the Thread Path
Lint can also build up in the thread guides and tension discs.
- Thread Removal: Make sure all old thread is removed from the machine.
- Brush Thread Guides: Use your brush to carefully clean the thread guides from the spool pin all the way down to the needle.
- Clean Tension Discs: Gently slide a piece of thin paper or cardstock between the tension discs to dislodge any trapped lint. Do this with the presser foot up.
The Art of Oiling Your Sewing Machine
Oiling a sewing machine is as important as cleaning it. Lubrication reduces friction, prevents rust, and ensures smooth operation. However, over-oiling or using the wrong type of oil can cause damage.
H3: Where and How to Lubricate
- Consult Your Manual: This is crucial. Your sewing machine manual will have diagrams showing the specific oiling points for your model. These are typically metal parts that move against each other.
- Use Only Sewing Machine Oil: Never use WD-40, cooking oil, or other household lubricants. These can attract dust, become sticky, and damage your machine.
- Apply Sparingly: A single drop is often enough for each oiling point. Too much oil can create a mess and attract lint.
- Run the Machine After Oiling: After applying oil, run the machine slowly for a few minutes without thread. This helps distribute the oil evenly.
- Wipe Away Excess: Use a lint-free cloth to wipe away any excess oil.
H3: Common Oiling Points (General Guide – Always Check Your Manual!)
- Bobbin Case Area: Apply a tiny drop of oil to the bobbin case holder and the bobbin driver.
- Needle Bar: Apply a drop of oil where the needle bar connects to the arm of the machine.
- Take-Up Lever Area: Lubricate the pivot point of the thread take-up lever.
- Hook Mechanism: Some machines have accessible oiling points around the hook assembly.
- Moving Metal Parts: Any metal-on-metal moving parts are potential oiling points.
H3: How Often to Oil
The frequency depends on how much you use your machine.
- Light Use: Every 6 months to a year.
- Moderate Use: Every 3-4 months.
- Heavy Use: After every major project or monthly.
A good indicator that your machine needs oil is if you hear any squeaking or grinding noises.
Simple Sewing Machine Troubleshooting and Repairs
Even with regular maintenance, you might encounter minor issues. Here are some common sewing machine troubleshooting tips.
H3: Skipped Stitches
Skipped stitches are frustrating! They usually happen when the needle isn’t hitting the center of the bobbin hook correctly or the needle is damaged.
- Check the Needle: Is it bent, dull, or the wrong type for your fabric? Changing a sewing machine needle is often the solution. Always use a new, sharp needle.
- Check Needle Insertion: Is the needle inserted correctly and all the way up?
- Check Threading: Re-thread the machine, ensuring the presser foot is up when threading the top thread.
- Check the Bobbin: Is the bobbin wound evenly? Is it inserted correctly?
- Check Hook Timing: If the above doesn’t work, there might be a timing issue, which usually requires professional service.
H3: Thread Breaking
Thread breaking can be caused by several factors.
- Needle Issues: A dull or bent needle, or the wrong needle type, can cause thread breaks.
- Tension Problems: Incorrect top or bobbin tension can lead to breakage.
- Lint Buildup: Lint in the tension discs or thread path can snag the thread.
- Poor Quality Thread: Use good quality thread.
- Sharp Edges: Check for any rough or sharp edges on the needle plate or thread guides.
H3: Bird’s Nest (Thread Tangling Underneath)
This is almost always a tension issue.
- Top Tension: The top tension might be too loose. Try increasing it slightly.
- Bobbin Tension: The bobbin tension might be too tight.
- Threading: Ensure the machine is threaded correctly, with the presser foot up.
- Lint: Clean the bobbin case and tension discs thoroughly.
H3: Uneven Stitches or Puckering
This often relates to tension or fabric handling.
- Tension Adjustment: You may need to fine-tune the sewing machine tension adjustment. Try adjusting the top tension first.
- Fabric Type: Some fabrics require different tension settings or needle types.
- Presser Foot Pressure: Some machines allow you to adjust the presser foot pressure.
- Feed Dogs: Ensure the feed dogs are not clogged with lint.
Routine Maintenance Tasks
Beyond cleaning and oiling, a few other tasks are part of good sewing machine maintenance.
H3: Changing a Sewing Machine Needle
This is one of the simplest yet most impactful maintenance tasks.
When to Change Your Needle:
- After every 8-10 hours of sewing.
- When you notice skipped stitches, thread breakage, or fabric snagging.
- When switching to a different fabric type or weight.
- If you drop the needle.
How to Change a Sewing Machine Needle:
- Turn off and Unplug: Always ensure the machine is powered off.
- Lower the Presser Foot: This provides stability.
- Loosen the Needle Clamp Screw: Use the screwdriver provided with your machine or a suitable one. Turn it counter-clockwise.
- Remove the Old Needle: Carefully pull the needle straight down and out of the needle clamp.
- Insert the New Needle: Make sure the flat side of the needle shank faces the correct direction (usually towards the back – check your manual). Push the new needle all the way up into the clamp.
- Tighten the Needle Clamp Screw: Turn the screw clockwise until it is snug, but don’t overtighten.
- Dispose of Old Needles Safely: They are sharp!
H3: Bobbin Winding
A well-wound bobbin is crucial for smooth stitching.
Tips for Bobbin Winding:
- Use a Good Quality Bobbin: Ensure it’s the correct type for your machine.
- Start the Thread: Secure the thread end to the bobbin with a piece of tape or by tucking it into a small notch on the bobbin.
- Thread Guide: Follow your machine’s specific threading path for the bobbin winder. There’s usually a special thread guide just for winding the bobbin.
- Wind Evenly: Most machines have an automatic stop when the bobbin is full. If yours doesn’t, stop manually to prevent overwinding, which can cause issues.
- Check Tension: The thread should wind smoothly and evenly without being too tight or too loose.
H3: Sewing Machine Tension Adjustment
Getting the tension right is key to balanced stitches. The goal is for the top thread and bobbin thread to meet exactly in the middle of the fabric layers.
- Top Tension: This is the dial usually located near the top of the machine. Increasing the number tightens the top thread; decreasing the number loosens it.
- Bobbin Tension: This is adjusted by a small screw on the bobbin case. Turning the screw clockwise tightens the bobbin thread; counter-clockwise loosens it. Bobbin case adjustments are delicate. Only make tiny turns (a quarter turn at most) and test.
- Testing Tension: Sew a test sample on scraps of the fabric you’ll be using. Check the stitch on both sides. If the knot is on the top, the top tension is too loose or bobbin tension too tight. If the knot is on the bottom, the top tension is too tight or bobbin tension too loose.
H3: Sewing Machine Belt Replacement
Over time, the drive belt connecting the motor to the handwheel can wear out, causing slipping or a complete loss of power.
Signs the Belt Needs Replacement:
- Slipping noise, especially under load.
- The handwheel turns but the machine doesn’t stitch.
- Cracked or frayed belt.
How to Replace a Sewing Machine Belt (General Steps):
- Unplug the Machine: Always disconnect power.
- Access the Belt: You’ll likely need to remove an outer casing or a side panel. Consult your manual for specific instructions.
- Remove the Old Belt: Carefully slide the old belt off the motor pulley and the handwheel pulley.
- Install the New Belt: Position the new belt onto the pulleys, ensuring it’s centered.
- Reassemble: Replace any panels or casings you removed.
- Test: Plug in the machine and test its operation.
Advanced Maintenance and When to Seek Professional Help
While DIY servicing is effective for most routine care, some issues require a specialist.
H3: Sewing Machine Lubrication Beyond Basic Oiling
Some machines have internal lubrication points that are harder to access. If your manual indicates these and you feel comfortable, you can attempt it. However, if you’re unsure, it’s best left to a professional.
H3: Overhauling Internal Mechanisms
If your machine has been neglected for a long time, it might benefit from a more thorough internal cleaning and lubrication. This can involve disassembling certain parts.
H3: When to Call a Professional
- Timing Issues: If your machine consistently skips stitches despite trying all other troubleshooting steps.
- Motor Problems: If the motor seems weak or makes unusual noises.
- Complex Mechanical Failures: If a part has broken or is jammed.
- Electronic Issues: For machines with circuit boards or digital displays.
- If You’re Unsure: If you’re uncomfortable with any step, it’s always better to seek expert help to avoid causing further damage.
Frequently Asked Questions (FAQ)
Q1: How often should I clean my sewing machine?
A1: It’s best to give your machine a quick clean (especially the bobbin area) after every project. A more thorough clean and oiling should be done every 3-6 months, depending on usage.
Q2: What is the difference between sewing machine oil and other oils?
A2: Sewing machine oil is specifically formulated to be light, non-gumming, and resistant to evaporation. Other oils can be too heavy, attract lint, or dry out, causing damage.
Q3: My stitches look messy even after cleaning and oiling.
A3: Check your needle, thread, and tension. Ensure the machine is threaded correctly with the presser foot up. If problems persist, it might be a timing issue.
Q4: Can I use canned air to clean my sewing machine?
A4: Yes, canned air can be helpful for blowing out dust from hard-to-reach areas, but use short bursts and hold the can upright. Be cautious not to blow lint deeper into the mechanism. Also, hold moving parts still if possible to prevent them from spinning too fast.
Q5: My bobbin winder isn’t working.
A5: Check if the bobbin winder mechanism is engaged correctly. Ensure the thread is threaded through the proper guide. If it still doesn’t work, there might be a mechanical issue with the winder itself.
By following these guidelines for sewing machine maintenance, cleaning a sewing machine, oiling a sewing machine, and performing basic sewing machine troubleshooting, you can keep your machine in excellent working order, ensuring countless hours of happy sewing. Regular care is an investment in your craft!