
Setting the tension on a sewing machine is a key step for good stitches. What is sewing machine tension? It is how tight the top thread and the bobbin thread are pulled. It controls how these two threads lock together. Why is it important? Proper tension makes your stitches look neat and strong. Bad tension causes many problems. It can lead to loose stitches, bunched fabric, or broken threads. This guide will help you fix common stitch problems. You will learn how to get the right tension every time. We will cover upper tension adjustment and bobbin tension troubleshooting. This will help you get excellent sewing machine stitch quality.
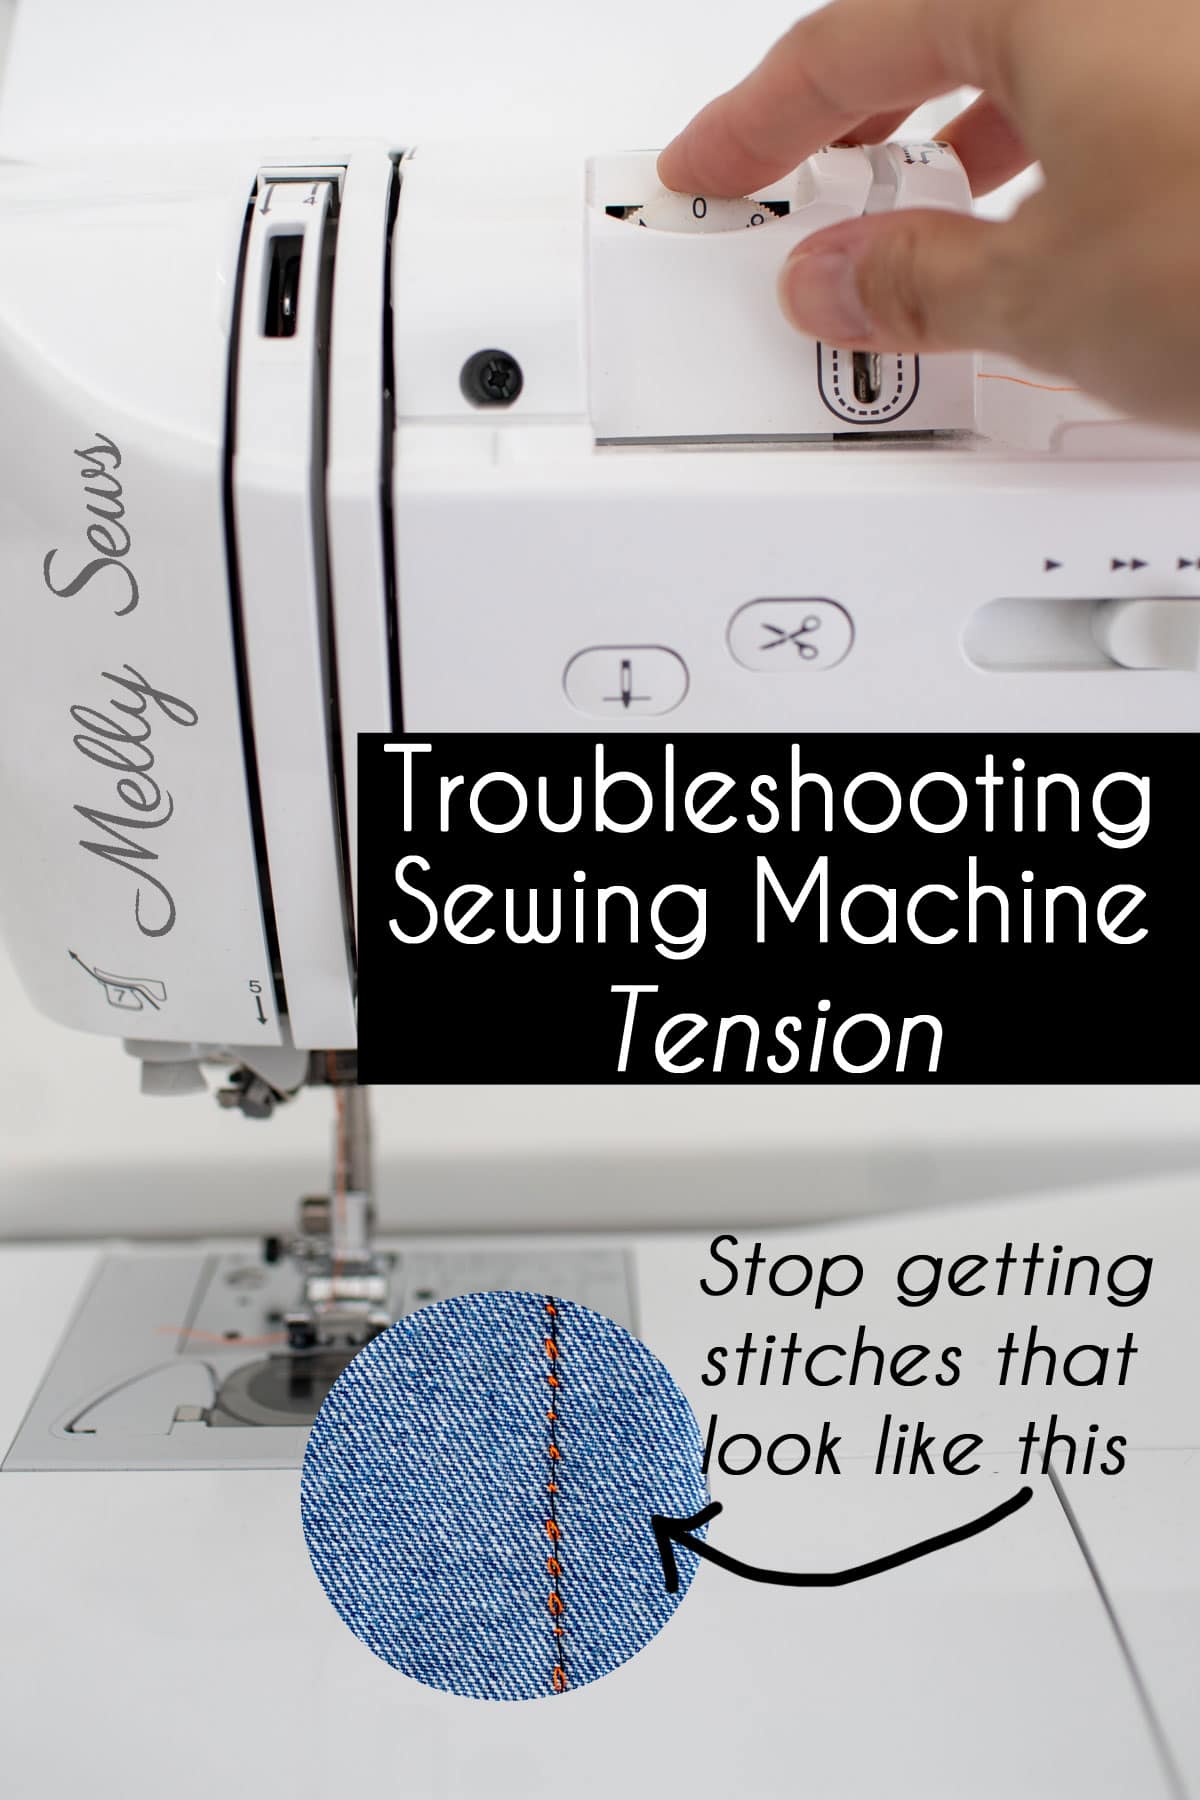
Image Source: mellysews.com
Grasping Sewing Machine Tension
Sewing machine tension makes threads meet in the middle of your fabric. Think of it like a tug-of-war. The top thread is pulled from one side. The bobbin thread is pulled from the other. For a perfect stitch, they must pull with the same strength. They meet exactly between the layers of fabric. This forms a strong, even line.
When tension is wrong, the threads do not meet in the middle. One thread might pull the other to its side. This makes the stitch look bad. It can also make your fabric pucker or your seams weak. Proper tension is a must for good sewing. It means your stitches hold up. It also means your projects look professional. Without good tension, you will face many stitch formation problems.
The Parts of Tension Control
Your sewing machine has two main ways to control thread tension. One is for the top thread. The other is for the bobbin thread. Each plays an important part in forming a balanced stitch.
Top Thread Tension: The Upper Hand
The top thread tension is the one you change most often. It is usually a dial or a screen on the front of your machine. This dial has numbers. Low numbers mean less tension (looser thread). Higher numbers mean more tension (tighter thread). Most machines work best around numbers 3 to 5.
When you turn the dial, two metal discs inside your machine move. They squeeze the top thread. A spring presses these discs together. More pressure means the thread is tighter. Less pressure means it is looser. This upper tension adjustment is your main tool. You will use it to fix most common stitch issues. A correctly set top tension makes the bobbin thread lie flat on the fabric’s underside. It stops the top thread from looping.
Bottom Thread Tension: The Bobbin’s Role
The bobbin thread tension is less often changed. It is set in the bobbin case. On most machines, the bobbin case has a small screw. Turning this screw changes the tension on the bobbin thread. A very tiny turn can make a big difference.
It is very important to know this: Do not touch the bobbin tension screw unless you have to. Most times, bobbin tension comes perfectly set from the factory. If you change it, it can be hard to get it back to normal. You should only adjust it if your top tension changes do not fix the problem. Or if you get a new bobbin case. We will cover bobbin tension troubleshooting later. When the bobbin tension is good, the top thread lies flat on the fabric’s top side. It stops loops on the bottom.
Spotting Stitch Problems
Knowing what a good stitch looks like helps you spot problems. Once you see a bad stitch, you can fix it.
What a Good Stitch Looks Like
A perfect stitch looks the same on both sides of the fabric. The threads meet evenly in the middle. You should not see loops on the top or bottom. The stitch length should be even. The fabric should lie flat. It should not pull or pucker.
Here is a quick look at good and bad stitches:
| Stitch Appearance | Top Thread | Bottom Thread | Fabric | Cause of Problem |
|---|---|---|---|---|
| Perfect Stitch | Flat | Flat | Flat | Balanced tension |
| Loops on Top | Too tight | Too loose | Flat | Bobbin tension too loose or upper tension too tight |
| Loops on Bottom | Too loose | Too tight | Flat | Upper tension too loose or bobbin tension too tight |
| Fabric Puckering | Too tight | Too tight | Pulled | Both tensions too tight, or wrong needle/thread |
| Loose Stitches | Not locked | Not locked | Flat | Both tensions too loose, or wrong threading |
Common Stitch Flaws and Their Causes
When your stitches do not look right, tension is often the cause. Here are some common issues and what they mean.
-
Looping Stitches on Top:
This happens when the top thread forms loops on the top side of your fabric. This means your top tension is too tight. Or your bobbin tension is too loose. The top thread is pulling the bobbin thread up too much. The looping stitches fix is to loosen your upper tension. Turn the dial to a lower number. If that does not work, your bobbin tension might be too loose. But try the upper tension first. -
Looping Stitches on Bottom:
This is the opposite problem. Loops form on the bottom side of your fabric. This means your top tension is too loose. Or your bobbin tension is too tight. The bobbin thread is pulling the top thread down too much. The looping stitches fix here is to tighten your upper tension. Turn the dial to a higher number. If this does not work, your bobbin tension might be too tight. -
Fabric Puckering:
Sometimes, your fabric pulls together and wrinkles along the stitch line. This is fabric puckering prevention in action. If it happens, your tension is likely too tight overall. Both top and bobbin threads are pulling too hard. This squeezes the fabric. Loosen both tensions slightly. Make sure your needle and thread are right for your fabric. A dull needle can also cause puckering. -
Loose Stitches:
If your stitches look weak or easily pull apart, they are too loose. This is one of the main loose stitches causes. Both top and bobbin tensions might be too low. Or, your machine might be threaded wrong. If the thread is not in the tension discs, it will be loose. Tighten your top tension first. Also, check your threading. -
Skipped Stitches:
A skipped stitch means the machine misses a stitch entirely. This is usually not a tension problem. It is often caused by a bent or dull needle. Or the wrong type of needle for your fabric. Sometimes, the needle is not put in all the way. Check your needle first if you see skipped stitches. -
Buncheed Stitches:
This looks like a bird’s nest of thread on the bottom of your fabric. It is a common stitch formation problem. This is almost always due to incorrect threading. The top thread might not be fully in the tension discs. Or it slipped out. This lets too much top thread go through. It gets tangled under the fabric. Always re-thread your machine if this happens.
Steps to Set Tension Right
Fixing tension takes a few simple steps. Be patient. Make small changes.
Prep Your Machine
Before you change any tension dial, do these important checks:
- Clean It: Lint and old thread bits can get stuck in your tension discs. This stops them from working right. Use a small brush to clean the area around the top tension discs. Also, clean out the bobbin case area. This is part of sewing machine calibration.
- Check Needle: A bent, dull, or wrong needle can cause many stitch issues. It can look like a tension problem. Always use a sharp needle. Make sure it is the right type and size for your fabric and thread. This is key for needle and thread compatibility.
- Thread Correctly: This is the most common reason for tension problems. Re-thread your entire machine. Make sure the top thread goes through every guide. It must sit deep inside the tension discs. Do this with the presser foot up. If the foot is down, the discs are closed. The thread cannot sit in them properly. For the bobbin, make sure it is wound evenly. Put it in the case the right way. Check your machine’s manual for the exact path.
How to Adjust Upper Tension
Once your machine is clean and threaded, you can adjust the tension. This is where you do most of your upper tension adjustment.
- Find Your Starting Point: Most machines are set around 3 or 4 for medium weight fabric. If you are unsure, put your dial back to this number. This is a good neutral sewing machine calibration point.
- Use a Test Fabric: Get a scrap piece of fabric. Make it the same type and number of layers as your project. Use thread that is a different color from your fabric. This helps you see the stitches better.
- Make a Test Stitch: Sew a few straight lines. Use a medium stitch length (like 2.5). Look closely at the stitches on both the top and bottom of the fabric.
- Decide What to Do:
- Loops on Top: Your top thread is too tight. Loosen it. Turn the dial to a lower number.
- Loops on Bottom: Your top thread is too loose. Tighten it. Turn the dial to a higher number.
- Adjust in Small Steps: Turn the tension dial only one number at a time. Then sew another test line. Keep doing this until the stitches look perfect. They should be flat on both sides. The threads should meet in the middle of the fabric.
- Check All Sides: Sometimes, the tension looks good on the top. But it is off on the bottom. Always check both sides of your fabric. This is how you achieve good sewing machine stitch quality.
When to Touch Bobbin Tension (And How)
As said before, try to fix tension with the top dial first. Only adjust bobbin tension if:
- You have loops on the top even with the top tension at its loosest.
- You have loops on the bottom even with the top tension at its tightest.
- You are using very special threads that need more or less tension.
- You got a new bobbin case and it seems off.
This is true bobbin tension troubleshooting. Be very careful.
- Get Ready: Take out the bobbin case. If it has a bobbin in it, remove it.
- Find the Screw: Look for a very small screw on the side of the bobbin case. It is usually flat-head.
- Make Small Turns: Use a tiny screwdriver. Turn the screw only a quarter turn (or less!).
- To tighten bobbin tension: Turn the screw to the right (clockwise). This pulls the thread tighter. This helps if you have loops on the bottom (top thread is too loose).
- To loosen bobbin tension: Turn the screw to the left (counter-clockwise). This makes the thread looser. This helps if you have loops on the top (top thread is too tight).
- Test and Repeat: Put the bobbin case back in. Re-thread your machine. Sew a test stitch. Adjust again if needed. Tiny changes make a big difference here. Mark your starting spot with a bit of nail polish or a marker. This way, you can go back if needed.
The Test Sew
Every time you change tension, do a test sew. This is not just for tension. It helps check needle and thread compatibility.
- Use Project Fabric: Always test on the same fabric you will use for your project. Use the same number of layers. Tension can change a lot with different fabrics.
- Different Stitches: Try a straight stitch. Then try a zig-zag stitch. Sometimes tension looks fine on one but not the other.
- Check Both Sides: Pick up your fabric. Look closely at the front and back. The stitches should be even. They should meet in the middle. If they do, your thread tension balance is good.
- Keep Notes: Write down your tension settings. Note the fabric type, needle type, and thread type. This helps for future projects. This is a good part of sewing machine calibration.
Achieving Thread Tension Balance
The goal is to get a perfect thread tension balance. This means the top thread and bobbin thread pull with the same strength. They lock perfectly in the center of the fabric.
Imagine a perfect stitch. It looks like a balanced knot. The knot sits right in the middle of the two fabric layers. On the top, you see only the top thread. On the bottom, you see only the bobbin thread. Neither thread pulls the other to its side.
When your tension is balanced, your sewing machine stitch quality will be high. Your seams will be strong. They will look neat and professional. This also helps with fabric puckering prevention. Balanced tension means less stress on your fabric.
Beyond Tension: Other Fixes for Stitch Formation Problems
Sometimes, tension is not the only issue. Other things can cause stitch formation problems. Check these if tension changes do not help.
Correct Threading Matters
This cannot be stressed enough. Incorrect threading is the number one cause of bad stitches. Even if you have sewn for years, take time to re-thread.
- Lift the Presser Foot: Always thread your machine with the presser foot up. This opens the tension discs. If the foot is down, the discs are closed. The thread cannot slip into them. It will just lie on top. This makes your top thread very loose. It leads to loose stitches causes and bird’s nests.
- Follow the Path: Look at your machine’s manual. Make sure the thread goes through every guide and hook.
- Check Bobbin: Is the bobbin wound evenly? Is it put in the bobbin case the right way? Does the bobbin thread go under the tension spring in the bobbin case?
Needle and Thread Pairings
The right needle for the right fabric and thread is vital. This is true needle and thread compatibility.
- Needle Type: Different fabrics need different needles.
- Universal needles: Good for woven fabrics.
- Ballpoint/Stretch needles: For knits, to prevent fabric damage.
- Sharp/Microtex needles: For delicate fabrics like silk, or thick fabrics like denim.
- Needle Size: The needle size should match your thread and fabric. A general rule:
- Small needle (60/8, 70/10): For fine fabrics, light thread.
- Medium needle (80/12, 90/14): For medium fabrics, general thread.
- Large needle (100/16, 110/18): For heavy fabrics, thick thread.
- If your needle is too small for the thread, the thread might break. Or it might skip stitches.
- If your needle is too big, it can make holes in your fabric. It can also cause fabric puckering.
- Thread Type: Use good quality thread. Cheap thread can break or shed lint. Use the same type and weight of thread for top and bobbin. An exception is embroidery.
Fabric Choice and Stabilizers
The fabric itself can affect tension.
- Thin Fabrics: Very thin or slippery fabrics (like silk, chiffon) often need less tension. They might also need a smaller needle. They can pucker easily if tension is too high.
- Thick Fabrics: Heavy fabrics (like denim, canvas) might need slightly more tension. They will need a larger needle.
- Stretchy Fabrics: Knits and stretchy fabrics can cause issues. They might stretch as you sew. Use a ballpoint needle. Consider using a walking foot. Sometimes, a temporary stabilizer can help with fabric puckering prevention. It gives the fabric more body.
Cleanliness is Key
A dirty machine is an unhappy machine. Lint and dust build up. They can cause tension problems. They can also mess with your sewing machine calibration.
- Under the Needle Plate: Take off your needle plate. Clean out the feed dog area. Lint can build up here. It stops the fabric from moving smoothly.
- Bobbin Area: Remove the bobbin case and bobbin. Brush out all lint. A tiny bit of lint under the bobbin tension spring can cause big problems.
- Tension Discs: Sometimes, lint gets stuck in the top tension discs. You might not see it. Try flossing them with a piece of strong thread. Lift the presser foot. Put a strong thread between the discs. Pull it back and forth.
Presser Foot Pressure
Some machines let you change the presser foot pressure. This is how hard the presser foot pushes down on the fabric.
- Too Much Pressure: Can squish thin fabrics. It can cause them to pucker. It can look like a tension issue.
- Too Little Pressure: Fabric might not feed evenly. It might slip around. Stitches can be uneven.
Check your manual to see if your machine has this feature. Adjust it based on your fabric. Less pressure for thin fabrics. More pressure for thick fabrics.
Advanced Tips for Perfect Stitches
Once you master basic tension, here are more tips.
- Sewing Different Fabrics:
- Knits: Use a ballpoint or stretch needle. Slightly reduce top tension. Use a walking foot.
- Silks/Satins: Use a very sharp, fine needle (Microtex). Reduce tension a lot. Hand-baste seams first.
- Heavy Canvas/Denim: Use a heavy-duty needle (denim, 100/16). Increase tension slightly if stitches are loose.
- Using Different Threads:
- Thick Threads: If using a thicker decorative thread on top, you might need to loosen top tension. Use a matching, normal weight thread in the bobbin.
- Metallic/Specialty Threads: These often need special needles (like metallic needles). They usually need much lower top tension. They can be tricky.
- Keeping a Test Swatch: For every new project, sew a test on a fabric scrap. Write down the tension setting. Note the needle type, thread type, and fabric layers. Keep these swatches. They are a helpful reference for future projects. This makes sewing machine calibration easier over time.
Frequently Asked Questions (FAQ)
Q: What is the default tension setting on a sewing machine?
A: Most sewing machines come set to a default tension of 3 to 5. This is for mid-weight woven fabrics. Always check your machine’s manual for its specific suggested setting.
Q: How do I know if my tension is too high or too low?
A: If your top thread is too tight, you will see loops on the top of your fabric. If your top thread is too loose, you will see loops on the bottom of your fabric. Too high overall tension causes fabric puckering. Too low overall tension leads to loose stitches.
Q: Can tension issues damage my sewing machine?
A: Severe tension problems, like a bird’s nest of thread jammed in the machine, can cause damage. They can bend needles or timing issues. Always stop sewing if you hear strange noises or see extreme thread bunching.
Q: Do I need to change tension for every project?
A: Not always, but often. Different fabrics, thread types, and needle sizes can all affect the ideal tension. It is good practice to test your tension on a scrap of your project fabric before you start.
Q: Why are my stitches loose even after adjusting tension?
A: Loose stitches causes can be more than just tension. First, check your threading. Is the top thread seated correctly in the tension discs? Is the bobbin wound evenly and put in right? A dirty machine (lint in tension discs) or a wrong needle can also cause loose stitches. Re-thread first.
Q: What if my bobbin tension screw won’t turn?
A: Do not force it. It might be stripped or stuck. Try a different small screwdriver that fits perfectly. If it still won’t turn, take your machine to a repair shop. Or consider buying a new bobbin case.
Q: What are signs of a stitch formation problem not related to tension?
A: Stitch formation problems can also come from other places. Skipped stitches often mean a bent, dull, or wrong needle. Uneven stitches can mean uneven feeding from lint in feed dogs or wrong presser foot pressure. Thread breaking can mean a dull needle, wrong needle size, or poor quality thread.
With these steps, you can tackle almost any stitch problem. Practice and patience will make you a tension-setting pro!