
Setting up a Brother sewing machine for the first time can feel like a big step. Don’t worry! This guide will walk you through every part, from unboxing to your very first time sewing Brother machine. We’ll cover everything you need to know to get started. This is your complete Brother sewing machine setup guide.
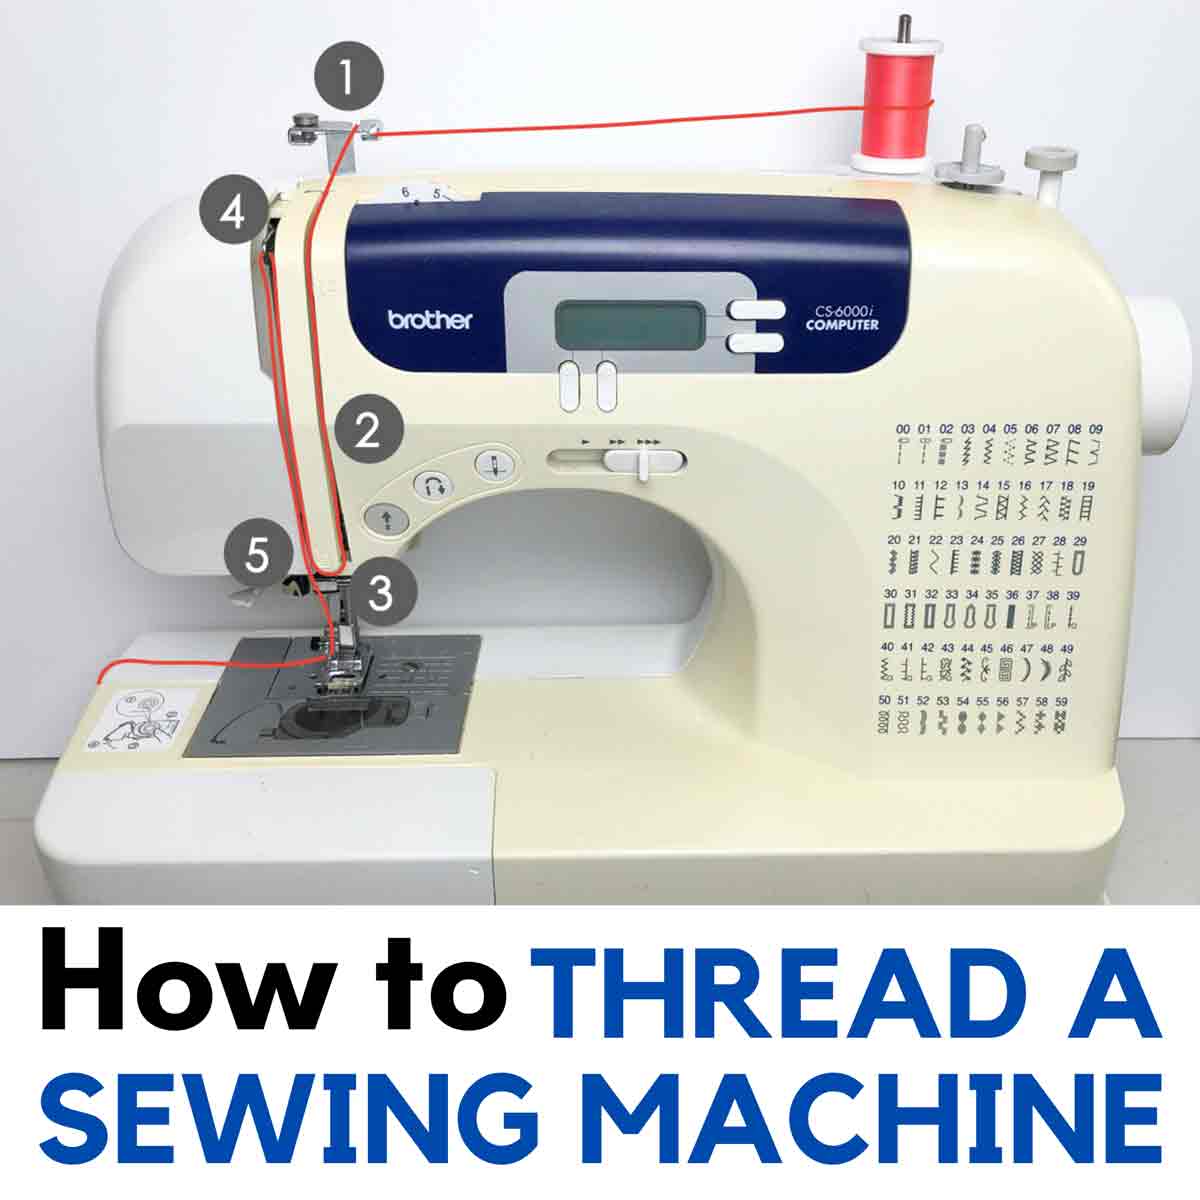
Image Source: mindymakes.com
Opening Your New Machine
First things first, let’s open the box. Find a large, flat, steady space to work. A kitchen table or sturdy desk works great.
Taking Things Out
Carefully open the box. Your machine is packed tight to keep it safe.
- Lift out the machine. It might be heavier than you think.
- Look for the power cord.
- Find the foot pedal.
- Your instruction manual is very important. Keep it safe!
- Look for a bag or box with accessories. These often include extra bobbins, needles, different presser feet, and tools.
Looking at Your Machine
Take a moment to look at your new machine. You’ll see different parts.
- There’s a handle on top, usually for carrying.
- You’ll see knobs or buttons on the front or side. These control things like stitches.
- The needle area is front and center.
- Below the needle is where the bobbin goes.
- There are thread guides all over the machine. They look like hooks or slots.
What Comes in the Box?
What exactly is usually in the box? This can be a little different depending on which Brother machine you have. But here are common things you’ll find:
| Item | What It Looks Like | Why It’s Needed |
|---|---|---|
| Sewing Machine | The main unit | For sewing! |
| Power Cord | A cord with plugs on both ends | Gives the machine power |
| Foot Pedal | A flat pedal with a cord | Controls how fast the machine sews |
| Instruction Manual | A book or booklet | Tells you how to use your specific model |
| Bobbins | Small plastic or metal spools | Holds the lower thread |
| Needles | Thin, sharp metal pins | Pushes thread through fabric |
| Presser Feet | Small metal feet that attach near the needle | Hold fabric down while you sew |
| Tools | Small brush, screwdriver | For cleaning or changing needles |
Getting Power to Your Machine
Now, let’s get the machine ready to turn on.
Finding the Right Spot
Put your machine on a steady, flat surface. Make sure you have enough space around it for fabric. You also need to be close to a wall outlet.
Plugging In
Find the Brother sewing machine power cord. It has two ends.
- One end plugs into the machine. Look for a spot on the side or back. It might have a picture of a plug.
- The other end plugs into the wall.
Only use the power cord that came with your machine.
Connecting the Foot Pedal
The foot pedal is how you tell the machine to sew. Think of it like the gas pedal in a car. Connect the foot pedal Brother machine by plugging its cord into the machine. There’s a specific spot for this, often near where the power cord goes.
Make sure both the power cord and the foot pedal are plugged in firmly.
Turning It On
Your machine has a power switch. It’s usually on the side near where the cords plug in. Flip the switch to “on.” A light on the machine might turn on.
Now the machine has power. But it won’t sew until you press the foot pedal.
Getting the Bobbin Ready
The bobbin holds the thread that makes the bottom part of your stitch. Before you can sew, you need thread on the bobbin. This is called winding bobbin Brother machine.
Grasping Bobbin Winding
Why do you wind a bobbin? Because thread comes on big spools. The bobbin is a small spool that fits inside the machine. You transfer thread from the big spool to the small bobbin.
Choosing the Right Bobbin
Brother machines usually use specific types of bobbins. They might be plastic or metal. Use only the bobbins that came with your machine or bobbins that your manual says will work. Using the wrong type can cause problems.
Steps for Winding Bobbin Brother Machine
Follow these steps carefully:
- Place the spool of thread: Put the spool of the thread you want to use on the spool pin. This is usually on top of the machine. There might be a cap to hold the spool in place.
- Guide the thread: Follow the path shown in your manual for winding the bobbin. It usually goes through a guide or two near the spool pin.
- Wrap the thread around the bobbin: Take the end of the thread and wrap it around the empty bobbin a few times. Wrap it in the direction that the manual shows.
- Place the bobbin: Put the bobbin onto the bobbin winder spindle. This spindle is often on the top or front of the machine. Push the bobbin down onto the spindle.
- Engage the winder: You need to tell the machine you want to wind the bobbin, not sew. On many Brother machines, you slide the bobbin winder spindle to the side (usually to the right). This disconnects the sewing needle.
- Hold the thread tail: Hold the end of the thread that you wrapped around the bobbin. Keep it held until the bobbin starts winding a little.
- Start winding: Gently press the foot pedal. The bobbin will start to spin quickly and wind the thread.
- Keep winding: Let the bobbin wind until it’s full, but not overflowing. It will usually stop automatically or slow down when full.
- Stop winding: Take your foot off the pedal.
- Cut the thread: Cut the thread connecting the full bobbin to the spool.
- Disengage the winder: Slide the bobbin winder spindle back to its original position (usually to the left).
- Remove the bobbin: Take the full bobbin off the spindle.
Now you have a full bobbin ready to go into the machine.
Threading the Top Thread
The top thread comes from the spool on top of the machine. It goes through a specific path before going through the needle. This is how to thread Brother sewing machine. Correct threading is very important for good stitches.
Deciphering Threading the Machine
Think of threading like following a trail. The thread needs to go through several points to get the right tension.
Choosing Thread
Before threading, you need thread! Choosing thread Brother sewing machine depends on your project.
- Types: Cotton thread is common for everyday sewing. Polyester is strong. Silk is fine.
- Weight: Thread comes in different thicknesses. Match the thread weight to your fabric and needle size. A medium-weight all-purpose thread is good for beginners and many fabrics.
- Color: Choose a color that matches your fabric or provides a nice contrast.
It’s best to use the same type and weight of thread in the top and the bobbin for balanced stitches.
Step-by-Step Top Threading
Make sure the machine is turned on, but don’t touch the foot pedal yet!
- Raise the needle: Turn the handwheel (the big wheel on the side) towards you. Turn it until the needle is in its highest position.
- Raise the presser foot: Use the lever on the back of the needle area to lift the presser foot up. This opens the tension discs, which is very important for correct threading.
- Place the thread spool: Put your spool of thread on the spool pin on top of the machine. Use the spool cap to hold it in place.
- Follow the first guide: Find the first thread guide near the spool pin. It might be a hook or a slot. Guide the thread through it.
- Go down the channel: Bring the thread down the main channel on the front of the machine. Look for numbers or arrows printed on the machine. Follow the path exactly.
- Around the turn: At the bottom of the channel, the thread usually makes a U-turn. Follow the arrows up the second channel.
- Through the take-up lever: This is a crucial step! The take-up lever is a metal arm that moves up and down as you sew. The thread must go through the hole or hook in the take-up lever. Make sure the lever is at its highest point (step 1) so you can easily loop the thread through it.
- Down to the needle: Bring the thread down from the take-up lever towards the needle.
- Through lower guides: There might be one or two small guides just above the needle. Thread goes through these.
- Through the needle eye: This is the tricky part! Thread the needle from the front to the back. Most Brother needles have a flat side on the back of the shaft to help you know which way it faces. If your machine has an automatic needle threader, now is the time to use it (check your manual for how). If not, thread it by hand.
- Pull thread: Pull about 6-8 inches of thread through the needle eye.
- Place thread: Slip this thread tail under the presser foot and towards the back of the machine.
Your top thread is now ready!
Putting the Bobbin In
The next step is to put the full bobbin into its spot. This is inserting bobbin Brother sewing machine. How you do this depends on if your machine has a top-loading or front-loading bobbin. Most modern Brother machines are top-loading, which is easier.
Top-Loading vs. Front-Loading
- Top-Loading: The bobbin case is flat and sits under a clear cover on the flat bed of the machine, to the right of the needle.
- Front-Loading: The bobbin case is round and fits into a metal case. This case then goes into a compartment on the front of the machine, below the sewing area.
We will focus on the more common top-loading method here. If you have a front-loading machine, check your manual specifically.
Steps for Inserting Bobbin Brother Sewing Machine (Top-Loading)
- Open the bobbin cover: Slide off the clear plastic cover plate just below the needle plate.
- Pick up the bobbin: Hold the full bobbin in your hand.
- Check direction: This is VERY important. Look at the thread on the bobbin. For most Brother top-loading machines, when you put the bobbin in, the thread needs to be coming off the bobbin in a specific direction. Often, it’s counter-clockwise, looking like the letter “P” or “9” when held. Always check your manual image for the exact direction. If the thread comes off the wrong way, your stitches won’t form correctly.
- Place the bobbin: Drop the bobbin into the bobbin case area.
- Guide the thread: Find the slots or guides inside the bobbin case area. Pull the bobbin thread through these slots following the arrows. This sets the bobbin tension. Pull the thread until it slips under a little metal finger.
- Leave thread tail: Leave about 4-6 inches of bobbin thread resting on the needle plate.
- Replace cover: Slide the clear plastic cover plate back into place until it clicks.
Do not trim the bobbin thread tail yet.
Getting Both Threads Ready to Sew
Now you have the top thread coming through the needle and the bobbin thread sitting under the cover. You need both threads to form a stitch. The bobbin thread needs to come up through the needle plate hole.
Fetching the Bobbin Thread
This step pulls the bobbin thread up so it can meet the top thread.
Steps
- Hold the top thread: Hold the tail of the top thread that is coming from the needle eye. Hold it gently to the side or front.
- Turn the handwheel: Slowly turn the handwheel on the side of the machine towards you. Watch the needle.
- Watch the needle: The needle will go down into the bobbin area and then come back up. As it comes up, the top thread will form a small loop. This loop is catching the bobbin thread.
- Catch the loop: Use a finger, tweezers, or the tip of small scissors to catch that loop of top thread. Pull it gently upwards.
- Pull up the bobbin thread: As you pull the top thread loop, the bobbin thread will be pulled up with it through the hole in the needle plate.
- Pull both threads: Pull both the top thread and the bobbin thread tail towards the back of the machine.
- Under the foot: Make sure both thread tails are pulled under the presser foot and back behind it.
Now both threads are ready and waiting under the presser foot!
Attaching the Presser Foot
Your machine likely came with several presser feet. One is usually already attached. The presser foot holds your fabric flat against the feed dogs (the little teeth that move the fabric) while you sew. Attaching presser foot Brother sewing is easy once you know how the system works.
Securing the Presser Foot
Most Brother machines use a snap-on presser foot system. This makes changing feet quick and easy.
Types of Presser Feet
Your machine manual will show you which feet came with your machine and what they do. Common feet include:
- Zigzag Foot (J): The standard foot, used for most stitches. It has a wide opening.
- Buttonhole Foot: Used for sewing buttonholes.
- Zipper Foot: Used for sewing zippers.
- Blind Stitch Foot: Used for hemming.
Always use the correct foot for the stitch you are using.
How to Attach or Remove a Presser Foot
- Raise the presser foot lever: Use the lever behind the needle bar to lift the presser foot up high.
- Remove the current foot: There is usually a red or black button on the back of the presser foot holder, just above the foot. Press this button, and the foot will drop off.
- Get the new foot: Take the foot you want to attach. There is a bar across the top of the foot.
- Position the foot: Place the new foot on the needle plate so the pin or bar across the top is directly under the slot on the bottom of the presser foot holder.
- Lower the holder: Gently lower the presser foot lever. The presser foot holder will come down and snap onto the bar of the new foot. You might hear a click.
- Check it’s secure: Wiggle the foot gently to make sure it’s attached firmly.
If you need to attach the presser foot holder itself (sometimes it comes off), look for a screw that attaches it to the presser bar.
Exploring Basic Controls
Your Brother machine has different controls to help you choose stitches, change stitch size, and more. Getting to know these basic controls Brother sewing machine will help you sew better.
Navigating Machine Controls
The controls might be knobs, buttons, or a touch screen, depending on your model. Your manual is the best guide for your specific machine.
Power Switch
We already covered this! It turns the machine on and off. Always turn the machine off when changing needles, presser feet, or when you’re done sewing.
Foot Pedal
This controls the speed. Press it gently for slower sewing. Press it harder for faster sewing. Take your foot off to stop.
Stitch Selector
This is how you pick which stitch the machine makes (like straight stitch, zigzag, etc.). It might be a dial you turn or buttons you press. Pictures or numbers on the machine show you the different stitches.
Stitch Length and Width
Some machines let you change how long and how wide the stitches are.
- Length: How far apart the stitches are. Shorter length makes stitches closer together.
- Width: How wide a zigzag or other stitch is.
These are often controlled by separate dials or buttons.
Tension Dial
The tension control adjusts how tight the stitches are formed. It controls the pull on the top thread. The bobbin tension is set in the bobbin case. If stitches are too loose or too tight, you might need to adjust this. A middle setting (often 3, 4, or 5) is usually a good starting point.
Reverse Lever or Button
This lets you sew backwards. You use this at the start and end of seams to lock the stitches so they don’t come undone.
Needle Up/Down
On some machines, there’s a button to make the needle go up to its highest point or down into the fabric.
Speed Control
Many digital machines have a slider or buttons to set the maximum sewing speed, separate from the foot pedal pressure. This is helpful for beginners to avoid sewing too fast.
Your First Stitch
You’ve unpacked, powered up, threaded, and put the bobbin in. You’re ready to try sewing! This is your first time sewing Brother machine. It’s a good idea to practice on scraps of fabric before sewing your real project.
Your First Stitch
Practicing helps you get a feel for the foot pedal and how the machine moves the fabric.
Gather Fabric Scraps
Find some small pieces of fabric. Cotton scraps are great for practice. You might want two layers of fabric, like you would use for a seam.
Set a Simple Stitch
Choose a basic straight stitch. On your stitch selector, find the straight stitch icon (it looks like a dashed or solid line). Set the stitch length to a medium setting, maybe 2.0 or 2.5.
Place the Fabric
Put the fabric scrap under the presser foot. Line up the edge of the fabric with a seam guide line on the needle plate (the metal plate the needle goes through). These lines help you sew straight seams.
Lower the Presser Foot
Use the lever to lower the presser foot onto the fabric. The foot holds the fabric firmly in place. You must lower the presser foot before sewing. If you don’t, you’ll get a tangled mess of thread!
Start Sewing Slowly
Gently press the foot pedal. The machine will start to sew. Go slowly at first. Watch how the fabric moves under the foot. Try to steer the fabric slightly to keep the edge lined up with the seam guide.
Practice
Sew a few straight lines. Try pressing the reverse button/lever at the start and end of a line to see how it locks stitches. Practice stopping and starting. Try a zigzag stitch to see how the machine makes it. The more you practice, the more comfortable you’ll feel.
Interpreting Small Problems
Sometimes, things don’t go perfectly right away. Don’t get frustrated! Many problems have simple fixes.
Interpreting Small Problems
Knowing what common issues look like helps you fix them quickly.
Thread Nests
If you get a tangled mess of thread on the underside of your fabric (sometimes called a “bird’s nest”), the most common cause is not threading the machine with the presser foot up. When the foot is up, the tension discs are open. When you thread with the foot down, the thread doesn’t go into the tension discs correctly, causing loose thread that tangles underneath. Re-thread the top thread with the presser foot raised.
Skipped Stitches
This can be caused by:
- A bent or dull needle. Change the needle.
- The wrong type or size of needle for your fabric.
- Incorrect threading. Re-thread the machine.
Tension Issues
Stitches that look loose on top (like loops) mean the top tension is too loose or the machine is threaded incorrectly (especially missing the take-up lever or not going into the tension discs).
Stitches that look loose on the bottom mean the top tension is too tight or the bobbin is not in correctly (wrong direction or not in the bobbin case tension slot).
Adjust the tension dial slightly or re-thread both the top and bobbin threads carefully.
Maintaining Your Machine
Taking care of your machine helps it run smoothly for a long time.
Maintaining Your Machine
Simple cleaning and care are usually all that’s needed for home sewing machines.
Cleaning
Lint and dust from fabric and thread can build up under the needle plate and in the bobbin area. Use the small brush that came with your machine to clean this out regularly. You might need to remove the needle and presser foot and the needle plate (check your manual for how) to clean properly.
Oiling
Some older or mechanical machines need oiling. Most modern Brother machines do not need oiling by the user. Check your manual! If yours does, the manual will show you exactly where to put a tiny drop of special sewing machine oil.
Needle Changes
Sewing needles get dull or can bend. Change your needle after every 8-10 hours of sewing or when you start having problems like skipped stitches or loud noises. Use the small screwdriver from your accessories to loosen the screw that holds the needle in place. Insert the new needle with the flat side facing the back (on most Brother machines). Tighten the screw firmly, but not too tight.
Frequently Asked Questions (FAQ)
Here are some common questions new Brother sewing machine owners ask.
Can I use any thread in my Brother machine?
You can use most types of sewing thread made for machine sewing (cotton, polyester, silk, rayon). Avoid hand-sewing thread, which is coated differently. Also, avoid very cheap, poor-quality thread, which can create a lot of lint and break easily. Make sure the thread weight is suitable for your needle and fabric.
My bobbin thread keeps breaking. What’s wrong?
This could be several things:
* The bobbin is wound too tightly or unevenly. Rewind it.
* The bobbin is in the bobbin case backwards. Check the direction in your manual.
* The bobbin thread isn’t correctly pulled through the tension slot in the bobbin case.
* You’re using the wrong type of bobbin.
* There’s lint buildup in the bobbin case area. Clean it out.
* The needle is bent or has a burr. Change the needle.
* The top tension is too tight.
Why won’t my machine sew?
- Is it plugged in? Is the power switch on?
- Is the foot pedal connected?
- Did you slide the bobbin winder spindle back after winding a bobbin? It must be in the sewing position.
- Is the presser foot down?
- Is the needle inserted correctly and not broken?
What needle should I use?
Needles have types and sizes.
* Universal needles: Good for woven fabrics. Come in sizes like 80/12 or 90/14. 80/12 is a good general size.
* Ballpoint or Jersey needles: Have a rounded tip for knits so they don’t snag the fabric.
* Jeans or Denim needles: Stronger needles for thick fabrics.
* Needle size: Lower numbers are finer needles for delicate fabrics. Higher numbers are thicker needles for heavier fabrics.
Your manual might recommend specific needle types for your machine.
How often should I clean my machine?
It’s a good idea to do a quick clean after each project or after several hours of sewing, especially if you’re using fabric types that create a lot of lint (like cotton or flannel).
Can I oil my machine?
Check your specific Brother machine manual. Most modern home Brother machines are factory-lubricated and do not require user oiling. Oiling a machine that doesn’t need it can actually cause problems by attracting lint.
Ready to Sew!
You’ve done it! You’ve set up your Brother sewing machine. You know how to wind and insert the bobbin, thread the top thread, and explore the basic controls. You’ve even done your first time sewing Brother machine practice stitches.
Keep your manual handy. It has lots of specific information for your model. Don’t be afraid to try sewing different stitches on scraps. The more you practice, the more confident you will become. Happy sewing!