
Are you holding a new Brother sewing machine and wondering, “How do I start?” or “What are the first steps for using this machine?” This guide is for you! We will walk through the important steps to get your Brother sewing machine ready. We will cover the first things you need to do, like finding parts, putting in a needle, winding and installing a bobbin, and putting thread in the machine. This is a helpful Brother sewing machine setup guide for anyone using one for the first time. We will cover Brother sewing machine basic operation to get you sewing quickly.
Sewing by machine can seem tricky at first. But taking it step by step makes it easy. Setting up your Brother sewing machine right is the first big step to sewing fun projects. Let’s get your machine ready to go!
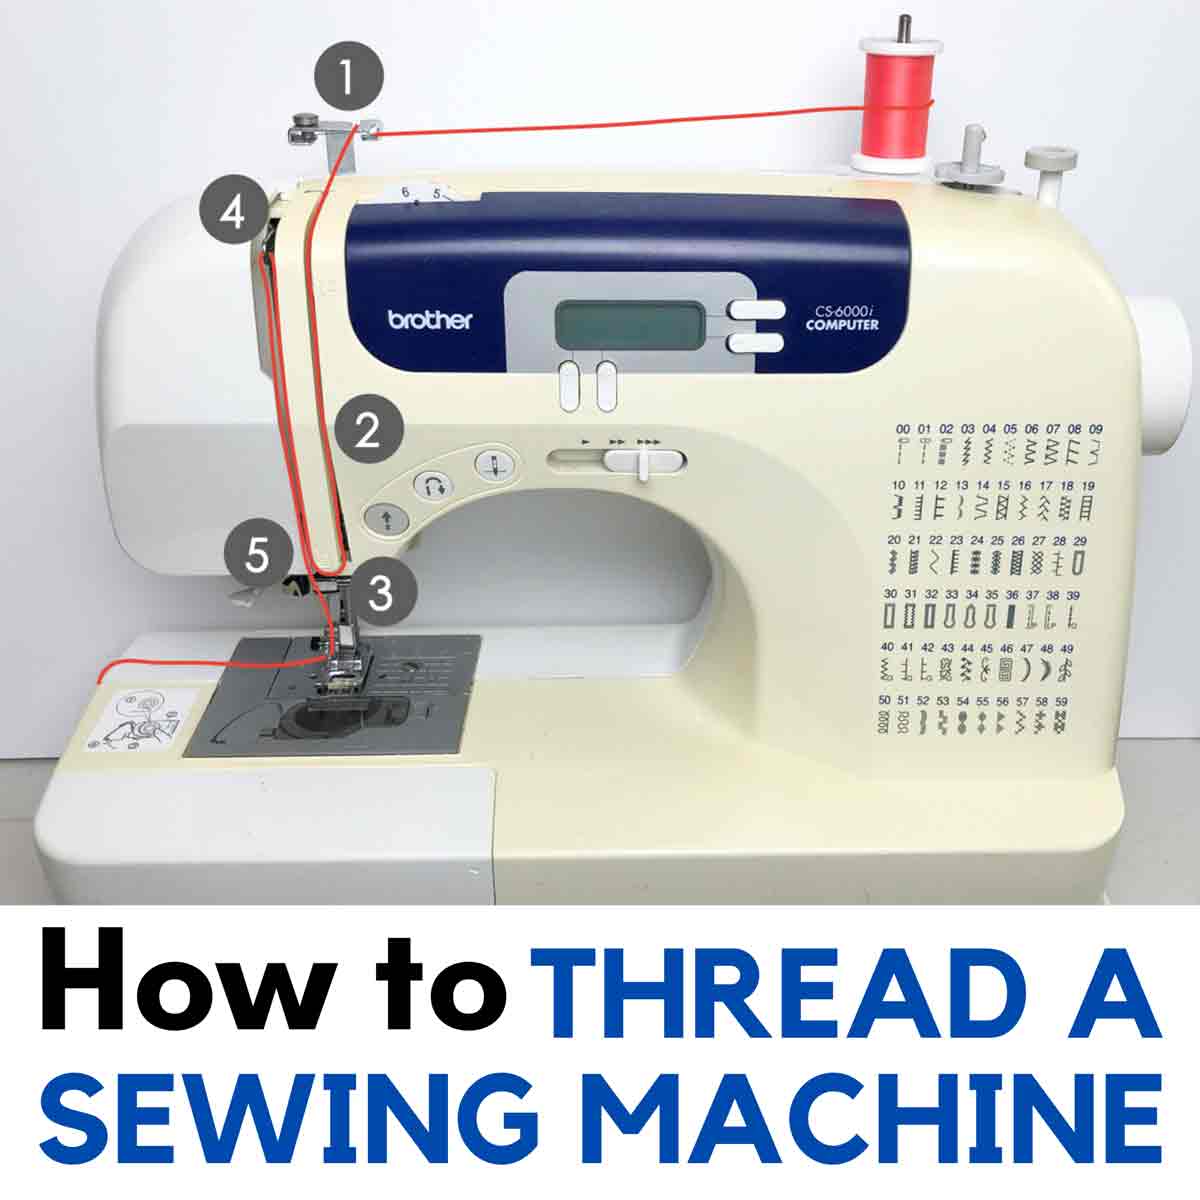
Image Source: mindymakes.com
Getting Your Machine Ready
When you first get your Brother sewing machine, it comes in a box. Take it out carefully. Find a good, flat place to put it. A table or desk works well. Make sure you have enough space to move fabric around.
Your machine will have some parts with it. Look for these things:
- The sewing machine itself.
- The power cord.
- The foot pedal (sometimes called a foot controller).
- A bag or box with small tools and parts.
- The Brother sewing machine user manual.
It is very important to find the Brother sewing machine user manual. This book has pictures and words just for your machine model. Keep it close by. It answers many questions you might have later. Read the safety notes in the manual first.
Finding the Right Space
Pick a spot that is well lit. You need to see what you are doing clearly. Make sure there is an electrical outlet nearby for the power cord. Your sewing area should be comfortable for sitting.
Taking Everything Out
Open the box and take out the machine gently. Lift it using the body of the machine, not just the handle. Put the machine on your table. Open the box of parts. Find the power cord and foot pedal. Put them near the machine. Find the manual and put it where you can easily see it.
Powering On Your Machine
Before you turn on the machine, look at it. Find where the power cord plugs in. This is usually on the side or back of the machine. It often has two holes. Find the power switch. It might be a flip switch or a button. It is also usually on the side or back, near where the cord plugs in.
Now, plug the foot pedal into the machine. There is a special plug for the foot pedal. It often looks different from the power plug hole. Plug the power cord into the machine. Then, plug the power cord into the wall outlet.
Make sure your hands are dry when you plug in the cords.
Now, you can turn the power switch to the ‘On’ position. You might see a light turn on on the machine. This means it has power. If your machine has a screen, it might light up.
This is Powering on Brother sewing machine. It’s a simple step, but it’s the first step to making your machine work.
What to Check Before Turning On
- Is the machine on a flat, steady surface?
- Are the power cord and foot pedal plugged in firmly to the machine?
- Is the power cord plugged into the wall?
- Is the area around the needle clear?
Getting the Needle Ready
Your machine needs a needle to sew. Needles can break or get dull, so you need to know how to change them. When you first set up your machine, it might already have a needle in it. But it is good to know how to put in a new one. This is called Inserting needle Brother sewing machine.
Sewing machine needles have a round side and a flat side at the top where they go into the machine. The flat side must face a certain way for the needle to be put in right. For most Brother machines, the flat side faces the back of the machine. Check your user manual to be sure for your specific model.
You will need a small screwdriver that came with your machine.
Here are the steps for Inserting needle Brother sewing machine:
- Turn off the power. Always turn off the machine before touching the needle. This is very important for safety.
- Raise the needle bar. Turn the handwheel (the big round wheel on the side) towards you until the needle is in its highest position.
- Loosen the needle clamp screw. This is a small screw that holds the needle in place. It is just above the needle. Use the screwdriver to turn the screw just enough to loosen it. Do not take the screw all the way out.
- Take out the old needle (if there is one). Pull the needle straight down out of the clamp.
- Put in the new needle. Hold the new needle with the flat side facing the back of the machine. Push the needle up into the needle clamp as far as it will go. It needs to be pushed all the way up.
- Tighten the needle clamp screw. Hold the needle in place with one hand. Use the screwdriver to tighten the screw firmly. Be careful not to overtighten.
- Check the needle. Give the needle a gentle pull down to make sure it is held tightly.
Using the right type and size of needle for your fabric is also important. The manual will have a chart showing which needle to use for different fabrics.
Getting the Bobbin Ready
Sewing machines use two threads. One comes from the top (the needle thread), and one comes from the bottom (the bobbin thread). The bobbin is a small spool that holds the bottom thread. You need to wind thread onto the bobbin first. This is Winding bobbin Brother sewing machine. Then you need to put the bobbin into the machine. This is Installing bobbin Brother sewing machine.
First, let’s talk about Winding bobbin Brother sewing machine.
- Get a bobbin. Brother machines use specific types of bobbins. Use only the bobbins that came with your machine or ones that say they work with your Brother model. Using the wrong bobbin can cause problems.
- Put thread on the bobbin winding pin. Find the bobbin winding pin. It is usually on the top of the machine. Put your empty bobbin onto this pin. There might be a little spring or clip to hold it.
- Put your spool of thread on the spool pin. Put your spool of thread on the spool pin. This is usually on the top or back of the machine. There might be a cap to put on the pin to hold the spool.
- Guide the thread. Look for a path or guides on the machine for winding the bobbin. This path usually goes from the thread spool, through a tension disc for bobbin winding, and then to the bobbin on the winding pin. Your manual shows this path clearly. Loop the thread around the bobbin a few times by hand to get it started.
- Move the bobbin winding pin. Push the bobbin winding pin to the side, towards the bobbin winding stop. This tells the machine you want to wind a bobbin, not sew.
- Start winding. Gently press the foot pedal (or press the start/stop button if your machine has one). The bobbin will start to spin and thread will wrap around it.
- Watch it fill. The machine will wind the bobbin. Most machines will stop automatically when the bobbin is full. If not, stop when it looks full but not overflowing.
- Cut the thread. Cut the thread that connects the bobbin to the spool.
- Push the bobbin winding pin back. Move the bobbin winding pin back to its original position.
- Take the bobbin off the pin.
Now you have a full bobbin! Next is Installing bobbin Brother sewing machine. Brother machines usually have a drop-in bobbin system on the top of the sewing bed.
- Turn off the power. Always turn off the machine before putting in the bobbin.
- Open the bobbin cover. Find the clear plastic cover on the flat part of the machine where you sew. Slide a latch or just lift the cover to open it.
- Put the bobbin in the case. Hold your wound bobbin. You need to put it into the bobbin case so the thread unwinds in the correct direction. There is a picture inside the bobbin area or in your manual showing which way the thread should come off the bobbin (usually counter-clockwise).
- Guide the thread through the slot. Pull the thread tail from the bobbin and guide it through the small slot or guide channel in the bobbin case area. There is a specific path here that sets the bobbin tension. Make sure the thread clicks into place in this channel.
- Leave a thread tail. Leave about 3-4 inches (7-10 cm) of thread tail hanging out.
- Close the bobbin cover. Put the clear plastic cover back into place and close it.
Now the bobbin is in and ready to go!
Threading the Machine
With the needle in and the bobbin installed, it is time to put the top thread in. This is called Threading Brother sewing machine. It might look like a lot of steps, but each step is important for the machine to sew correctly. There is a path for the thread to follow. Look for numbers or arrows on your machine that show this path.
Here are the basic steps for Threading Brother sewing machine:
- Raise the presser foot. Use the lever on the back of the needle bar area to lift the presser foot up. The presser foot is the part that holds the fabric down while you sew.
- Raise the needle. Turn the handwheel towards you until the needle is in its highest position. This also raises the take-up lever inside the machine, which is a key part of the threading path.
- Put the spool of thread on the spool pin. Place your spool of thread on the spool pin on top of the machine. Put the spool cap on to hold it in place.
- Follow the threading path. This path is marked on your machine with numbers or arrows.
- First, take the thread from the spool and guide it through the first thread guide (often a hook or slot near the spool).
- Bring the thread down along the channel on the front of the machine.
- When you get to the bottom of this channel, turn the thread upwards.
- Pull the thread up to the take-up lever. The take-up lever is a metal arm that moves up and down as the machine sews. The thread must go through the eye or hook of this lever. This is a very important step many beginners miss. Make sure the lever is in its highest position (step 2) so you can put the thread through it.
- Bring the thread back down the channel towards the needle.
- Guide the thread through the needle guides. There might be one or two small hooks or guides right above the needle. Thread the thread through these guides.
- Thread the needle. Now, put the thread through the eye of the needle. The thread usually goes from the front of the needle to the back. Some Brother machines have a built-in needle threader which makes this much easier. Follow the instructions in your manual for using the automatic needle threader if you have one. If threading by hand, cut the end of the thread clean and push it through the needle eye.
- Pull thread under the presser foot. Pull the thread you just put through the needle eye and bring it under the presser foot. Pull it towards the back of the machine.
You have now done the main part of Threading Brother sewing machine!
Picking Up the Bobbin Thread
Before you can start sewing, you need to bring the bobbin thread up through the needle plate hole.
- Hold the top thread. Hold the tail of the top thread (the one coming from the needle) loosely with one hand.
- Turn the handwheel. Use your other hand to slowly turn the handwheel towards you. Watch the needle go down and come back up.
- Catch the loop. As the needle comes up, it will catch the bobbin thread and make a loop.
- Pull the loop. Gently pull the top thread tail you are holding. A loop of the bobbin thread will come up through the hole in the needle plate.
- Pull up the bobbin thread. Use your fingers or tweezers to pull the bobbin thread loop all the way up.
- Bring both threads back. Pull both the top thread and the bobbin thread tails under the presser foot and towards the back of the machine. Place them under the presser foot, not over it.
Now, both threads are ready, coming from under the presser foot towards the back.
Preparing for Your First Stitch
You have powered on the machine, put in a needle, wound and installed the bobbin, and threaded the machine. You are almost ready for your First time using Brother sewing machine to actually sew.
You need a piece of scrap fabric to test. This is very important. Do not start sewing on your project right away. Test on a piece of the same type of fabric.
- Choose a stitch. Most Brother machines have different stitches. For your first test, choose a simple straight stitch. Look at the stitch selector dial or buttons. Find the straight stitch setting. The manual will show which one it is. It often looks like a line or a series of dashes.
- Set stitch length and width. For a straight stitch, you usually only set the length. A length of 2.5 mm is good for a test stitch. A shorter stitch is stronger, a longer stitch is easier to take out. Set the width to 0 for a straight stitch. Again, check your manual or machine display for how to do this.
- Lower the presser foot. Put your scrap fabric under the presser foot. Line up the edge of the fabric with a guide line on the needle plate if you want to sew a straight line. Use the presser foot lever to lower the foot onto the fabric. The fabric is now held in place.
- Position threads. Make sure the two thread tails are under the presser foot and pointed towards the back.
Sewing Your First Stitches
Now, take a deep breath and sew your First time using Brother sewing machine.
- Start sewing. Gently press the foot pedal (or press the start/stop button). The machine will start sewing. Go slowly at first. Guide the fabric gently with your hands. Do not push or pull the fabric hard. The machine feeds the fabric by itself using the feed dogs (the little teeth under the presser foot).
- Sew a few inches. Sew a line of stitches a few inches long.
- Stop sewing. Take your foot off the pedal (or press the start/stop button again).
- Raise the needle and presser foot. Turn the handwheel to bring the needle up to its highest point. Raise the presser foot lever.
- Take out the fabric. Pull the fabric with your stitches out from under the presser foot towards the back.
- Cut the threads. Cut the thread tails connecting your fabric to the machine. Most machines have a thread cutter on the side or back.
Look at your stitches on the scrap fabric. A good stitch looks the same on the top and the bottom. The stitches should be even. This simple test shows you if the Threading Brother sewing machine and Installing bobbin Brother sewing machine steps were done right.
Inspecting Your First Stitches
What do your stitches look like?
- Good Stitch: The stitches on the top look like small, even dashes. The stitches on the bottom look the same. When you pull on the fabric, the stitches do not come out easily. The top thread and bobbin thread meet neatly in the middle of the fabric layers.
- Problem Stitches:
- Loops on top: If you see loops on the top of the fabric, the bobbin thread tension might be too loose, or more likely, the top thread is not threaded right. Check the entire Threading Brother sewing machine path again, especially making sure the thread is in the take-up lever and pulled firmly down into the tension discs with the presser foot raised.
- Loops on bottom: If you see loops on the bottom of the fabric, the top thread tension might be too loose, or the bobbin was not installed right. Check Installing bobbin Brother sewing machine step. Make sure the bobbin thread is in the tension channel correctly. Also, re-check the top Threading Brother sewing machine path.
These common issues often come from threading or bobbin setup errors, not usually from the Brother sewing machine tension adjustment dial yet, unless the problem is severe.
Simple Tension Ideas
Your Brother sewing machine has a tension control. This control balances the pull of the top thread and the bobbin thread. For most basic sewing, the tension setting that the machine comes with (often around 3, 4, or 5 on a dial) works well.
Brother sewing machine tension adjustment is usually only needed if your stitches are not looking right after you have checked the threading and bobbin setup carefully.
- If loops are on the bottom (top thread too loose): You might need to increase the top tension number slightly.
- If loops are on the top (bobbin thread too loose, or top thread too tight): You might need to decrease the top tension number slightly.
Always make small changes to the tension dial and test on scrap fabric again after each change. The Brother sewing machine user manual will have a section on tension and what different stitch problems mean. For your First time using Brother sewing machine, it is best to trust the machine’s standard setting unless your test stitch shows clear problems you cannot fix with re-threading.
Cleaning Your Machine (Quick Note)
While setting up, it is a good habit to keep your machine clean. Dust and lint can build up, especially in the bobbin area. Your manual will show you how to open the bobbin case area for cleaning. Use a small brush that came with your machine. Do not use canned air, as it can push lint deeper inside the machine. Keeping it clean helps your machine run smoothly.
Putting Things Away
When you finish sewing, even just testing, turn off the power. Unplug the machine from the wall. It’s a good idea to unplug the foot pedal too. Put the machine’s cover on if it came with one. Store your accessories and manual in a safe place.
A Summary: Brother Sewing Machine Setup Guide
Let’s quickly go over the steps for setting up your Brother sewing machine:
- Unpack: Take the machine and parts out of the box. Find your user manual.
- Find Space: Set up on a flat, well-lit table near a power outlet.
- Connect Power: Plug in the foot pedal and the power cord. Do not turn it on yet.
- Insert Needle: Put in a new needle, flat side facing the back (usually). Turn off power first!
- Wind Bobbin: Put thread on a bobbin using the bobbin winding pin. Follow the thread path for winding.
- Install Bobbin: Put the wound bobbin into the bobbin case area. Make sure the thread is going the right way and through the tension slot.
- Thread Top Thread: Put the thread spool on the pin. Follow the numbered path on the machine, making sure the thread goes through the take-up lever (needle up!) and the needle eye.
- Pick Up Bobbin Thread: Hold the top thread, turn the handwheel, and pull up a loop of the bobbin thread. Bring both threads under the presser foot.
- Power On: Turn the power switch to ‘On’.
- Test: Put scrap fabric under the presser foot. Lower the foot. Sew a line of stitches.
- Check Stitches: Look at the stitches on your scrap fabric to see if they are balanced. Re-thread if needed. Adjust tension only if necessary after checking threading and bobbin setup.
This Brother sewing machine setup guide covers the basic steps to get you started. Each Brother model might have slightly different parts or threading paths, so your Brother sewing machine user manual is your best friend. Follow its pictures and steps exactly.
Mastering Winding bobbin Brother sewing machine, Inserting needle Brother sewing machine, and Threading Brother sewing machine are the most important skills for getting your machine ready. Once you can do these steps easily, the rest of Brother sewing machine basic operation becomes much simpler.
Remember to take your time. If something is not working, stop and check the steps again. Most problems are solved by checking the threading, the bobbin, and the needle.
Going Beyond Setup: First Stitches and Simple Projects
Once you are happy with your test stitch, you can try sewing on a practice piece. Draw some lines on fabric and try sewing straight lines. Try sewing curves. This helps you get used to guiding the fabric and using the foot pedal to control speed.
Your manual will have information on simple stitches and maybe even a basic project idea. Start with very easy things like sewing straight lines or sewing two pieces of fabric together.
Don’t be afraid to practice. Sewing is a skill that gets better with practice. Your First time using Brother sewing machine will get easier each time you set it up and use it.
Remember these keywords cover the steps:
* Threading Brother sewing machine
* Winding bobbin Brother sewing machine
* Inserting needle Brother sewing machine
* Brother sewing machine user manual
* Brother sewing machine tension adjustment
* First time using Brother sewing machine
* Brother sewing machine setup guide
* Installing bobbin Brother sewing machine
* Powering on Brother sewing machine
* Brother sewing machine basic operation
You’ve covered all these things by setting up your machine!
Table of Common Setup Checks
Here is a quick table to help you remember what to check if something is not working after setup:
| Problem | What to Check First |
|---|---|
| Machine won’t turn on | Is the power cord plugged in? Is the power switch on? |
| Needle won’t go in | Is the power off? Is the flat side of the needle facing the back? Is it pushed all the way up? |
| Thread keeps breaking | Is the machine threaded right? Is the thread old or poor quality? Is the needle bent or dull? |
| Loops on bottom of fabric | Is the top thread threaded correctly (especially the take-up lever)? Is the presser foot down? |
| Loops on top of fabric | Is the bobbin installed right? Is the thread in the bobbin tension channel? |
| Machine makes strange noise | Is the machine threaded right? Is there lint in the bobbin area? Check manual. |
Making Sense of Your Machine’s Features
Different Brother sewing machines have different features. Some have dials, some have buttons and screens.
- Dials: You might have dials to select your stitch, adjust stitch length, or stitch width. Turn these dials to change settings.
- Buttons/Screen: You might press buttons to select stitches or change numbers on a screen.
Your Brother sewing machine user manual explains all the features on your specific model. For Brother sewing machine basic operation, you will mainly use the stitch selector, maybe length/width controls, the handwheel, foot pedal, and presser foot lever.
Don’t worry about all the fancy stitches or features right away. Focus on setting up the machine correctly and sewing a simple straight stitch. As you get more comfortable, you can learn about other stitches and features.
Safety Reminders
Working with a sewing machine means being careful.
- Always turn the power off when changing the needle, changing the presser foot, or threading the machine.
- Keep your fingers away from the needle when sewing. Use a seam guide or your fingers to guide fabric edges, but keep them a safe distance from the needle.
- Unplug the machine when you are done using it or before cleaning.
- Do not let small children use the machine without close adult help.
Following these simple rules keeps you safe while you learn.
Keeping Your Manual Handy
We keep talking about the Brother sewing machine user manual because it is truly the best resource for your specific machine. It has pictures that match your machine exactly. It shows the threading path, how to wind the bobbin, how to change the needle, and explains the parts. Keep it near your sewing space. If you lose it, you can often find a copy online on the Brother support website by typing in your machine’s model number.
Using your Brother sewing machine is a rewarding hobby. Taking the time to set it up correctly following this Brother sewing machine setup guide and your manual will help you avoid frustration and get sewing smoothly. Winding bobbin Brother sewing machine, Inserting needle Brother sewing machine, and Threading Brother sewing machine are steps you will do often. Practice them until they feel easy.
Welcome to the world of sewing with your Brother machine!
Frequently Asked Questions (FAQ)
Q: My thread keeps breaking when I start sewing. What is wrong?
A: This is a common problem! First, check your Threading Brother sewing machine path carefully. Make sure you followed all steps and the thread is not getting stuck anywhere. Make sure the thread is in the take-up lever. Also, check that the presser foot is down when you sew. Check your needle – is it in correctly (flat side to back)? Is it bent or dull? Try a new needle. Make sure you are using good quality thread.
Q: How do I know if I installed the bobbin correctly?
A: When Installing bobbin Brother sewing machine, the most important thing is that the thread comes off the bobbin in the right direction (usually counter-clockwise). Look inside the bobbin case area or in your manual for a small picture showing the correct direction. Also, make sure the thread is pulled through the tension channel slot in the bobbin case.
Q: What tension setting should I use for my First time using Brother sewing machine?
A: Start with the standard setting recommended in your Brother sewing machine user manual, or the number that looks like it is marked as the default (often around 4 or 5). This setting works for most basic sewing on medium weight fabric. Only change the tension if your test stitches show loops on the top or bottom, and you have already re-checked threading and bobbin setup.
Q: Do I need to oil my Brother sewing machine?
A: Many modern Brother machines do not need oiling by the user. Some older or specific models might. Check your Brother sewing machine user manual. It will tell you if your machine needs oiling and where to put the oil. Do not oil your machine unless the manual says to.
Q: Can I use any bobbin in my Brother machine?
A: No. You must use bobbins made for your specific model of Brother sewing machine. Using the wrong size or type of bobbin can cause major problems with stitching and can even damage your machine. Use the bobbins that came with the machine or buy ones that say they work with your model number.
Q: What is the foot pedal for?
A: The foot pedal controls the speed of your sewing machine. The harder you press, the faster the machine sews. Gently pressing makes the machine sew slowly, which is great for beginners.
This guide gave you the steps for Brother sewing machine setup guide. By following these steps, you have learned the core parts of Brother sewing machine basic operation and are ready to start your sewing journey. Happy sewing!