
Do you have a new Brother sewing machine and wonder, “How do I get it ready to sew?” This guide will walk you through the basic setup steps for your machine. We will cover everything from taking it out of the box to getting the thread ready for its first time use. This includes power cord connection, connecting foot pedal, winding a bobbin, threading the bobbin, inserting needle, Brother sewing machine threading for the top thread, and installing presser foot. We will also touch on troubleshooting setup issues.
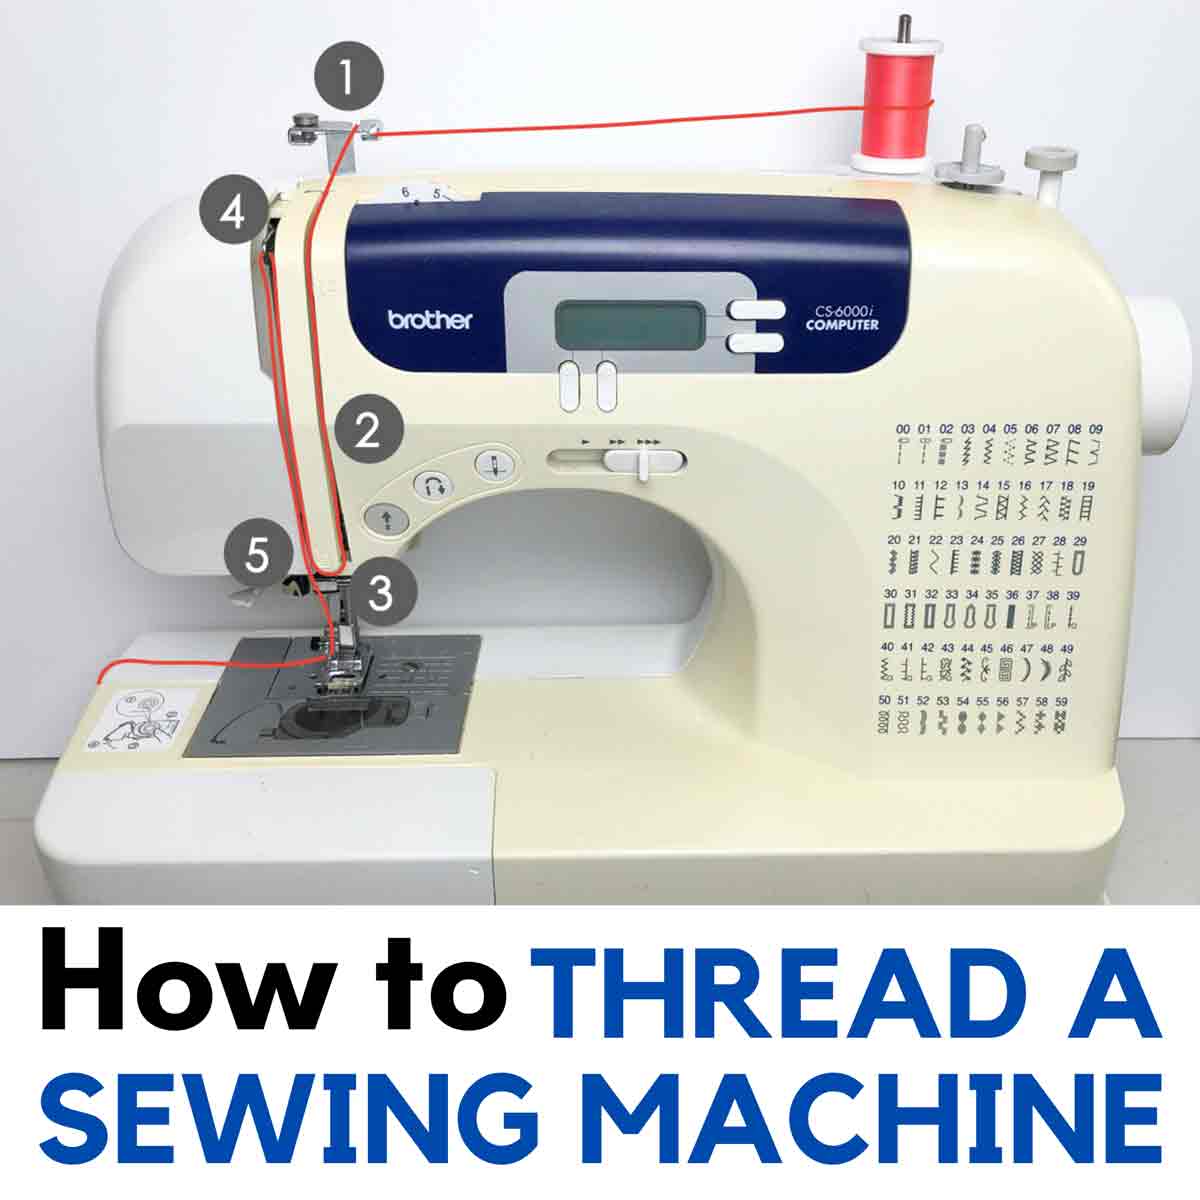
Image Source: mindymakes.com
Getting Ready to Sew
Let’s start by getting your machine out and finding all the pieces. This is the very first part of your basic setup steps.
Unpacking Your Machine
Open the box carefully. Lift the machine out. It might be heavy, so be careful. Put it on a flat, sturdy table or desk. Make sure you have enough space around it to work.
Finding the Parts
Your Brother machine comes with different parts. Look in the box and any side parts of the foam packing. Find these things:
- The sewing machine itself.
- The foot pedal (sometimes called a foot controller).
- The power cord.
- The instruction manual (this is very important!).
- Small bags with tools and parts (needles, bobbins, presser feet, screwdrivers, etc.).
Keep the box and packing in case you need to move or store the machine later. Look at the list of parts in your manual. Make sure you have everything.
Connecting Power and Foot Pedal
Now, let’s give your machine power and connect the part that makes it go. This covers the power cord connection and connecting foot pedal.
Making the Power Connection
Find the power cord. Look at the back or side of your sewing machine. You will see a place to plug in the power cord. It often has two holes.
- Take one end of the power cord. This end usually has two pins.
- Push this end firmly into the power socket on the machine.
- Take the other end of the power cord. This end goes into a wall power outlet.
- Plug it into the wall.
Important: Make sure the machine’s power switch is OFF before you plug it into the wall. The power switch is usually on the side of the machine.
Attaching the Foot Pedal
The foot pedal is how you control the sewing speed. It also needs to be plugged into the machine.
- Find the foot pedal cord. It has a connector at the end.
- Look at the back or side of your machine again. There is usually another place to plug in the foot pedal. It might look like a round plug or a set of pins.
- Line up the foot pedal connector with the port on the machine.
- Push it in firmly.
You should now have both the power cord and the foot pedal connected. Now you can turn the machine on. Flip the power switch to ON. A light might turn on on the machine.
Bobbin Preparation
The bobbin is a small spool that holds the thread for the bottom stitch. You need to put thread on an empty bobbin. This is called winding a bobbin. Then you need to put this bobbin into the machine. This is threading the bobbin.
Steps for Winding a Bobbin
First, you need thread. Choose the color thread you want to use. Get an empty bobbin that came with your machine. Brother machines often use plastic bobbins.
- Put a spool of thread on the spool pin. This is usually on the top of the machine. It might stand up or lie flat. Some machines have a small cap to put over the spool to keep the thread on.
- Find the bobbin winding pin or spindle. This is a small pin that sticks up, often near the top right of the machine. There’s also a bobbin winding tension disc or guide nearby. This guide helps put the thread on tightly.
- Take the end of the thread from the spool. Guide it through the bobbin winding tension guide. Your manual will show you the exact path. It might wrap around a small disc.
- Take an empty bobbin. Find the small hole or slot on the side of the bobbin.
- Push the end of the thread into this hole on the bobbin from the inside to the outside.
- Put the bobbin onto the bobbin winding pin. Push it down gently.
- Slide the bobbin winding pin (with the bobbin on it) to the right. It should click into the “winding” position. This stops the sewing needle from moving while you wind the bobbin.
- Hold the end of the thread coming out of the bobbin for a few seconds.
- Gently press the foot pedal. The bobbin will start to spin and wind thread onto it.
- Once some thread is on the bobbin, stop pressing the pedal. Trim the thread tail you were holding close to the bobbin.
- Start winding again. Keep pressing the pedal until the bobbin is full. Do not overfill it; the thread should stay within the edges of the bobbin.
- Stop pressing the pedal. Slide the bobbin winding pin back to the left (the “sewing” position).
- Take the full bobbin off the pin.
- Cut the thread connecting the bobbin to the spool.
You now have a full bobbin ready to go into the machine.
Steps for Threading the Bobbin into the Machine
Putting the bobbin in the machine is the next step for threading the bobbin. How you do this depends on your machine model. Some have a bobbin case you remove, and some have a drop-in bobbin.
For Machines with a Removable Bobbin Case:
- Open the bobbin cover. This is usually a slide-off plate or a door near the needle plate.
- Lift out the bobbin case. It has a small latch or handle.
- Open the latch on the bobbin case.
- Place the full bobbin inside the bobbin case. The thread should come off the bobbin in the direction the manual shows. This is often clockwise or counter-clockwise. Look for a picture in your manual.
- Pull the bobbin thread into the small slot on the bobbin case edge. Then pull it along the tension spring on the side of the case. The thread should slide under the spring.
- Hold the bobbin case by the latch.
- Put the bobbin case back into the machine’s bobbin area. It will click into place.
- Close the bobbin cover.
For Machines with a Drop-in Bobbin:
- Open the bobbin cover. This is usually a clear plastic slide-off plate on the flat bed part of the machine, right under the needle.
- Put the full bobbin into the bobbin area. The thread must come off the bobbin in the correct direction. There is usually a diagram right on the machine or in the manual showing which way the thread should turn (clockwise or counter-clockwise). Make sure the bobbin sits flat.
- Pull the thread end into the first notch or slot on the bobbin case area.
- Pull the thread gently along the marked path (often a series of slots or arrows) until it reaches the end of the path. There is usually a cutter at the end of this path to snip the thread. Leave a tail of thread about 4-6 inches long.
- Close the bobbin cover.
Now the bottom thread (bobbin thread) is in place.
Needle and Top Thread
Now we need to put in the needle and thread the top part of the machine. This covers inserting needle and Brother sewing machine threading for the top thread.
Inserting a Needle
Needles can break or get dull. Knowing how to put in a new one is key. Always use the correct type and size of needle for your fabric.
- Make sure the machine is turned OFF.
- Raise the needle to its highest position. You can turn the handwheel on the side of the machine towards you to do this.
- If there is an old needle in place, loosen the needle clamp screw. This screw holds the needle in. Use the small screwdriver that came with your machine. Turn it counter-clockwise.
- Carefully pull the old needle straight down and out. Dispose of it safely (don’t just toss it in the trash).
- Look at the new needle. Sewing machine needles are not perfectly round at the top. They have one flat side and one rounded side. The flat side usually goes towards the back of the machine. Check your manual to be sure for your specific model.
- Hold the new needle by the lower plastic or metal part (the shank). The flat side should face the back (or as your manual directs).
- Push the needle up into the needle clamp as far as it will go. It must be pushed all the way up.
- Hold the needle in place. Tighten the needle clamp screw firmly with the screwdriver. Turn it clockwise. Be careful not to overtighten, but make sure the needle is secure.
Your needle is now installed and ready for thread.
Brother Sewing Machine Threading (Top Thread)
This is perhaps the most detailed part of the Brother sewing machine threading. Follow the numbers or arrows on your machine and in your manual exactly. The path must be correct for the stitches to form properly.
- Make sure the machine is turned OFF.
- Raise the presser foot lever. This is usually on the back of the needle bar area. Lifting the foot opens the tension discs, which is very important for correct threading.
- Put your spool of thread on the spool pin. If you used a spool cap earlier, put it back on.
- Find the first thread guide. This is usually near the spool pin. It might be a hook or a slot. Bring the thread from the spool through this guide.
- Find the next guide. The thread path usually goes down the front of the machine. Follow the numbered guides or arrows.
- You will reach a point where you need to go DOWN a channel or slot on the front of the machine. Pull the thread firmly into this channel.
- At the bottom of this channel, the path usually turns and goes UP. Follow the path up.
- As you go up, you will reach the take-up lever. This is a part that moves up and down as you sew. It usually has a slot or a hole. Make sure the take-up lever is at its highest point. You can turn the handwheel towards you to raise it. Hook the thread into or through the take-up lever.
- After going through the take-up lever, the thread path goes back DOWN towards the needle. Follow the guides going down. There may be one or more hooks or guides along the needle bar.
- The last step is threading the needle itself. The thread goes through the eye of the needle. For most Brother machines, you thread the needle from front to back.
Tip: If your machine has an automatic needle threader, this is the time to use it! Lower the presser foot (this is sometimes needed for the threader to work) and follow the threader instructions in your manual. It will push a small wire or hook through the needle eye and pull the thread back through.
If you don’t have an automatic threader, you’ll need to thread the needle manually. It can be tricky. Cut the end of the thread cleanly with sharp scissors. Wetting the thread slightly or using a needle threader tool can help.
- Pull about 6-8 inches of thread through the eye of the needle.
Your top thread is now ready.
Presser Foot and Final Checks
Almost there! Now we need the presser foot and a quick check before sewing. This section covers installing presser foot and some basic checks.
Installing Presser Foot
The presser foot holds the fabric flat while you sew. Your machine might have come with the general purpose presser foot already on, or you might need to put it on. If you want to use a different foot (like a zipper foot or buttonhole foot), the steps are similar.
- Make sure the machine is OFF.
- Raise the presser foot lever all the way up.
- Below the needle, you will see the presser foot holder or ankle. This is the part the presser foot clips onto.
- Take the presser foot you want to use. It has a pin or bar at the top.
- Line up the pin on the presser foot with the slot or bar on the bottom of the presser foot holder.
- Lower the presser foot holder using the lever. As it comes down, the slot in the holder should go around the pin on the foot. It should click or snap into place.
If you need to remove a presser foot, raise the lever, and there’s usually a small button or lever on the back of the presser foot holder to release the foot.
Basic Setup Check
Before you try to sew, let’s do a quick check.
- Is the power cord plugged into the machine and the wall? Yes/No.
- Is the foot pedal plugged into the machine? Yes/No.
- Is the machine’s power switch ON? Yes/No.
- Is the bobbin wound correctly and put into its place (case or drop-in)? Yes/No.
- Is the needle inserted correctly (flat side usually to the back) and pushed all the way up? Yes/No.
- Is the top thread following the correct path exactly, from spool through all guides, through the take-up lever, and through the needle eye (front to back)? Yes/No.
- Is the presser foot installed correctly? Yes/No.
- Is the presser foot lever down now? (You lift it for threading, but need it down to sew). Yes/No.
Bringing Up the Bobbin Thread
Before you sew your first stitch, you need both the top and bottom threads pulled to the top of the needle plate.
- With the presser foot DOWN, hold the end of the top thread gently with your left hand.
- Turn the handwheel on the side of the machine towards you (counter-clockwise). Watch the needle go down into the needle plate hole and come back up. As the needle comes up, it should catch the bobbin thread and bring it up with it, forming a small loop.
- Stop turning the handwheel when the needle is at its highest point.
- Use scissors, tweezers, or your fingers to pull the loop of bobbin thread up through the hole in the needle plate.
- Pull both the top thread and the bobbin thread tails (about 4-6 inches long) towards the back of the machine and under the presser foot.
Now both threads are ready to start sewing.
Your First Stitch
You are now ready to sew! Take a scrap piece of fabric. Put it under the presser foot. Line up the edge with a seam guide line on the needle plate if you want a straight line.
- Make sure the presser foot is down.
- Hold the thread tails gently to the back.
- Gently press the foot pedal. The machine will start to sew.
- Sew a few stitches slowly. See if the stitches look good on both the top and the bottom.
Basic Stitch Check
- Look at the top of the fabric: Do the stitches look like nice, even dashes?
- Look at the bottom of the fabric: Do those stitches also look nice and even?
- Are the threads looping or tangled on either side?
If the stitches look good, congratulations! Your first time use setup was successful. If there are loops or tangles, you might need some troubleshooting setup.
Help If Things Go Wrong: Troubleshooting Setup
Even if you follow all the steps, sometimes things don’t work perfectly the first time. Here are common issues when setting up and how to fix them. This is troubleshooting setup for beginners.
Machine Won’t Turn On
- Check Power: Is the power cord plugged firmly into the machine and the wall outlet? Try a different outlet.
- Check Switch: Is the power switch on the side of the machine flipped to the ON position?
- Check Pedal: Is the foot pedal plugged in firmly? (Though the light should still turn on even without the pedal plugged in, the machine won’t sew).
Machine Turns On But Won’t Sew
- Check Pedal: Is the foot pedal plugged in? Is the cord damaged?
- Check Bobbin Winding: Did you slide the bobbin winding pin back to the “sewing” position (usually to the left)? If it’s still in the winding position, the needle bar is locked.
- Check Handwheel: Is the handwheel pulled out or pushed in correctly? On some machines, you push the handwheel in to sew and pull it out to wind the bobbin.
Thread Breaks While Sewing
This is often a threading issue.
- Re-thread Top: Remove the top thread completely. Raise the presser foot. Thread the machine again exactly following the guides and numbers. Make sure the thread is seated properly in the tension discs (raising the presser foot helps). Make sure the thread is through the take-up lever.
- Check Needle: Is the needle bent or dull? Replace it with a new one. Is the needle inserted correctly (flat side back) and pushed all the way up?
- Check Bobbin: Is the bobbin wound correctly (not too loose, not too tight)? Is the bobbin put into its case or drop-in area the right way (thread direction)? Is the thread pulled into the tension spring or path correctly?
- Thread Type: Are you using thread meant for sewing machines? Is the thread very old or poor quality? Try a new spool of good thread.
- Tension: Machine tension can affect thread breaking, but for setup issues, re-threading is the most common fix. If it keeps breaking, check your manual’s section on tension.
Stitches Look Bad (Loopy, Tangles)
This is also almost always a threading problem.
- Check Top Threading: Is the top thread missing any guides? Is it properly in the take-up lever? Is the presser foot down when you start sewing? Sewing with the presser foot up means there is no top tension, leading to big loops on the bottom. Re-thread the top thread carefully with the presser foot up, then lower the foot to sew.
- Check Bobbin Threading: Is the bobbin in the case or drop-in area correctly? Is the thread pulled into the bobbin tension path? (If using a bobbin case, is the thread under the tension spring?)
- Bringing Up Bobbin Thread: Did you bring the bobbin thread up to the top before starting to sew? Having both tails pulled to the back helps the machine start properly.
- Needle Issue: Is the needle the right size for the thread and fabric? Is it bent or dull?
- Bobbin Winding: Was the bobbin wound evenly and not too loosely?
| Problem | Common Causes (Setup Related) | How to Fix (Setup Related) |
|---|---|---|
| Machine won’t power on | Cord unplugged, switch off, outlet issue | Check power cord connections, turn switch on, try different outlet |
| Machine on, won’t sew | Bobbin winder engaged, foot pedal unplugged/faulty | Slide bobbin winder back, check foot pedal connection, check manual for handwheel position |
| Thread breaks (top) | Incorrect top threading, bad needle, poor thread quality | Re-thread machine (foot up then down), change needle, use good thread |
| Thread breaks (bobbin) | Bobbin wound poorly, bobbin threaded incorrectly | Re-wind bobbin evenly, re-insert bobbin correctly (check path/case tension) |
| Stitches look loopy (top) | Bobbin threaded incorrectly (no tension), wrong bobbin | Re-thread bobbin correctly (check path/case tension), ensure it’s a Brother bobbin |
| Stitches look loopy (bottom) | Top thread threaded incorrectly (no tension), presser foot up | Re-thread top carefully (follow path, use guides), lower presser foot to sew |
| Machine makes loud noise | Needle not inserted correctly, wrong needle, something stuck | Check needle installation (position, tightness), remove bobbin/thread to check for jams |
Most setup problems come from missing a step or not threading correctly. Always go back to your manual and the machine’s threading diagrams.
Ready to Sew!
Once you have successfully set up your machine and checked your first stitches, you are ready to start your sewing projects! Remember to always refer to your Brother sewing machine manual. It has pictures and details specific to your model.
Frequently Asked Questions (FAQ)
h4: Can I use bobbins from a different brand in my Brother machine?
It is best to only use bobbins that came with your Brother machine or bobbins that your Brother manual says are right for it. Bobbins look similar, but small differences in size or shape can cause problems with stitch quality or even damage your machine.
h4: Which way does the needle go into the machine?
For most Brother home sewing machines, the flat side of the needle faces the back of the machine when you insert it. Always check your specific machine’s manual to be sure.
h4: Why does my bobbin thread keep getting tangled underneath the fabric?
This is usually caused by incorrect top threading. Make sure the top thread is following the path exactly and is properly seated in the tension discs and the take-up lever. Also, make sure the presser foot is down when you sew.
h4: How long should the thread tails be when I start sewing?
Pull the top and bobbin thread tails about 4 to 6 inches long and place them together under the presser foot and towards the back before you start sewing. This helps prevent the threads from being pulled back into the machine at the start.
h4: What should I do if the machine jams with thread?
Turn the machine OFF immediately. Gently try to pull the fabric out. Raise the presser foot. If it’s stuck, do not force it. Remove the needle, the presser foot, the bobbin cover, and the bobbin. Carefully cut away tangled threads with small scissors. Check your manual for how to clean the bobbin area, as lint can cause jams.
Following these steps will help you get your Brother sewing machine set up correctly for smooth sewing. Happy sewing!