
Image Source: www.gursewingmachines.com
Ultimate Guide How To Sew Leather On A Sewing Machine
Can you sew leather on a home sewing machine? Yes, absolutely! You can sew many types of leather and faux leather on a regular sewing machine, especially lighter weights. What tools do you need? You will need special needles, strong thread, and often a different presser foot. This guide will walk you through everything you need to know to start sewing leather with confidence using your machine.
What You Need Before You Start
Before you begin stitching beautiful leather projects, gather the right supplies. Using the wrong tools makes sewing leather hard and can even damage your machine or the leather itself. Think of it like cutting wood; you need the right saw.
Picking the Right Needles
This is perhaps the most important step. You cannot use a standard needle for sewing leather. Leather needs a needle with a special point that can make a clean hole through the material.
Why Leather Needles are Special
Leather needles are very sharp. They have a cutting point, usually shaped like a wedge or a triangle. This point cuts through the tough fibers of leather. Regular needles have a rounded or sharp point that just pushes fabric threads apart. This does not work well with leather and can cause skipped stitches or break the needle. Using the right leather sewing machine needles prevents problems.
Types of Leather Needles
Different leather needles exist for different jobs and machines.
- Leather Point (LH or LR): This is the most common type for home machines. It has a cutting edge that makes a small slit or a clean hole. It is good for most leather projects.
- Triangular Point (S): This point makes a triangular hole. It is very sharp and used for stiff or thick leather.
- Diamond Point (D): This is a very sharp point for very thick or tough materials. It might be too harsh for thin leather.
Needle size matters too. Use larger sizes (like 90/14 or 100/16) for thicker leather. Smaller sizes (like 80/12) might work for very thin leather or faux leather. Always use a new needle for each leather project or often. A dull needle makes sewing much harder and can damage the leather.
Choosing Strong Thread
Leather is strong and lasts a long time. Your stitches need to be just as strong. Regular sewing thread, like cotton or polyester for fabric, will likely break or wear out quickly when sewing leather.
Why Heavy-Duty Thread Matters
You need heavy duty thread for leather. This thread is thicker and stronger than normal thread. It is made to handle the stress of holding leather pieces together. It resists breaking when pulled tight and wears better over time as the leather moves and rubs.
Types of Thread to Use
Look for threads made for upholstery, leather, or outdoor use.
- Bonded Nylon: This is a very popular choice for leather. It is strong, smooth, and resists rot and mildew. It comes in different weights. Use a weight that fits your needle size and the leather thickness.
- Bonded Polyester: Similar to nylon, it is strong and durable. It also resists UV rays better than nylon, making it good for items used outside.
- Artificial Sinew: This thread is very strong, flat, and waxed. It is often used for hand-sewing leather, but some machines can use it if the needle and bobbin can handle its thickness.
- Specialty Leather Thread: Some brands make thread specifically labeled for leather. These are usually strong nylon or polyester.
Avoid using cotton thread. It can rot over time, especially if it gets wet. Always test your thread with your leather and needle on a scrap piece first.
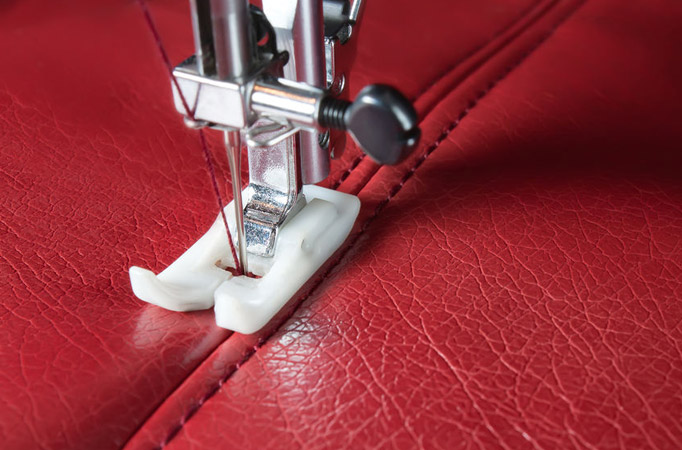
Getting the Right Foot
The presser foot on your machine holds the fabric down as the needle stitches. Leather can be sticky. A regular metal presser foot can stick to the leather surface, making it hard to feed the material through the machine smoothly. This causes uneven stitches or the machine to stop.
How a Walking Foot Helps
A walking foot for sewing leather is highly recommended, especially for beginners or when sewing thicker pieces. This foot has its own set of feed dogs (small teeth) on top. These upper feed dogs work with the machine’s lower feed dogs. They help pull the top layer of leather through the machine at the same rate as the bottom layer. This prevents the leather from sticking, stretching, or shifting. It helps create even, consistent stitches.
Other Helpful Feet
If you do not have a walking foot, other feet can help:
- Teflon Foot (Non-Stick Foot): This foot is made from a slippery material like Teflon or plastic. The smooth surface slides over leather easily without sticking. It is a good option for smooth-finished leathers or faux leather.
- Roller Foot: This foot has small rollers on the bottom. These rollers help the foot glide over bumpy or sticky surfaces like leather.
- Open Toe Foot: While not specifically for leather sticking, an open toe foot gives you a better view of your stitches, which is helpful when starting on a new material like leather.
If you only have a standard metal foot, you can try putting tissue paper or masking tape under the foot or on top of the leather. The foot slides on the paper or tape, and you tear it away after sewing. This is a temporary fix but can work for small projects.
Tools for Cutting Leather
Clean cuts are important for neat seams in leather. Scissors can work, but leather can be tough to cut smoothly, especially in curves.
Using a Rotary Cutter
A rotary cutter for leather is a great tool for cutting straight lines and gentle curves. It has a sharp, circular blade that rolls over the leather. You use it with a self-healing cutting mat. A rotary cutter gives a cleaner, more even edge than scissors, especially on thicker pieces. Make sure the blade is sharp.
Other Cutting Options
- Sharp Fabric Scissors: Use dedicated scissors for leather. Leather dulls scissors quickly, so do not use your good fabric scissors. Heavy-duty tailoring shears can work for thinner leather.
- Craft Knife or Utility Knife: A sharp craft knife (like an X-Acto) or a utility knife with a fresh blade is excellent for cutting straight lines, especially with a ruler as a guide. It is also good for cutting curves or inside shapes.
- Leather Shears: These are specifically made for cutting leather and are very strong.
Always use a cutting mat underneath when using rotary cutters or knives.
Setting Up Your Machine
Once you have your needles, thread, and foot ready, you need to adjust your sewing machine’s settings. Leather is different from fabric, so standard settings won’t work well.
Setting Your Sewing Machine Tension
Getting the sewing machine tension settings right is key for strong, good-looking stitches. Tension controls how the top thread and bobbin thread interlock.
- Check the Manual: Start by looking at your machine’s manual for suggested settings for heavy fabrics or leather.
- Test on Scraps: Always test your tension on two layers of the exact leather you will use for your project. Sew a line of stitches.
- Ideal Stitch: A perfect stitch looks the same on both the top and bottom of the leather. The place where the top thread meets the bobbin thread should be hidden inside the leather layers.
- Troubleshooting Tension:
- If the top thread looks like straight lines on the bottom (loops on top), the top tension is too tight, or the bobbin tension is too loose. Loosen the top tension dial slightly.
- If the bobbin thread looks like straight lines on the top (loops on the bottom), the bobbin tension is too tight, or the top tension is too loose. Tighten the top tension dial slightly.
- Bobbin Tension: You might need to adjust your bobbin tension slightly for heavy thread. This is more advanced. Often, adjusting the top tension is enough. If you adjust bobbin tension, do it slowly and mark the original setting so you can go back.
Leather does not stretch or move like fabric, so even tension is very important. Adjust the tension until your test stitches look perfect on both sides.
Getting the Right Stitch Length
The stitch length for leather should be longer than what you use for typical fabric. Why? Because each hole made by the needle is permanent. If stitches are too short (too close together), you make many holes in a small area. This can weaken the leather and cause it to tear along the seam line.
- Recommended Length: A good starting point is a stitch length of 3.5 mm to 4 mm (about 8-6 stitches per inch).
- Test on Scraps: Again, test different stitch lengths on your scrap leather. Sew a few lines with different lengths. See how they look. Try to gently pull the layers apart along the seam.
- Finding the Balance: You want stitches long enough to not weaken the leather but short enough to hold the pieces together securely. Thicker leather usually needs a longer stitch length.
Longer stitches also look better on leather projects. They give a classic, strong look.
Sewing Leather Step by Step
Here is a simple process for sewing leather pieces together on your machine.
-
Prepare Your Leather:
- Cut your leather pieces using a rotary cutter or knife for clean edges.
- Use leather glue or double-sided leather tape to hold edges together before sewing. This keeps layers from shifting. Do not use pins! Pins make permanent holes (preventing needle holes in leather is key).
- Mark your stitch line if needed using a silver leather pen or chalk that wipes away.
-
Set Up Your Machine:
- Install the correct leather needle for your leather type and thickness. Use a new one!
- Thread your machine with heavy-duty thread. Wind a bobbin with the same thread.
- Attach your walking foot or Teflon foot.
- Set your stitch length to 3.5 mm or longer.
- Adjust your tension settings based on your test stitches.
-
Start Sewing:
- Place your leather under the presser foot.
- Lower the presser foot.
- Start sewing slowly. Do not sew too fast. Guide the leather gently. Do not push or pull the leather through the machine. Let the feed dogs and the walking foot do the work.
- Sew in a straight line or follow your marked line.
- When you reach the end, backstitch a few stitches to secure the seam. Go slowly when backstitching to ensure the needle goes back into the same holes.
- Lift the needle and presser foot. Pull the leather away from the machine. Cut the threads, leaving tails about 4-6 inches long.
-
Finish Threads:
- With leather, you cannot usually just trim threads close. They will unravel.
- To secure, you can thread the tails onto a hand needle and pull them through the layers of leather to hide them.
- Alternatively, you can use a small amount of leather glue or fabric glue on the thread ends right at the stitch line to stop them from coming undone. Trim the ends after the glue is dry.
Avoiding Common Problems
Sewing leather has specific challenges. Knowing how to handle them makes the process much smoother.
Stopping Needle Holes
Needle holes in leather are permanent. You cannot simply pull out stitches and re-sew without leaving visible holes. This is why preventing needle holes in leather is so important.
- Use Clips, Not Pins: Never use pins to hold leather pieces together. They leave holes. Use binder clips, paper clips, or special leather clips instead.
- Use Leather Glue or Tape: Double-sided leather tape or specialized leather glue (like contact cement used sparingly on edges) is great for holding seams perfectly in place before you sew. The needle will stitch through the glue/tape.
- Test First: Always test your stitch length and tension on scraps. Make sure you like the way the stitches look before sewing on your project.
- Sew Carefully: Go slowly and follow your stitch line. If you make a mistake, try to unpick stitches carefully and re-stitch exactly in the same holes if possible. Sometimes, a mistake means starting over with a new piece of leather.
Tips for Dealing with Thick Leather
Sewing thick leather can be tough for a home machine. If your machine struggles, do not force it. Forcing can break needles or even damage the motor. Dealing with thick leather might require extra steps or realizing your machine has limits.
- Check Your Machine’s Power: Some basic home machines are not built for very thick materials. A heavy-duty home machine or a machine specifically for upholstery or leather will handle thickness better. Check your manual for the maximum thickness your machine can sew.
- Use the Right Needle and Thread: This is crucial. A large needle (like 100/16 or 110/18) and strong thread (like bonded nylon 69) are necessary.
- Use a Walking Foot: This foot helps feed the layers evenly and reduces strain on the machine.
- Hammer Seams: Before sewing, you can gently hammer the edges of the leather where you will sew. Use a cobbler’s hammer or even a regular hammer with a piece of scrap leather on top to protect the good side. Hammering flattens the seam area, making it easier for the machine to sew through.
- Reduce Layers: Can you change your design to have fewer layers meeting at one seam? Sometimes, changing how you construct a project helps avoid sewing through too much thickness.
- Manual Turning: If the machine struggles over a particularly thick spot (like a cross seam), you can turn the handwheel slowly yourself for a few stitches instead of using the foot pedal. This gives you more control and power.
- Consider Hand Sewing: For very thick areas or if your machine cannot handle it, hand-sewing leather using special needles and an awl might be the best option.
Do not keep sewing if your machine sounds like it is straining hard or the needle is bending. This is how damage happens.
Sewing Different Materials
Leather comes in many forms, including fake or synthetic versions.
Using a Regular Sewing Machine
As mentioned, you can often sew thinner leather on a using a regular sewing machine for leather.
- Limits: Standard machines are best for garment-weight leather (thin, soft) or lighter upholstery leather (medium thickness). They are generally not designed for heavy belt leather or multiple layers of thick leather.
- Must-Haves: Even on a regular machine, you must use a leather needle, heavy-duty thread, and ideally a walking foot or Teflon foot.
- Go Slow: Sew much slower than you would with fabric.
- Listen to Your Machine: If it jams, skips stitches, or sounds stressed, you are asking it to do too much. You might need to use a lighter leather or try hand sewing.
Tips for Sewing Faux Leather
Faux leather sewing tips are similar to real leather tips but with some differences. Faux leather is often easier to sew than real leather.
- Needles: A leather needle works well, but sometimes a sharp universal needle or a microtex needle is enough, especially for very thin faux leather. Test on a scrap.
- Thread: Heavy-duty thread is still a good idea for strength, but you might get away with slightly lighter but still strong thread for garment-weight faux leather.
- Presser Foot: A walking foot or Teflon foot is still highly recommended because faux leather can also be sticky.
- No Pins: Just like real leather, pins leave permanent holes in faux leather. Use clips or tape.
- Ironing: Be very careful or avoid ironing faux leather. High heat can melt it. If you must press seams, use a very low heat setting and a pressing cloth, pressing from the wrong side if possible. Often, finger-pressing seams or using a rubber mallet to flatten them works better.
- Thickness Varies: Faux leather comes in many thicknesses and backings (woven, knit). Thicker faux leather will need techniques more like real leather (larger needle, longer stitch).
Faux leather does not require conditioning or treatments like real leather, making it lower maintenance in some ways.
More Helpful Tips
- Practice: Always practice on scrap pieces of the exact material you are using before sewing your project. Test stitches, tension, and how the machine handles corners.
- Clean Your Machine: Sewing leather creates tiny dust particles. Clean your machine often, especially the bobbin area and feed dogs.
- Use a Hump Jumper: This small tool helps your presser foot stay level when sewing over thick seams or bumps. It stops skipped stitches at these spots.
- Finishing Edges: Leather edges can be left raw, folded and stitched, or finished with edge paint or burnishing (for vegetable-tanned leather). How you finish edges depends on the look you want and the type of leather.
- Storing Leather Needles: Keep leather needles separate from your regular needles so you do not accidentally use one on fabric (which can damage fabric).
Questions People Ask (FAQ)
Q: Can my standard home sewing machine handle leather?
A: Yes, many standard machines can sew thinner leather (garment or light upholstery weight) if you use the right needles, thread, and presser foot. However, they may struggle with or be damaged by thicker leather.
Q: What is the best needle for sewing leather?
A: A leather needle with a cutting point (like LH or LR) is best. Choose the size based on the leather thickness (larger size for thicker leather).
Q: Do I need special thread for leather?
A: Yes, you need a strong, heavy-duty thread like bonded nylon or polyester. Regular thread is not strong enough and will break easily.
Q: Is a walking foot necessary for sewing leather?
A: A walking foot is highly recommended. It helps feed the leather smoothly and prevents sticking, leading to more even stitches and less strain on your machine. A Teflon foot or roller foot can also help.
Q: Why are my stitches uneven when sewing leather?
A: This is often caused by the leather sticking to the presser foot. Use a walking foot or Teflon foot. Also, check your tension and make sure you are not pushing or pulling the leather through the machine.
Q: Can I use pins to hold leather together?
A: No! Pins make permanent holes in leather. Use clips (binder clips, paper clips) or double-sided leather tape or glue instead.
Q: What stitch length should I use for leather?
A: Use a longer stitch length than for fabric, usually 3.5 mm to 4 mm or more. Shorter stitches can weaken the leather and cause it to tear along the seam.
Q: How do I secure the thread ends on leather?
A: You cannot usually just trim them. Pull the thread tails to the back, knot them, and pull the ends inside the leather layers with a needle, or use a tiny drop of glue to secure them at the stitch line.
Q: Can I sew thick leather on my machine?
A: It depends on your machine’s power. Home machines may struggle with very thick leather. You might need a heavy-duty machine or techniques like hammering seams before sewing. Do not force your machine.
Q: Is sewing faux leather different from real leather?
A: Yes, faux leather is often easier but can still stick. Use a walking foot or Teflon foot and avoid pins. Be careful with heat if pressing.
Sewing leather on a machine takes a little practice and the right tools, but it is a rewarding skill. Start with simple projects and thinner leather. As you gain confidence, you can move on to more complex items and thicker materials. Happy stitching!