
Splitting embroidery thread is a basic skill that helps make your stitches look just right. You might ask, “How do I separate embroidery floss?” or “What is the best way to split embroidery embroidery thread?” The answer is simple: you gently pull one strand away from the others while holding the rest. This lets you choose how many strands you want to use for your sewing project. Choosing the right number of strands changes how your stitches look, from fine and delicate to thick and bold. Learning how to split embroidery floss strands correctly is key to getting the look you want in your embroidery or cross stitch work.
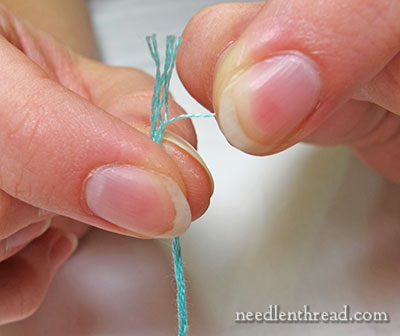
Image Source: www.needlenthread.com
Finding Out About Embroidery Thread
Embroidery thread, often called embroidery floss, is usually made of cotton. It comes in many colors and is shiny. A standard piece of embroidery floss is made up of six thinner strands twisted together. You get it in a long loop or wound around a small card.
These six strands are designed to be used together or apart. Knowing you can separate them is the first step to getting different looks in your sewing.
Why We Split Thread
Why bother pulling the thread apart? Why not just use all six strands every time? There are several good reasons:
- Changing Stitch Thickness: Using all six strands makes a thick line. Using just one or two makes a very thin line. Different parts of a picture need different line thicknesses. Think of sewing a fine line for an outline versus filling a large shape.
- Matching the Fabric: Thin fabrics can’t handle thick thread. Using too many strands on thin cloth makes holes too big and can pull the fabric out of shape. Thicker fabrics can hold more strands without a problem.
- Getting Different Looks: A stitch made with one strand looks very different from the same stitch made with six strands. You can make soft shading with few strands or bold texture with many. This lets you add more detail and life to your project.
- Making Stitches Neater: Sometimes, using fewer strands helps your stitches lie flatter and look neater, especially for small details or specific stitches.
Splitting thread lets you control the look and feel of your embroidery, giving you more choices for your projects. It’s part of preparing embroidery thread the right way for the job.
How to Separate Embroidery Floss Strands: The Simple Way
The core skill of splitting embroidery floss strands is quite easy once you know the trick. Here is the most common and best way to split embroidery thread:
H4 Getting Ready to Split
- Cut Your Thread: First, cut a length of thread from your skein or card. A good length to start with is about your arm’s length, from your fingertips to your elbow. This is around 18-24 inches (45-60 cm). Using pieces that are too long makes the thread more likely to tangle when splitting and sewing.
- Hold It Right: Hold the piece of thread in one hand. Pinch the end of the thread between your thumb and first finger.
- Pick One Strand: With your other hand, gently pick up one strand from the end you are holding. It doesn’t matter which one you pick to start. You might need a fingernail or the tip of a needle to help separate just one strand from the bundle of six.
H4 The Splitting Steps
Now, you are ready for the main part. This method uses a little bit of tension to keep the other strands from tangling too much.
- Hold the Rest: Keep holding the end of the whole piece of thread (the six strands) firmly in your first hand. Make sure your grip is steady but not so tight that you can’t pull one strand free.
- Pull One Strand Up and Away: With your other hand, hold the single strand you picked. Gently and slowly pull this single strand straight up and away from the rest of the bundle. It’s important to pull upwards, not just sideways.
- Let the Others Hang: As you pull the single strand upwards, let the other five strands hang down freely from your first hand. They might twist or puff up (sometimes called the “popcorn effect”), and that’s normal. Don’t worry about the twisting right now.
- Keep Pulling: Continue pulling the single strand smoothly until it is completely separated from the rest of the thread. Pull all the way to the other end of the cut piece.
- You Did It! You now have one single strand of embroidery thread separate from the other five.
H4 What Happens Next?
You can put the five strands aside for now. If you need more strands (like two or three), you will follow the same steps again using the remaining bundle of threads.
- If you need two strands: Separate one strand as above. You have five left. Then, take the bundle of five and separate one more strand from that bundle. You now have two single strands. You can hold these two strands together and thread them into your needle.
- If you need three strands: Separate one strand. You have five left. Separate another strand. You have four left. Separate one more strand from the four. You now have three single strands to use together.
This method works because the strands are only lightly twisted together. Pulling one strand straight up helps it slide free from the twist of the others without making a big knot.
Tips for Easier Separating
Sometimes, splitting thread can be a bit tricky, especially if the thread is very twisted or if you are new to it. Here are some embroidery thread usage tips related to splitting:
- Use the Right Length: As mentioned, about an arm’s length is best. Very short pieces are hard to hold. Very long pieces tangle easily.
- Pull Slowly: Don’t yank the thread. A slow, steady pull works best. This gives the other strands time to untwist and let the single strand slide out.
- Keep the Rest Loose: Make sure the hand holding the bulk of the thread is firm but allows the other strands to hang loosely. If you grip them too tightly, they can’t untwist, and you’ll get knots.
- Deal with Twisting: The remaining strands will likely twist up as you pull one out. This is okay. Once you have pulled the one strand free, the rest of the bundle should relax. You can hang it down or let it dangle to help it untwist before separating the next strand.
- If It Knots: If the thread starts to knot while you are splitting, stop pulling. Gently try to loosen the knot with your fingers or the tip of a needle. Often, if you just stop pulling and let the threads hang, the knot will loosen itself. Never try to force it by pulling harder.
Using these tips makes preparing embroidery thread much easier.
Choosing How Many Strands to Use
A common question is “how many strands to use?” The answer depends on several things:
- What Fabric Are You Using?
- Fine Fabrics (like silk, thin linen, high-count evenweave): Use 1 or 2 strands. More will be too thick and damage the fabric.
- Medium Fabrics (like quilting cotton, aida 14-count, lower-count linen): Use 2 or 3 strands for most stitches. You might use 1 for very fine details or 4 for thicker lines.
- Thick Fabrics (like canvas, heavy linen, aida 6-count): Use 4, 5, or all 6 strands for good coverage.
- What Stitch Are You Making?
- Fine Outlines or Details: Use 1 or 2 strands.
- Basic Stitches (like backstitch, running stitch): Often use 2 strands for a clear line, or 3 for a slightly bolder line.
- Filling Shapes (like satin stitch, long and short stitch): This really changes the look.
- 1-2 strands give a smooth, subtle fill with nice shading.
- 3-4 strands give a fuller, slightly textured fill.
- 5-6 strands give a very textured, raised fill.
- Knots (like French knots, colonial knots): The number of strands changes the size of the knot. Use 1-2 strands for small knots, 3-4 for medium, and 5-6 for large.
- What Look Do You Want?
- Delicate, Detailed, Realistic: Use fewer strands (1-2).
- Bold, Graphic, Textured: Use more strands (4-6).
- Standard Embroidery: Many projects use 2-3 strands as a common base.
H5 Strand Count Ideas Table
This table gives you a simple starting point. Feel free to try different counts to see what you like!
| Number of Strands | Common Uses / Look | Good For |
|---|---|---|
| 1 Strand | Very fine lines, delicate detail, subtle shading | Fine outlines, tiny details, fine fabrics |
| 2 Strands | Standard outlines, small fill areas, small text | Versatile, good for many stitches, cross stitch |
| 3 Strands | Slightly bolder lines, medium fill, medium text | Common for general embroidery |
| 4 Strands | Fuller fill, bolder outlines, medium-large knots | Good coverage on medium fabrics |
| 5 Strands | Thick lines, heavy fill, large knots | Bold designs, covering fabric |
| 6 Strands | Very thick lines, maximum coverage, very large knots | Filling large areas quickly, thick fabrics |
Remember, these are just guides. The best way to know how many strands to use is to test it on a scrap piece of your fabric before you start your main project.
Preparing Embroidery Thread Properly
Splitting the thread is a key part of preparing embroidery thread, but there are other steps to make sewing easier:
- Cutting: Cut a piece about an arm’s length. Why not longer? Long pieces mean the thread passes through the fabric multiple times. Each time, it rubs against the fabric and the other thread loops. This rubbing can make the thread fray, weaken, or knot more easily.
- Separating: Use the method described above to get the number of strands you need.
- Putting Strands Together: If you separated, say, two strands, hold their ends together evenly before threading your needle. Make sure they are side-by-side, not twisted around each other.
- Straightening/Conditioning: Some people like to run the separated strands between their fingers to help them lie flat and remove any kinks. You can also use a thread conditioner (like beeswax or a commercial product). Pulling the thread through the conditioner makes it smoother and less likely to tangle. This is very helpful when untangling embroidery thread is a common problem for you.
Splitting Thread for Cross Stitch
Cross stitch uses the same kind of stranded embroidery floss, often DMC floss. Splitting thread for cross stitch is done the exact same way as for regular embroidery.
The main difference in cross stitch is that the pattern usually tells you exactly how many strands to use. This often depends on the fabric count (how many squares per inch).
- On 14-count Aida fabric, you usually use 2 strands.
- On 16-count Aida, you might use 2 strands.
- On 18-count Aida, you might use 1 or 2 strands for finer stitches.
- On lower counts like 11-count Aida, you might use 3 strands for good coverage.
Always check your cross stitch pattern for the suggested number of strands. But the way you separate them – pulling one strand away from the bundle – is the same. Separating DMC floss is no different from separating other brands of cotton floss.
Untangling Embroidery Thread
Tangles are a common issue, whether you are splitting thread or sewing with it. Here are ways to untangle embroidery thread:
- Stop Immediately: As soon as you feel a knot forming or the thread twisting badly, stop pulling or sewing.
- Let It Hang: If you are sewing, let the needle and thread dangle towards the floor. The weight of the needle can sometimes help the twists unwind naturally.
- Gentle Fingerwork: Use your fingers to gently loosen the loops of the knot. Don’t pull tighter.
- Use a Needle Tip: A needle tip or pin can be helpful to tease loops apart without damaging the thread.
- Work from the Loop: Find the main loop of the knot and try to trace the thread ends going into and out of it. Gently pull on the ends leading away from the knot.
- Cut If Needed: Sometimes, a knot is too tight. It’s better to cut the thread close to the knot and start with a new piece than to damage your fabric or spend ages fighting a stubborn tangle.
Properly preparing embroidery thread and using shorter lengths greatly reduces tangles in the first place.
More Embroidery Thread Usage Tips
Beyond splitting and basic prep, here are more tips for using embroidery thread strands effectively:
- Threading the Needle: Once you have your chosen number of strands, hold the ends together evenly. Pinch the ends tightly and push them through the eye of the needle. A needle threader tool can be very helpful, especially with smaller needles or more strands.
- Starting Your Stitch:
- Knot: You can tie a small knot at the end of your thread. Bring the needle up from the back of the fabric. The knot stops the thread.
- Waste Knot: Tie a knot about an inch or two away from where you start your first stitch. Bring the thread up, make your stitches, and then weave the tail of the thread into the back of your completed stitches to secure it before cutting off the waste knot. This leaves the back of your work flatter.
- Holding Tail: Bring the thread up, leave about an inch of tail on the back, and make your first few stitches over the tail to secure it.
- Ending Your Stitch:
- Weave the thread end under the back of several nearby stitches. Do this for about an inch.
- For cross stitch, run the thread under the back of several completed ‘x’ stitches.
- Cut the thread close to the fabric after securing.
- Managing Skeins: Keep your thread organized. You can put skeins in bags, boxes, or on little bobbins to prevent them from turning into a tangled mess (more untangling embroidery thread prevention!).
- Direction Matters: When using multiple strands together, sometimes running the thread through your fingers or using conditioner can help the strands lie flatter and parallel as you stitch, leading to neater stitches like satin stitch.
Common Problems and How to Fix Them
Here are some issues you might run into and simple ways to fix them, covering embroidery thread usage tips and untangling embroidery thread:
| Problem | What It Looks Like | Possible Cause | How to Fix It |
|---|---|---|---|
| Thread keeps knotting | Knots form as you sew or split. | Thread too long, pulling too fast, dry thread. | Use shorter lengths. Pull slowly. Use thread conditioner. Let thread hang to untwist. |
| Thread frays easily | Ends separate, thread looks worn. | Thread rubbing too much, old/dry thread. | Use shorter lengths. Use conditioner. Check if needle eye is too small/sharp. |
| Stitches look uneven | Some stitches thin, some thick/loose. | Using too many/few strands, pulling stitches too tight/loose. | Practice keeping tension even. Make sure you are using the correct number of strands from your split. |
| Can’t separate one strand | Threads stick together when pulling. | Gripping the rest too tightly, pulling sideways. | Hold the bundle loosely. Pull the single strand straight up. |
| Thread twists a lot | Strands twist up when splitting/sewing. | Natural thread behavior, pulling technique. | Let the remaining strands hang freely. Let sewing thread dangle to untwist. |
More on Different Thread Types
While cotton is most common (like separating DMC floss), you might use other types.
- Silk Thread: Very fine and beautiful, but can be slippery and harder to handle. The splitting method is similar, but requires extra care due to the slipperiness.
- Rayon/Viscose Thread: Shiny and smooth, but can also be prone to tangling and fraying. Use shorter lengths and thread conditioner. Splitting is possible but needs a gentle touch.
- Metallic Thread: Often does not split easily or at all, as it might be a single ply or twisted differently. Check the thread type. If it can be split, use extra care as it can be delicate.
Always test how a new thread type behaves before using it on your main project.
Figuring Out Strand Counts for Design
When you plan your own embroidery design, deciding how many strands to use is part of the creative process.
- Look at your drawing or plan. What parts need bold lines? What parts need fine details? What areas will be filled in?
- Think about the size of your design. A very small design needs fewer strands for detail. A large design can handle more strands for faster filling and bolder effects.
- Think about the fabric color. If you are stitching with dark thread on dark fabric, you might need more strands for the color to show up. If you are stitching with light thread on dark fabric, even one strand can stand out.
- Again, the best method is to make a small sample on a scrap of your fabric. Sew a few stitches with different numbers of strands (1, 2, 3, 4, 6). See which thickness looks best for the different parts of your design. This testing is part of preparing embroidery thread well.
Getting Really Good at Splitting
Like anything new, splitting thread gets easier with practice.
- Don’t be afraid to try. Messing up a piece of thread is okay! Thread is not expensive.
- Practice the pulling technique. Feel how the thread releases when you pull straight up.
- Learn to manage the bundle in your holding hand. The looser it is, the less it tangles.
- If you’re splitting many strands at once (like separating 3 from 6), sometimes it helps to separate them one at a time instead of trying to pull 3 strands away from 3 remaining ones all at once. Pull one, then the next, then the next.
This skill is simple, but mastering the smooth pull makes a big difference in avoiding frustration and untangling embroidery thread problems later.
Finishing Up Your Thread Ends
Once you have finished sewing with a piece of thread (the number of using embroidery thread strands you chose), you need to secure the end on the back of your work.
- Never tie a knot at the very end of your thread unless it’s a starting knot you plan to cover or cut off.
- Always run the end of the thread under several stitches on the back. This anchors the thread securely so your work doesn’t unravel.
- For cross stitch, tuck the end under the back of at least 3-4 complete X stitches.
- For embroidery, weave it through the back of nearby dense stitches or lines.
- Cut the leftover tail close to the fabric once it’s secure.
Properly finishing thread ends keeps the back of your work neat and strong, completing the good preparation you started by splitting your thread.
How to Handle Leftover Strands
What do you do with the strands you don’t use? If you split one strand from six, you have five left.
- Keep the remaining strands together. You can put them back on the card or skein with the main thread, or wrap them around a small piece of cardboard.
- Label them if needed (e.g., “DMC 310 – 5 strands left”).
- These strands are ready to be used later when you need 5 or fewer strands for another part of your project. Just split them again as needed.
This helps reduce waste and keeps your threads tidy.
Summing Up
Splitting embroidery thread is a basic skill, but it unlocks many possibilities in your embroidery and cross stitch. By learning how to separate embroidery floss using the simple pull method, you gain control over stitch thickness, texture, and coverage. Knowing how many strands to use for different fabrics and stitches, properly preparing embroidery thread lengths, and having tips for untangling embroidery thread makes the sewing process smoother and more enjoyable. Whether you are separating DMC floss for a cross stitch project or using various embroidery thread strands for a detailed picture, this skill is essential for creating beautiful, perfect stitches. Practice the pull, choose your strand count wisely, and enjoy the control you have over your finished work!
Frequently Asked Questions (FAQ)
H4 Why does my thread twist so much when I split it?
It’s normal for the other strands to twist. They are bundled together. When you pull one away, the others react. Pulling straight up helps, but some twist is expected. Just let the bundle hang free after splitting to help it relax.
H4 Is there an easier way to split thread than pulling one strand at a time?
The pull method described is widely considered the easiest and best way to split embroidery thread. There isn’t a magic tool or faster way that avoids tangles. It’s a simple manual process.
H4 Can I split thread from any brand?
Yes, you can separate embroidery floss from almost all brands of standard 6-strand cotton embroidery floss, like separating DMC floss or Anchor floss. Other thread types like silk or rayon can also be split but might be harder to handle.
H4 How short is too short for a piece of thread?
If a piece is shorter than about 6-8 inches (15-20 cm), it can be hard to hold onto the ends to split and hard to manage when sewing. It’s better to use slightly longer pieces, even if it means a little more chance of tangles, than struggling with very short ones.
H4 Do I have to separate the strands even if I use all 6?
No, if you want to use all six strands together, you do not need to split them apart and put them back together. Just cut your length and thread all six strands into the needle as one. However, some people still separate all six and then put them back together loosely. They feel this helps the strands lie flatter and reduces tangles. It’s an extra step you can try if you like, but it’s not required.