
Image Source: www.wanderingthreadsembroidery.com
Beginner’s Guide: How To Start An Embroidery Stitch
Getting started with embroidery is exciting! You may ask, “How do I start an embroidery stitch?” Starting an embroidery stitch means putting your needle and thread into the fabric and making sure the thread stays put before you make your first actual stitch. It is the very first step in creating any stitched design. Learning hand embroidery begins with mastering this simple but important action. This guide will show you exactly how to do it, making embroidery for beginners easy and fun.
Getting Ready for Your First Stitch
Before you can start stitching, you need a few things. Gathering your embroidery supplies for beginners is the first step. Don’t worry; you don’t need a lot to begin. Simple embroidery projects are a great way to use these basic supplies.
What You Need to Start
Here are the main things you will need:
- Fabric: Cotton or linen fabric works well. Pick something not too stretchy. A light color helps you see your stitches.
- Embroidery Floss: This is the special thread used for embroidery. It comes in many colors. It usually has six thin strands. You can use all six strands or separate them.
- Embroidery Needle: You need a needle with an eye big enough for the floss. Crewel needles are a good choice. They have a sharp point to go through fabric and a larger eye.
- Embroidery Hoop: This helps hold your fabric tight. Using an embroidery hoop makes stitching much easier.
- Small Scissors: You need these to cut your thread. Sharp ones are best.
Using these basic embroidery stitches tools is key to learning how to start an embroidery stitch smoothly.
How Embroidery Hoops Help
Using an embroidery hoop is a very helpful step. The hoop keeps your fabric pulled tight like a drum. This tightness helps you make even stitches. It also stops your fabric from puckering.
An embroidery hoop has two parts. There is an inner ring and an outer ring. The outer ring usually has a screw to loosen or tighten it.
Here is how to use an embroidery hoop:
- Loosen the screw on the outer ring.
- Separate the two rings.
- Place the inner ring on a flat surface.
- Lay your fabric over the inner ring. Make sure the fabric is flat. The spot where you want to stitch should be in the center.
- Put the outer ring over the fabric and inner ring. Push the outer ring down firmly.
- Pull your fabric from the sides to make it tight. Pull gently. Make sure the fabric grain is straight.
- Tighten the screw on the outer ring. Make the fabric as tight as possible without hurting it.
- Your fabric should feel firm now. It should not sag.
Proper embroidery hoop use makes a big difference. It helps when you are learning hand embroidery.
Getting Your Needle and Thread Ready
Now you have your fabric in the hoop. It is time to get your thread ready. This means cutting your thread and threading an embroidery needle.
Cutting Your Embroidery Floss
Embroidery floss comes in skeins. These are twisted bundles. Do not pull a long piece from the skein. This can make knots.
Cut a piece about 18 to 24 inches long. This is about the length from your fingertips to your elbow. A piece too long can get tangled easily as you stitch. A shorter piece is easier to manage.
Separating Strands (If Needed)
Most embroidery floss has six strands twisted together. For basic embroidery stitches, you often use fewer strands. Using fewer strands makes thinner lines. Using more strands makes thicker lines.
For many simple embroidery projects, two or three strands are a good start.
Here is how to separate the strands:
- Hold one end of your cut piece of floss.
- Hold the other end with your other hand. Let the thread hang down.
- Pinch one or two strands near your top hand.
- Slowly pull the pinched strands up and away from the rest of the thread.
- The other strands might twist. This is normal. Just let them hang and untwist.
- Keep pulling gently until the chosen strands are free.
- Put the unused strands aside. You can use them later.
This might take a little practice. Be patient.
Threading an Embroidery Needle
Threading an embroidery needle can be tricky at first. Needles for embroidery have a larger eye than sewing needles. But it can still be small.
Here are tips for threading your needle:
- Lick or dampen the end of the thread slightly. This helps keep the strands together.
- Pinch the very end of the thread between your thumb and pointer finger. Pinch it flat.
- Bring the eye of the needle close to the pinched thread.
- Push the pinched end of the thread through the needle’s eye.
- If it is hard to push, try using a needle threader tool. This is a small tool that pulls the thread through the eye. Many beginner kits include one.
- Pull about 4-6 inches of thread through the eye. This gives you a tail.
Now your needle is threaded! You are almost ready to start learning how to start an embroidery stitch.
Different Ways to Start Your Thread
The main part of learning how to start an embroidery stitch is securing embroidery thread. You need to make sure your thread stays in place when you begin. You also want the back of your work to look neat. There are a few common ways to secure your thread. The best method can depend on the type of fabric and the stitch you plan to use.
Here are simple methods for securing embroidery thread for beginners:
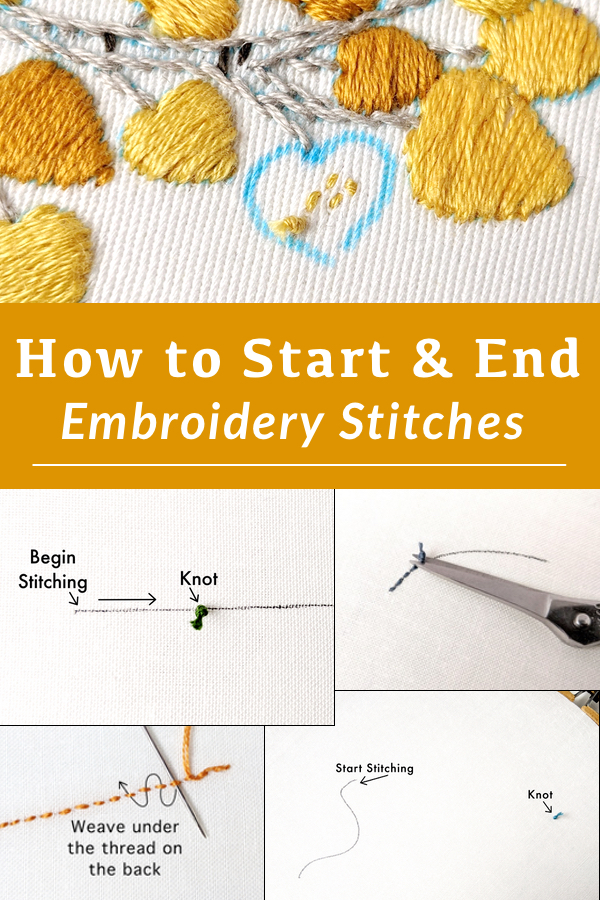
Starting with a Waste Knot
This is a very easy way to start. It is great for many basic embroidery stitches. You make a knot that you will cut off later. This knot sits on the front of your fabric.
Here are the steps for the waste knot method:
- Make a knot at the long end of your thread. Make it a simple knot.
- Pull the knot tight.
- Decide where you want to make your first stitch.
- Go about 1 to 2 inches away from that spot. Pick a spot where your stitching will cover up the area.
- Bring your threaded needle up from the back of the fabric to the front at this spot.
- Pull the thread all the way through until the knot rests on the front of the fabric. The knot is now your “waste knot.”
- Now, move to the spot where you want your first actual stitch to begin.
- Start stitching as planned. Work your first few stitches over the thread tail on the back of the fabric. This helps secure the thread.
- After you have made several stitches covering the tail, you will have stitched back towards your waste knot on the front.
- Once your stitches reach close to the waste knot, stop.
- Turn your hoop over. Look at the back. You should see the thread tail secured under your new stitches.
- Turn back to the front. Carefully cut off the waste knot. Cut it close to the fabric.
The waste knot method is good for single stitches or starting a line where you stitch back over the tail. It keeps the back neat near your starting point. It’s a simple way for embroidery for beginners to secure thread.
Starting with an Away Knot
The away knot is like the waste knot. But you place the knot further away. You stitch towards the knot, then cut it off.
Here are the steps for the away knot method:
- Make a knot at the long end of your thread.
- Pull it tight.
- Find where you want your first stitch to be.
- Go about 3 to 4 inches away from that spot. Pick a spot that will not be covered by your embroidery right away. It could be in a corner of the hoop.
- Bring your threaded needle up from the back to the front at this far-away spot.
- Pull the thread until the knot rests on the front. This is your “away knot.”
- Bring your needle back down into the fabric very close to where you came up. This makes a tiny stitch.
- Now, bring your needle up at the actual starting point of your embroidery design. This is where your first real stitch begins.
- The thread on the back now has a long tail running from your start point back to the away knot. As you stitch, make sure your first few stitches go over this long tail on the back.
- Stitch for a while, covering the tail.
- Once you have finished stitching near the beginning of your design, and the tail is secured, turn to the front.
- Go back to the away knot you made earlier.
- Carefully cut off the away knot.
The away knot method is helpful when you don’t have stitches planned near your starting point right away. It is another neat way of securing embroidery thread.
Starting with Small Stitches on the Back
This method does not use a knot. It is a very neat way to start. It works best on fabrics where small stitches on the back will not show through. It is a good technique as you learn hand embroidery.
Here are the steps for starting with small stitches:
- Do not make a knot at the end of your thread.
- Decide where you want your first stitch to start.
- Bring your needle up from the back of the fabric to the front. Leave a tail of about 1 inch on the back.
- Hold the tail end gently on the back of the fabric with one hand.
- Bring your needle back down into the fabric very close to where you came up. Make a very small stitch, maybe just one or two fabric threads wide.
- Bring your needle back up again, very close to the last spot.
- Bring your needle back down again, close by.
- Make two or three very small stitches, staying right near your starting point. Keep holding the tail on the back.
- Make sure these small stitches on the back go over the thread tail you left. This secures the tail.
- Once you have made 2-3 tiny stitches covering the tail, you are ready to start your main embroidery design stitch.
- Bring your needle up at the exact spot your first design stitch should begin.
- Now start stitching your design as planned.
This method creates a very flat start. It is often preferred for techniques where knots might create bumps. It is a key skill when getting started with embroidery neatly.
Starting with a Knot on the Back
Some people prefer to start with a knot directly on the back of the fabric. While simple, this can sometimes create a small bump on the back. It is generally not recommended for fine embroidery but can be used for very simple embroidery projects or thicker fabrics.
Here are the steps for starting with a knot on the back:
- Make a knot at the end of your thread.
- Bring your needle up from the back of the fabric to the front at the exact spot where your first stitch should begin.
- Pull the thread all the way through until the knot rests against the back of the fabric.
- Make your first stitch.
- On the back, make sure your next few stitches help hold down the small tail near the knot.
This is the quickest way, but practice the knotless methods or waste knot method first for a neater finish.
Making Your First Embroidery Stitch
Once your thread is secured, you are ready to make your first actual embroidery stitch. The type of stitch depends on your design. As embroidery for beginners, you will likely start with very basic embroidery stitches.
Some common first stitches after securing the thread include:
- Running Stitch: This is a simple stitch that goes in and out of the fabric to make a dashed line.
- Straight Stitch: This is just one single stitch from one point to another.
- Back Stitch: This stitch makes a solid line and is great for outlines. You work backward to fill in gaps.
The steps for making these stitches will be covered in guides on specific types of embroidery stitches. For now, focus on getting that thread secured!
Practice Makes Perfect
Learning hand embroidery takes practice. Don’t worry if your first few starts or stitches are not perfect. Keep trying. Use scrap fabric to practice securing your thread using different methods. See which one you like best or which works best for your fabric.
Simple embroidery projects like stitching a single line or a simple shape are great for practicing. They help you get used to handling the needle, thread, and hoop.
More About Types of Embroidery Stitches
While this guide is about starting a stitch, it’s good to know there are many types of embroidery stitches you can learn. Once you master securing your thread, you can move on to these.
Some categories of stitches include:
- Surface Embroidery: Stitches that sit on top of the fabric. Most basic embroidery stitches like running stitch, back stitch, and straight stitch fall into this group.
- Counted Thread Embroidery: Stitches made by counting threads in the fabric, like cross-stitch or blackwork. Starting these might use similar securing methods or specific techniques for counted fabric.
Learning hand embroidery means exploring these different types over time. But it all begins with knowing how to start your thread correctly.
Common Beginner Questions
Starting something new always brings questions. Here are a few common ones about getting started with embroidery.
What if my thread keeps knotting?
This is common! It often happens if your thread is too long. Cut shorter pieces (18-24 inches). Also, let your needle and thread hang freely now and then as you stitch. This lets the thread untwist.
Should I use all six strands of floss?
It depends on the look you want. For fine details or small designs, using 1, 2, or 3 strands is common. For bolder lines or filling areas, you might use 4, 5, or 6 strands. Most simple embroidery projects start with 2 or 3 strands.
How tight should my embroidery hoop be?
Your fabric should be tight like a drum. You should be able to tap it and hear a little sound. Not so tight that it stretches or damages the fabric, but firm enough that it doesn’t sag. Proper embroidery hoop use prevents puckering.
How long should the thread tail be when securing?
For securing on the back with small stitches, leave about an inch tail to stitch over. For waste knots, the tail isn’t stitched over, just cut. For away knots, the tail is longer and stitched over. Aim for enough length to catch under stitches, but not so long it gets tangled.
Can I use sewing thread?
Embroidery floss is best. It is made differently than sewing thread. It is usually mercerized cotton, which gives it a nice shine and makes it strong but easy to separate. Sewing thread is thinner and not designed for the look of embroidery stitches.
Is it okay if the back of my work isn’t perfectly neat?
When you are learning hand embroidery, especially getting started with embroidery, the back might not be perfect. Focus on making the front look good. As you get more practice, the back will naturally become neater, especially when you learn different ways of securing embroidery thread and ending stitches.
Summing Up Starting Your Stitch
Knowing how to start an embroidery stitch is a core skill. It sets up your entire piece. You have learned about the supplies you need, like using an embroidery hoop and threading an embroidery needle. You’ve explored different ways of securing embroidery thread, including the waste knot, away knot, and starting with small stitches on the back.
Remember to use your embroidery supplies for beginners. Practice these starting methods. They are the foundation for all basic embroidery stitches and more complex types of embroidery stitches later on.
Embroidery for beginners is about taking small steps. Starting your thread is the first one. Pick a simple embroidery project and try one of the starting methods. You are on your way to creating beautiful stitched art!