
So, you want to start embroidery? You can! It’s a fun way to make art with needle and thread. Hand embroidery for beginners is easy to pick up. You just need a few things to get started embroidery. We will show you how step by simple step. You can start making your own pretty pictures today!
Embroidery is like drawing with thread on fabric. You use a needle to pull thread through cloth. This makes shapes, lines, and pictures. People have done embroidery for a very, very long time. It’s a craft enjoyed all over the world.
Why try hand embroidery? It’s relaxing. It lets you be creative. You can make gifts. You can make things for your home. It’s a quiet hobby you can do almost anywhere.
Ready to learn how to start? Let’s gather what you need. Then we’ll learn some simple embroidery techniques and basic embroidery stitches.
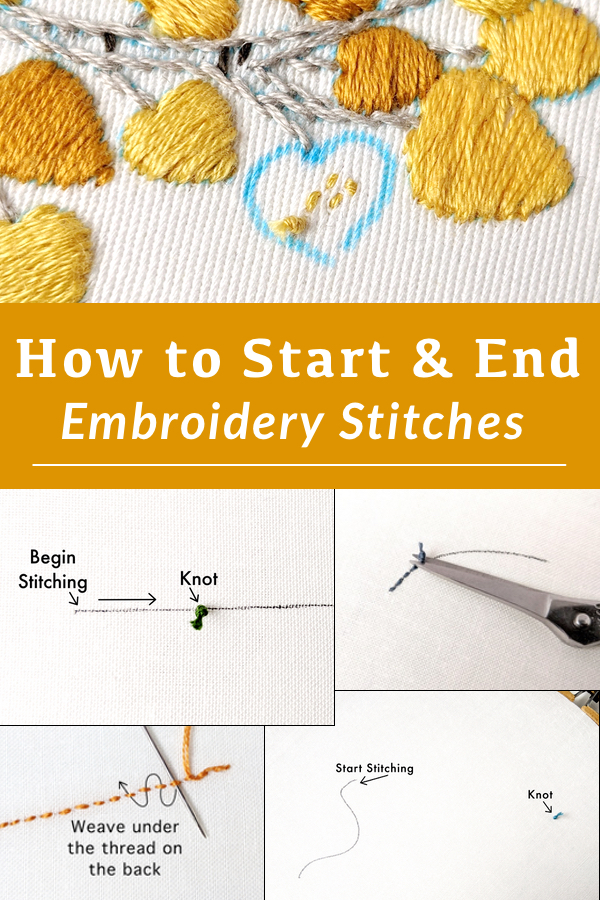
Image Source: www.wanderingthreadsembroidery.com
Getting Your Gear: Embroidery Supplies List
To start, you don’t need many things. The items are easy to find. Here is a list of embroidery supplies you will need.
- Fabric
- Needles
- Embroidery thread
- An embroidery hoop
- Small scissors
- A way to mark your fabric (like a pen or pencil)
That’s it! Just a few things to begin.
Picking Your Fabric
What fabric is best? For first embroidery projects, pick a simple fabric. Cotton is great. Linen works too. A fabric that is not too thin or too thick is best. Look for fabric that is easy to push a needle through. A plain color helps you see your stitches well. Old cotton bedsheets or tea towels are good places to start.
Choosing Your Needle
Embroidery needles are special. They have a bigger eye (hole) at the top. This is for the thicker embroidery thread. They are also quite sharp. Sharp needles go through fabric easily. Start with a size that feels good in your hand. Needles have numbers. A bigger number means a thinner needle. A smaller number means a thicker needle. For beginner thread, a medium needle (maybe size 5 to 8) is a good start.
Selecting Your Thread
Embroidery thread for beginners is usually stranded cotton. This thread is made of six thin strands twisted together. You can use all six strands at once. Or you can pull them apart and use fewer. Using fewer strands makes thinner stitches. Using more strands makes thicker stitches. Stranded cotton thread is colorful and easy to work with. It’s the most common type for hand embroidery. Pick a few fun colors to begin!
Picking an Embroidery Hoop
An embroidery hoop for beginners is a must-have tool. A hoop has two parts. An outer ring and an inner ring. The hoop holds your fabric tight like a drum. This makes it easy to stitch. Without a hoop, your fabric can wrinkle and your stitches can look messy.
How to use an embroidery hoop:
* Take the outer ring. It has a screw at the top. Loosen the screw a little.
* Put the inner ring on a table.
* Lay your fabric over the inner ring. Make sure the fabric is smooth.
* Place the outer ring on top of the fabric. Push it down over the inner ring.
* Pull the fabric tight from all sides.
* Tighten the screw on the outer ring. Your fabric should be tight. It should not move easily.
Hoops come in different sizes and materials. Wood or plastic hoops are fine. A medium size (like 5 or 6 inches across) is good for first projects. It fits nicely in your hands.
Getting Small Scissors
You need small, sharp scissors. These are for cutting your thread neatly. Craft scissors or small sewing scissors work best.
Marking Your Fabric
You might want to draw your design on the fabric first. A pencil works on light fabric. Water-soluble pens are also good. The pen marks wash away later with water. Test your pen or pencil on a small scrap of fabric first. Make sure it comes out.
Getting Started Embroidery: First Steps
Now you have your supplies. Let’s get ready to stitch. This involves putting your fabric in the hoop, picking thread, and threading your needle.
Preparing Your Fabric in the Hoop
We talked about this a little. Take your hoop. Put the inner ring down. Lay your fabric over it. Center the part you want to stitch. Push the outer ring down. Pull the fabric tight all around. Tighten the screw. Your fabric should be tight and smooth. This is very important for neat stitches.
Preparing Your Thread
Embroidery thread comes in long pieces. It’s usually about 8 meters long. You don’t need a piece that long to work with. Cut a piece about the length of your arm. Maybe 18 to 24 inches (45 to 60 cm). This is a good length. It’s not too long to get tangled.
Remember, the thread has six strands. For Basic embroidery stitches, you can use different numbers of strands.
* Use 1 or 2 strands for very thin lines or small details.
* Use 3 strands for a common look, not too thin, not too thick.
* Use 6 strands for thick lines, bold stitches, or filling areas quickly.
For your first stitches, try using 3 strands. It’s a good middle ground. To get 3 strands, cut your length of thread. Hold one end. Gently pull just one strand away from the rest. The others will bunch up a bit. Keep pulling slowly. It will come free. Then pull two more strands. Now you have 3 strands together. The other 3 strands can be used later.
Threading the Needle
This can be tricky sometimes! Take your cut piece of thread (the 3 strands). Take your needle. Look at the eye of the needle. It’s the hole. Pinch the end of your thread together very tightly. Make it as flat and pointy as you can. Hold the needle steady in one hand. With the other hand, push the pinched end of the thread through the eye of the needle.
If it’s hard, you can wet the end of the thread a tiny bit. Or lick it. This helps the strands stick together. Some people use a needle threader tool. It’s a small wire loop on a handle. You push the wire loop through the needle eye. Then you put the thread through the wire loop. Then you pull the wire loop back out, bringing the thread with it. Needle threaders are very helpful!
Once the thread is through the needle eye, pull about 4 to 6 inches (10 to 15 cm) of thread through. This is the tail. Don’t pull it all the way through.
Starting and Ending Your Thread
How do you start stitching so the thread doesn’t pull out? How do you end so it stays put?
Starting Your Thread
Many beginners use a knot to start.
1. Thread your needle.
2. Hold the longer piece of thread (not the short tail).
3. Make a knot at the very end of this long piece. A simple overhand knot works. Make it big enough so it won’t pull through your fabric. You can make a double knot.
4. Bring your needle up from the back of your fabric. The knot is on the back. It stops the thread from coming all the way through.
Some people don’t like knots. They like a cleaner back. A knotless way to start is:
1. Don’t make a knot.
2. Bring your needle up from the back of the fabric. Leave about 2 inches (5 cm) of thread tail hanging out on the back.
3. Make your first few stitches. As you stitch, sew over the thread tail on the back. This holds the tail in place. After a few stitches covering the tail, you can trim the extra bit. This is a clean way to start.
For learning, using a knot is fine! It’s the easiest way when you are getting started embroidery.
Ending Your Thread
When you finish a line of stitches, or your thread is getting short, you need to end it. You want the thread to stay in place.
If you used a knot to start, you can use a knot to end on the back.
1. Push your needle down to the back of the fabric after your last stitch.
2. On the back, make a small knot close to the fabric. You can slip your needle under a few nearby stitches on the back. Pull the thread part way through. Then put your needle through the loop of thread you made. Pull it tight. This makes a knot right next to your stitches.
3. Make another knot the same way for extra strength.
4. Cut the thread close to the knot.
A knotless way to end:
1. Push your needle down to the back after your last stitch.
2. On the back, weave your needle and thread tail under several nearby stitches. Go under about an inch (2-3 cm) of stitches.
3. Pull the thread through.
4. Trim the thread close to the fabric. Weaving the thread under stitches holds it firm without a knot.
Both ways work. For beginners, practicing the knot at the end is simple and effective.
Learning Simple Embroidery Techniques and Basic Stitches
Now for the fun part: making stitches! Simple embroidery techniques start with just pushing the needle up and down through the fabric. Basic embroidery stitches are the building blocks. Let’s learn a few easy embroidery stitches to get you going.
The Running Stitch
This is one of the very basic embroidery stitches. It looks like a dashed line. It’s fast and easy.
How to make a running stitch:
1. Start your thread on the back (with a knot or by holding a tail). Bring the needle up through the fabric at point A.
2. Push the needle back down through the fabric a short distance away at point B. You made one dash.
3. Bring the needle back up through the fabric at point C, a short distance from B.
4. Push the needle back down at point D, a short distance from C.
5. Keep going: Up, down, up, down. Make the dashes about the same length. Make the spaces between them about the same length too.
You can also do this stitch faster by ‘loading’ the needle.
1. Bring the needle up at A.
2. Weave the needle in and out of the fabric several times before pulling it all the way through. Push down, come up, push down, come up.
3. Then pull the needle and thread all the way through. You made several stitches at once.
The running stitch is great for outlines or making simple lines.
The Backstitch
This is another essential stitch. It makes a solid line. It’s great for outlining shapes or for writing words.
How to make a backstitch:
1. Start your thread on the back. Bring the needle up at point A.
2. Push the needle down at point B, a short distance from A. You made your first stitch going backwards.
3. Bring the needle up at point C, a short distance ahead of B (about the same distance as A to B).
4. Now, push the needle down back into the same hole as point B.
5. Bring the needle up again at point D, a short distance ahead of C.
6. Push the needle down back into the same hole as C.
You are always pushing the needle back into the end of the stitch you just made. This links the stitches together, making a solid line. It’s called backstitch because you go forward a bit (C to D, etc.) but then stitch back to join the previous stitch.
The Straight Stitch
This is the simplest stitch of all! It’s just one single stitch.
How to make a straight stitch:
1. Start your thread on the back. Bring the needle up at point A.
2. Push the needle down at point B.
That’s it! A straight stitch is just a line segment. You can make them short or long. You can point them in any direction. Use many straight stitches together to fill a shape, make stars, or add texture. If you make many short straight stitches radiating from a point, it looks like a star or an asterisk. If you make many parallel straight stitches, it can fill an area.
The Satin Stitch
This stitch is used to fill shapes with smooth color. The stitches are made very close together.
How to make a satin stitch:
1. Draw a shape on your fabric (like a leaf or a heart).
2. Start your thread at one edge of the shape. Bring the needle up.
3. Push the needle down on the opposite edge of the shape. This makes one stitch that covers part of the shape.
4. Bring the needle up very close to where you started the first stitch (just next to it).
5. Push the needle down very close to where you ended the first stitch (just next to it).
6. Keep making straight stitches across the shape, right next to each other. The goal is to cover the fabric completely with smooth, parallel stitches.
For beginners, satin stitch can be tricky to keep neat. Keep the shape small at first. Make sure your stitches lie flat and don’t twist.
The French Knot
This stitch makes a little dot. It adds texture or can be used for small details like eyes or flower centers. It looks harder than it is.
How to make a French knot:
1. Start your thread on the back. Bring the needle up through the fabric at point A.
2. Hold the thread that comes from the fabric with your non-stitching hand. Pull it a little bit tight.
3. Bring the needle tip very close to where the thread comes out of the fabric (point A).
4. Wrap the thread around the needle one or two times. Keep the thread held a bit tight with your other hand.
5. While still holding the thread taut, gently push the needle tip back down into the fabric very close to point A. Do NOT go into the exact same hole, or the knot might pull through. Go just next to it.
6. Slowly pull the needle and thread all the way through to the back. As you pull, slide the wraps you made down the needle until they sit flat against the fabric as you pull the rest of the thread through.
Practice this one! It might take a few tries to get the tension right. One wrap makes a small knot. Two wraps make a slightly bigger knot.
The Lazy Daisy Stitch (Detached Chain Stitch)
This stitch makes a single loop, like a petal or a small leaf.
How to make a lazy daisy stitch:
1. Start your thread on the back. Bring the needle up at point A.
2. Hold the working thread with your thumb so it forms a loose loop.
3. Push the needle back down into the fabric very close to point A (almost the same spot, just slightly next to it).
4. Bring the needle up again at point B, which is where you want the tip of your petal or loop to be. Make sure the loop of thread is under the needle tip.
5. Pull the needle and thread through. This makes the loop.
6. To hold the loop in place, make a tiny stitch over the loop at point B. Push the needle down just outside the loop.
This makes one little petal. You can make several lazy daisy stitches in a circle to form a flower.
Practicing Your Stitches
The best way to learn hand embroidery is to practice.
- Get a piece of scrap fabric.
- Draw some lines, circles, or simple shapes.
- Practice the running stitch along the lines.
- Practice the backstitch along other lines.
- Fill in small circles with satin stitch.
- Make rows of straight stitches.
- Try making French knots.
- Make lazy daisy flowers.
Don’t worry if your first stitches aren’t perfect. They might be uneven. Your lines might wobble. That’s normal! Keep practicing. Your stitches will get neater and more even with time.
Finding First Embroidery Projects
Once you feel a bit more comfortable with easy embroidery stitches, you might want to make something. First embroidery projects should be simple.
Ideas for First embroidery projects:
* Stitch your initial on a handkerchief or tea towel. Use backstitch for the outline.
* Make a simple design with just straight stitches or running stitches. Like a little star or a simple house shape.
* Embroider a small shape like a heart or a star using satin stitch to fill it in.
* Stitch a border of running stitches around a piece of fabric.
* Create a simple pattern with French knots or lazy daisy stitches.
Look for simple patterns online or in beginner embroidery books. Many free patterns are available. You can also draw your own simple designs. Think about shapes you can make with the stitches you know.
Simple Embroidery Techniques Beyond Basic Stitches
Beyond the basic stitches, there are other simple techniques:
-
Transferring Designs: How do you get the picture onto the fabric?
- Tracing: If your fabric is light, put the fabric over your drawing. Put it all on a light source (like a sunny window or a light box). Trace the lines onto the fabric with your fabric pen or pencil.
- Carbon paper: Special carbon paper for fabric exists. Place the fabric down. Place the carbon paper (inky side down) over the fabric. Place your drawing on top. Trace firmly over the lines of your drawing with a pencil or stylus. The lines will transfer onto the fabric.
- Iron-on transfers: Some patterns come on paper you can iron onto your fabric.
-
Working with Thread:
- Keeping thread neat: Don’t pull your thread too tight when stitching. This can make the fabric pucker (wrinkle).
- Avoiding knots: Use a thread length about the length of your arm. Longer pieces tangle more easily. When pulling thread through, do it smoothly. If you see a twist starting, stop and let the needle hang and untwist.
- Changing colors: Finish your old color thread neatly on the back. Start the new color thread as you would normally start a new thread.
Troubleshoot Common Beginner Issues
Things might not always go perfectly. Here are some common problems and what to do:
- Thread is Knotting:
- You are using thread that is too long. Cut shorter pieces.
- You are pulling the thread through too fast or not smoothly. Pull gently.
- Try letting the needle hang and spin sometimes as you stitch. This helps untwist the thread.
- Fabric is Puckering (Wrinkling):
- Your fabric is not tight enough in the hoop. Tighten the hoop screw. Pull the fabric tighter.
- You are pulling your stitches too tight. Try to keep an even tension. Your stitches should lie flat, not pull the fabric tight.
- Stitches Look Uneven:
- This is totally normal when starting! Keep practicing. Try to make your stitch lengths and spacing consistent. It gets easier with practice.
- Can’t Thread the Needle:
- Use a needle with a bigger eye.
- Wet the end of the thread.
- Use a needle threader tool.
Don’t get frustrated! Everyone starts somewhere. These are all part of learning hand embroidery. Just take a break and try again.
Caring for Your Finished Embroidery
Once you finish your first embroidery projects, you might want to clean or press them.
- Cleaning: If your fabric got a bit dirty as you worked, you can wash it gently. Check if the thread colors might run first (test a small piece of thread with water). Usually, quality embroidery thread colors are colorfast. Wash by hand in cool water with a little mild soap. Rinse well.
- Drying: Lay the embroidery flat on a clean towel. Roll the towel up gently to squeeze out water. Unroll and lay flat to air dry.
- Pressing: To make it look smooth, you can iron it. Place the embroidery face down on a clean, soft towel. Iron the back of the embroidery. Use a medium heat. This protects the stitches on the front.
Continuing Your Embroidery Journey
You’ve learned the basic embroidery stitches and simple embroidery techniques. You know about embroidery supplies list, embroidery hoop for beginners, and embroidery thread for beginners. You are ready to keep going!
- Learn More Stitches: There are hundreds of embroidery stitches! Look up stitches like the chain stitch, feather stitch, fly stitch, or woven wheel stitch. Each stitch makes a different texture or line.
- Try New Threads: There are threads other than stranded cotton. Pearl cotton is a shiny, non-divisible thread. Silk ribbon embroidery uses thin silk ribbons for stitches.
- Work on Different Fabrics: Try stitching on different types of fabric. See how the stitches look.
- Design Your Own Patterns: Once you feel confident, try drawing your own designs to stitch.
Remember to keep your supplies tidy. Store your threads so they don’t get tangled. Keep your needles in a needle case so you don’t lose them.
Hand embroidery is a wonderful skill. It takes time and practice, but it is very rewarding. Start small, practice often, and have fun with it! You are now on your way to becoming an embroiderer.
Frequently Asked Questions (FAQ)
Q: What are the most important basic embroidery stitches to learn first?
A: Start with running stitch, backstitch, and straight stitch. These three let you make lines and simple shapes. Satin stitch and French knot are also very useful early on.
Q: Do I need a special embroidery machine?
A: No! This guide is about hand embroidery. You only need a needle and thread, plus a few other simple tools. Machine embroidery is different.
Q: Can I use regular sewing thread?
A: Regular sewing thread is much thinner than embroidery thread. You can use it, but the stitches will be very fine. Embroidery thread is designed to be seen and makes bolder stitches. For hand embroidery for beginners, stranded cotton embroidery thread is best.
Q: How do I stop the thread from twisting?
A: Use shorter lengths of thread. Let the needle hang and untwist sometimes as you work. Pull the thread through smoothly after each stitch.
Q: My stitches look messy. What am I doing wrong?
A: Nothing is wrong! It takes practice to make stitches neat. Make sure your fabric is tight in the hoop. Try to make your stitches about the same size. Keep practicing, and they will get better.
Q: How tight should the fabric be in the hoop?
A: The fabric should be pulled tight like a drum. It should not be saggy. If it is loose, your stitches can pull it and make it pucker.
Q: Where can I find simple patterns?
A: Look online for “beginner embroidery patterns” or “free simple embroidery designs”. Many blogs and websites offer them. Simple shapes, letters, or outlines are great for first embroidery projects.
You are now ready to start your embroidery journey. Gather your embroidery supplies list, pick some fun embroidery thread for beginners, secure your fabric in an embroidery hoop for beginners, and try out those easy embroidery stitches. Happy stitching!