
How do you start embroidery thread? You begin by getting your thread ready, putting it into the needle, and then securing it to your fabric so you can start stitching neatly. Do you need a knot? Most of the time, you don’t need a knot right at the start. Knotless methods help keep the back of your work clean and tidy. Learning how to start your thread the right way is key to making your embroidery look nice from the very first stitch. This guide will show you different ways to start, step by step.
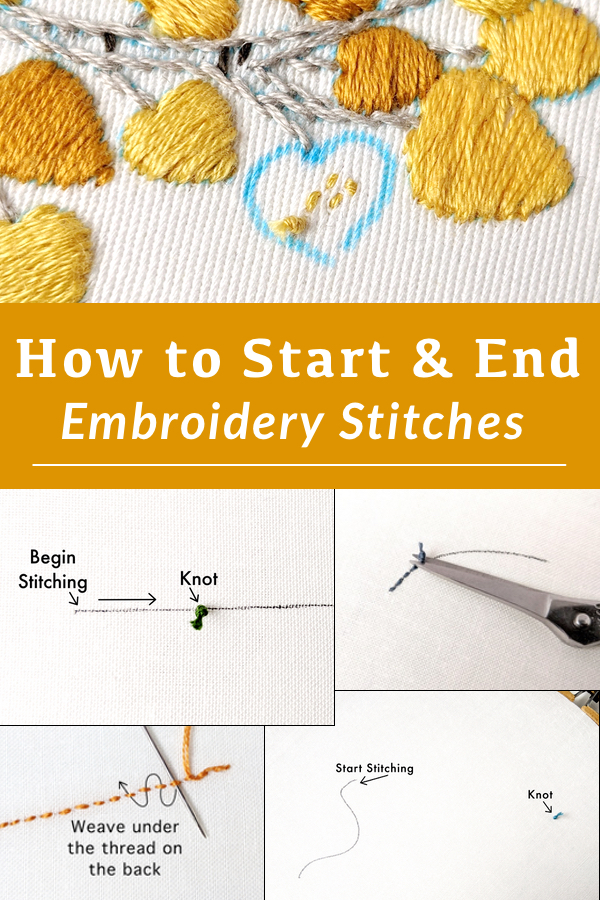
Image Source: www.wanderingthreadsembroidery.com
Grasping the Importance of a Good Start
Starting your embroidery thread the right way is very important. A good start makes your work look professional. It keeps the back of your piece tidy. A messy back can cause problems later, like snags or bumps. It can even show through thin fabric. Choosing the right way to start secures embroidery thread firmly. This stops your stitches from pulling out. It also helps control the tension of your thread as you stitch.
Preparing Your Embroidery Floss
Before you can put thread on your needle, you need to get it ready. This involves cutting the right length and separating the strands. This is part of embroidery floss preparation.
Choosing the Right Thread Length
How long should your thread be? A good rule is to cut a piece about 18 to 24 inches long. (That’s roughly 45 to 60 cm).
- Why this length? If the thread is too long, it can tangle easily. It can also get worn out by pulling it through the fabric many times. This makes the thread weaker and more likely to break.
- Too short? If it’s too short, you will run out of thread often. This means more starting and stopping.
Find a length that feels comfortable for you to work with.
Separating Embroidery Floss Strands
Most embroidery floss comes as six thin strands twisted together. For many stitches, you will not use all six strands. You will need to separate embroidery floss strands before threading your needle.
Here is how to separate them:
- Cut your chosen length of floss.
- Hold the thread near one end.
- With your other hand, gently pull just one strand straight up and away from the rest.
- The other strands will twist around each other. Let them twist! Don’t try to stop them.
- Keep pulling the single strand up slowly. It will slide free.
- Smooth out the strand you pulled.
- If you need more strands (like two or three), pull them one by one the same way.
- Put the number of strands you need together. Hold the ends level. Run your fingers down the length to help them lie flat together.
This method helps the strands separate without knotting up. It keeps the floss smooth and easier to stitch with.
Threading Your Embroidery Needle
Now that you have your prepared strands, it is time for threading embroidery needle. Embroidery needles have larger eyes (holes) than sewing needles. This makes them easier to thread.
Getting the Thread Through the Eye
There are a few simple ways to do this:
- The Simple Way: Pinch the end of your thread very tightly between your thumb and first finger. Make the very end stiff and flat. Push this flat end through the needle’s eye. This works best if the thread end is cut clean and isn’t fuzzy.
- The Fold Method: Fold the thread end over the needle’s eye. Pinch the fold tightly. Push the tiny fold through the eye. This makes a smaller, stiffer bit to push.
- Using a Needle Threader: These are small tools, often with a wire loop. Push the wire loop through the needle’s eye. Put the thread through the wire loop. Pull the wire loop (and the thread) back through the needle’s eye. This is very helpful if you have trouble seeing or steadying your hands.
Once the thread is through, pull it through the eye by several inches.
Choosing Your Embroidery Start Methods
Now for the main part: getting the thread onto the fabric. There are several embroidery start methods. Your choice depends on things like:
- How many strands you are using.
- Whether the back of your work will be seen.
- The type of fabric you are using.
- Your personal preference.
We will look at the most common and useful methods for securing embroidery thread. Most of these methods avoid a traditional knot. Starting embroidery without knot is often preferred for a cleaner look.
Method 1: The Loop Start
The loop start embroidery is a very popular way of starting embroidery without knot. It is neat and secure. It works best when you are using an even number of strands (2, 4, or 6).
How the Loop Start Works
You start with a folded length of thread. The loop end is what you pull through the fabric to secure the thread.
Steps for the Loop Start
Let’s say you are using two strands.
- Start with one length of thread, twice as long as you normally would cut.
- Fold this single thread in half.
- Put the two cut ends together. This is the end you will thread into your needle.
- Thread the needle with the two cut ends. You now have a needle with a loop at the other end of the thread.
- Bring your needle up from the back of the fabric at your starting point (let’s call this point A). Pull the needle and thread through, but do not pull the loop through. Leave the loop hanging on the back of your fabric.
- Make your first small stitch. Push your needle down through the fabric just a tiny bit away from point A (let’s call this point B). Point B should be very close to point A, or perhaps where the first part of your stitch ends. For example, if doing a small cross stitch leg, point B would be the other end of that leg.
- On the back of your fabric, you will see the loop and the working thread coming through point B.
- Pass your needle through the loop on the back.
- Gently pull the working thread. The loop on the back will get smaller and tighten around the thread coming through point B.
- Pull snug, but not so tight it puckers the fabric. The loop is now securely fastened to the thread on the back of your fabric.
- You can now make your first full stitch, starting from point B (or wherever the loop is secured) and going back to the front.
Visualizing the Loop Start
Imagine the thread on the back forming a small, tight loop that holds the thread coming through the fabric.
| Step | Action | Result on Back |
|---|---|---|
| 1. Prepare Thread | Fold one strand in half, thread cut ends. | Loop at one end, two tails threaded. |
| 2. Up Through Fabric | Bring needle up at start point (A). Leave loop on back. | Thread emerges at A, loop hangs freely on back. |
| 3. Down Through Fabric | Push needle down at point B (close to A, or end of first stitch leg). | Thread emerges at B. |
| 4. Secure the Loop | Pass needle through the loop on the back. | Needle passes through the loop. |
| 5. Tighten | Gently pull working thread. | Loop tightens around thread from B, securing it. |
| 6. Start Stitching | Make your first proper stitch. | Start is secured neatly on the back. |
Benefits of the Loop Start
- Very Neat: The back is very clean with no knot.
- Secure: It locks the thread firmly in place.
- Saves Thread: You start with one length instead of two shorter ones, which can sometimes be more efficient.
Downsides of the Loop Start
- Only for Even Strands: You must use 2, 4, or 6 strands. It doesn’t work with an odd number.
- Requires Space: You need a little bit of space on the back to maneuver the needle through the loop.
This method is an excellent way of starting embroidery without knot and is favoured by many stitchers.
Method 2: The Waste Knot Start
The waste knot embroidery is another good way to start. It works well for any number of strands (odd or even). With this method, you use a temporary knot that you cut off later.
How the Waste Knot Works
You tie a knot in the thread, make your first few stitches, and then cut the knot off. The first stitches you made trap the tail of the thread against the fabric on the back, securing it.
Steps for the Waste Knot Start
- Take your prepared thread (any number of strands, cut to your usual length).
- Tie a simple knot at one end of the thread. It doesn’t need to be fancy.
- Bring your needle up from the front of the fabric. Start about an inch or two (2.5 to 5 cm) away from where your first stitch will actually be. The knot should be on the front of the fabric.
- Pull the thread through until the knot stops it on the front. This is your “waste knot.” It’s just holding the thread temporarily.
- Now, make your first stitch (the real stitch you want to make) by bringing the needle up at your true starting point. Stitch as you normally would.
- As you make your next few stitches, make sure the tail of the thread running from the waste knot to your stitching point is lying flat on the back of the fabric.
- Work enough stitches (usually 3-5 stitches) over the tail on the back to secure it firmly. The stitches on the back cross over and trap the tail.
- Once you are sure the tail is trapped, turn your fabric to the front.
- Snip the waste knot off close to the fabric.
- The end of the thread (where the knot was) will pull through to the back. The tail you stitched over holds everything in place.
Visualizing the Waste Knot Start
Imagine a thread coming from a temporary knot on the front, running across the back to your stitching area, and being caught under your first few back stitches.
| Step | Action | Result on Front | Result on Back |
|---|---|---|---|
| 1. Prepare Thread & Knot | Cut thread, tie knot at one end. | Knot at one end. | – |
| 2. Start Point (Front) | Bring needle up about 1-2 inches away from real start point. | Waste knot sits on fabric. | Tail runs to stitching area. |
| 3. First Real Stitch | Make your first actual stitch, starting at the correct spot. | First stitch appears. | Tail lies flat under path. |
| 4. Secure Tail | Continue stitching (3-5 stitches) over the tail on the back. | Stitches form pattern. | Stitches cross over tail. |
| 5. Remove Knot | Turn to front, snip waste knot close to fabric. | Knot removed. | Secured tail remains. |
Benefits of the Waste Knot Start
- Works with Any Strands: Good for odd or even numbers of strands.
- Secure: The tail is held firmly by several stitches.
- Good Control: Allows you to start stitching exactly where you need to.
Downsides of the Waste Knot Start
- Requires Space: You need space on the front for the waste knot and space on the back to lay the tail flat. This method isn’t great if your stitching area is very small or surrounded by other stitches.
- Trimming Required: You have to remember to snip the knot off.
This is another effective method for securing embroidery thread without a permanent knot at the starting point.
Method 3: The Away Waste Knot
This is a variation of the waste knot. Instead of placing the knot a short distance away from your stitching area, you place it much further away, even on a different part of the hoop or fabric edge.
How the Away Waste Knot Works
You run the thread from the distant waste knot to your starting point. You make your first stitches, securing the long tail on the back. When done, you cut the knot and pull the tail through to the back, securing it there.
Steps for the Away Waste Knot
- Prepare your thread and tie a knot at one end.
- Bring your needle up from the front of the fabric very far away from your starting point. This could be near the edge of your hoop, or even outside the area you are working on.
- Run the thread loosely across the back of your fabric (or front, if needed, then across the back) to your actual starting point. Bring your needle to the front at your true start spot.
- Start making your stitches. As you stitch, make sure the long thread running from the distant knot is laying flat on the back. Stitch over this tail for several stitches (at least 5-10 stitches, maybe more depending on the length). The longer the tail you are securing, the more stitches you need to cover it.
- Once the tail is well secured by stitches on the back, turn your fabric.
- Find the waste knot and snip it off.
- Gently pull the end of the thread through to the back. It should be held tight by the stitches you made over the tail.
Benefits of the Away Waste Knot
- No Knot Near Stitching: Keeps the area right around your first stitches completely clear.
- Good for Crowded Areas: Useful if your actual starting spot is in a tight space.
- Very Secure: Trapping a long tail makes for a strong start.
Downsides of the Away Waste Knot
- Uses More Thread: You need extra thread to reach from the distant knot to your work.
- Can Leave Marks: The thread running across the fabric (especially if on the front temporarily) can leave marks or get in the way.
- Careful Stitching Needed: You must be careful to lay the long tail flat on the back and stitch over it consistently.
This is a less common but useful method for securing embroidery thread when space is limited near the starting point.
Method 4: Burying the Thread (No Knot Start)
This method is more often used for ending thread, but it can be adapted for starting embroidery without knot, especially when starting near existing stitched areas.
How Burying the Thread Works
Instead of a knot, you weave the thread end under existing stitches on the back of the fabric to hold it.
Steps for Burying the Thread Start (Near Existing Stitches)
- Prepare your thread (any number of strands). No knot needed.
- Turn your fabric to the back. Find an area with existing stitches close to where you want to start your new stitches.
- Slide your needle carefully under 4-6 existing stitches on the back. Weave it through the back of the fabric, not coming through to the front.
- Pull the thread through, but leave a tail of about an inch (2.5 cm) on the back. Do not pull the tail through under the stitches yet.
- Bring your needle to the front of the fabric at your true starting point.
- Turn back to the back. Gently pull the tail you left. It should slide under the stitches you wove under and be secured.
- Trim the end of the secured tail close to the fabric.
- Turn back to the front and make your first stitch.
Visualizing the Burying Thread Start
Imagine sliding the needle horizontally under lines of stitching on the back, pulling the thread through to anchor it before bringing the needle to the front.
| Step | Action | Result on Front | Result on Back |
|---|---|---|---|
| 1. Prepare Thread | Cut thread, no knot. | – | – |
| 2. Bury (Back) | Turn to back. Slide needle under 4-6 existing stitches. Leave tail. | – | Thread woven under stitches, tail hangs free. |
| 3. Bring to Front | Bring needle up at your true start point on the front. | Thread emerges. | Thread runs from woven section to emergence point. |
| 4. Secure Tail (Back) | Turn to back. Gently pull tail to slide it under stitches. | – | Tail is pulled through woven path. |
| 5. Trim Tail (Back) | Trim excess tail close to fabric. | – | Tail is secured and trimmed. |
| 6. Start Stitching (Front) | Turn to front. Make your first stitch. | Stitch appears. | Secured thread remains hidden. |
Benefits of Burying the Thread Start
- Very Neat: No knot at all on the back.
- Invisible Start: Blends in completely with existing stitches.
- Good for Filling Areas: Useful when adding to stitched sections.
Downsides of Burying the Thread Start
- Requires Existing Stitches: You cannot use this method to start in a completely empty area.
- Can Be Tricky: Needs careful weaving under stitches without catching the fabric itself.
- Less Secure Initially: May not be as instantly secure as a loop or waste knot for the very first stitch if not done carefully.
This knotless method is excellent once you have some stitching already done on your piece.
Method 5: The Knot (Traditional)
This method involves tying knot embroidery thread right at the start. While it is the most basic way to secure thread, it is often not recommended for modern embroidery, especially if the back will be seen or if working on fine fabric.
How the Knot Works
You tie a knot, pull it to the back of the fabric, and the knot stops the thread from pulling through.
Steps for the Knot Start
- Prepare your thread (any number of strands).
- Tie a knot at one end. A simple overhand knot will do. You can tie it close to the end or leave a small tail. Some people tie a double knot for more security.
- Bring your needle up from the back of the fabric at your starting point.
- Pull the thread through to the front.
- Keep pulling until the knot hits the back of the fabric and stops the thread.
- The knot is now holding the thread on the back.
- Make your first stitch.
Visualizing the Knot Start
Imagine a lump of thread sitting directly on the back of the fabric at the very beginning of your first stitch.
| Step | Action | Result on Front | Result on Back |
|---|---|---|---|
| 1. Prepare Thread & Knot | Cut thread, tie knot at one end. | – | Knot at one end. |
| 2. Up Through Fabric | Bring needle up at your start point (A). | Thread emerges. | Knot sits on fabric back. |
| 3. Start Stitching | Make your first stitch. | Stitch appears. | Knot holds the thread end. |
Benefits of the Knot Start
- Simple and Quick: Very easy and fast to do.
- Secure (Initially): The knot holds the thread firmly at that point.
Downsides of the Knot Start
- Messy Back: Creates a lump on the back of your work. This is the main reason it’s often avoided.
- Can Snag: The knot can catch on things.
- Can Pull Through: On loose weave or very fine fabric, the knot might pull through the fabric hole.
- Shows Through: The lump can sometimes be seen from the front, especially on light or thin fabric.
Because of the downsides, starting embroidery without knot is generally preferred. The loop start, waste knot, or burying methods offer neater alternatives for securing embroidery thread.
Comparing the Embroidery Start Methods
Choosing the right method depends on your project and preference. Here is a quick look at when to use each one:
| Method | Best For | Number of Strands | Back Neatness | Ease of Use | Notes |
|---|---|---|---|---|---|
| Loop Start | Neat back, even strands | Even only (2, 4, 6) | Very Neat | Easy | Requires folding thread. |
| Waste Knot | Any strands, need space | Any | Mostly Neat | Easy | Requires trimming knot later. |
| Away Waste Knot | Tight start area, any strands | Any | Mostly Neat | Moderate | Uses more thread, longer tail to secure. |
| Burying Thread | Near existing stitches | Any | Very Neat | Moderate | Cannot start in empty area. |
| Knot | Quick start, back won’t show | Any | Messy | Very Easy | Generally not recommended. |
Most stitchers rely mainly on the Loop Start and Waste Knot methods for starting embroidery without knot in most situations.
Making Your First Stitch
Once you have secured your thread using one of the methods above, you are ready to make your first actual embroidery stitch. How to start embroidery stitch flows directly from your chosen starting method.
- Loop Start: Your first full stitch starts from where the loop was secured (point B in the steps above) and goes to complete the first stitch leg or element.
- Waste Knot: Your first stitch is the one you make after bringing the thread up near the waste knot. It’s the first part of your actual pattern. You simply stitch as planned, making sure the tail on the back is caught.
- Burying Thread: After bringing the thread up at your starting point and securing the buried tail on the back, you just make the first stitch of your pattern from that point.
The starting method simply anchors your thread. The first stitch then builds upon that secure anchor. Pull your stitches gently and evenly. Make sure the thread tension is consistent.
Putting It All Together: A Practice Run
Try practicing the Loop Start and the Waste Knot on a scrap piece of fabric.
- For Loop Start: Get one length of thread. Fold it. Thread the cut ends. Practice bringing the needle up and down, passing it through the loop on the back, and pulling tight. Do this a few times. See how neat the back looks.
- For Waste Knot: Get a length of thread. Tie a knot. Bring it up an inch away from where you want to stitch. Bring the needle up at your real start. Make 3-4 small stitches, making sure the tail is under them on the back. Turn it over, snip the knot. See how the tail is caught.
Practicing helps you feel how much tension to use and makes you more comfortable with each method.
Frequently Asked Questions
Here are some common questions about starting embroidery thread.
How short can I make the thread?
It is best to stick to the 18-24 inch (45-60 cm) range. Shorter than that, you will constantly be starting and ending, which takes more time. Much shorter threads (like under 12 inches) can also be harder to manage and secure properly.
What if my thread is too short for a loop start?
The loop start requires you to fold the thread in half. If you cut a piece that is too short (say, less than 12 inches total), the resulting loop might be too small to easily pass your needle through on the back. Also, stitching with a very short thread folded in half leaves you with very little working thread. If your thread is short, the waste knot or burying method (if near existing stitches) are better choices for securing embroidery thread.
Does the knot go on the front or back?
If you must use a knot (which is generally not advised), the knot goes on the back of the fabric. The waste knot method is the exception, where the knot is temporarily on the front, but it is cut off later. The goal for a clean look is usually starting embroidery without knot, so there is no knot on either the front or back.
Can I start anywhere on the fabric?
With the waste knot, loop start, or knot methods, you can start anywhere. The burying method needs existing stitches nearby to hide the thread under. Think about where your first stitch needs to be and choose a method that works best for that spot.
How do I start with very delicate fabric?
On very thin or loosely woven fabrics, a knot might pull through. The waste knot or loop start are usually safer. For the loop start, be extra gentle when pulling the loop tight so you don’t pucker the fabric. For the waste knot, make sure the tail is spread flat on the back so the securing stitches have more to grab onto, rather than being a single thin line that could pull through. Burying thread can also work well if there are existing stitches, as it spreads the tension.
Moving Forward
Mastering how to start embroidery thread is a basic skill that makes a big difference. By using methods like the loop start or waste knot, you keep your work looking neat and professional. Practice these steps. Find the methods you like best for different situations. A good start sets you up for beautiful stitching. Now you know the main embroidery start methods and how to prepare your floss and needle. You are ready to begin your stitching journey with confidence!